
Foundation Excavation Techniques From Soil Tests To Backfill
Foundation Excavation Methods That Keep Projects On Schedule
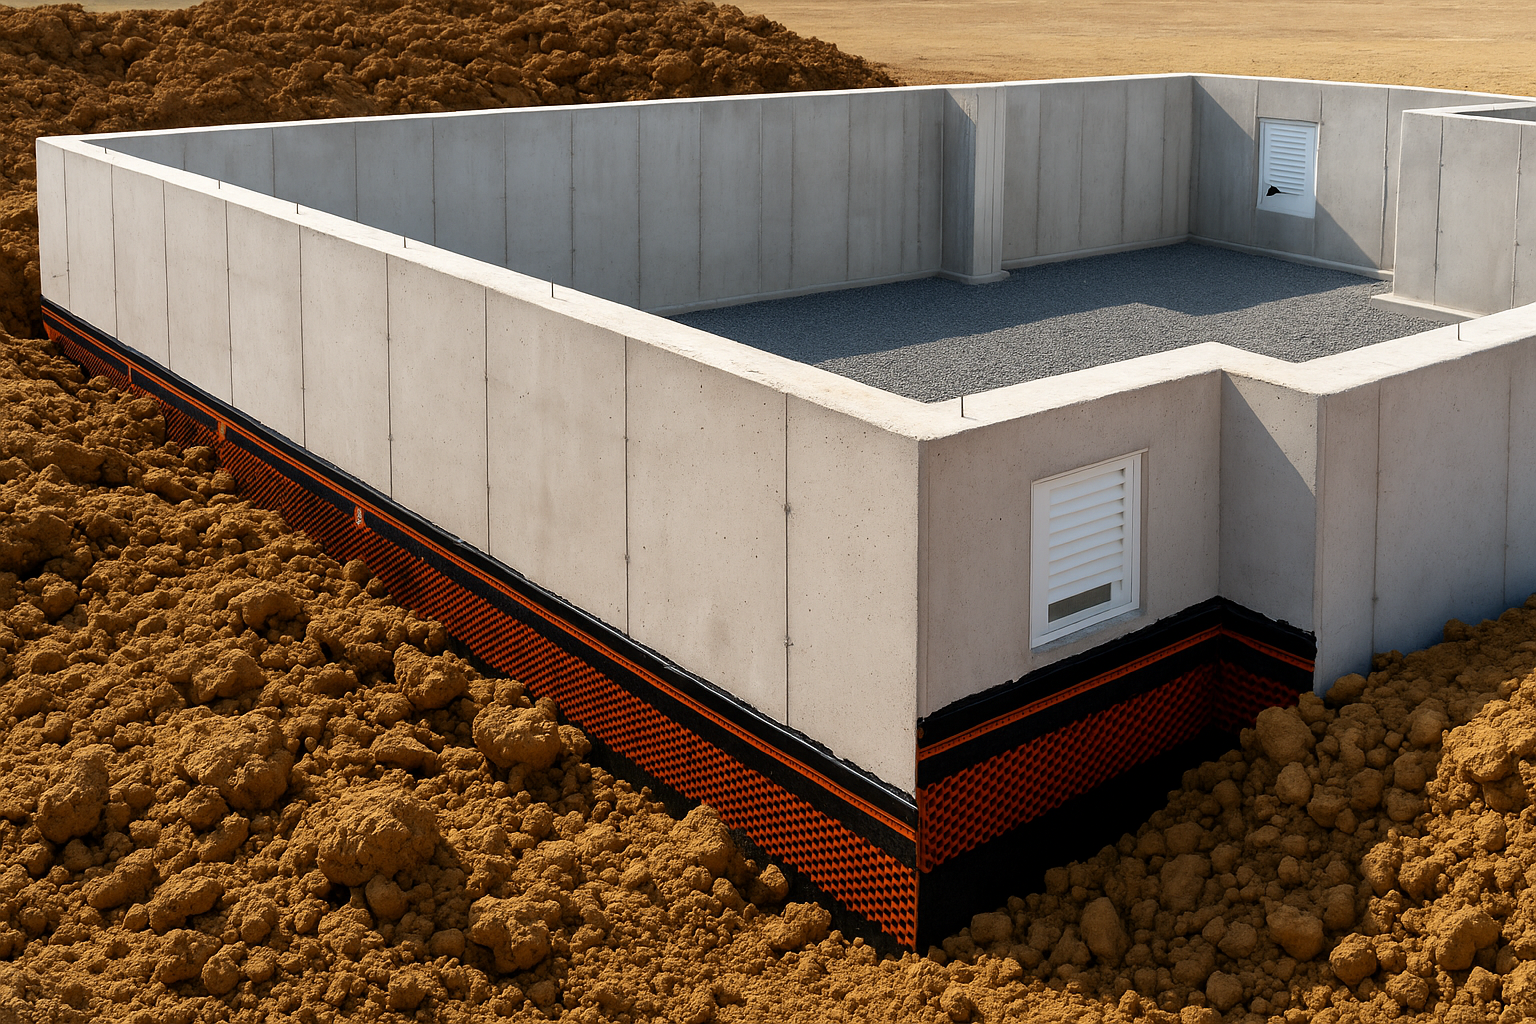
Get the hole right and the building stands a chance. Get it wrong and everything above it pays for it.
Foundation excavation is not just dirt work. It is soil classification, utility locating, shoring, water control, and clean handoff for forms and rebar.
Modern crews use GPS machine control for accurate cuts, vacuum excavation near live services, trench shields and engineered shoring for safety, and real dewatering plans instead of pumps tossed in a pit.
This piece walks through the current playbook. Read soils before you dig. Choose the right support system. Control groundwater. Stage trucks and spoil so the site keeps moving. Finish with compacted subgrade that passes inspection the first time.
See how crews dig smarter today. From trench shields and sheet piles to vacuum excavation and haul planning. Clear steps for clean, safe foundations.
Practical methods for foundation excavation. Pick the right shoring, manage water, avoid utility hits, and leave a compacted inspection ready hole.
Read This Before You Dig
Utilities first
Call locates before anything else. In the U.S., dial 811. Daylight every marked line with hydrovac or air-vac. Photograph what you expose and label the shots. That folder will save you when an inspector asks.
Shoring and slope rules
Open cuts need the right angle. As a quick field check
Type A soil about three-quarters horizontal to one vertical.
Type B about one to one.
Type C about one and a half to one.
If the trench is deeper than 5 feet, bring engineered shoring or a trench box. Do not bet safety on a guess.
Safe ways in and out
If a trench is deeper than 4 feet, you need a ladder or ramp. Keep an exit within 25 feet of any worker. No exceptions.
Keep weight off the edge
Spoil piles sit at least 2 feet back from the lip. Park machines even farther. Edge loads cause sloughing and sudden failures.
Groundwater and rain
Plan dewatering before you dig. Sumps, well points, permits for discharge, filtration if needed. Cover subgrade if rain is coming. Once you hit grade, protect it or you will be reworking mud.
Nearby buildings and streets
If your cut is close to a footing, sidewalk, or road, get the engineer to check the zone of influence. You may need underpinning, a soldier pile and lagging wall, or tiebacks. Do a pre-condition survey with photos of adjacent cracks and elevations.
Soil changes mid-dig
Clay to sand. Fill to native. As soon as the cut face looks different, stop and reassess your protection. The slope you started with may not be safe anymore.
Environmental and disposal
Hydrovac slurry is not just dirt and water. Contain it and dispose of it legally. If you hit contaminated soil, stop work and follow the environmental plan. Do not spread it around the site.
Paperwork and inspections
Erosion control in place before digging. Shoring submittals approved. Dewatering permits posted. Schedule inspections early. Nothing burns schedule like a missed sign-off.
Document everything
Daily photos. Elevations at key points. Utility exposures with measurements. Keep a simple site log. When questions come, you will have answers.
One more hard truth
Most excavation problems are predictable. Utility strikes. Collapsed sides. Soft bottoms from rain. Spend an hour planning and you save days of rework. Keep people safe. Keep the bottom true. The concrete will thank you.
You might like: Architectural Drawing Basics Every Architect Must Know
Foundation Excavation For Builders A Modern Field Guide
The Importance of Foundation Excavation
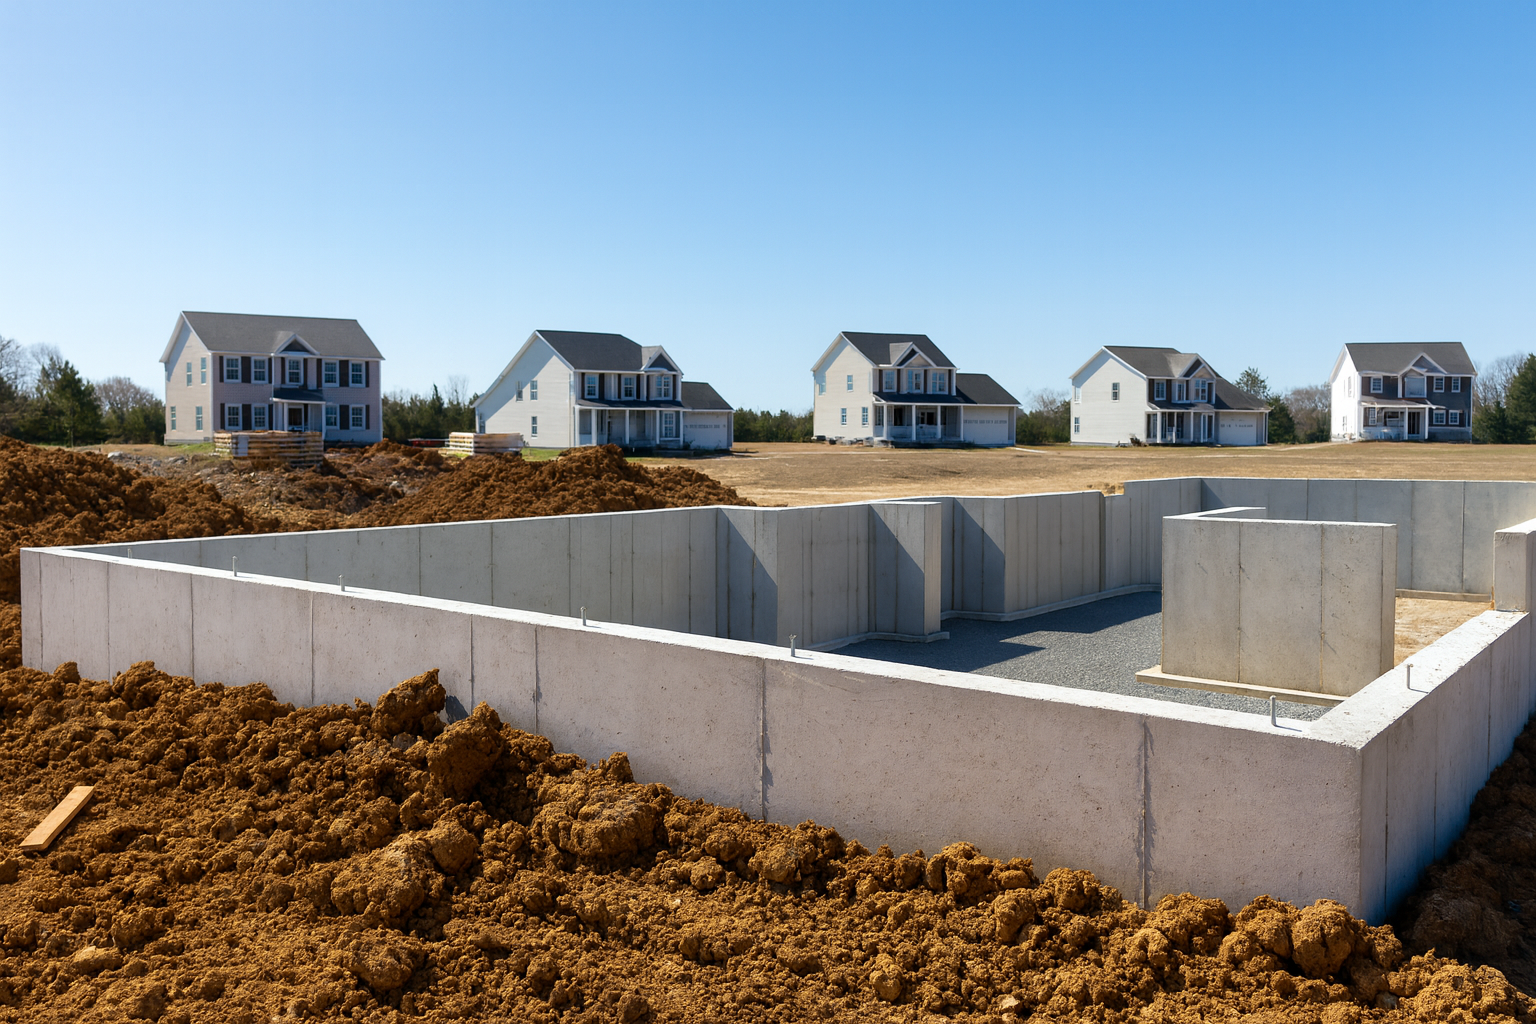
Get excavation right and the structure behaves. Get it wrong and you fight cracks, leaks, and callbacks for years. This step is about preparing soil that can carry load, shed water, and stay stable through seasons.
What “right” looks like
Load ready. Subgrade reaches the bearing capacity in the geotech report. Soft pockets are removed or improved.
Dry and drained. Groundwater is controlled, bottoms are dry, and perimeter drainage has a path out.
Safe and stable. Slopes or shoring match plan and law. Spoil piles sit back from the edge. People go home safe.
Inspection ready. Bottoms are to line and elevation, clean of loose fill, compacted, and proof-rolled without rutting.
Key objectives, translated to the field
Stability
• Follow the geotechnical report for bearing pressures, frost depth, and over-excavation limits.
• Proof-roll with a loaded truck or plate. If it pumps, undercut and replace with compacted granular.
• Compact in lifts. Typical targets are 95 percent of maximum density at proper moisture.
Durability
• Cut to undisturbed soil. No smeared clay or loose fill under footings.
• Over-excavate soft spots 6 to 12 inches, backfill with crushed stone or engineered fill, compacted in thin lifts.
• Set perimeter drains at or below slab level with a place to discharge. Wet bottoms today become wet basements later.
Safety
• Use benching, sloping, or engineered shoring in any trench or cut that needs it.
• Keep spoil at least 2 feet back from the edge.
• De-energize, locate, and daylight utilities near the dig. Vacuum excavation around live services is worth the time.
What can go wrong if you skip steps
Differential settlement. Footings sit on mixed soils, the light side sinks, walls crack.
Heave and frost action. Frost reaches untreated soils, lifts the footing, doors stick, slabs curl.
Water intrusion. No drainage, no outlet. Hydrostatic pressure finds a way into the basement.
Schedule drift. Re-digs, failed inspections, and emergency dewatering eat weeks and budget.
Field checks that save projects
Before digging
• Read the geotech report and mark bearing strata and groundwater notes on the plan.
• Call locates. Walk the site with the superintendent and mark all conflicts.
• Plan haul routes and stockpile locations that will not load the edge of excavation.
During excavation
• Shoot elevations often. Machine control helps, but verify with a rod.
• Keep the bottom clean. No churned mud under footings. Place a mud mat if rain is coming.
• If water appears, switch to well points or sump and trench with a discharge plan, not a single pump in a hole.
Before concrete
• Final proof-roll. If it ruts, fix it now.
• Confirm compaction test reports and subgrade moisture.
• Verify footing width, depth, and location against strings or control points.
• Photograph the condition of the bottom and drains for the record.
An inspector failed a footing because the subgrade “looked shiny.” He was right. Clay had been smeared by the bucket, sealing the surface. We undercut 8 inches, placed ¾ inch stone, compacted, and passed. Cost us a morning, saved us months of settlement grief.
Success checklist
• Geotech report on site and followed
• Utilities located and daylighted where needed
• Slopes or shoring in place, spoil set back
• Subgrade to elevation, firm, and compacted
• Drainage installed with a real outlet
• Photos and test results filed before the pour
Do the simple things well. Solid bottom, dry excavation, clean details. Everything above depends on it.
See also: House Foundations & Groundworks: Guide to Construction
Modern Foundation Excavation Techniques

Types of Excavation for Modern Foundations
Hydrovac excavation
What it is
High-pressure water loosens the soil and a vacuum truck removes it. Great for tight sites and utility-heavy areas.
Use it for
• Footing test pits and utility daylighting near the foundation line
• trenching around existing services before you widen or underpin
Why crews pick it
• Precise cuts around live lines
• Clean spoils and faster cleanup
• Fewer utility strikes and stop-work headaches
Watch for
• Water management. Plan sumps, pumps, and discharge.
• Slurry disposal rules. Confirm with the city before you dig.
Field note
We cleared a footing enlargement beside a live gas service in Denver with hydrovac only. No strikes, no shutdown, one morning saved.
Vacuum excavation with air
What it is
Compressed air fractures soils and a vacuum removes them. Similar to hydrovac but dry.
Use it for
• Fragile soils where added water is a problem
• Winter work when water would freeze
• Sites with strict slurry restrictions
Why crews pick it
• Non-destructive and dry subgrade
• Easier backfill and compaction right after exposure
Watch for
• Slower than hydrovac in stiff clays
• Noise and dust. Bring hearing and dust control.
Trenchless methods on foundation sites
What it is
Horizontal directional drilling and small-bore tunneling place pipes and conduits without open trenches.
Use it for
• Site utilities under future slabs and footings
• Crossing sidewalks and streets without open cuts
• Tight urban lots where open excavation would undermine neighbors
Why crews pick it
• Minimal surface disruption and fewer traffic control costs
• Faster reinstatement of hardscape
Watch for
• Accurate as-built depth and alignment. Verify clearances under footings.
• Steering issues in cobbles. Add a pilot bore and adjust muds.
Laser and GPS machine control
What it is
Dozer and excavator blades guided by laser, GPS, or total station to hit exact grades and slopes.
Use it for
• Pad builds and footing benches to tight tolerances
• Large cuts where constant hand checking would slow you down
Why crews pick it
• Fewer re-cuts and rework
• Consistent bottoms ready for inspection
Watch for
• GPS drift near buildings and trees. Switch to total station control for final trims.
• Always spot-check with a rod. Trust but verify.
Result from a recent job
We hit finished subgrade within 10 millimeters across a 25,000 square foot pad. The inspector walked, looked, signed.
Auger boring
What it is
A rotating helical auger removes soil to create a horizontal bore. Often used to pass utilities under roads or rail within a site.
Use it for
• Sleeve installs under existing hardscape that you cannot open cut
• Services that must run beneath future foundations without settlement risk
Why crews pick it
• Stable bore in many soils
• Predictable line and grade
Watch for
• Ground loss in very loose sands. Consider casing.
• Set pits and jacking frames need real estate. Plan the pit early.
Quick chooser
• Need to expose utilities safely next to future footings: hydrovac or air-vac.
• Need utilities under slabs without open trenches: trenchless or auger bore.
• Need perfect grades on large pads and benches: laser or GPS machine control.
Common pitfalls to avoid
• Muddy bottoms after hydrovac. Place a mud mat or over-excavate and backfill with compacted stone.
• No discharge plan. Pumps are not a plan. Route water to an approved outlet with filtration.
• Assuming GPS is perfect. Close work near structures needs total station checks.
• Missing compaction after utility bores. Backfill and test or you will see slab cracks later.
Documentation that keeps inspections smooth
• Geotech report on hand with bearing pressures and notes highlighted
• Photos of exposed subgrade before and after cleanup
• Compaction and proof-roll records
• As-builts for any trenchless runs showing depth and offsets to footings
Get the method right for the soil and the site, manage water, and prove your subgrade. Everything above the footing depends on it.
Field Notes From Real Jobs
Hydrovac in Seattle kept the schedule moving
Tight site. Live utilities everywhere. The crew used hydrovac to daylight every line before cutting for footings. No strikes. Inspectors signed off faster because the lines were exposed cleanly and photographed. The pad poured on the original date.
Trenchless work in New York without killing the street
A new water main had to cross busy blocks. Horizontal drilling handled the run under sidewalks and lanes while traffic stayed open. Less mess, fewer complaints, no week of patching asphalt after. Stores kept trading. The city liked the lower restoration cost.
Laser control on a San Francisco high-rise pad
Machine control held cut and subgrade within tight tolerances over a large footprint. Crews weren’t chasing highs and lows. Compaction tests passed on the first visit. Formwork dropped in clean and the pour sequence stayed intact.
How to Choose the Right Excavation Method
Start with the ground and the map
Soil type, groundwater, and utility density decide most of the method. Pull the geotech report. Call in utility locates. Walk the site with the plan set open.
Quick match guide
-
Dense utilities or unknowns near structures
Pick hydrovac or air-vac to daylight first, then dig. -
Long runs under roads or trees
Use trenchless methods like HDD or auger boring to avoid surface damage. -
Tight tolerances on big pads or stepped footings
Go laser or GPS machine control for depth and slope. -
Unstable or wet soils
Stage the dig, shore early, dewater with permits in place.
Check the footprint and access
Can you swing a full-size excavator. If not, mini ex plus hydrovac for corners and along walls often wins. Plan spoil routes and haul-off before the first bucket hits the ground.
Weigh cost against rework
Hydrovac and laser control can look pricey up front. They are usually cheaper than a utility strike, a stop-work order, or re-cutting a pad that failed inspection.
Plan for the environment
Hydrovac slurry needs containment and legal disposal. Trenchless entries need erosion control. Dewatering needs filtration and a discharge plan. Write it down and assign it.
Keep safety first
Expose utilities before production digging. Use trench boxes and keep spoil back from edges. Verify marks with test holes, not guesses. Log clearances. Photograph everything.
Pro Tips That Save Time
Sequence daylighting with staking
Vac out the corridor, then stake the footings. Your layout crew works faster and your cut sheets are right the first time.
Protect the subgrade
Once you hit grade, keep traffic off it. Track mats, clean boots, and immediate protection with geotextile or prep for base. Wet subgrade costs days.
Document while you dig
Daily photos, elevations, and utility exposures go into a simple folder structure. When the inspector asks, you have proof. Disputes end quickly.
House Foundation Drawings and Details

Get the foundation sheets right and the rest of the set gets easier. Miss stuff here and the job bleeds time and money. Keep it clear, buildable, and complete.
What goes on the foundation plan
-
Grid lines with clear bubbles. Match structural.
-
Footing layout with sizes and locations. Call out stepped footings where grades change.
-
Foundation walls with thickness and material. Note any retaining walls.
-
Piers, grade beams, and pads. Label each with size and rebar mark that matches the schedule.
-
Slab edges, thickened slab bands, and control joint layout.
-
Dimensions that matter. Face of concrete to face of concrete. Do not dimension to insulation or finishes here.
-
Door and window openings in foundation walls. Mark any egress wells.
-
Penetrations for plumbing, electrical, and mechanical. Size, sleeve, and exact location.
-
Elevations. Top of footing, top of wall, finish slab. Use one datum across the set.
-
North arrow, scale, and a clean legend.
Sections you actually need
-
Typical wall over footing. Show sill plate, anchor bolts, sill sealer, termite shield if required, and first course of wall.
-
Slab on grade. Show subbase, vapor retarder, insulation location, reinforcement, and saw cut depth and timing note.
-
Stepped footing at a sloping site. Show dowels at each step and keyway if engineered.
-
Retaining wall section. Show heel and toe, drain tile, filter fabric, and relief for hydrostatic pressure.
-
Walkout basement or daylight condition if the site drops off.
-
Frost protected shallow foundation if you are in cold climate and not going full depth.
Details that save jobs
-
Rebar placement and cover. Note clear cover at soil and forms. Call lap lengths by bar size.
-
Anchor bolt and hold down layout. Edge distances, spacing, and washer type. Call out uplift where shear walls land.
-
Shear key or keyway at cold joints. Prevents sliding on sloped sites.
-
Control joints and isolation joints. Where the slab meets foundation walls and around columns.
-
Pipe sleeves through walls and footings. Use non corrosive sleeves and seal the annular space.
-
Waterproofing stack. Primer, membrane, protection board, drainage board, and filter fabric to drain tile.
-
Insulation stack. Under slab R value, edge insulation, thermal break at slab edge to reduce heat loss.
-
Termite protection where required. Soil treatment or physical barrier notes by region.
-
Radon rough in if your region needs it. Perimeter vent mat, tee to vertical stack, cap at attic for future fan.
Notes the inspector looks for
-
Subgrade prep. Proof roll, moisture condition, and compaction targets with test method.
-
Over excavation and backfill. When to undercut and what material replaces it.
-
Concrete strength, mix, air, and slump limits. Placement and curing notes.
-
Vapor retarder spec and locations where you do not place it, like under thick toppings that need bond.
-
Waterproofing product names and application thickness. Include manufacturer data reference.
-
Drainage. Perforated pipe size, slope to sump, and where the discharge goes.
-
Rebar support. Chairs and spacers that keep steel off the dirt.
-
Saw cuts. Timing window and depth. Get this wrong and you live with random cracks.
Coordination with structural and MEP
-
One footing schedule across all sheets. Architectural should not invent new sizes.
-
Show every plumbing stack, floor drain, cleanout, and sleeve in plan and section. Get heights right for traps and slopes.
-
Lay out mechanical pads and housekeeping pads before slab pour.
-
Note conduit crossings at the footing line. Sleeves now save core drilling later.
-
If a shear wall lands on a thin slab, thicken the slab or drop a footing. Decide on paper, not at 6 am with a truck waiting.
Dimensions that matter
-
Foundation wall outside to outside. Keep a running dimension string.
-
Centerline to centerline for piers and columns. Do not stack tiny dimensions to find one center.
-
Opening widths and heights in concrete walls. Add rough opening notes.
-
Offsets from grids for any odd jogs. Call them once and circle them.
Elevations and benchmarks
-
One benchmark on site and one backup. Put both on the sheet.
-
Tag all top of footing elevations. Tag all top of wall elevations. Tag finish slab elevations and slopes to drains.
-
If the slab slopes, add spot elevations at corners and at the drain. Do not make the crew guess.
Slab on grade package
-
Subbase depth and type. Clean, well graded stone. No fines that pump.
-
Vapor retarder location. Under the slab unless the spec says otherwise. Tape seams and turn up at walls.
-
Reinforcement. Mesh on chairs or bars in bands. Note cover and spacing.
-
Joints. Control, construction, and isolation lines with spacing. Add a short note on saw timing.
-
Finishes. Hard trowel, broom, or polish ready. Call flatness and levelness numbers if required.
Basement package
-
Wall waterproofing. Positive side membrane, protection board, and dimpled drainage mat.
-
Perimeter drain tile at the footing. Washed stone and filter fabric wrap.
-
Sump pit location and discharge route. Check code for backflow and storm tie in.
-
Egress window wells. Size, ladder if deep, and drain connection to the tile.
-
Backfill notes. Do not backfill until the slab or floor diaphragm is in. That wall needs a brace.
Sheet list that keeps teams sane
-
A101 Foundation plan
-
A301 Wall over footing and slab sections
-
A302 Step footing and retaining wall sections
-
A501 Typical details index with bubbles that match the plan
-
S series for all rebar sizes, bars marks, and schedules
-
M and P sheets for under slab work and sleeves
Keep the callout bubbles consistent. Example detail tag 3 on A501 is always the wall over footing.
Tolerances you can build
-
Excavation to subgrade within plus or minus one half inch.
-
Top of footing within plus or minus one quarter inch.
-
Anchor bolt location within one quarter inch, projection per spec.
-
Slab flatness and levelness per spec. If none is given, call for numbers that match the finish.
Records that save you later
-
Pre pour photos of rebar, chairs, sleeves, and vapor retarder.
-
Markup of any field changes on a clean plan. That becomes the as built.
-
Concrete tickets kept and scanned. Note truck times and any water added.
-
Test reports. Soil density, concrete cylinders, and post pour floor readings if specified.
Quick field checklist
-
Utilities located and daylighted
-
Dewatering running with a backup
-
Subgrade proof rolled and signed off
-
Rebar on chairs with correct cover
-
Sleeves and block outs in place and tagged
-
Vapor retarder taped and turned up at walls
-
Joints laid out and saw plan ready
-
Anchor bolts set with templates where needed
-
Photos taken before pour
-
Inspector sign off captured
Get this package clean and your foundation will pour on time and pass inspection the first time. Then you can worry about the next headache instead of fixing the one under your feet.
You might like: Guide to Understanding Building Codes Simplified for Beginners
Final Word
Modern excavation is about control. Pick the method that fits the soil, the utilities, and the tolerance. Use hydrovac to see what you are cutting. Use trenchless when the surface cannot be torn up. Use laser or GPS so the bottom comes out right. Do that and your foundation forms drop in, inspections run smoother, and the concrete shows up on time.
FAQ
1) What is foundation excavation in plain English
Cut the ground to the right depth and shape so the foundation sits on stable soil. Keep it safe, square, and dry. That is the job.
2) Do I need a geotechnical report before digging
Yes. A soils report tells you bearing capacity, water table, and what you will hit. Digging blind is how budgets explode.
3) Who do I call before I dig near utilities
In the U.S., call 811 for locates. Then daylight every mark with hydrovac or air-vac. Do not trust paint on asphalt alone.
4) Hydrovac vs air-vac. Which is safer
Both are non-destructive. Hydrovac cuts faster in dense soils. Air-vac keeps spoil dry for reuse and easier disposal. Use either to expose utilities without breaking them.
5) When should I choose trenchless methods
Use trenchless in streets, finished landscapes, or tight urban sites. You avoid long open cuts, traffic closures, and patchwork repairs.
6) What does laser guided excavation actually do
Machine control ties a laser or GPS model to the blade. You cut to design grade within tight tolerances and skip most hand checks.
7) Is auger boring only for pipes
Mostly, yes. It creates a horizontal bore with good line and grade. Great under roads and rail where open cuts are a non-starter.
8) How deep can I cut without shoring
If a trench hits 5 feet or more, bring a trench box or engineered shoring. Even at 4 feet you need safe access. Slopes must match soil type.
9) What are the rule of thumb slopes for open cuts
Rough field check. Type A about three quarters to one. Type B about one to one. Type C about one and a half to one. When in doubt, flatten it or shore it.
10) How close can I excavate to a neighbor’s footing
Not close without a plan. Get the engineer to check the zone of influence. You may need underpinning, a soldier pile wall, or tiebacks. Photograph everything before you start.
11) What is the biggest cause of trench failure
Undercut slopes, surcharge on the edge, and water. Spoil piles and machines belong back from the lip. Dewater early.
12) How do I handle groundwater
Well points or sumps with pumps. Filter discharge if required. Keep subgrade covered once it is at elevation. Mud ruins bearing.
13) Can I reuse excavated soil for backfill
Only if it meets the spec. Many sites need imported granular for drainage and compaction. Wet clay backfill is how you trap water against the wall.
14) What compaction target should I expect
Often 95 percent of Standard Proctor for structural backfill. Check the spec. Test lifts as you go. Rework is expensive when walls are in.
15) How accurate does the excavation depth need to be
Tight. Usually within an inch or two over large areas. Over-dig means more concrete or more backfill. Both cost money.
16) What inspections happen during excavation
Erosion control, shoring, utility exposure, subgrade proof roll, footing elevation checks. Schedule them early or you will sit waiting.
17) Do I need permits for dewatering
Often yes. Many cities require discharge permits and sediment control. Plan that before you bring pumps.
18) How do I price hydrovac work
By hour or by volume. It is not cheap, but neither is a utility strike. Use hydrovac for risk areas, not to dig the whole basement.
19) Rock on site. What now
You will need hoe-ram, saw cutting, or controlled blasting with permits and monitoring. Rock changes everything. Expect slower production and vibration control.
20) What weather shuts down excavation
Heavy rain that saturates slopes or subgrade. Freeze that turns spoil to bricks. High wind when lifting trench boxes. Work the plan, not the calendar.
21) How far from the edge should spoil piles sit
At least 2 feet from the trench lip. More is better. Keep equipment back too. Edge load collapses are sudden.
22) What is the best way to locate unknown utilities
Records, ground penetrating radar, and non-destructive daylighting. Expect surprises on older sites. Probe gently.
23) How big should the crew be
For a small foundation cut, one operator, one laborer, one truck can run. Add spotters and a shoring crew as depth and risk increase.
24) How do I control silt and mud leaving the site
Silt fence, stabilized construction entrance, street sweeping, inlet protection. Inspect after rain. Fines add up fast.
25) What is proof rolling and why do I care
A loaded truck drives the subgrade while the engineer watches for deflection or pumping. If it fails, you over-excavate and replace with structural fill.
26) Can laser guided systems replace surveyors
No. You still need control points, offsets, and checks. Machine control is only as good as the model and the setup.
27) How do I keep the bottom flat in wet soils
Cut high, dewater, then trim to final with a clean bucket pass. Lay geotextile and stone if you have pumping fines. Protect it until concrete lands.
28) What is the safest way to enter a trench
Use a ladder or ramp. Ladders extend above the lip and sit within 25 feet of workers. Never climb on shoring or bucket teeth.
29) How do I document utility exposures
Wide photos with context, close-ups with measurements, and notes on depth and offset. Label files by date and grid. Inspectors love clean records.
30) How do I choose between trenchless and open cut on cost
Add restoration and traffic control to your open-cut price. Add mobilization and specialty crew to your trenchless price. Urban streets often favor trenchless once you add lane closures and paving.
31) What does a good pre-dig meeting cover
Scope, dig limits, utilities, shoring, dewatering, trucking routes, inspections, emergency plan. Ten minutes here saves days later.
32) Can I pour footing pads on native soil
Only if the geotech signs off. Many sites need a leveling pad or engineered fill. Never assume native is good because it feels firm under boots.
33) How do I keep neighbors calm on tight sites
Share schedule, limit early noise, keep streets clean, monitor vibration. A quick notice letter and a phone number do wonders.
34) What is the most common schedule killer
Waiting on approvals and late design changes after you open the ground. Lock details early. Get submittals approved before mobilizing.
35) What mistakes do new teams make
Over-digging, poor water control, no safe egress, spoil on the edge, and weak photo logs. Fix those five and the job looks ten times smarter.
36) One thing to do tomorrow before you dig
Walk the site with the soils report in hand. Mark control points. Mark no-go zones. Then final check utilities with the vac. You start clean, you finish clean.
Keep Learning
Overviews & Planning
- Introduction to Foundations: The Backbone of Every Structure
- Foundation of a House: Why It Matters
- Types of Building Foundations: Benefits and How to Choose the Right One
- House & Building Foundations: What You Need to Know Before Construction
- The Right Home: Choosing the Best Foundation Type
Excavation & Sitework
- Excavation Depth for Foundations: What You Need to Know
- Foundation Excavation Methods: Techniques, Tools, and Best Practices
- Foundation Excavation: Key Steps and Considerations
- Hydrovac Excavation: Modern Techniques in Foundation Work
Soils, Testing & Site Investigation
Footings, Walls & Structural Elements
- Concrete Foundation Footings: What You Need to Know
- Foundation Footings: Essential Elements for Stability
- Precast Foundation Footings: Advantages and Uses
- Foundation Footing Cost: DIY Considerations
- Foundation Footing Repair: When and How to Do It
- Foundation Pillar Construction: Tips and Techniques
- Foundation Wall Construction: Step-by-Step
Foundation Types
- Slab-on-Grade Foundation: What It Is and When to Use It
- Basement Foundations 101: What They Are and How They Work
- Post-Frame Foundations: How They Work and Why They Matter
- Crawl Space Foundation 101: What They Are and How They Work
- Foundation Construction Methods: Pier and Beam
- Concrete Foundation House: Building Basics
- Concrete Foundation House: Expert Tips
Waterproofing & Drainage
- Exterior Foundation Waterproofing: What You Need to Know
- Foundation Waterproofing: Protecting Your Investment
- Foundation Waterproofing: Latest Innovations
- Best Exterior Foundation Waterproofing Products
- 5 Best Materials & Tools for Sealing a Leaking Foundation
Lifting, Leveling & Underpinning
- Concrete Foundation Leveling: Everything You Need to Know
- Foundation Lifting Costs: Costs, Tips, and Scams to Avoid
- House Lifting and Foundation Raising: What You Need to Know
- Foundation Underpinning: Strengthening Your Structure
Repair, Failures & Diagnostics
- Foundation Cracks in Houses: When to Worry and When to Repair
- How to Repair a Concrete Slab Foundation: Tips and Methods
- Foundation Repair 101: Signs, Fixes, and How to Save Money
- Sinking Foundation 101: Identification, Repair, and Prevention Guide
- Foundation Issues and Identification FAQs
- Reinforced Concrete Foundation: Case Studies
Costs, Financing & Buying Decisions
- How Much Does Foundation Repair Cost? | Tips to Avoid Scams
- How Much Does Foundation Repair Cost in Texas? (And How to Save)
- How Much Does Foundation Repair Cost in North Texas? Tips to Save Thousands
- Foundation Repair Costs Per Square Foot: What to Expect
- How to Pay for Foundation Repair: Avoid Costly Mistakes
- Grants for Foundation Repair: Tips, Types, and Eligibility
- Is a $30,000 Foundation Repair Worth It? What You Need to Know
- Concrete Foundation Installation Cost: DIY vs. Professional
- Cost to Build Foundation and Basement: What to Expect
- Should You Buy a House with Foundation Repairs or Issues?
DIY Guides
- Foundation Construction: DIY Tips
- House Foundations DIY: How to Build a House Foundation?
- Slab Foundation: DIY Guide
- Building Foundations: Expert DIY Tips
- Building Foundations
Materials & Alternatives
- Concrete Foundations 101: Everything You Need to Know
- Building a Strong Foundation: My Experience with Concrete Pad Alternatives
- Alternative Foundation Materials: Building Strong, Sustainable Foundations
Contractors & Services
- Foundation Excavation Contractors: Choosing the Right One
- Foundation Repair Contractors: How to Choose the Best
- Foundation Repair Contractors: Learning from Failures
- Residential Foundation Contractors: Success Stories
- Foundation and Concrete Services: Comprehensive Solutions
- Specialized Piling and Foundation Services: What They Offer
- Specialized Piling and Foundation Services: Insights
Education & Courses
- Construction and Engineering Courses: From Foundations to Advanced Techniques
- Undergraduate Foundation Courses in Architecture
History & Theory
- Ancient Greek Architecture: Foundations, Features, and Influence
- Romanesque Architecture Style: The Foundation Before Gothic Took Over
- Medieval Engineering: Building the Foundations of a New World
- Parti in Architecture: The Foundation of Great Design