
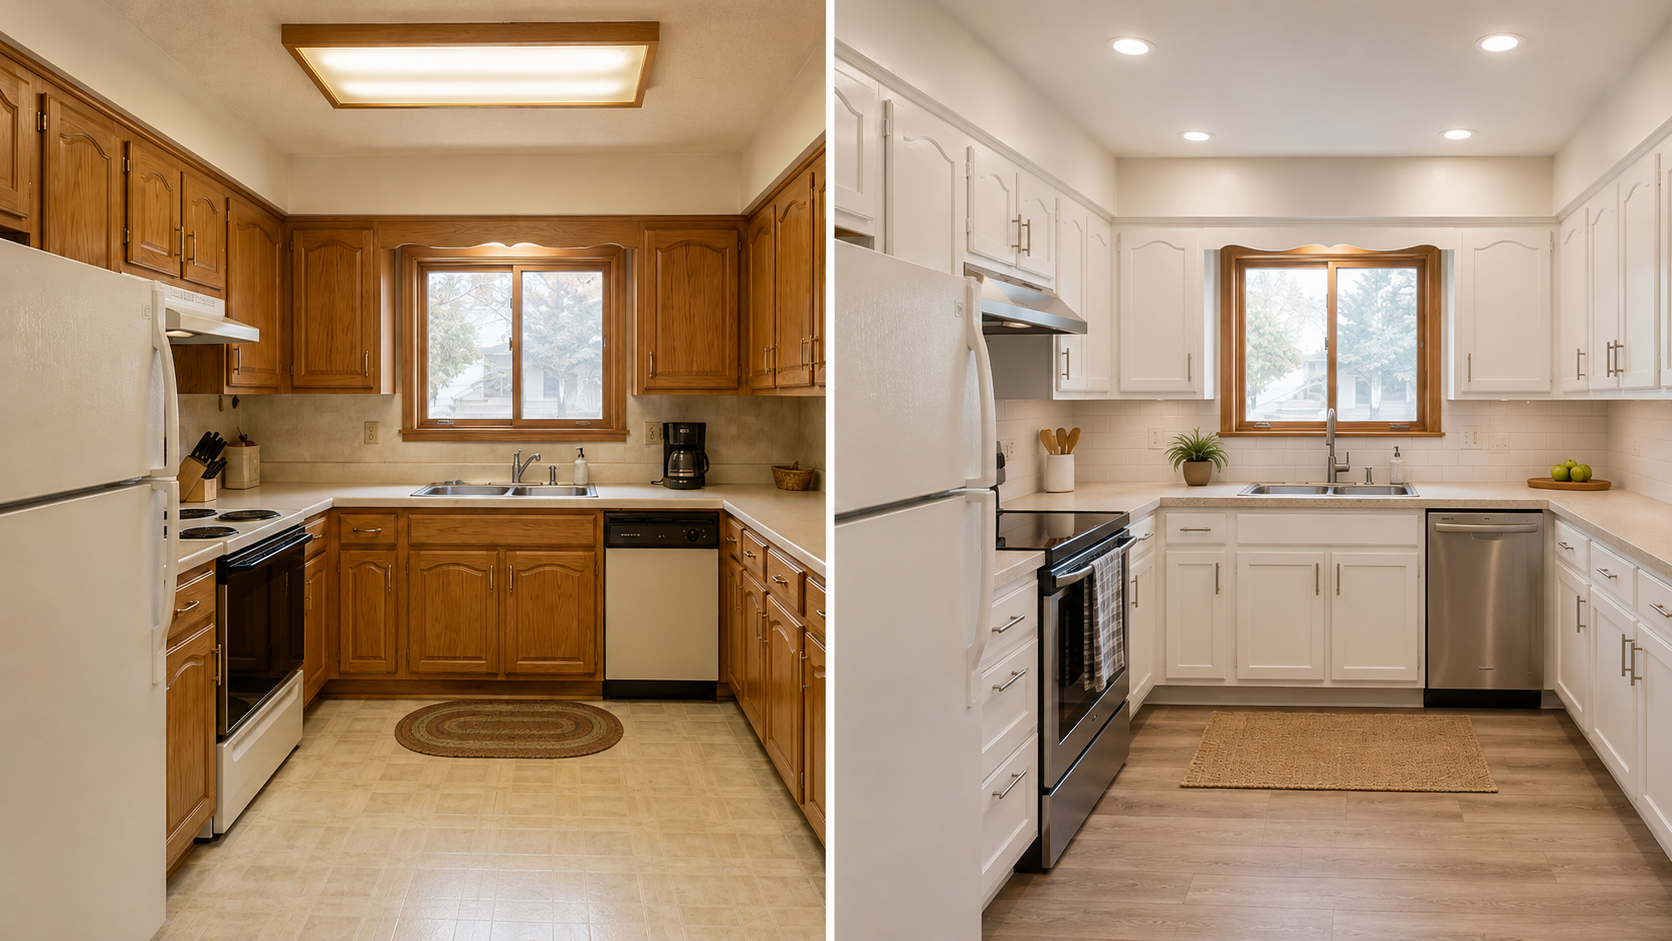
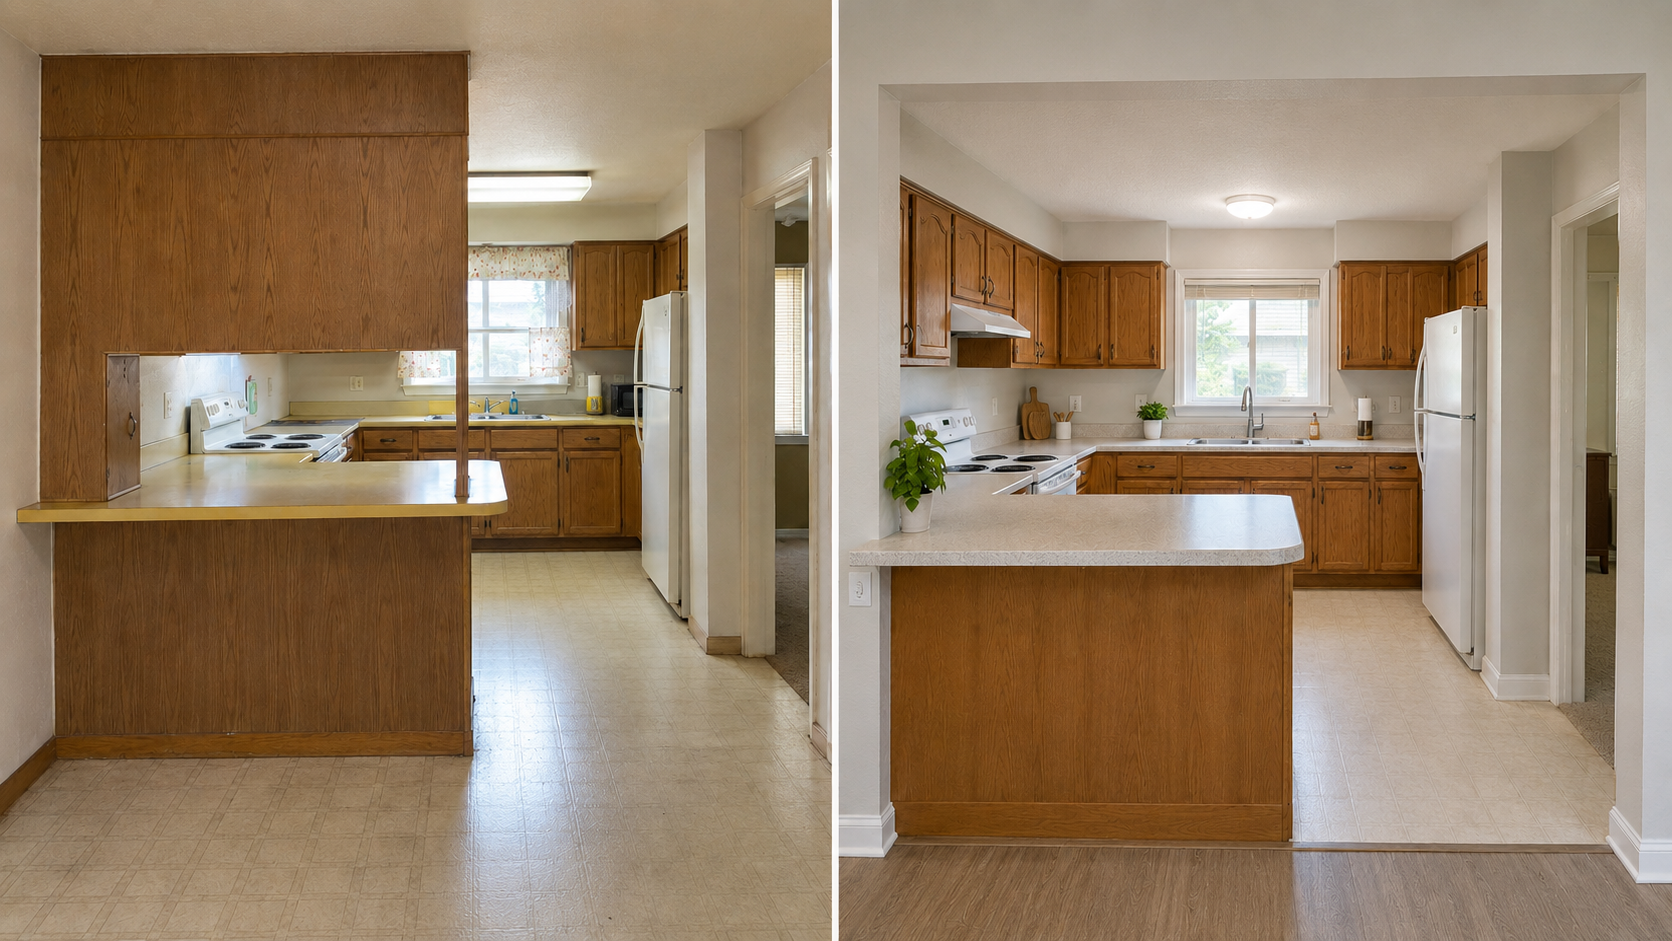
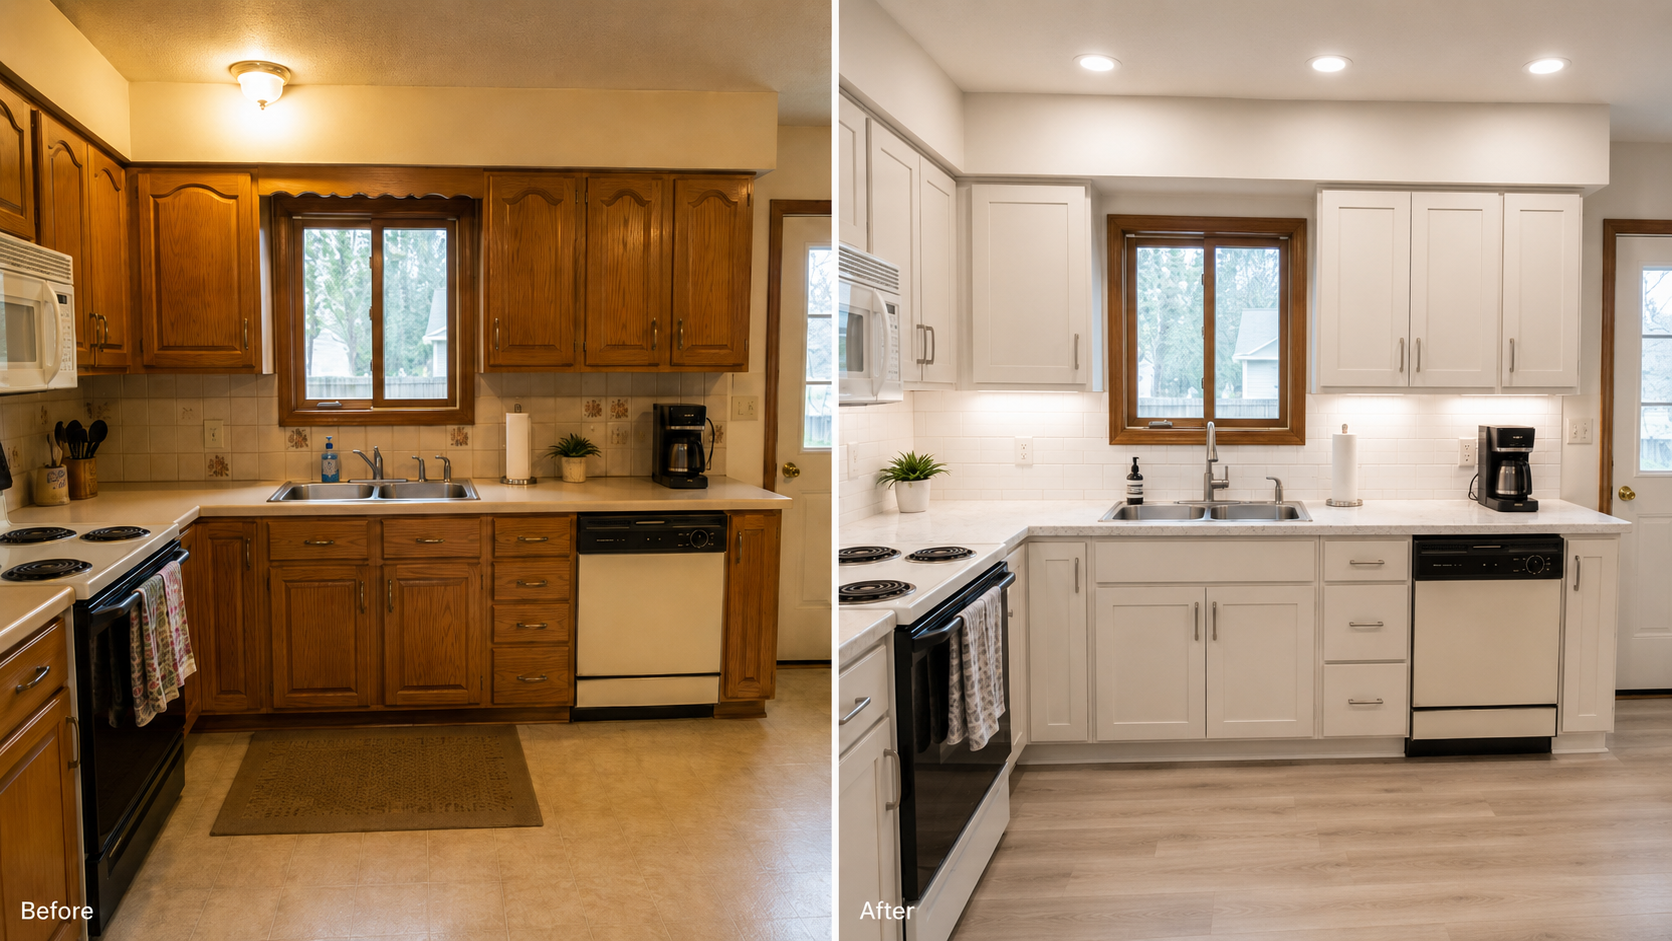
Someone shows you the after photo of a kitchen they love, and the first thing they say is that the owners painted the oak cabinets white. It's almost never just the cabinets. Put the before and after side by side, cover the cabinet doors with your thumb, and the room still looks changed — the ceiling is quieter, the light isn't flat and yellow anymore, the floor and the counter have stopped fighting. The cabinet color is the change people name because it's the easiest one to see, not the one that did the work.
That's why some 1980s kitchen before-and-afters read as a full gut even when the sink, range, and cabinet boxes never moved. This page is for reading those photos honestly: what changed, what quietly stayed, and what happened in between. For the full remodel order, see 1980s kitchen remodel; for the cabinet decision on its own, 1980s kitchen cabinets; and if the kitchen is one room in a bigger project, start with 1980s house renovation.
What the Before Photo Usually Shows
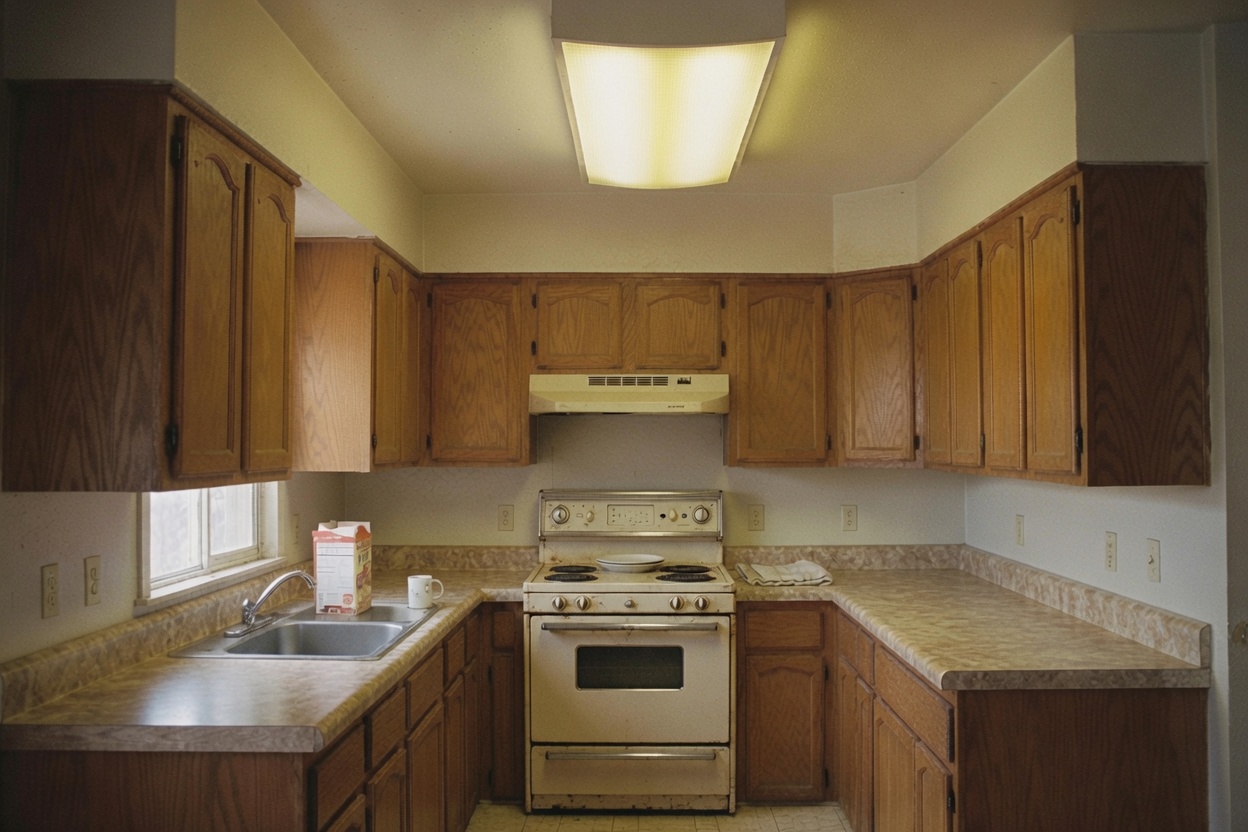
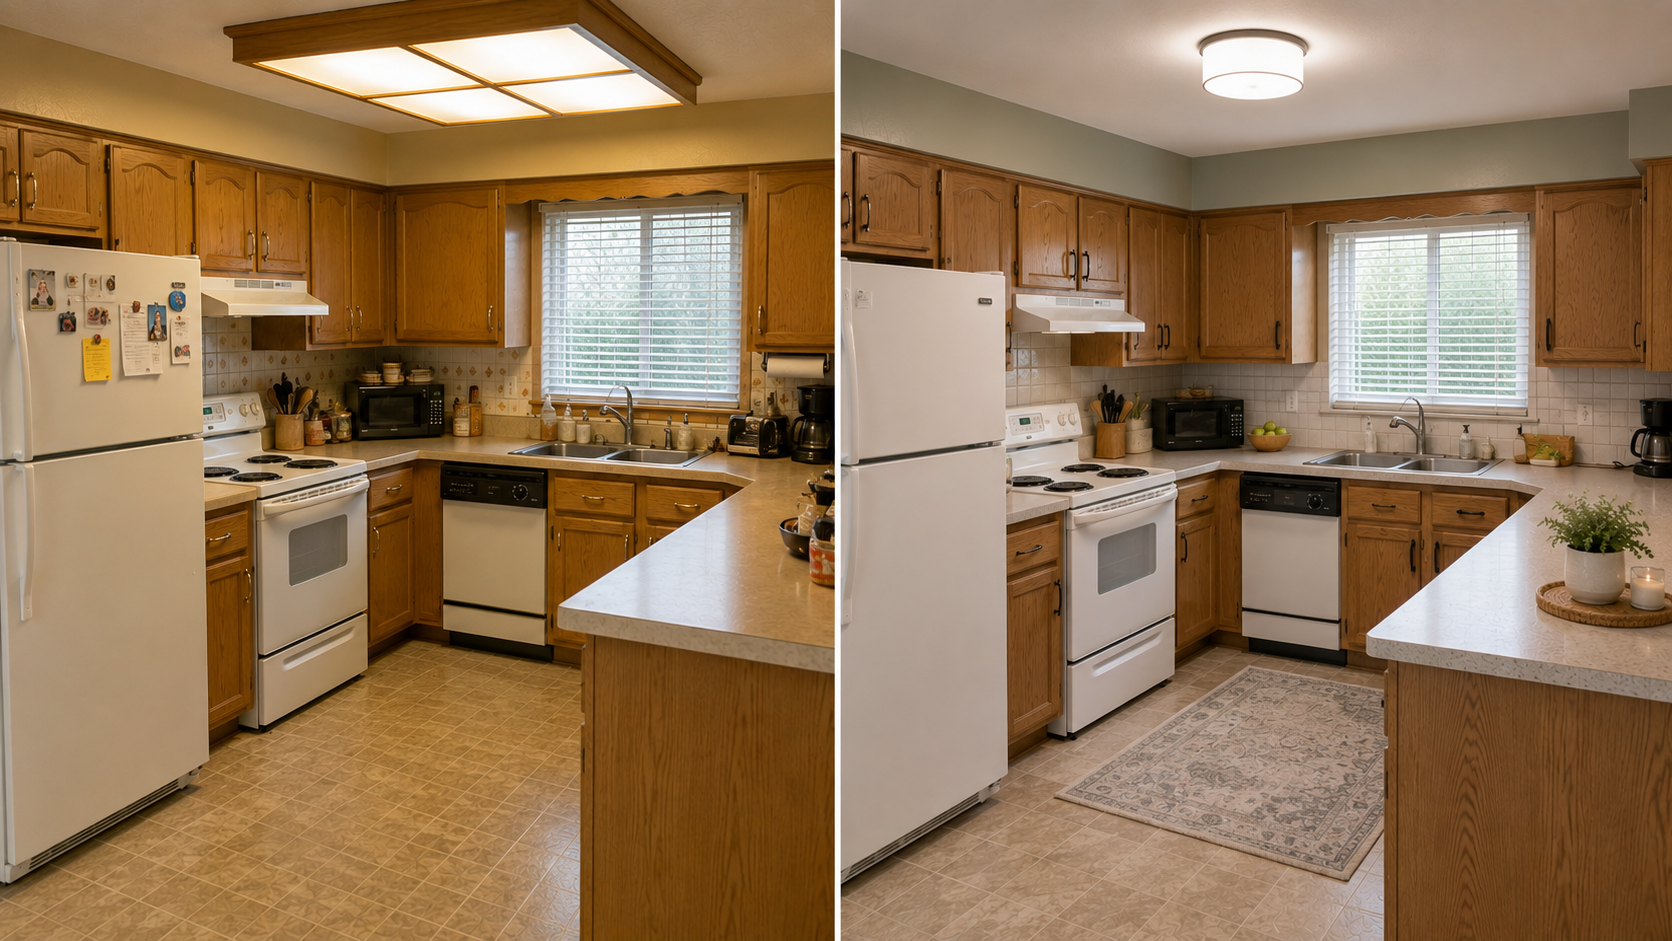
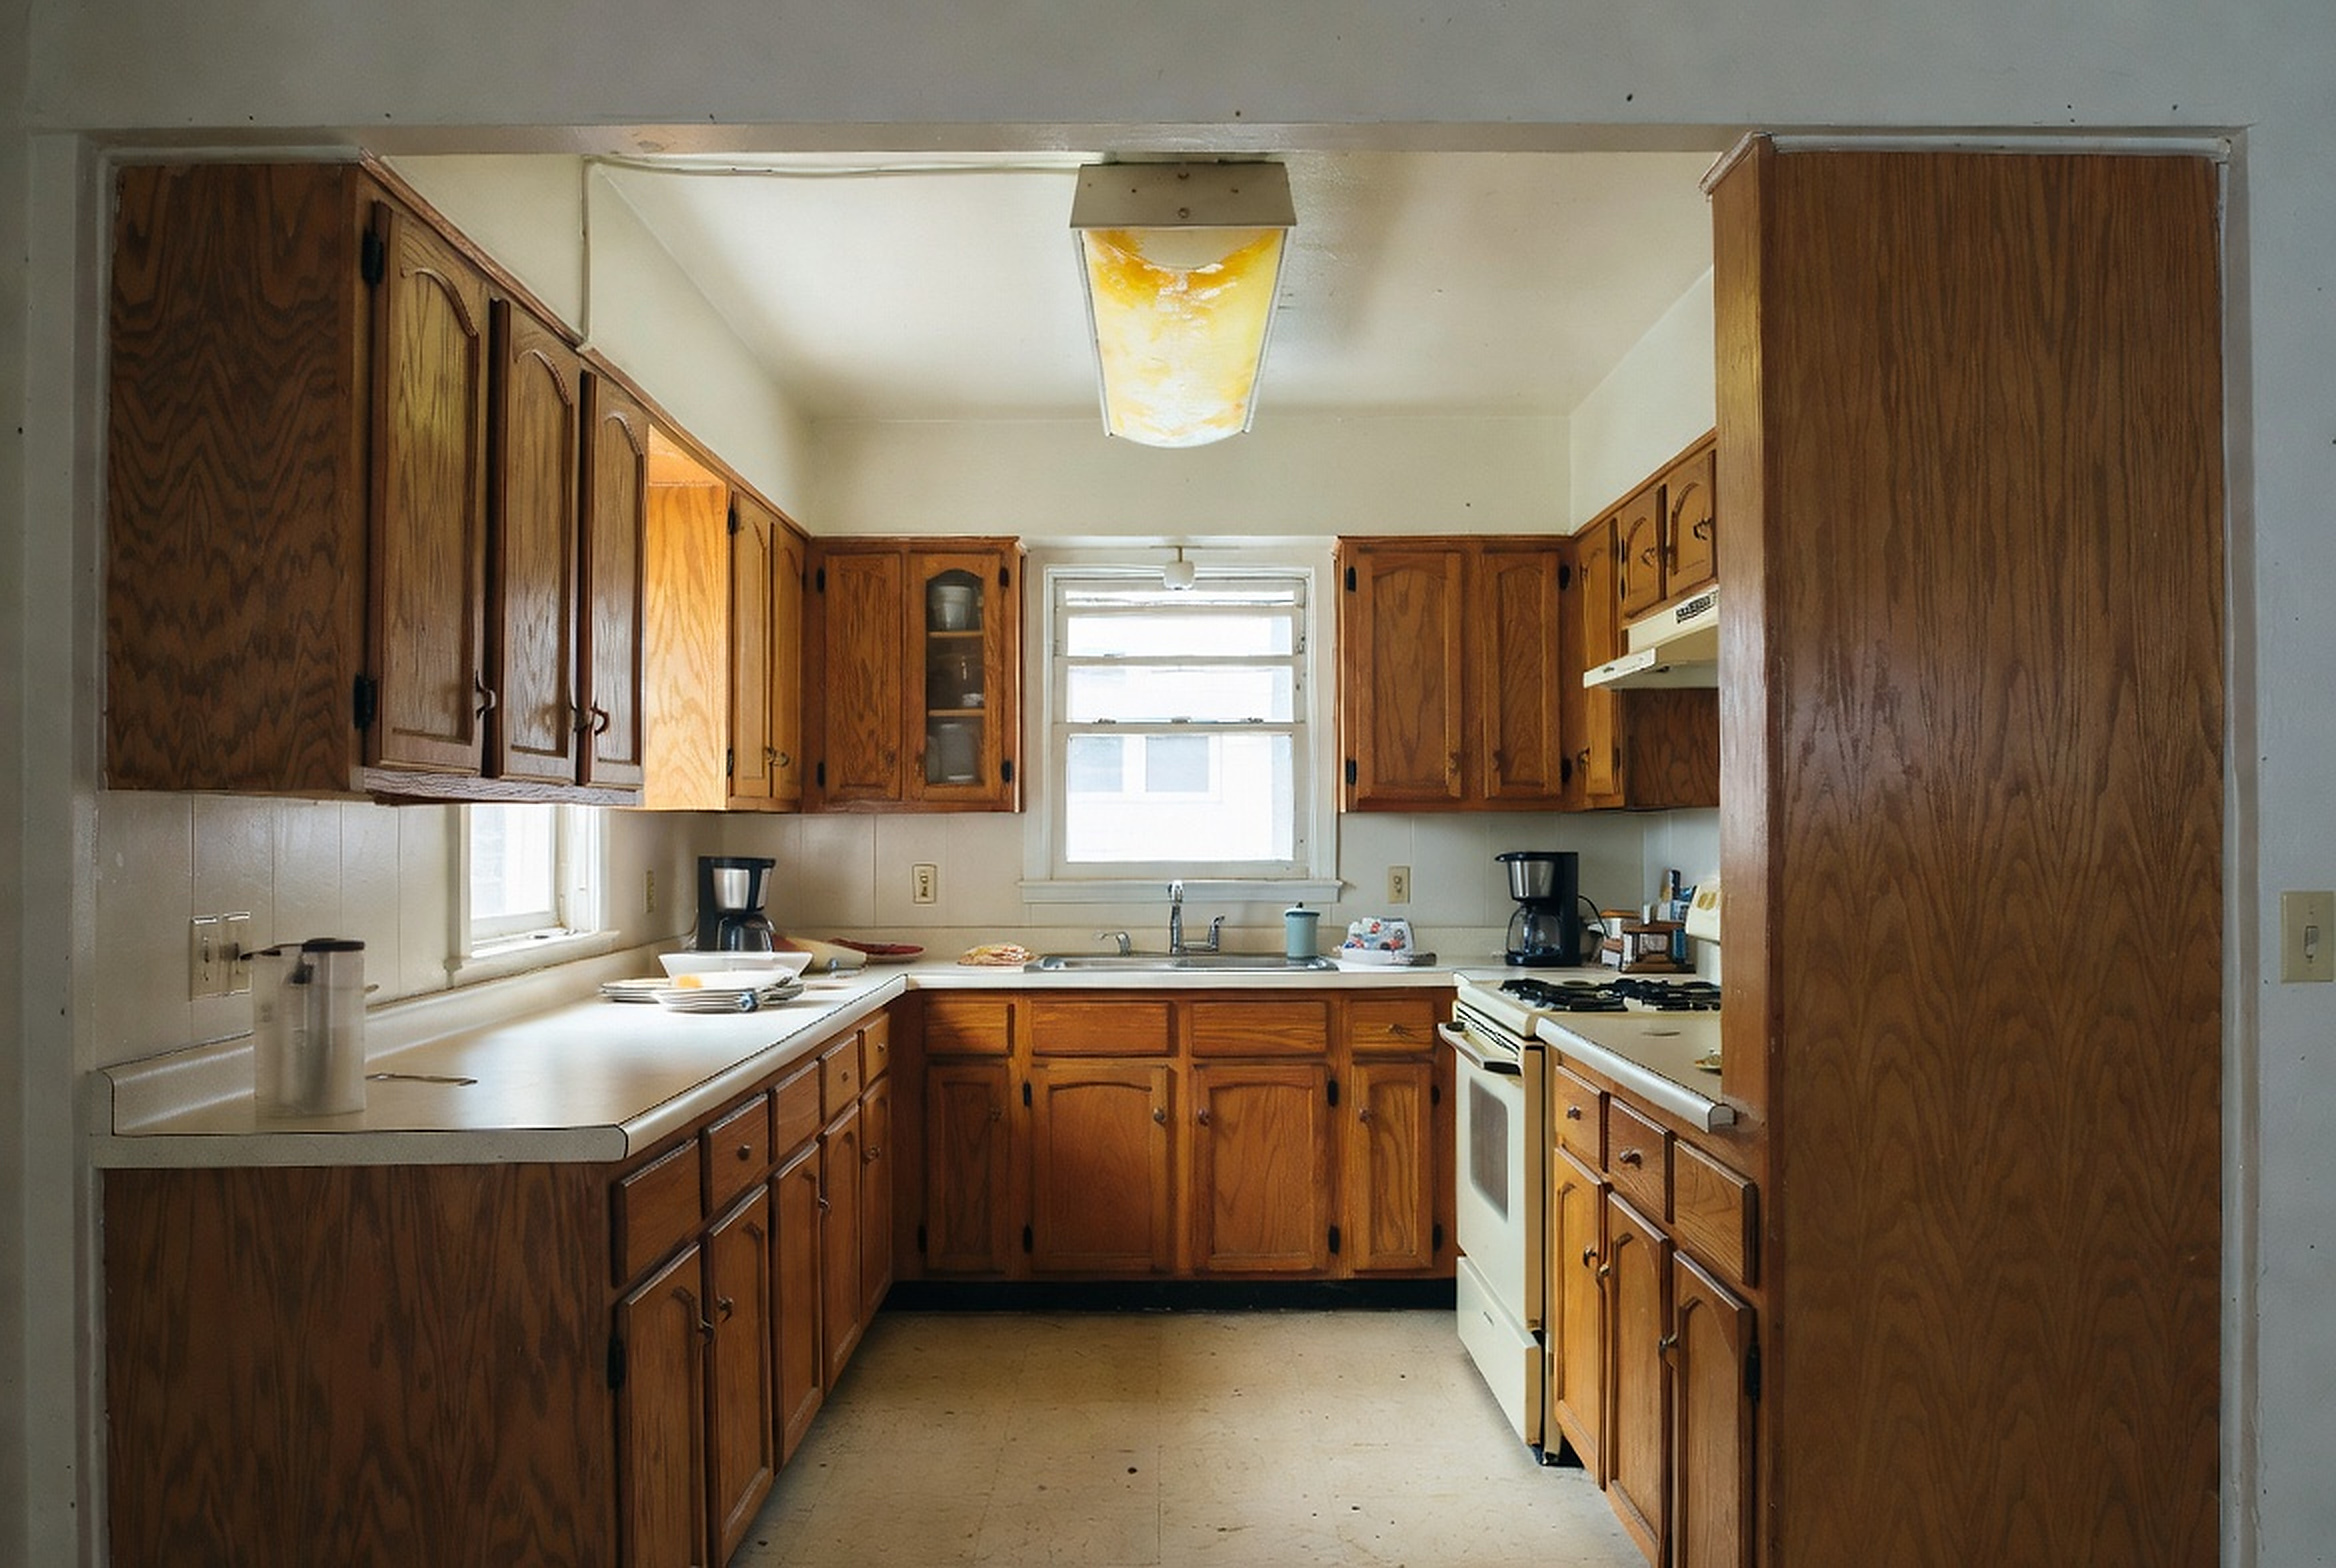
A typical 1980s before photo is not one problem, it is a stack of them sitting on top of each other. Honey oak cabinets with arched doors and brass pulls, almond appliances, laminate counters, a beige vinyl floor, a fluorescent box in the middle of the ceiling, a soffit boxing in the tops of the cabinets, and a backsplash carrying more pattern than the room can absorb. No single piece is a disaster, but stacked together they make the kitchen feel heavy, yellow, dim, and busier than its actual size.
This is why a before-and-after should never be judged on one finish. A kitchen with freshly painted cabinets can still feel dated if the ceiling light, floor, counter, backsplash, and hardware are all still arguing with each other. The room reads as the sum, not as the cabinet doors.
What Changed the Room
A strong after photo works because several quiet changes are propping each other up. The ceiling gets calmer when the fluorescent box is pulled, rebuilt, or at least made less dominant. The light improves, so the shadows that used to sit under the upper cabinets are gone. The hard finishes stop competing because the counter, backsplash, floor, and cabinet color were finally chosen against each other instead of one at a time. And the room sheds clutter, losing a few of the small patterns and warm-yellow surfaces that were quietly crowding it.
I have stood in a kitchen where the owner was certain the white paint was the whole story, and the change that actually lifted the room was taking the fluorescent box out of the ceiling — she just never noticed the ceiling because she was looking at the doors. Unless the project was a full gut, the after should not look like a different house. In most 1980s kitchens the smarter update keeps the footprint and fixes the stack.
The Same Layout Can Still Change a Lot
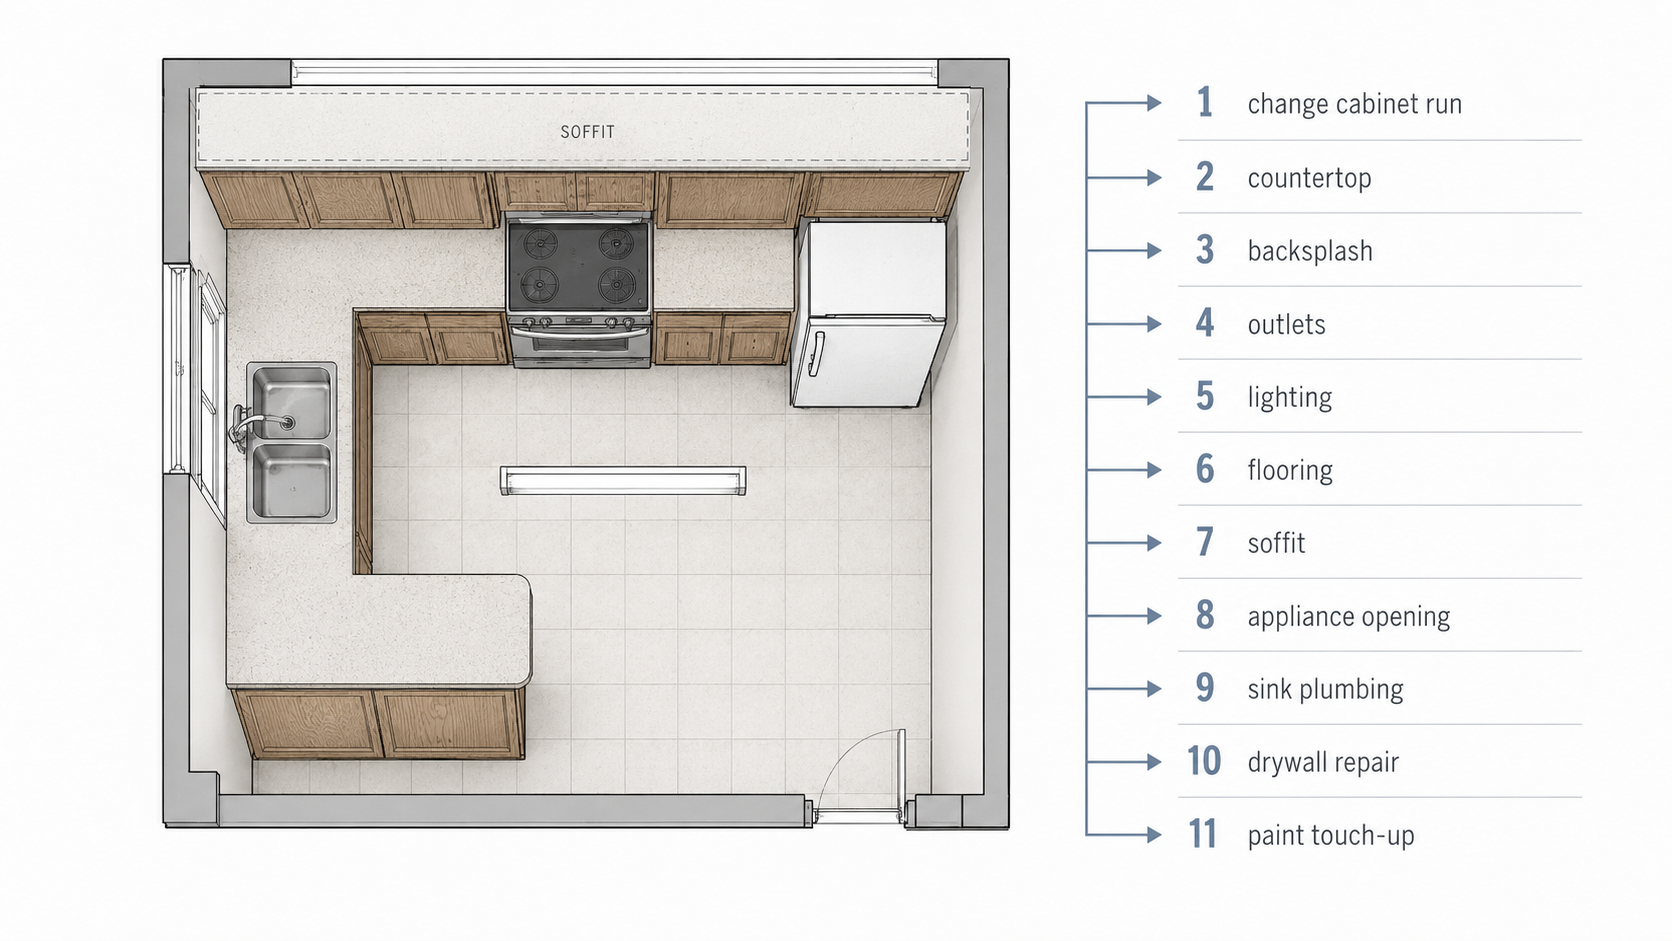
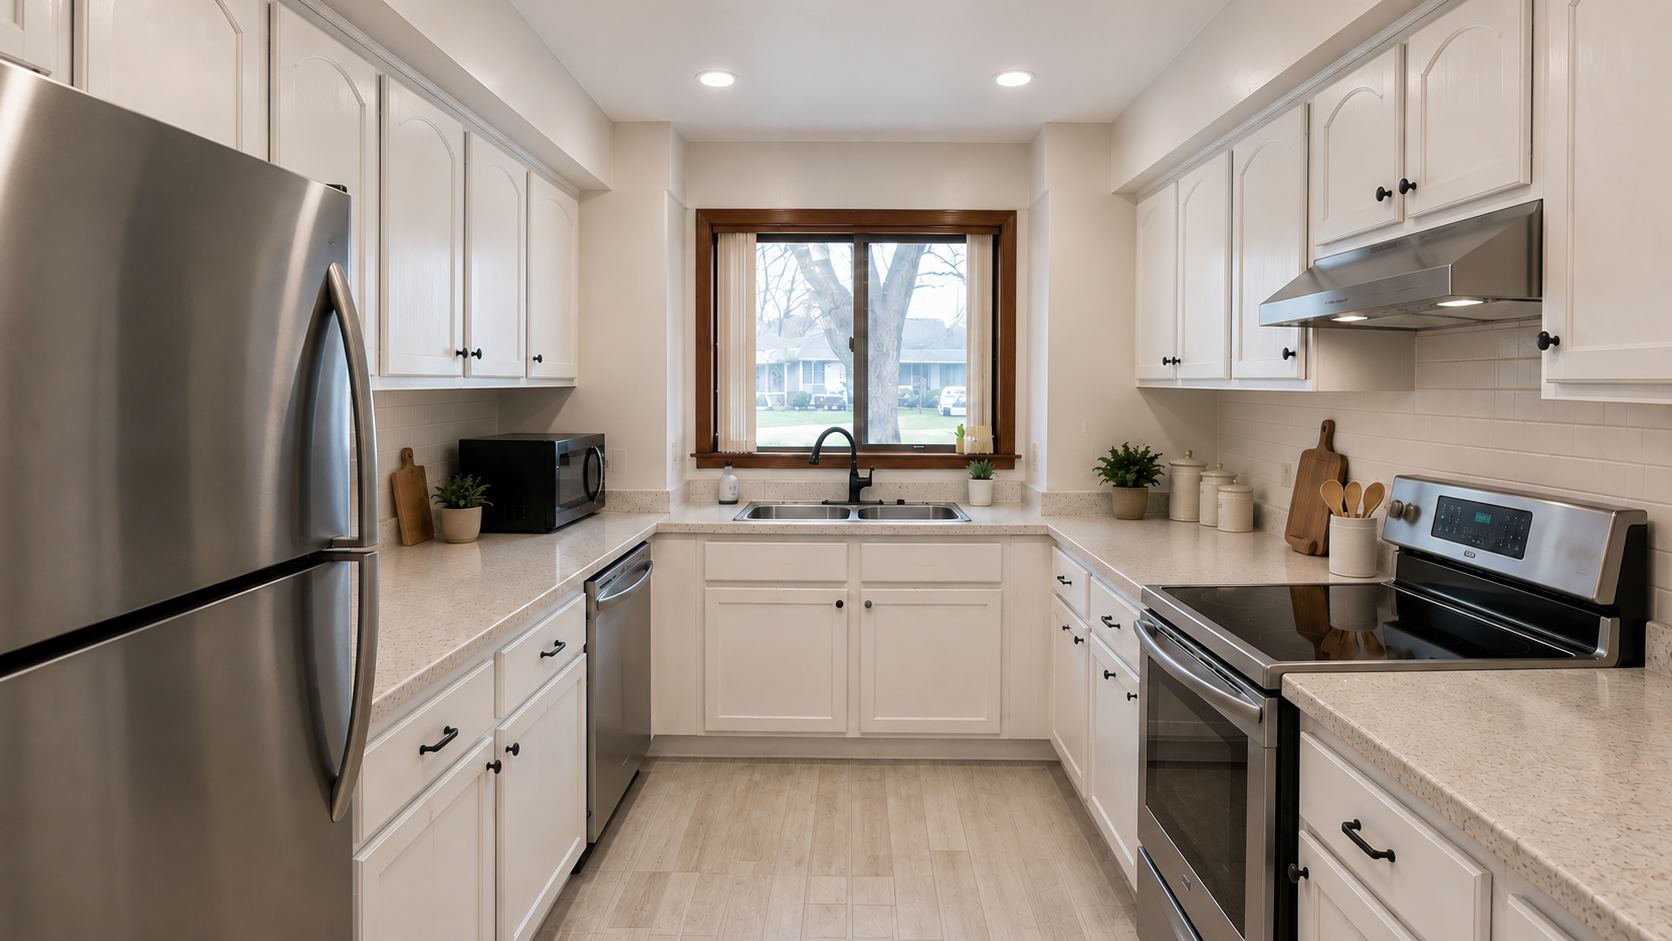
Keeping the layout is often the safest before-and-after there is. The sink stays under the window, the range stays on its wall, the refrigerator stays in its corner, and the cabinet boxes stay if they are sound. That restraint is what keeps the plumbing, the electrical, the floor cuts, and the ceiling repairs from spreading, which is where before-and-after budgets usually blow up.
Same layout does not mean small impact, though. New lighting, a new cabinet finish, better hardware, a quieter counter and backsplash, a calmer floor, and a fresh wall color can make a room read as cleaned-up without a single service line moving. The approach only holds when the layout was not the problem in the first place. If the work triangle is usable and the storage is decent, finishes alone can carry it. If the trouble is a narrow aisle, a trapped refrigerator, a bad sink location, or a dead corner, that trouble is still sitting there the morning after the paint dries.
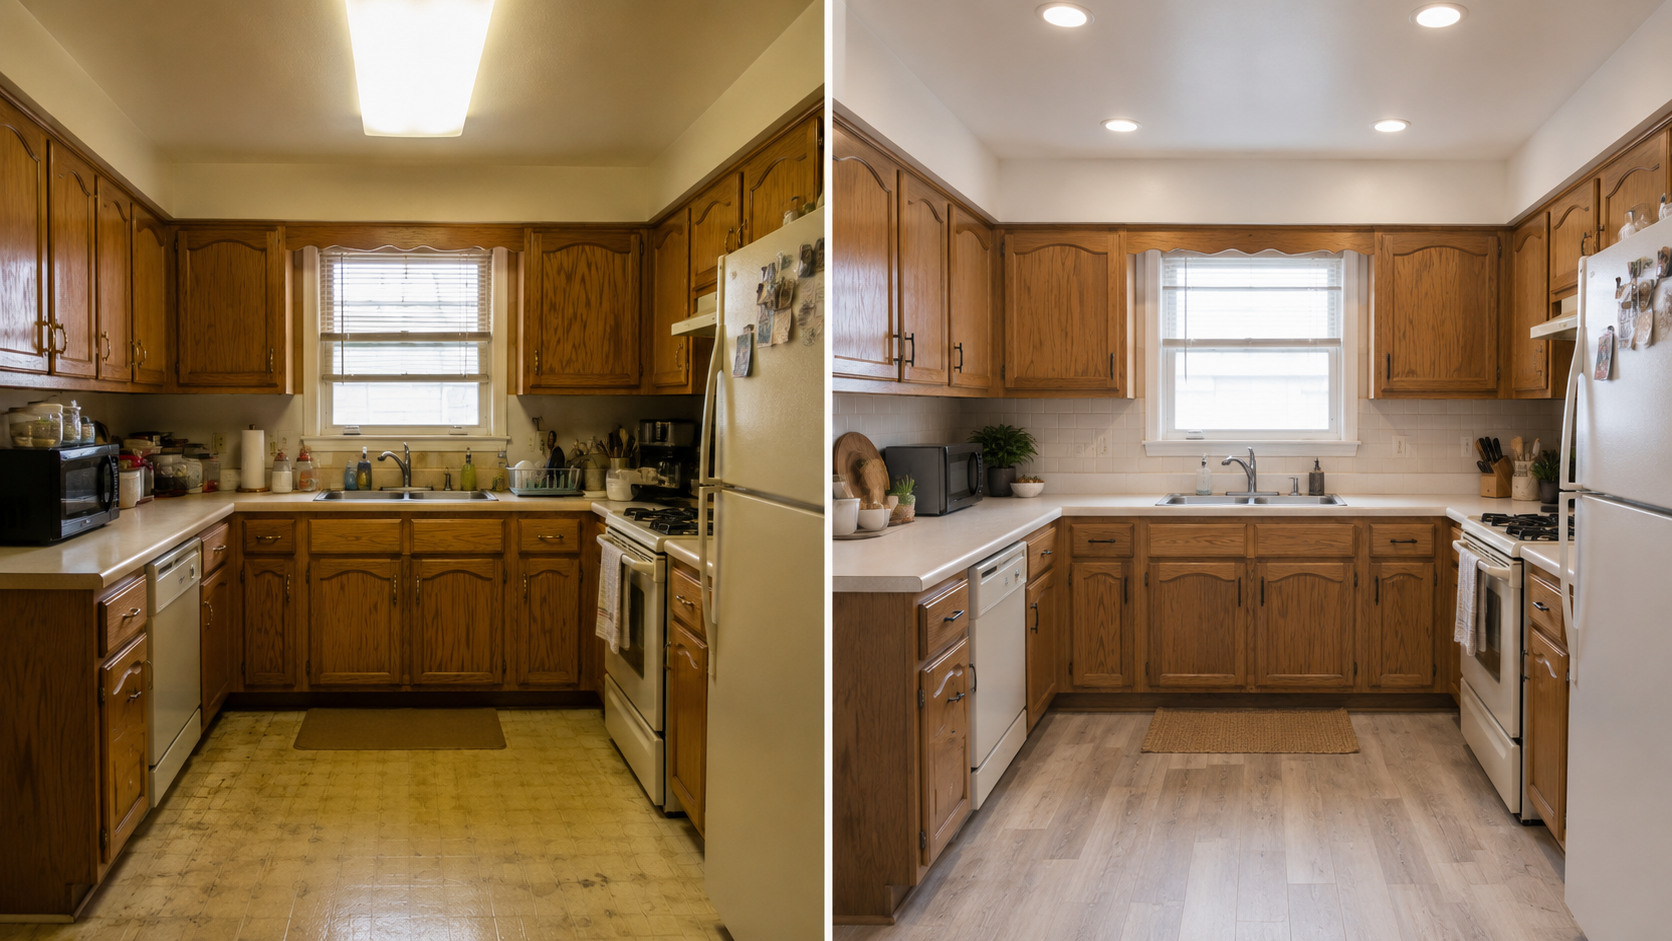
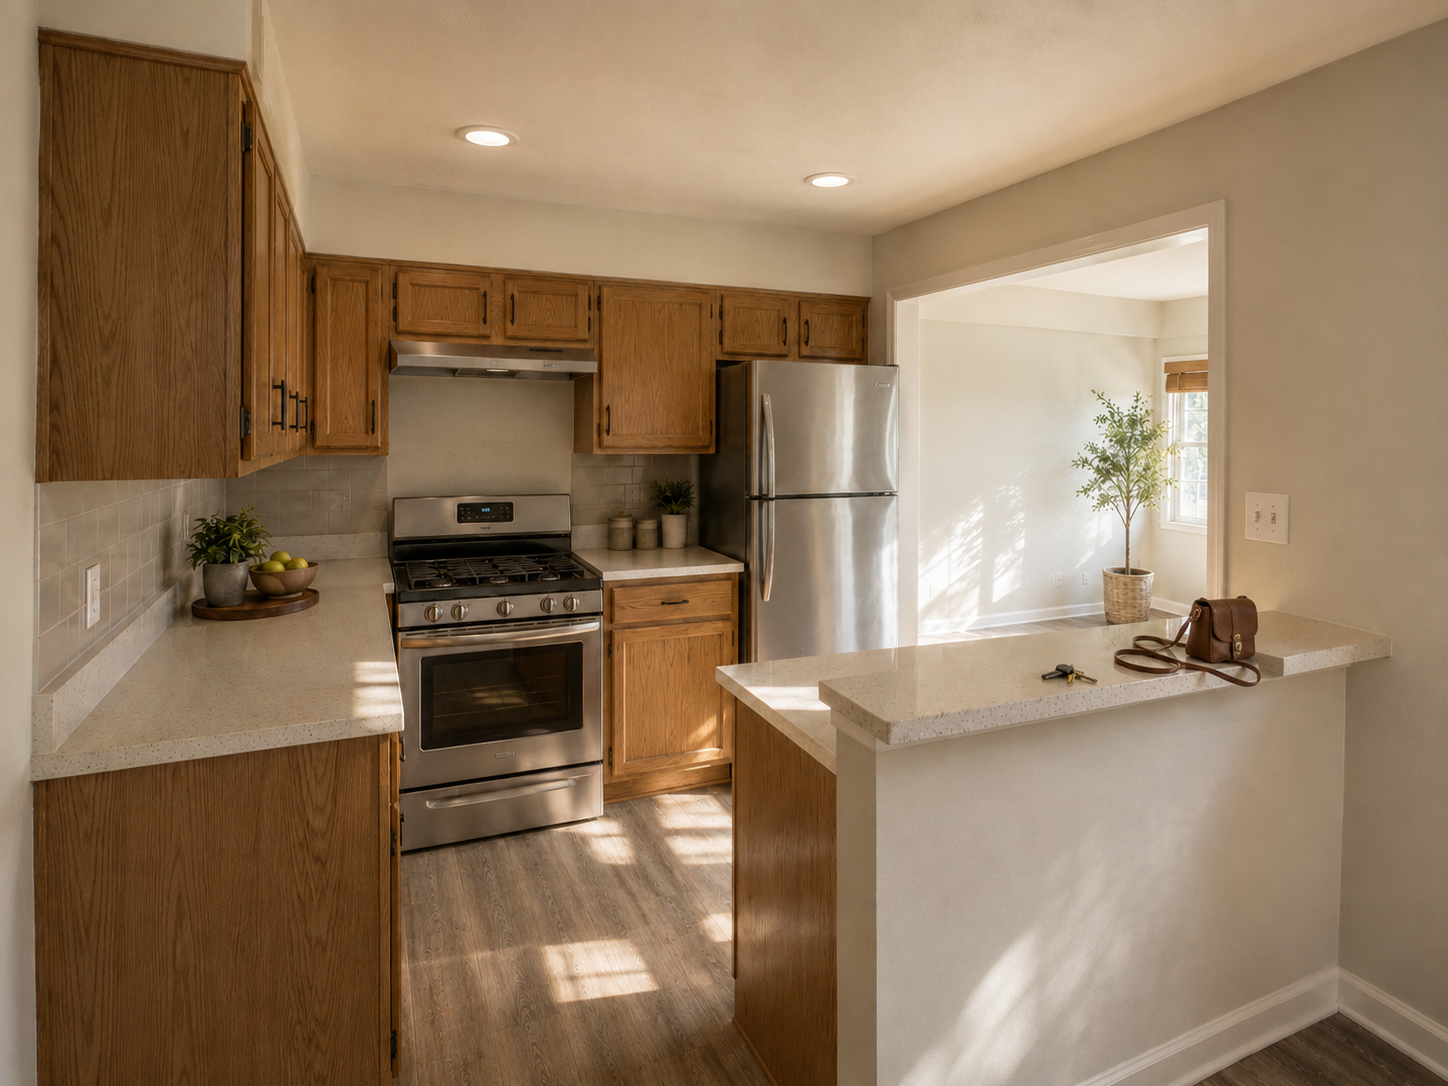
When Keeping the Oak Works
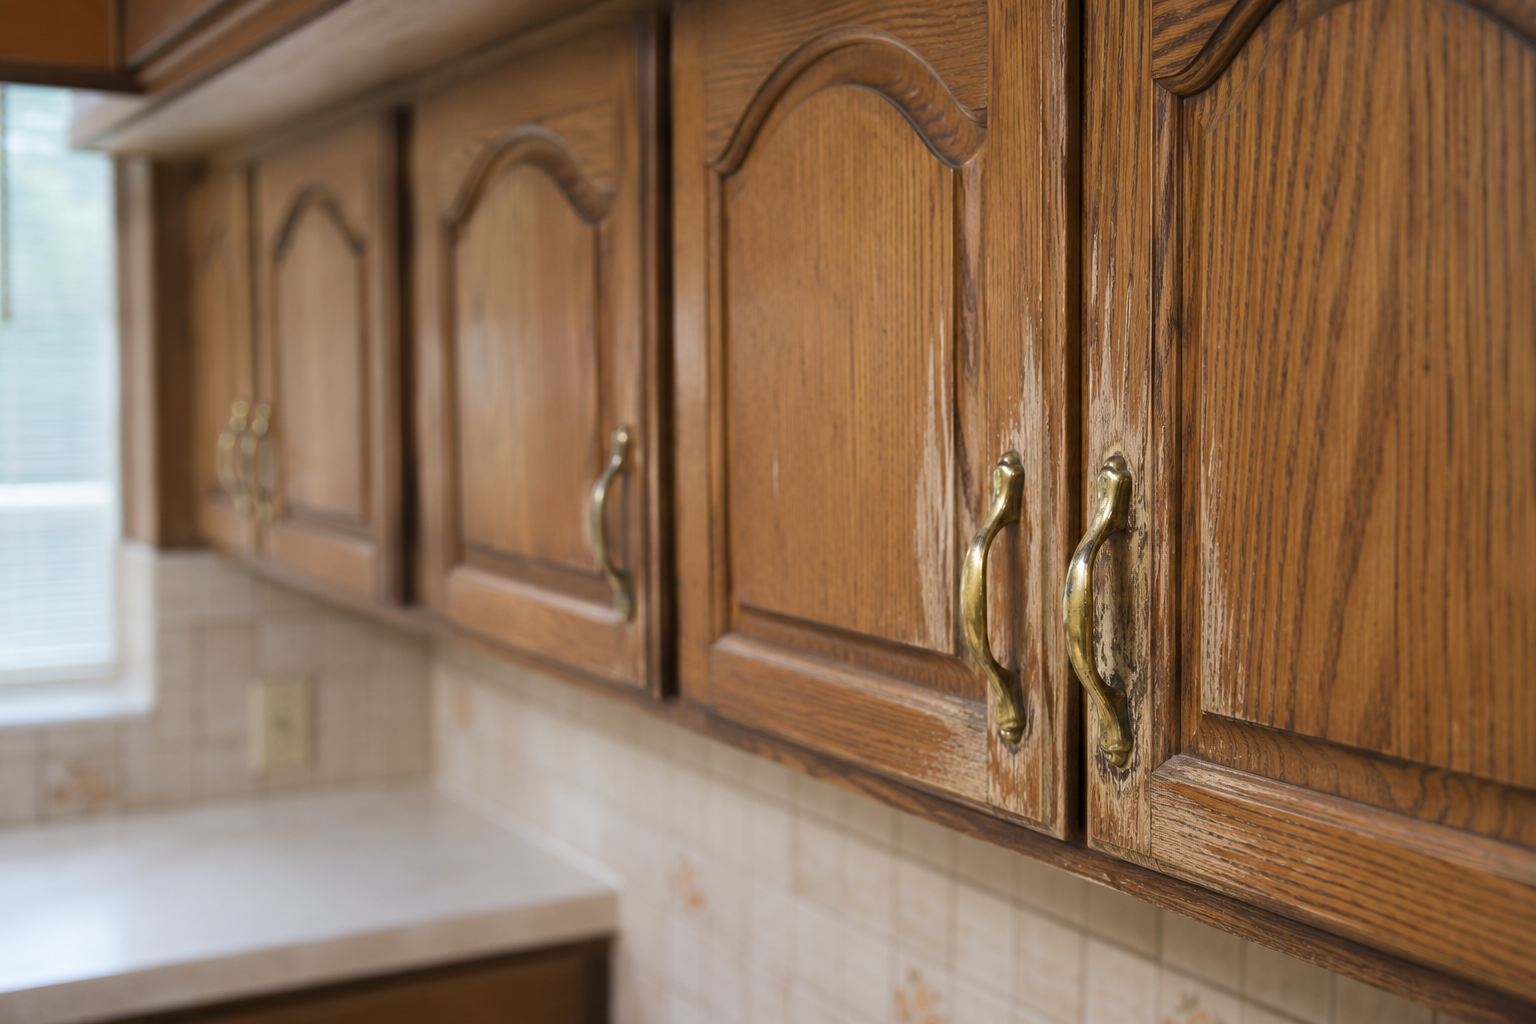
Not every 1980s oak kitchen needs painted cabinets. Oak can stay when the boxes are solid, the doors close well, the drawer boxes still run, and the color can be balanced by calmer choices around it. The finishes near the wood decide more than the wood does. Better hardware, a quieter counter, a simpler backsplash, improved lighting, and a floor that does not pile on more yellow can make oak look intentional instead of tired.
It works best when the room still has some warmth worth keeping. It works badly when the cabinets have gone orange and glossy, or are damaged, loose, and water-stained, and are sitting in a room where every other surface is also a warm beige. At that point the oak is not the issue by itself, it is one part of a color-and-condition problem the finishes alone will not solve. If the cabinets are the real question, weigh paint, refacing, and replacement in 1980s kitchen cabinets before you commit.
When Painted Cabinets Make Sense
Painted cabinets can brighten a 1980s kitchen fast, and they expose bad prep just as fast. Paint earns its place when the boxes are solid, the doors are worth saving, the hinges can be adjusted, and the budget actually allows the prep to be done properly. Rush it and the paint chips at the handles within a year, sits thick in the door profiles, and somehow makes old doors look cheaper than the bare oak did.
The honest test is whether the layout works and only the finish is dragging the room down. Paint makes less sense when the doors are failing, the drawer boxes are loose, the sink base is swollen, or a planned soffit change is going to rework the cabinet line anyway. One sequencing rule saves a lot of regret: do not paint first while the counter, backsplash, floor, and lighting are still undecided. Cabinet color is the one choice that has to be made with the whole room in view, not ahead of it.
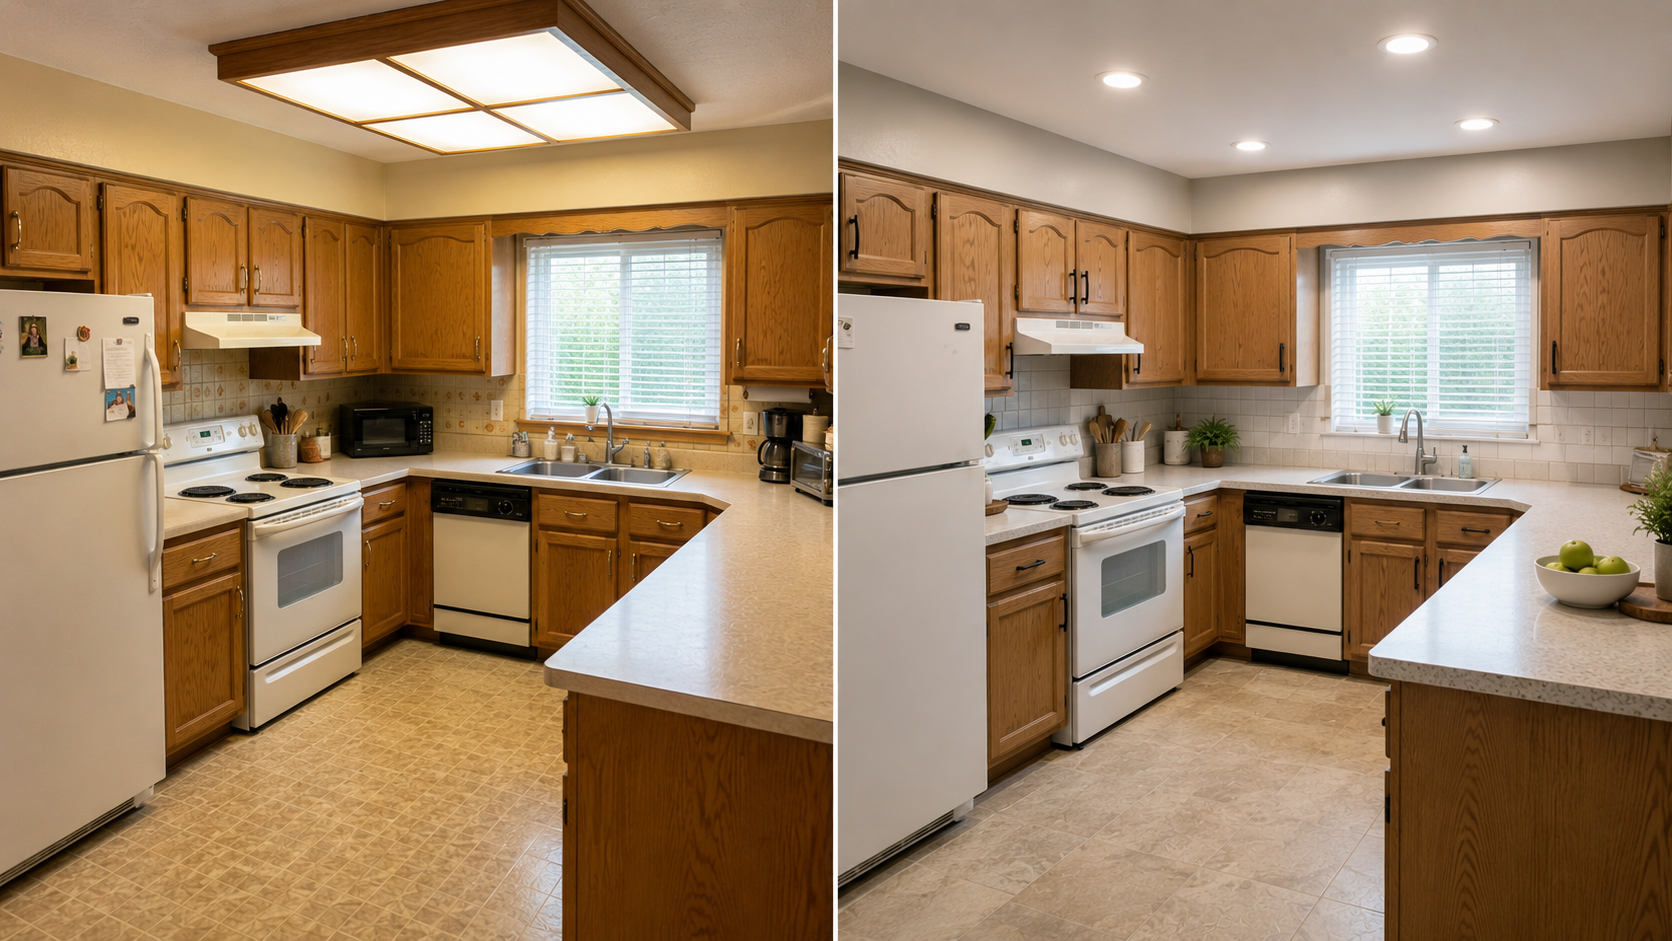
The Fluorescent Ceiling Box Changes More Than the Light
Here is the part the before-and-after roundups skip, and it is one of the changes that does the most quiet work in these photos. The fluorescent box in the center of the ceiling is one of the fastest things dating a 1980s kitchen. It throws flat light, the diffuser yellows, and it makes the room feel like a service space. Pull it and the after photo looks cleaner before a single cabinet door is touched. So far this matches what everyone says.

What no one tells you is that the box is not a fixture you swap, it is a ceiling project you have not priced yet. Take it down and you are looking at the raw ceiling it was hiding: the cut-out where it was mounted, the wiring it was fed by, and whatever texture and patch history is up there. Best case, it is a clean patch, a coat of paint, and a new recessed layout. Worse case, the surrounding ceiling has old texture that will not match a fresh patch, or drywall that was never finished above the box because nobody was ever going to see it. You do not find out which one you have until the box is on the floor and you are looking up at the hole. That uncertainty does not fully resolve on paper — budget the lighting change as a ceiling change, plan it before you order cabinets or counters, and leave room for the ceiling to turn out worse than it looked.
The Soffit Is Not Always Empty
A soffit makes the upper cabinets feel short and heavy, which is why people want it gone. It can also be carrying something. Before anyone frames removal as easy, the boxed space above the cabinets has to be checked for ductwork, wiring, plumbing, framing, and old vent runs. Sometimes it is hollow and the cleanup is cheap. Sometimes it is full, and removal spreads into drywall, cabinet, electrical, plumbing, and ceiling work all at once. I have opened a soffit expecting dead air and found a cold-air return I then had to reroute before anything else could move.
That is why the best before-and-after is not always the one where the soffit vanishes. A soffit can be quieted instead of removed, painted into the wall or cabinet field, with a cleaner cabinet line below it and the lighting fixed so the eye stops landing on it. Full removal is the better call only when the hidden conditions and the budget both say so.
When Opening the Kitchen Helps
Opening a 1980s kitchen helps when the room genuinely feels cut off from the dining or family space. A wider opening, a simplified peninsula, or a partial wall change can clean up the sightlines and make the after photo feel bigger, and it can fix a path through the room that the old wall and overhead cabinets used to choke.
An opening is not automatically the better move. The wall may be carrying load, and even if it is not, it may be carrying electrical, plumbing, ductwork, switches, outlets, or cabinet storage you will have to replace somewhere else. The cost is rarely the opening itself. It is the chain behind it — a beam, posts, ceiling repair, floor patching, cabinet changes, and an inspection.
If the kitchen sits in a split-level or raised layout, tie the decision to 1980s split-level remodel, because a kitchen wall change there can pull in the entry, the stair view, the flooring transitions, and the feel of the level below.
The Budget Update Works Only When the Cabinets Are Sound
A budget before-and-after can work genuinely well, but it lives or dies on condition. If the cabinet boxes are solid, the sink base is dry, the drawers run, and the layout is usable, a smaller update can do plenty: hardware, lighting, wall color, backsplash, faucet, a floor repair, and a cleaner counter will move the room without a gut.
If the boxes are swollen, the floor is soft near the sink, the doors are failing, or the layout creates daily friction, the same budget spent on finishes is money you will be tearing back out next year. I have watched a twelve-hundred-dollar refresh outlast a nine-thousand-dollar one, because the cheap job started with sound boxes and the expensive one painted over a swollen sink base. The cheapest update is not the one with the lowest first invoice. It is the one you do not have to undo.
What the After Photo Does Not Show
A good after photo hides its own work, which is exactly why it can mislead you. You see painted cabinets, clean counters, brighter light, and a calmer floor. You do not see the cabinet prep, the hinge repair, the relocated outlet, the ceiling patch, the under-cabinet lighting, the plumbing adjustment, the floor transition, or the second trip from the electrician.
You also do not see what was deliberately left alone — the boxes, the appliance locations, the sink wall, the window, the soffit — and that restraint is often the reason the project stayed in budget at all. One thing the after photo never shows is what was under the old floor. Some resilient flooring and mastic from this era can contain asbestos, so before that beige vinyl gets ripped up, a quick test is cheap and disturbing it blind is the expensive surprise; the U.S. Environmental Protection Agency explains that some older building materials should be handled carefully during remodeling. Before you copy a photo, ask what changed, what stayed, and what work had to happen in the gap between the two images.
1980s Kitchen Before-and-After Decisions
| Decision | Works when | Watch out for |
|---|---|---|
| Keep the layout | The sink, range, refrigerator, aisles, and storage already work | Bad appliance locations, trapped corners, narrow aisles, and poor workflow |
| Keep oak cabinets | Boxes are solid, doors work, and surrounding finishes can calm the wood | Orange finish, worn varnish, damaged doors, weak drawers, and too many warm surfaces |
| Paint cabinets | Boxes are sound, layout works, and prep can be done properly | Chipping, thick paint at door profiles, poor adhesion, and old hardware problems |
| Remove fluorescent box | Ceiling repair, electrical, and a new lighting layout are in the scope | Drywall patches, old texture, wiring, uneven ceiling paint, and permit requirements |
| Remove or change soffit | The soffit is confirmed empty or the hidden work is in the budget | Ductwork, wiring, plumbing, framing, cabinet height changes, and ceiling repair |
| Open a wall | The load path is checked and the kitchen still has enough storage | Beams, posts, ceiling repair, floor patches, electrical moves, and lost cabinets |
What to Copy From a Good Before-and-After
Copy the order of operations, not the exact finishes. The kitchen you are admiring has its own light direction, window size, ceiling height, cabinet condition, and budget, and none of those travel with the photo. White cabinets that glow in one room go flat in another, black hardware that looks crisp in one kitchen looks harsh in the next, and a soffit that came out easy in one house costs a fortune in yours. What does travel is the thinking: calm the ceiling before you lock the cabinet color, fix the lighting before you judge the wood tone, choose the counter, backsplash, floor, and hardware against each other rather than one at a time, and keep the layout when it works so the budget goes to the parts that actually change the room. That is the difference between a before-and-after that is useful and one that is only pretty.
Where These Updates Go Wrong
The bad after photo usually tries too hard. It paints every cabinet white, adds black hardware, installs a loud backsplash, swaps the floor, takes out a wall, and hangs new lights, and the room still feels off because the ceiling, the layout, and the proportions were never actually solved. The opposite mistake is going cheap in the wrong places — peel-and-stick over moisture damage, paint over greasy doors, new flooring laid across a soft spot by the sink, a backsplash set before the electrical was done. Both produce an after photo with a short shelf life. A 1980s kitchen does not need to become a luxury kitchen. It needs to stop fighting itself, and that is mostly a matter of fixing the right things in the right order.
The kitchen also should not read as if it belongs to a different house than the rest of the home. If the hallways still have oak trim and the bedrooms still have beige carpet, the kitchen update has to connect to the larger plan, which does not mean matching every finish so much as making the transition feel deliberate. For the rest of that plan, use 1980s house interior and 1980s house exterior update.
1980s Kitchen Before-and-After Gallery
Each image below shows a different version of the same 1980s kitchen problem — some keep the layout, some keep oak, some paint, and some show how lighting, openings, and condition change the room.
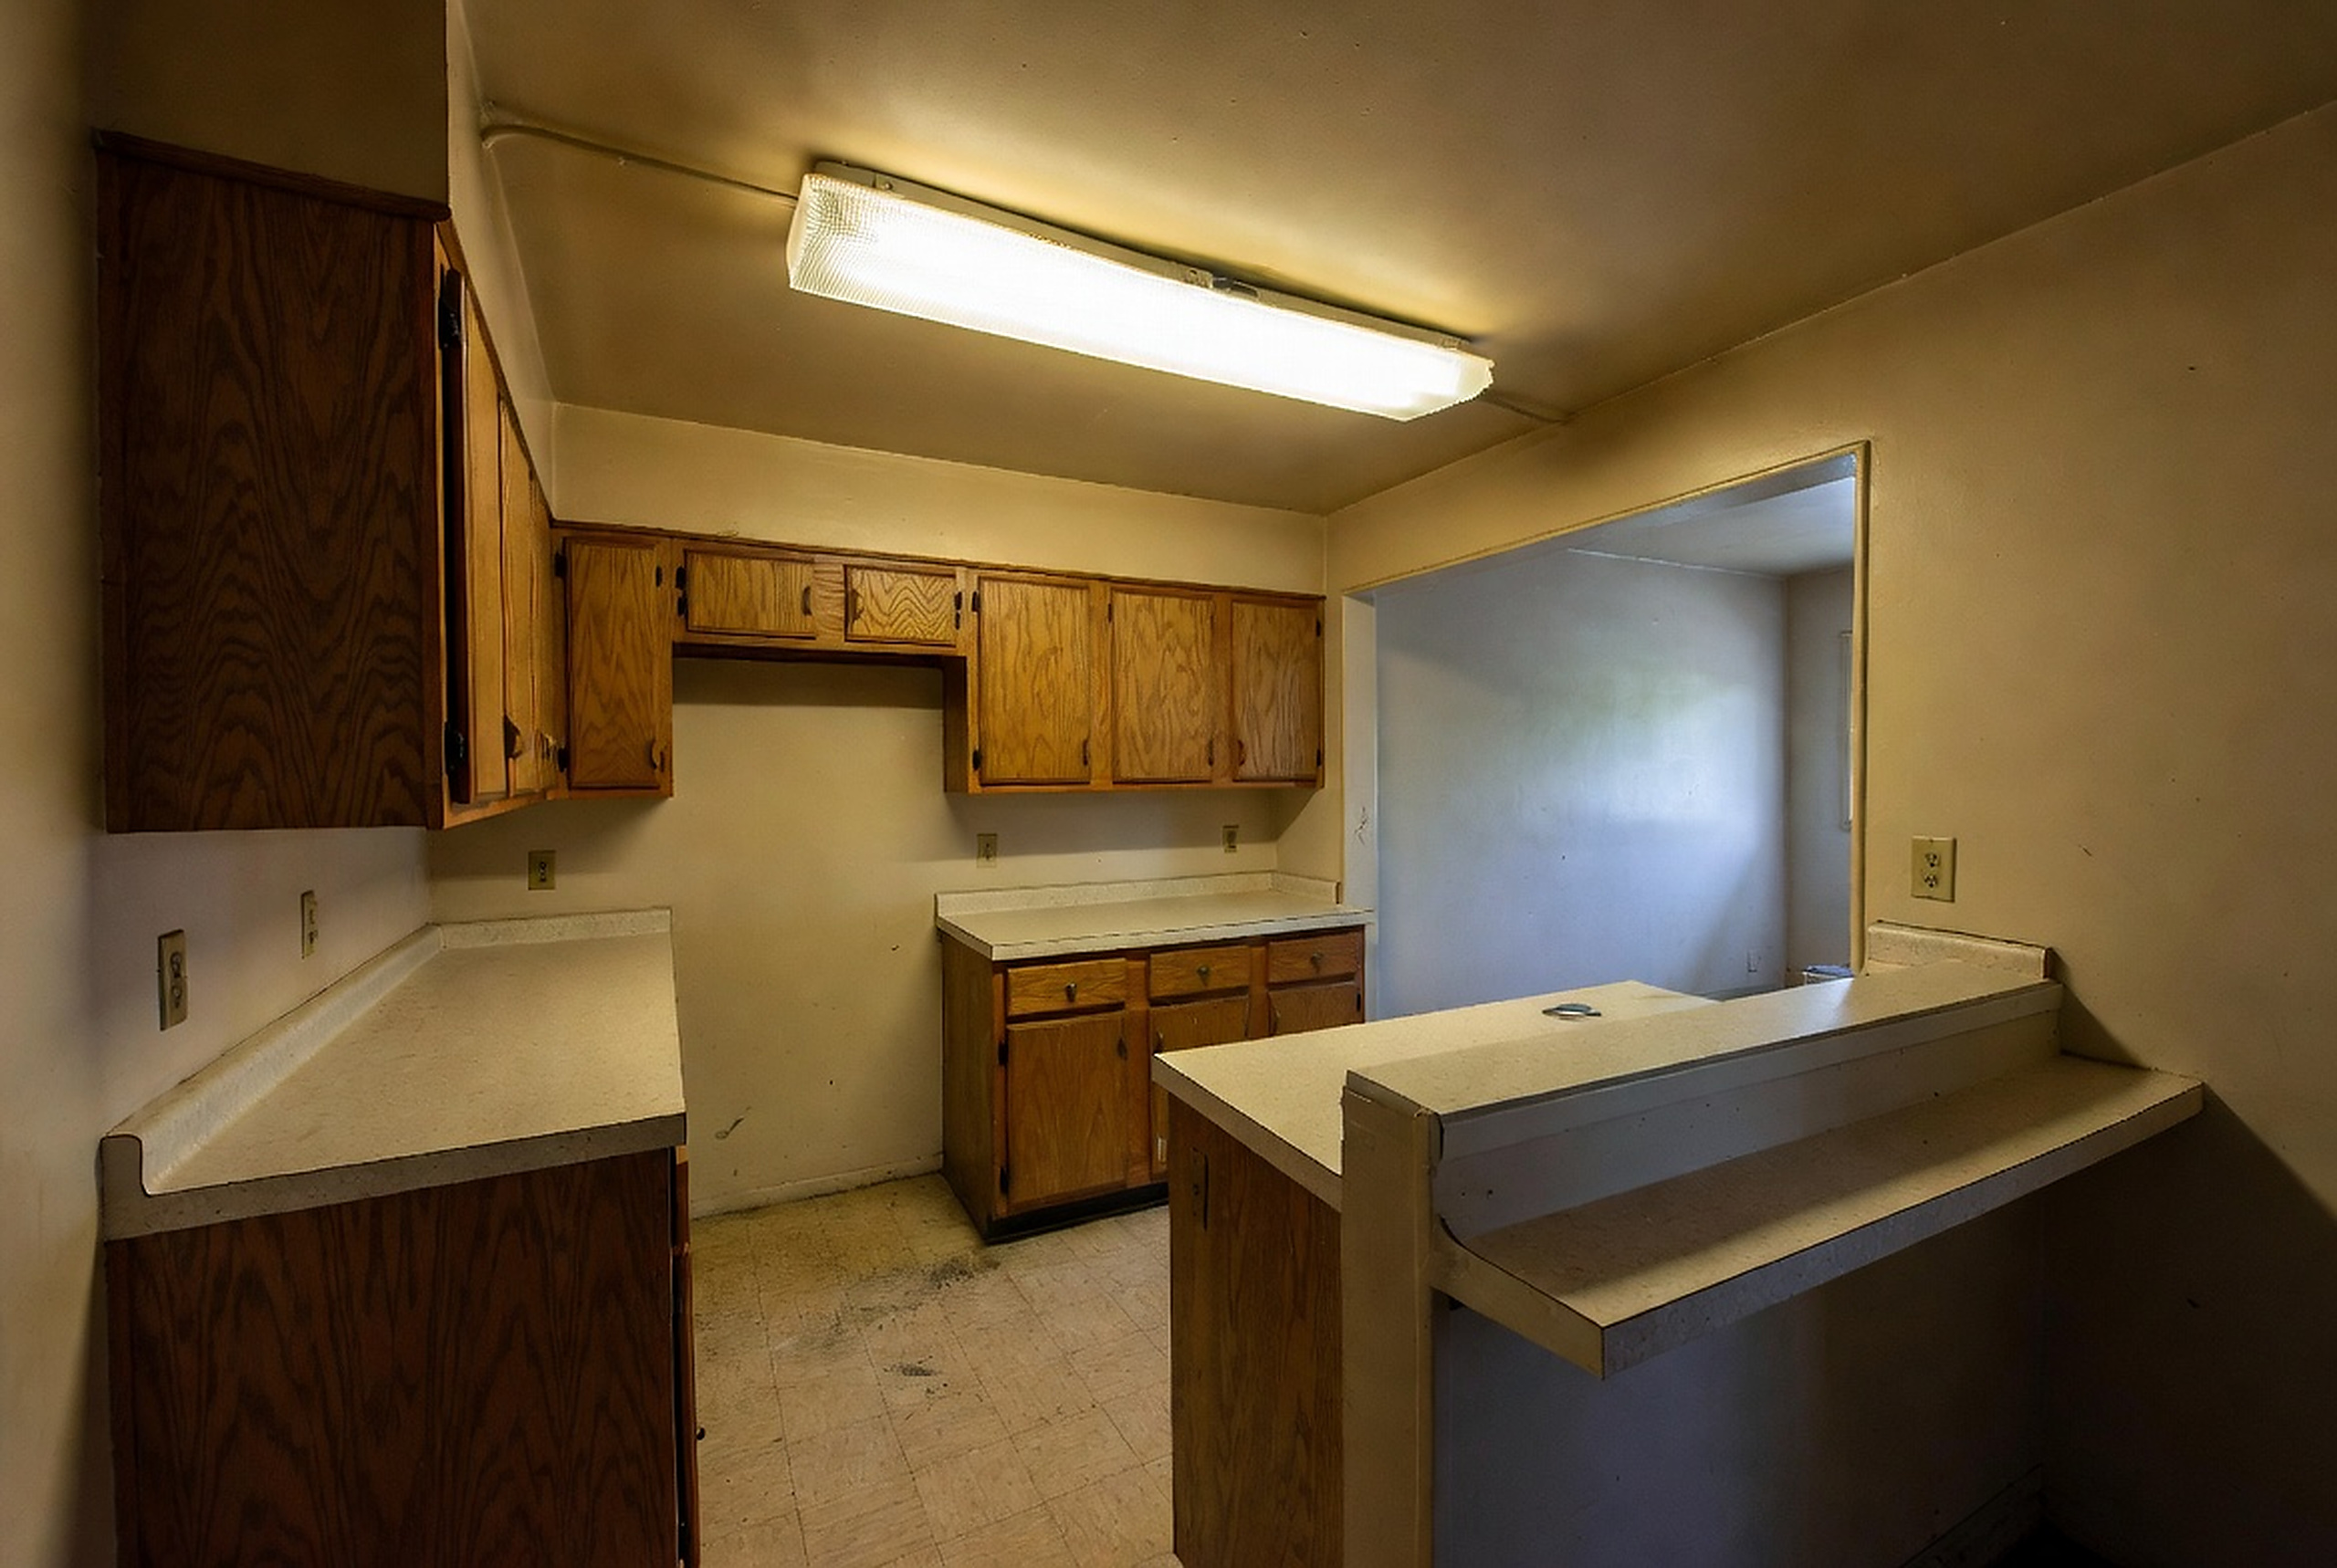
The before, unpolished

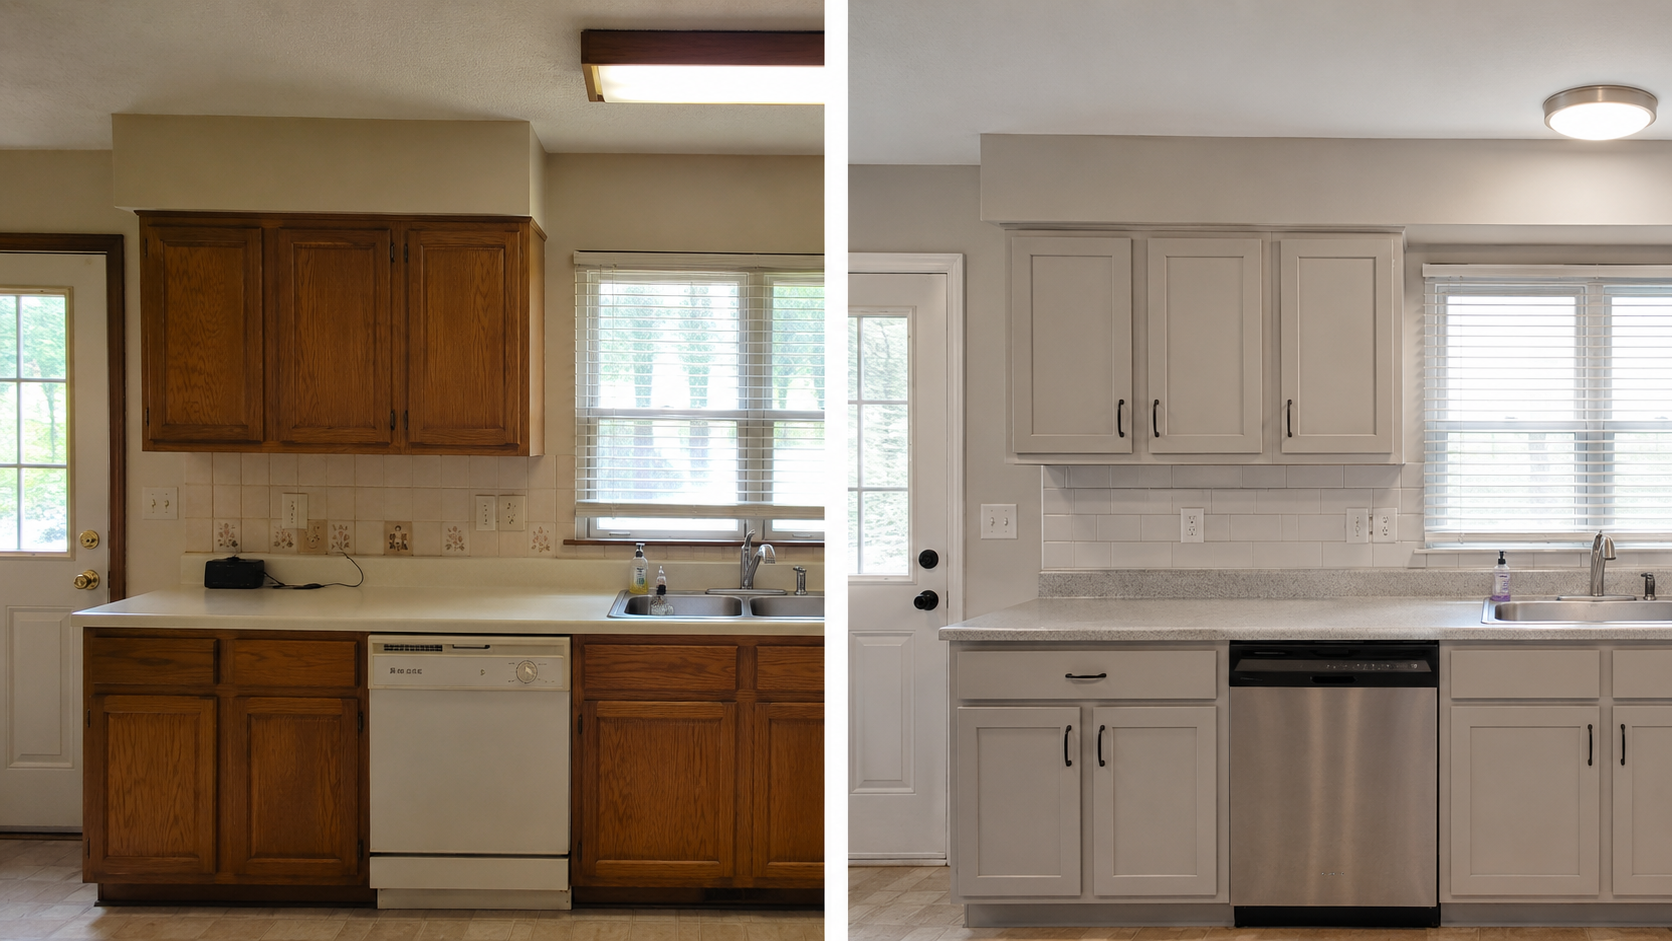
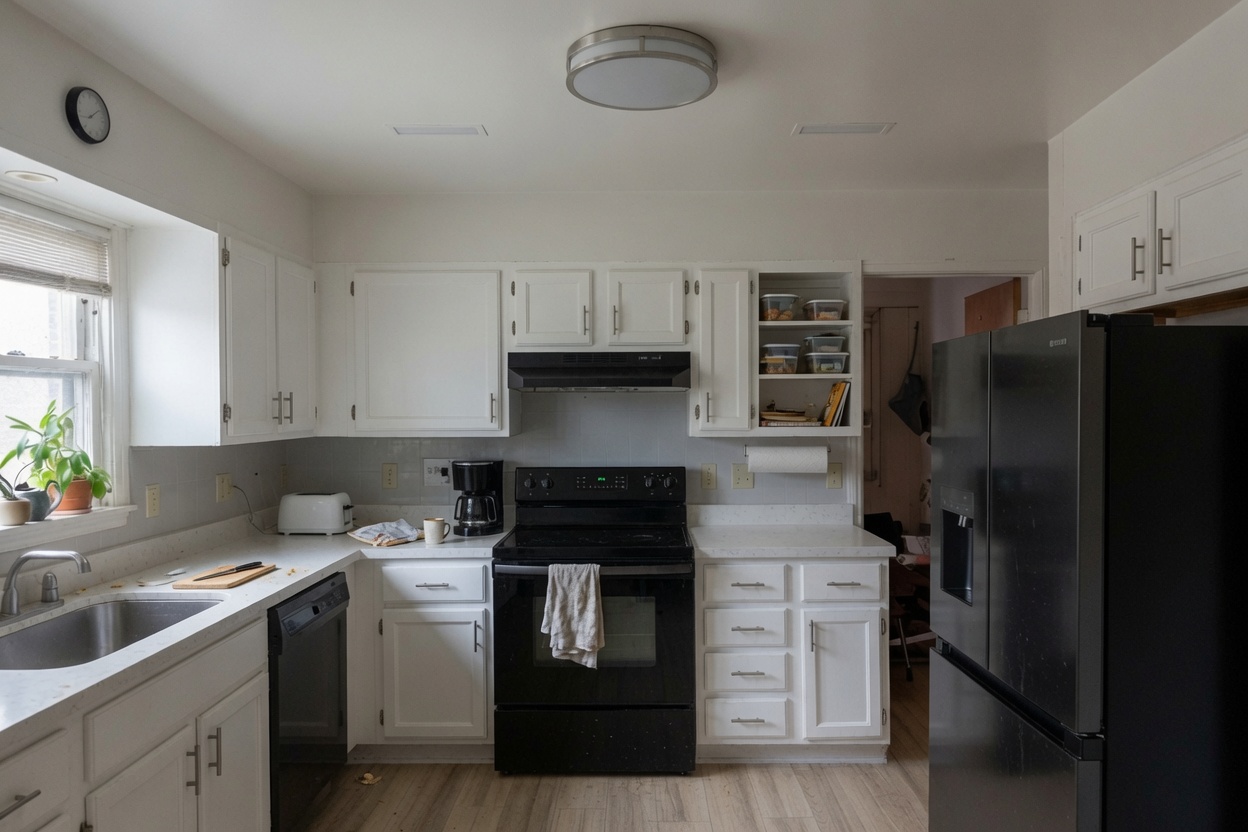
The range wall
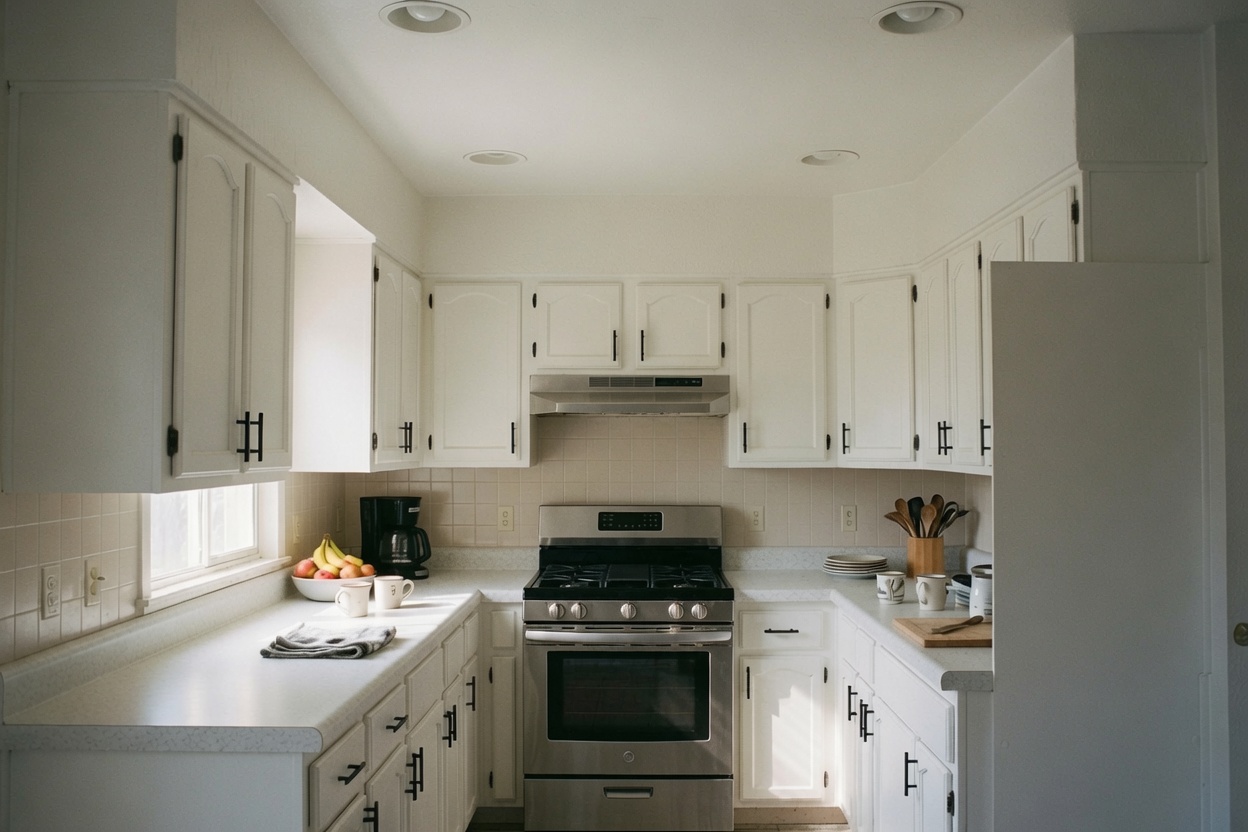
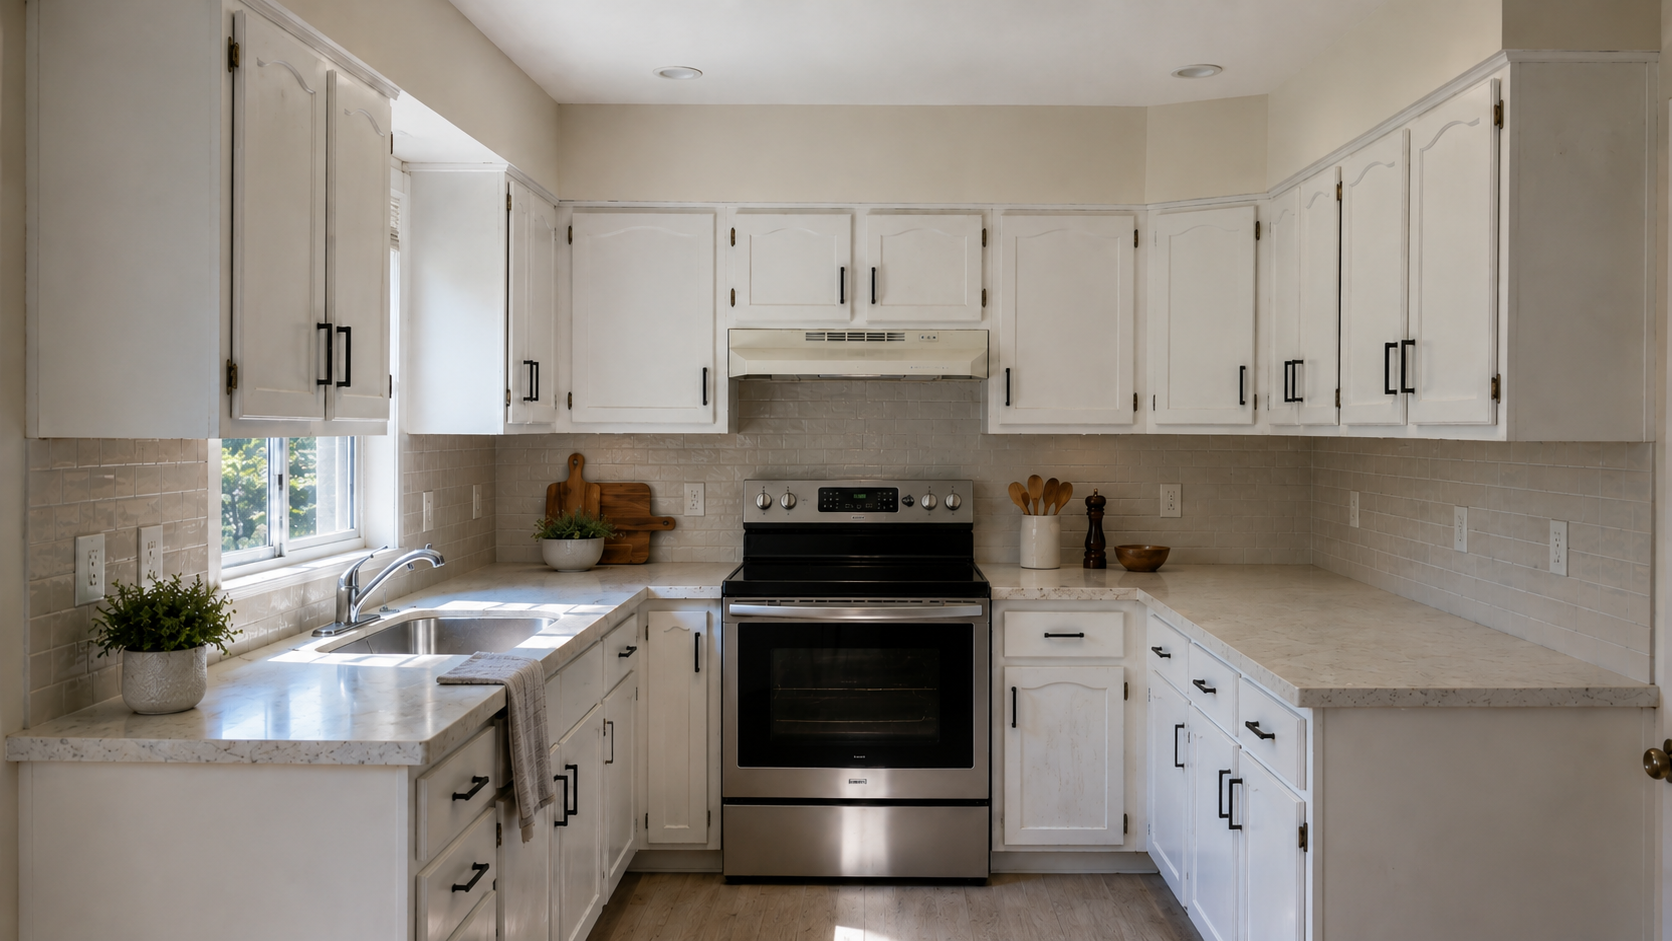
A modest painted after
Same footprint, cleaner room
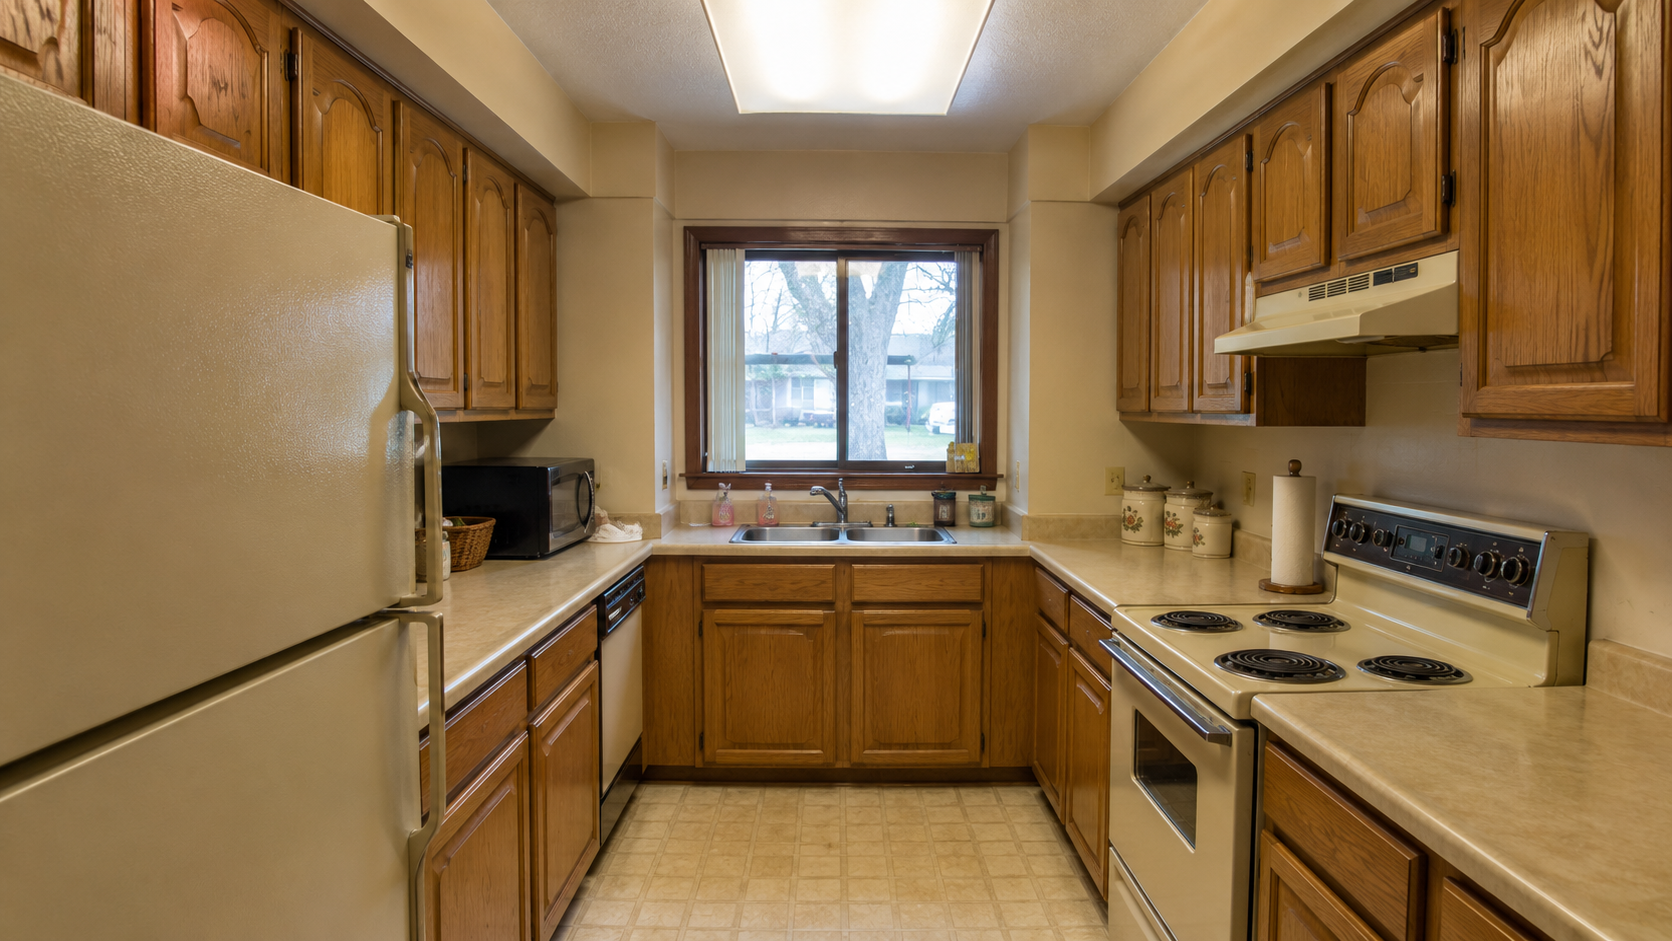
When the layout is the pressure
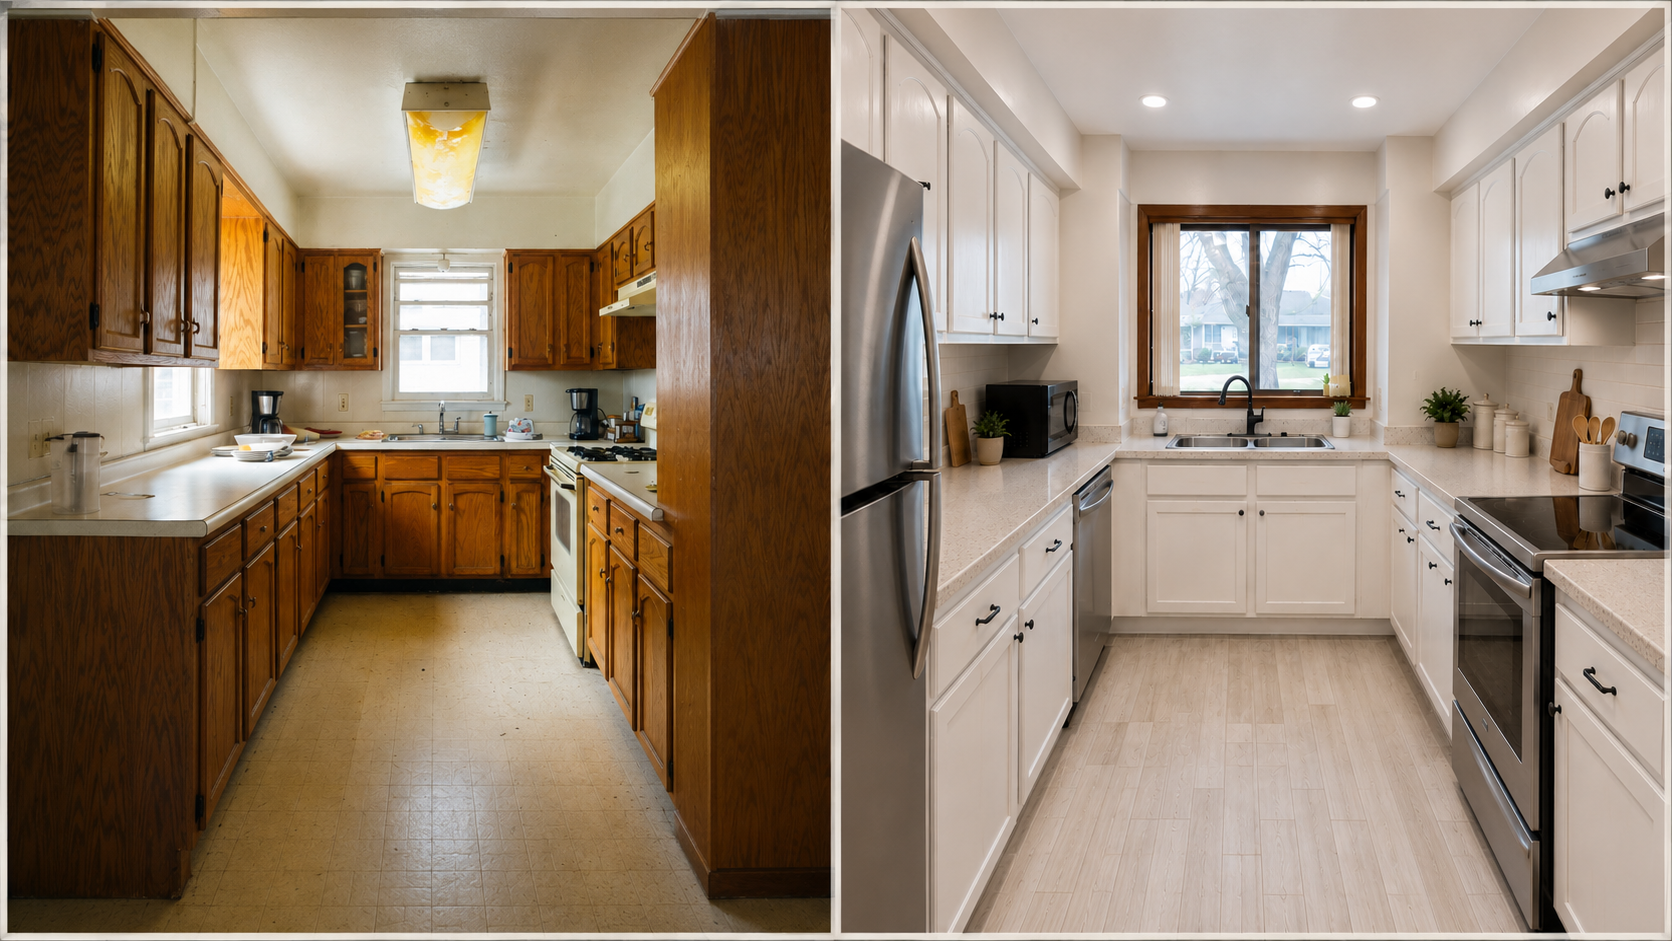
Galley before
Galley after
Cabinet finish and hardware
Cabinet condition, up close
FAQ
What makes a 1980s kitchen before-and-after look better?
Usually several pieces changing together: lighting, ceiling, cabinets, hardware, counters, backsplash, flooring, appliances, and clutter. Cabinet paint alone rarely explains the whole difference.
Can I update a 1980s kitchen without changing the layout?
Yes, when the existing layout works. Keeping the sink, range, refrigerator, and cabinet positions saves money while still allowing real visual improvement through lighting, finishes, hardware, and flooring.
Should I paint 1980s oak kitchen cabinets?
Only if the boxes are solid, the doors are worth saving, and the prep can be done properly. If the boxes are damaged, the sink base is swollen, or the layout is poor, painting can waste money.
Can 1980s oak cabinets look good after an update?
Yes. Oak works when the surrounding finishes are calmer — better lighting, quieter counters, a simpler backsplash, improved hardware, and flooring that does not add more yellow.
Should I remove the fluorescent light box?
Often yes, but plan for more than a fixture swap. Removing the box can require wiring, drywall repair, ceiling texture work, paint, and a new lighting layout, and you will not know the ceiling's real condition until the box is down.
Should I remove a 1980s kitchen soffit?
Only after checking what is inside. A soffit may hide ductwork, wiring, plumbing, or framing. Sometimes removal is worth it; sometimes making the soffit quieter is the better move.
Is opening a 1980s kitchen wall worth it?
It can be, when the kitchen feels cut off and the wall opens safely. Check structure, electrical, plumbing, ductwork, ceiling repair, floor patches, and lost storage before committing.
What is the best budget update for a 1980s kitchen?
Start with lighting, hardware, wall color, backsplash, faucet, and floor condition, provided the cabinets are sound. Do not spend money covering water damage, soft flooring, or failing boxes.
What should I compare before copying an after photo?
Cabinet condition, ceiling height, window light, soffit condition, appliance layout, plumbing location, floor transitions, and total scope. A finish that works in one kitchen may not work in another.
Read This Next
- 1980s Kitchen Remodel
- 1980s Kitchen Cabinets
- 1980s House Renovation
- 1980s House Interior
- 1980s Bathroom Remodel
- 1980s House Exterior Update
- 1980s Split-Level Remodel