When the beige tile and the almond toilet are the things you notice, the remodel starts at a tile showroom. That order can lock the project into the wrong scope. The finishes are the visible part. What sits behind them is not: the gypsum board behind the bottom course of tub tile, the subfloor at the toilet flange, the fan duct that may end in the attic, and a vanity base that has been swelling quietly for a decade.
Before choosing anything, prove the room is dry and find out what the tub surround is built on. Both change the scope of the job.
For the whole-house sequence, see renovating a 1980s house without making it worse. If the bathroom is part of a wider interior update, connect it back to 1980s house interior.
Prove the Room Is Dry Before Anything Else
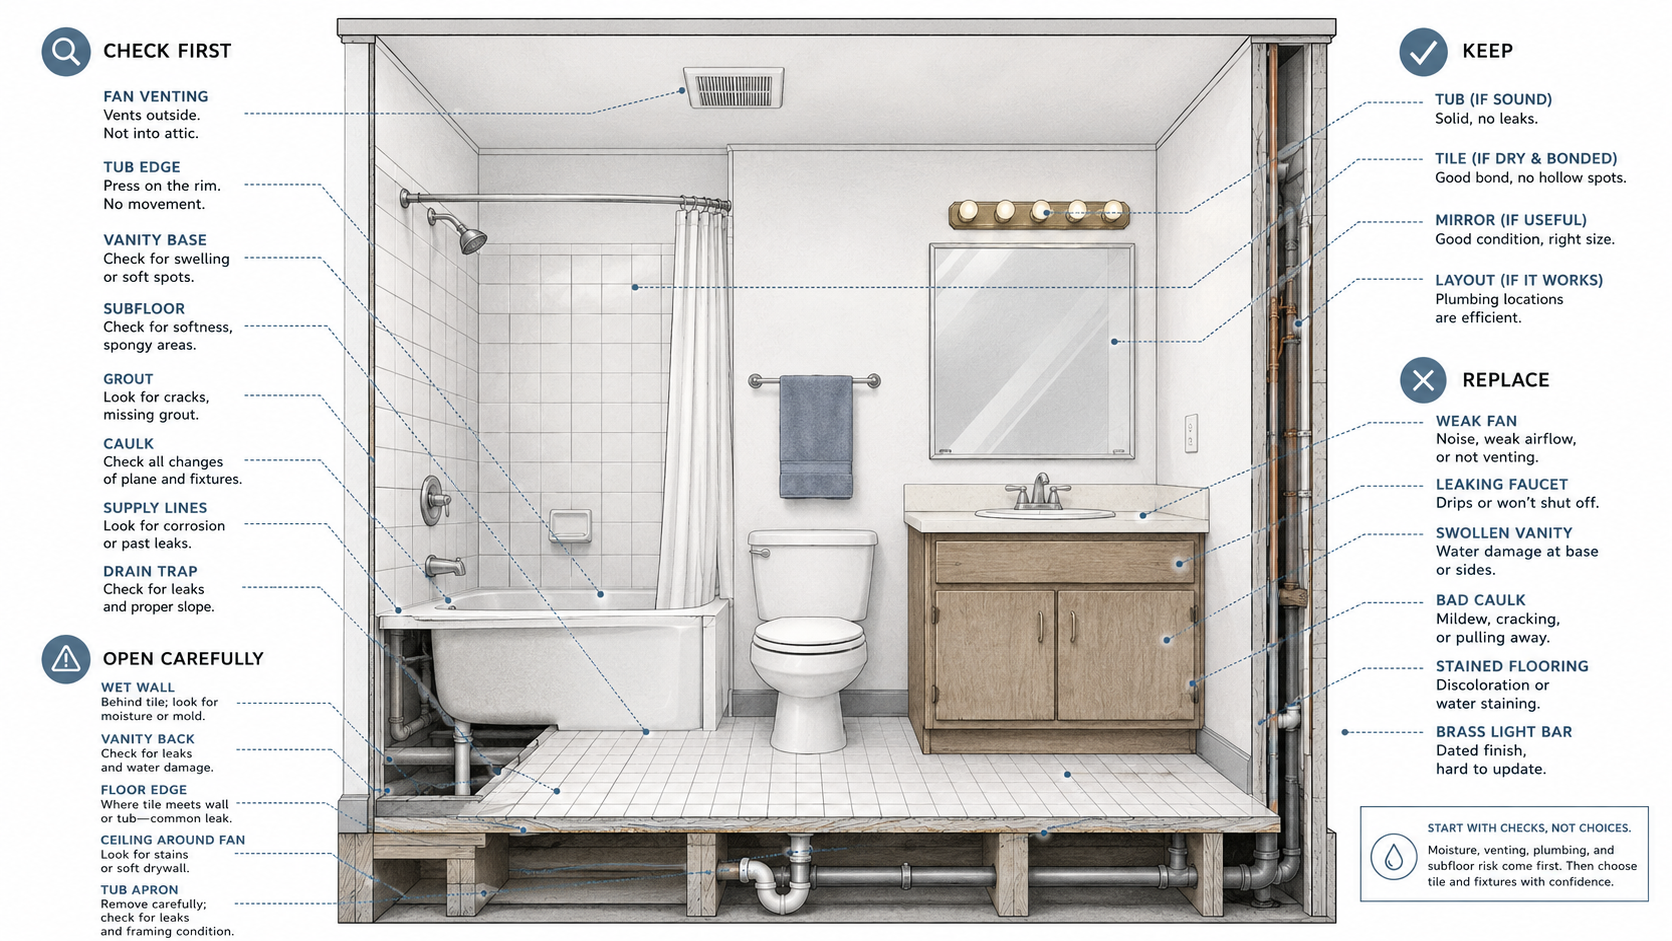
Bathrooms conceal damage better than kitchens do. A kitchen leak turns up under the sink or on the floor. A bathroom leak can sit behind tile, under vinyl, inside a vanity base, under a toilet flange, behind a tub apron, or in the ceiling of the room below, and none of those show themselves from a doorway.
Four checks cover most of it. Look at the bottom 6 inches of the vanity cabinet for swelling, stains, and crumbling particleboard. Check the caulk line where the tub meets tile and where tile meets the floor. Press near the toilet base and the tub edge for softness underfoot. Run the fan and go find where it exhausts.
A musty smell after a shower, split caulk, or a floor that flexes near the tub means the room is not ready for finish decisions. That does not force a gut renovation. It means the hidden work gets identified before the visible work gets chosen.
What the Tile Is Stuck To Changes the Scope
This is the part that separates a 1980s bathroom from a newer one, and most remodeling guides skip it.
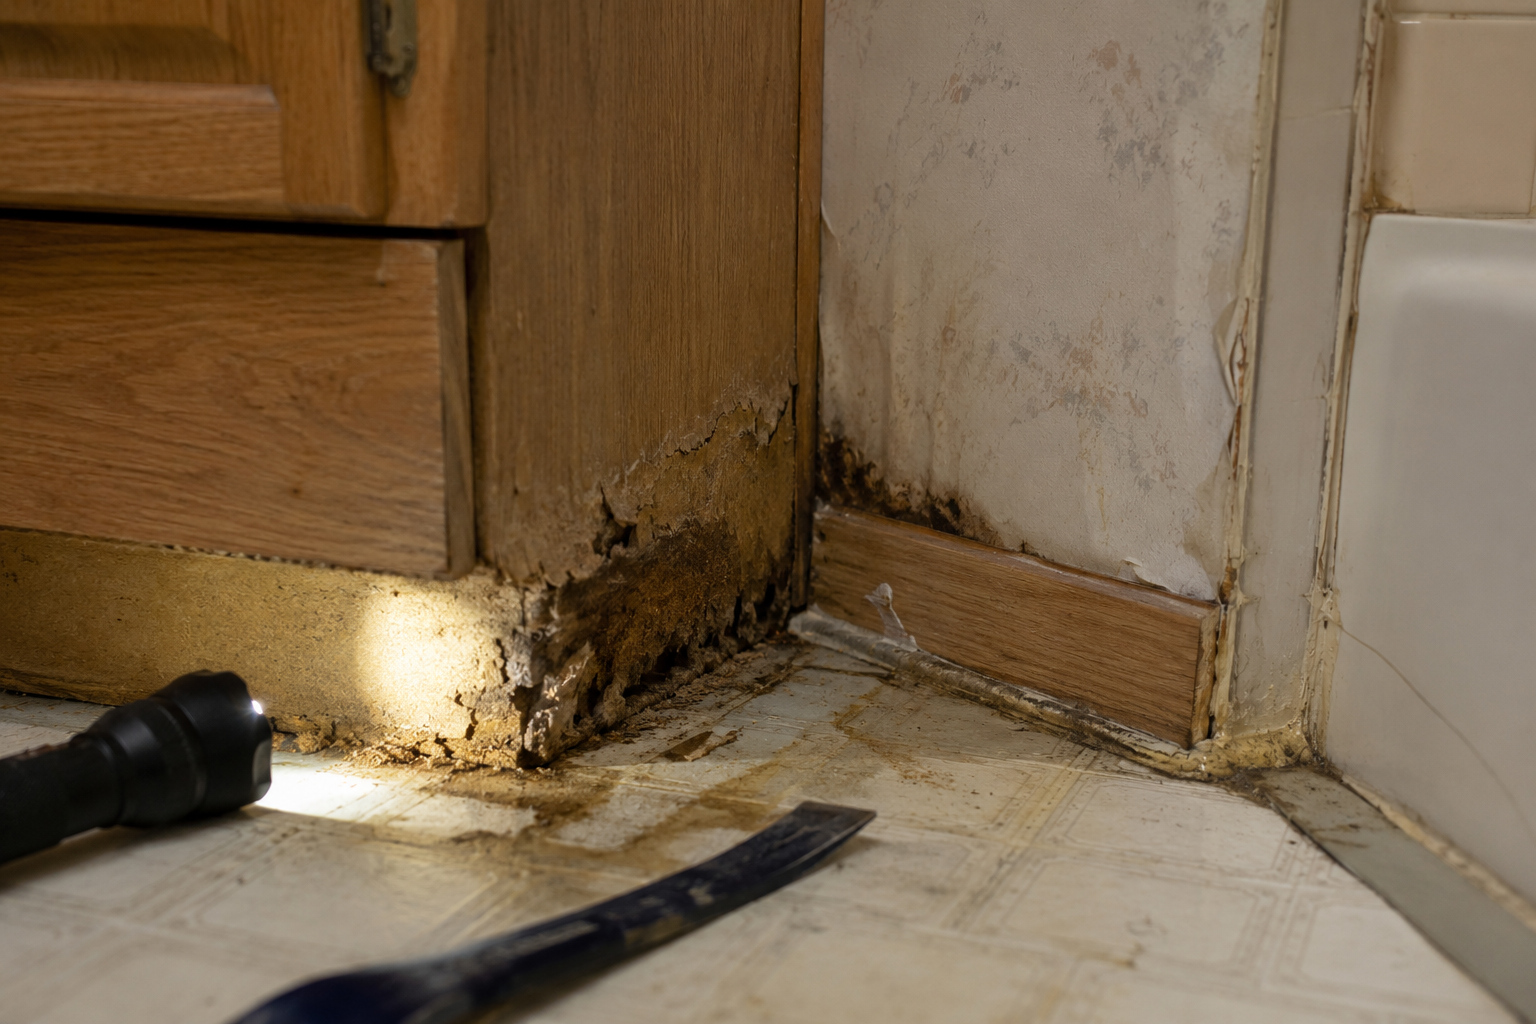
Through the 1980s, tile was often installed directly over paper-faced water-resistant gypsum board, the green stuff, around tubs. Some houses of that era have a mortar bed behind the tile, while others have ordinary drywall or another backer.
Greenboard is water resistant, not waterproof. If water reaches the paper facing, the gypsum core can soften and the tile can lose its grip from behind. The bottom course above a tub is especially vulnerable because it takes repeated wetting and sits beside the tub joint.
Current IRC provisions require an approved tile backer listed in Table R702.4.2, such as cement board, fiber-cement board, glass-mat gypsum panel, fiber-reinforced gypsum panel, or a listed cementitious-coated foam backer board. Paper-faced water-resistant gypsum board is not listed for direct tile application in tub and shower compartments. The locally adopted code edition and amendments still control the work.
So a loose bottom course may be more than a tile problem. Once the tile comes off and the backer is soft, the failed material has to be removed, a compliant assembly installed, and the wet area completed according to the backer and waterproofing manufacturers' instructions. That is a different scope from reglazing a sound tub or replacing a few intact finishes.
Two quick checks can flag a concern, but they cannot identify the hidden assembly. Tap across the surround and listen for a hollow change at the bottom courses. Press at the tub joint and watch for movement. Hollow areas or movement justify inspecting an accessible edge or carrying an allowance for a small exploratory opening before the final scope is set.
What Dates the Room, and What Only Looks Dated
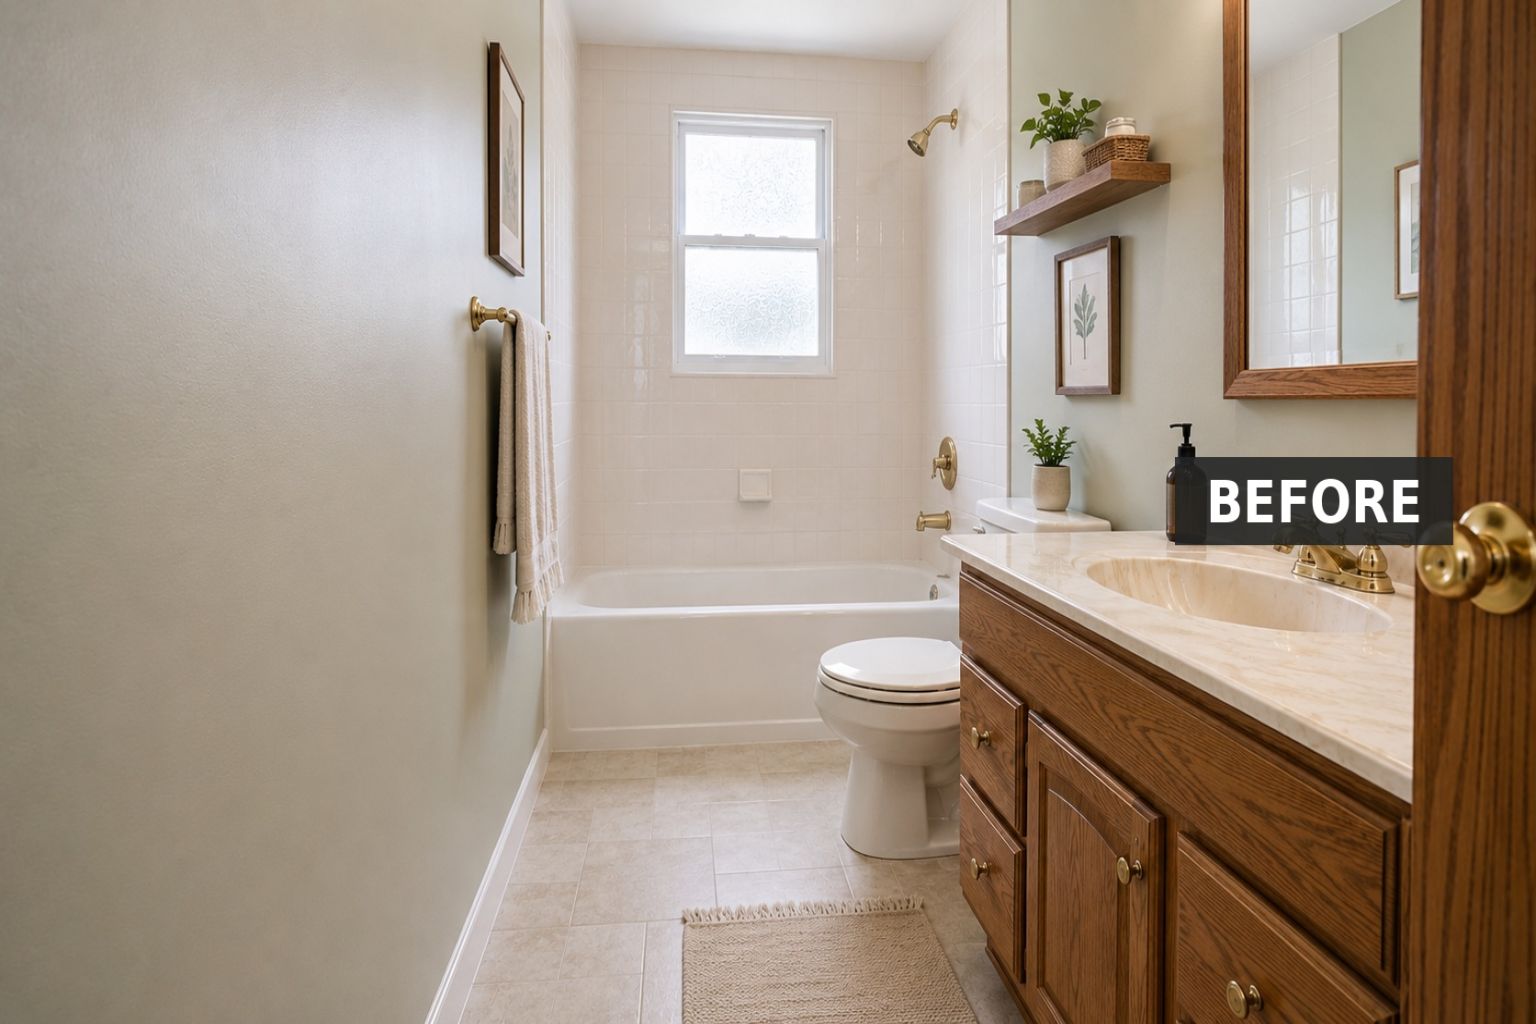
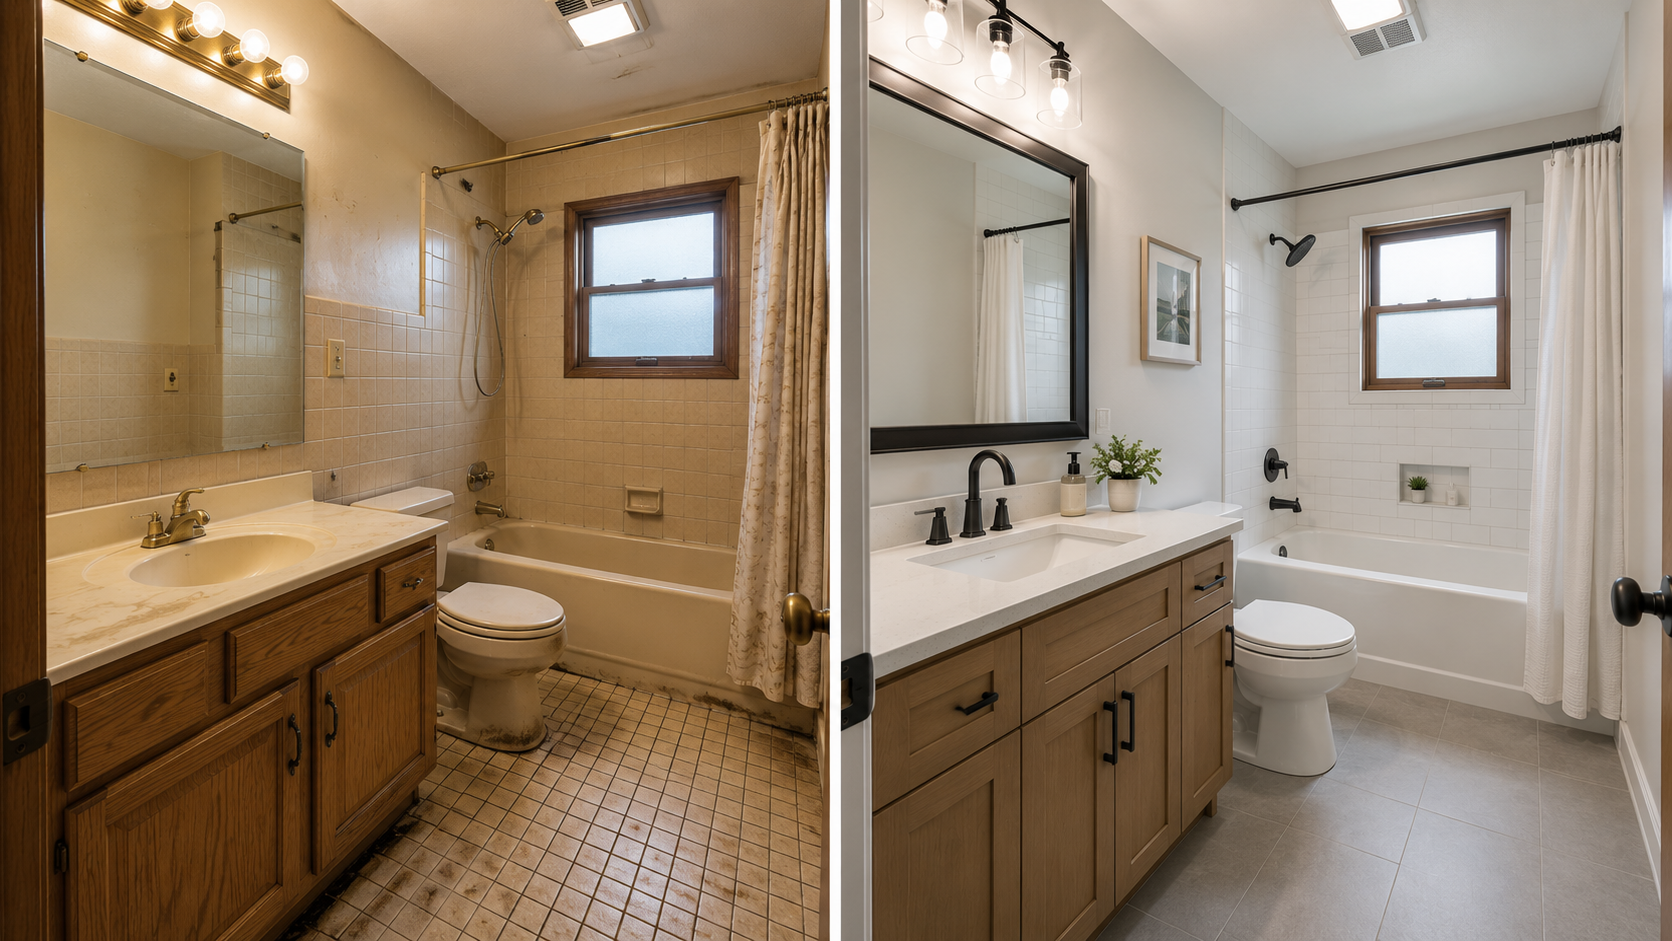
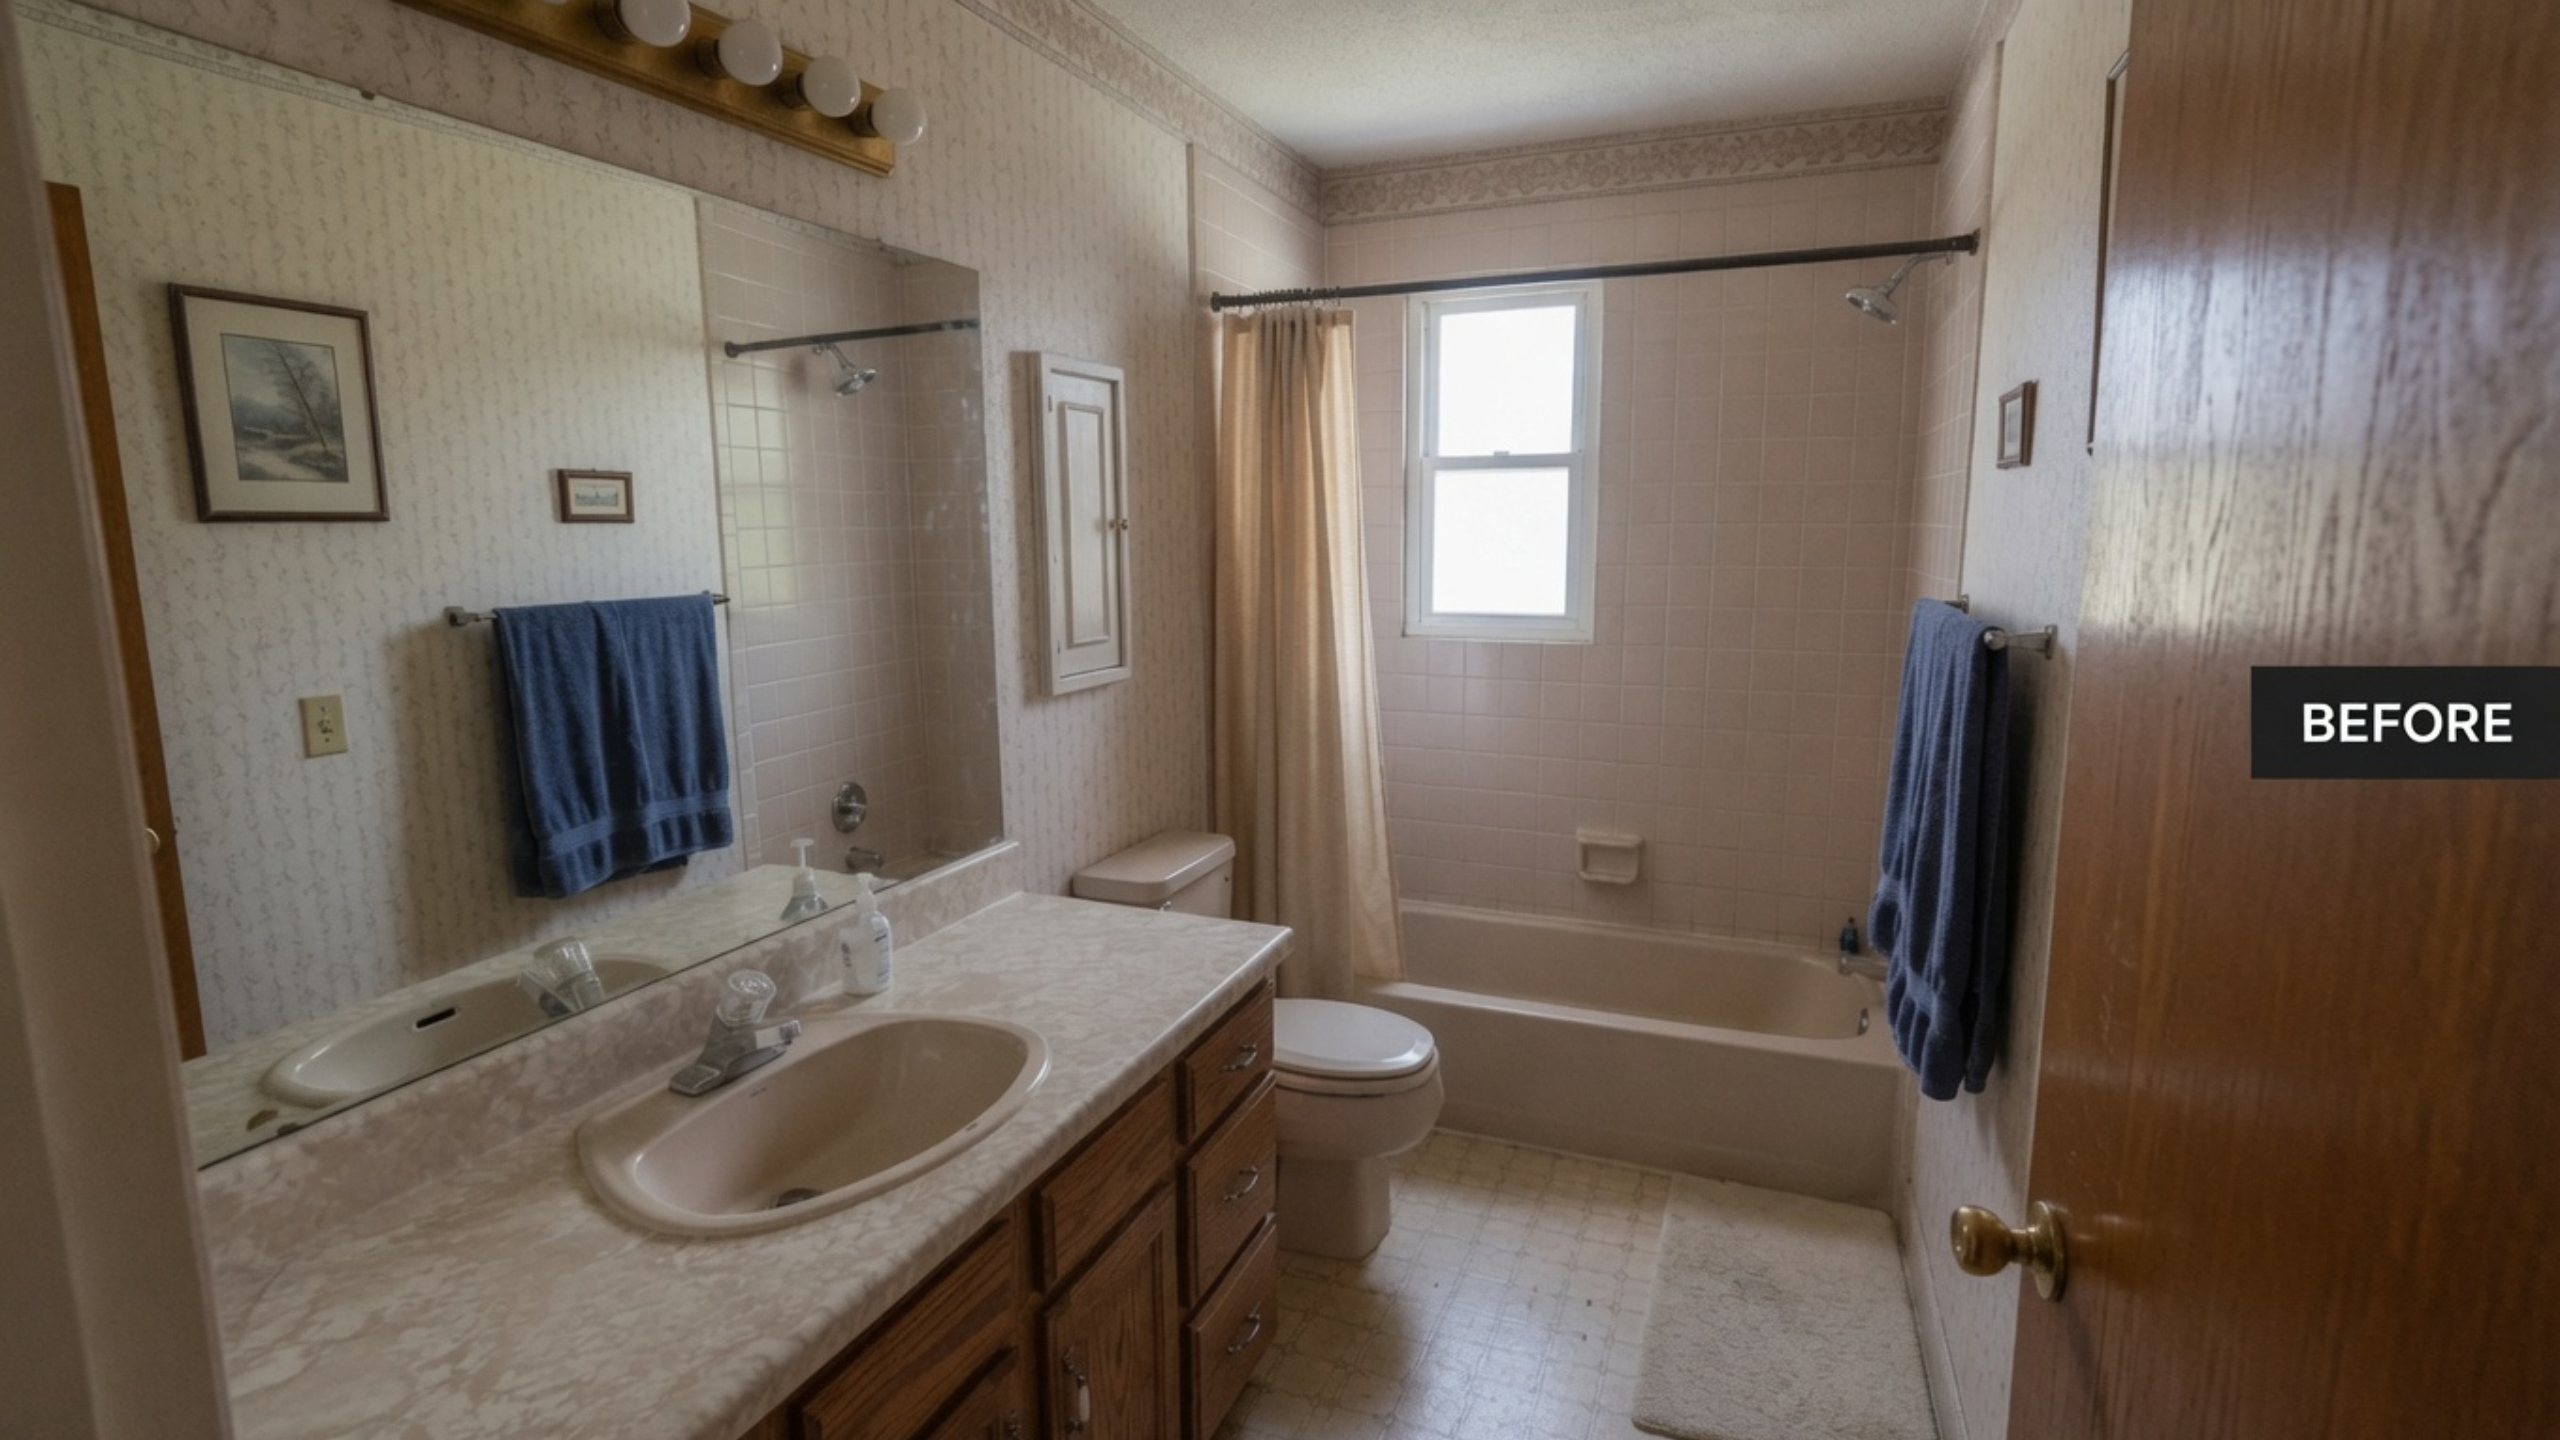
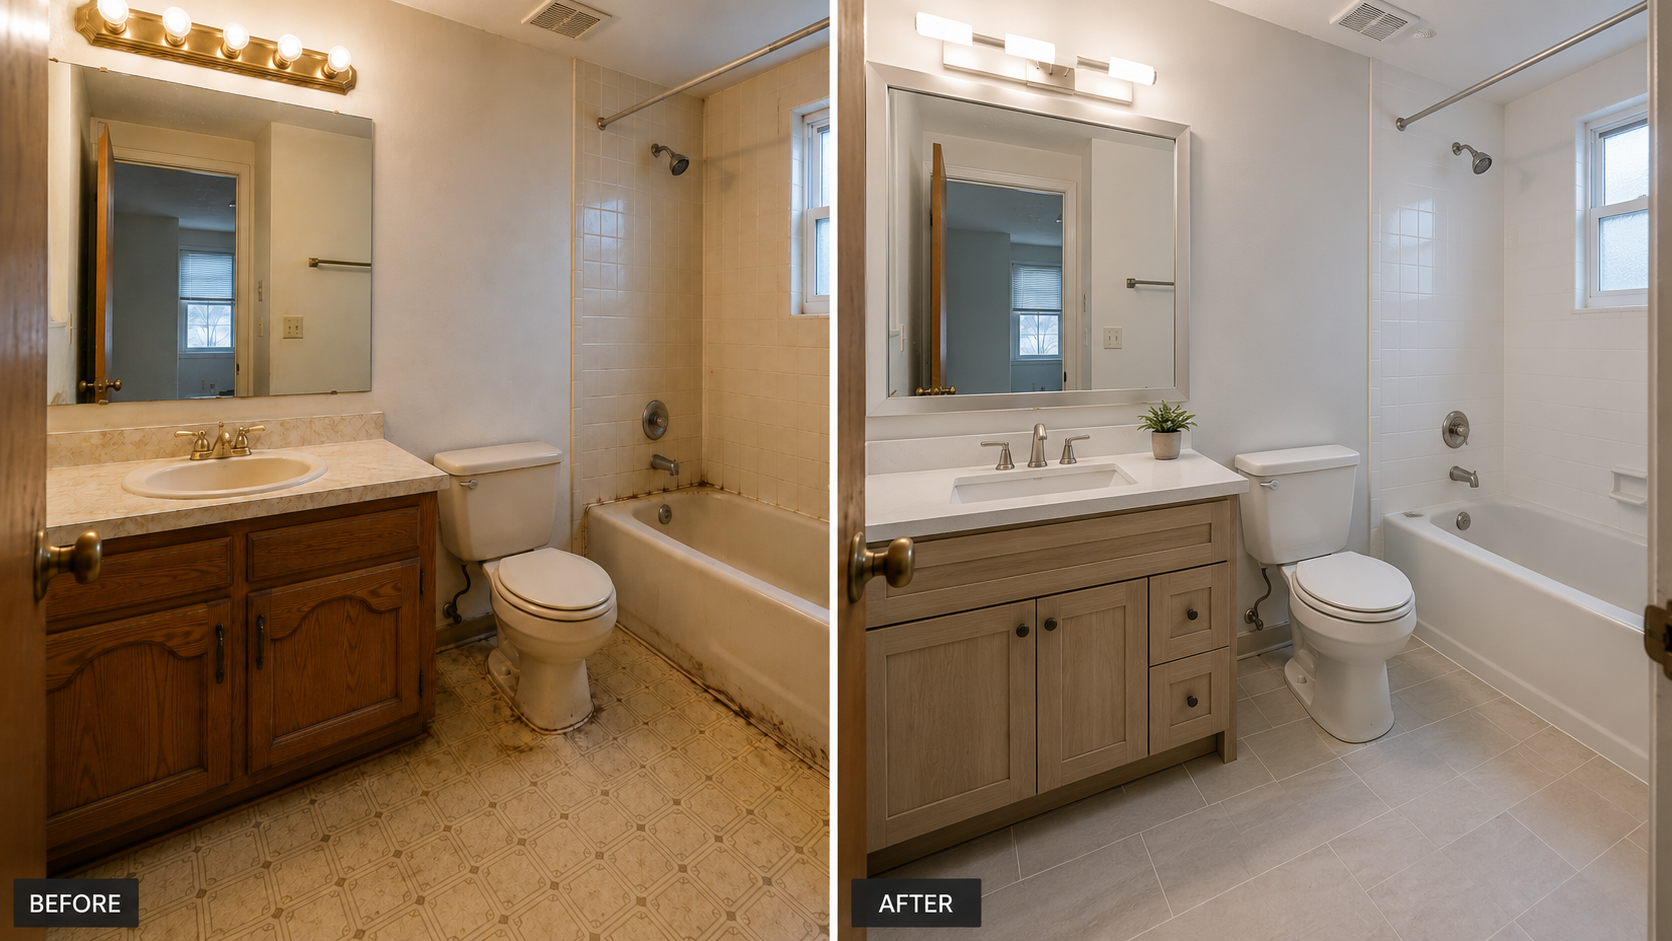
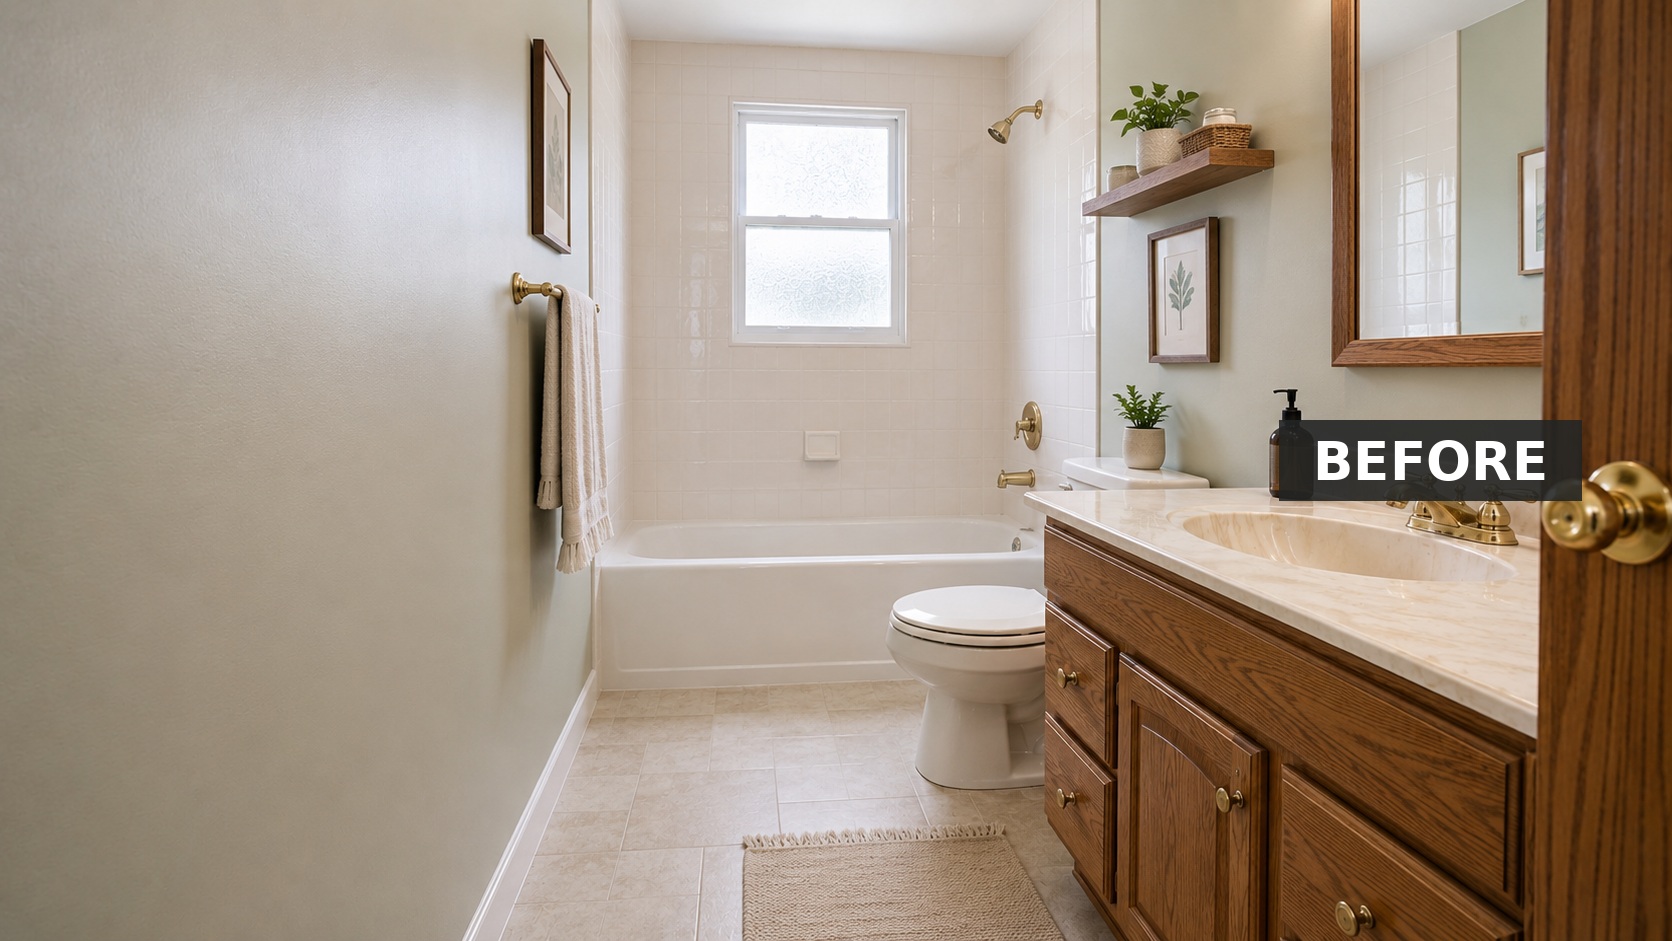
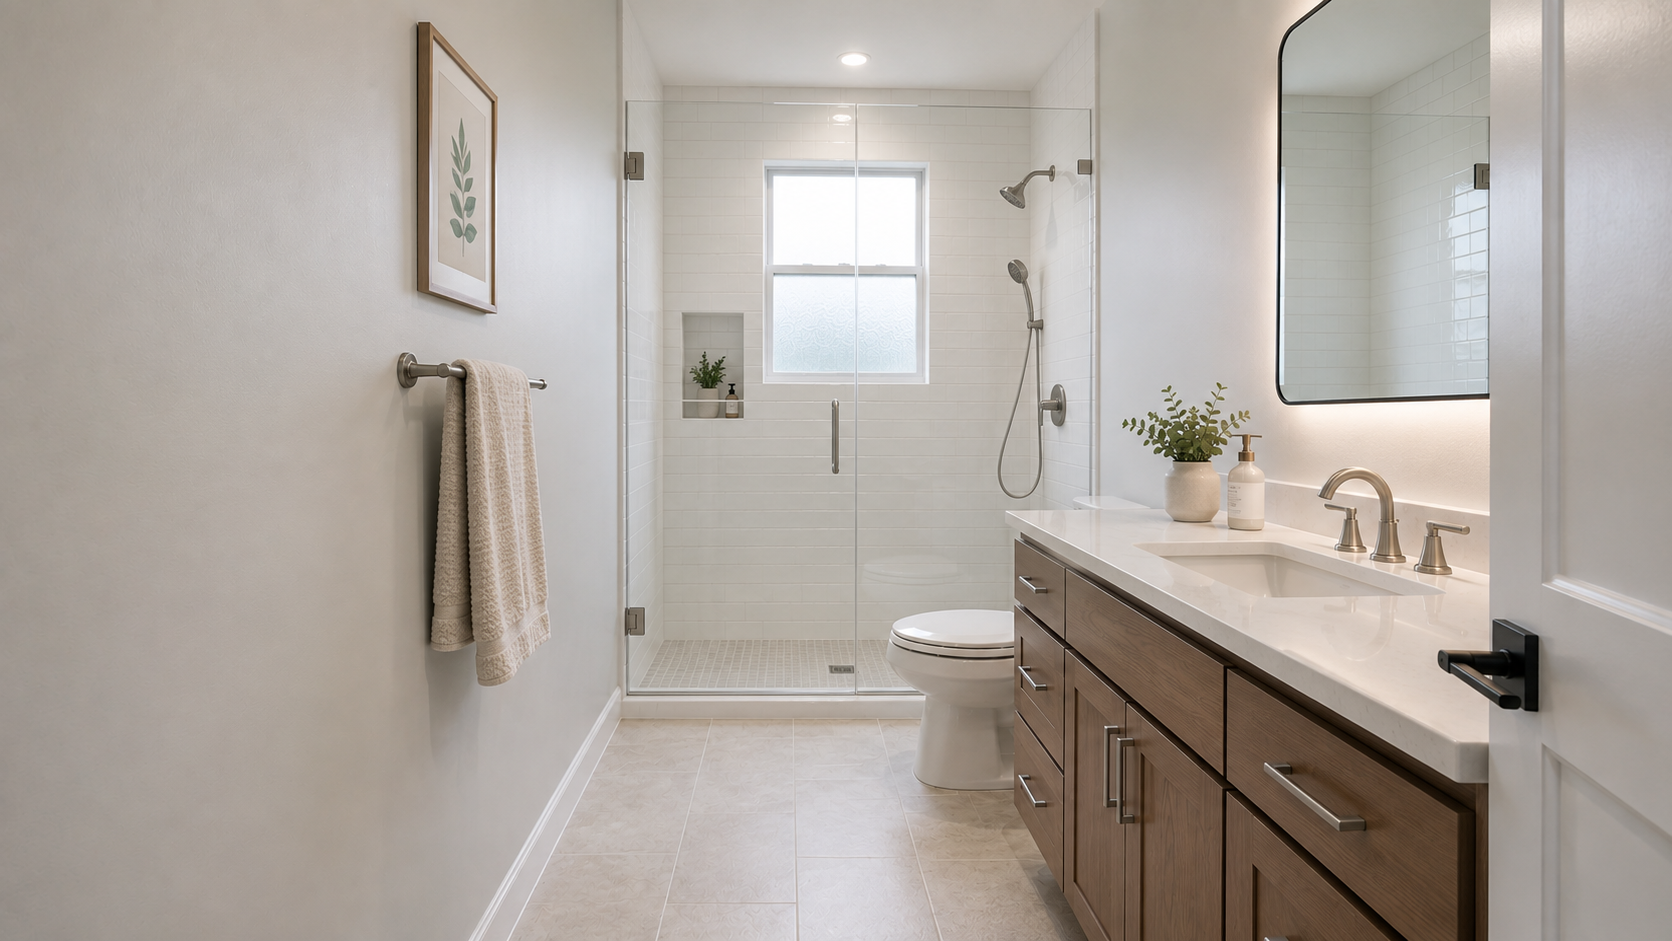
The finish package usually gives the age away: beige tile, almond fixtures, polished brass faucets, brass-framed shower doors, a wide vanity light bar, one large mirror glued to the wall, oak vanity doors, a cultured marble top, and vinyl flooring. Any one of them can be lived with. Together they read as a decade.
The useful distinction is between things that only look old and things that are also failing.
| Feature | Why it dates the room | What to check before replacing it |
|---|---|---|
| Large wall mirror | It flattens the room and reflects old lighting | Whether it is mastic-glued, and the drywall repair that follows |
| Oak vanity | It repeats the wood tone used through the rest of the house | Water damage at the base and the condition of the plumbing wall |
| Brass light bar | It ages the mirror and vanity around it | Electrical box location and the wall patching a new fixture needs |
| Tub surround tile | The color reads as period, but the tile may still be sound | Hollow spots, loose bottom course, and what the backer is made of |
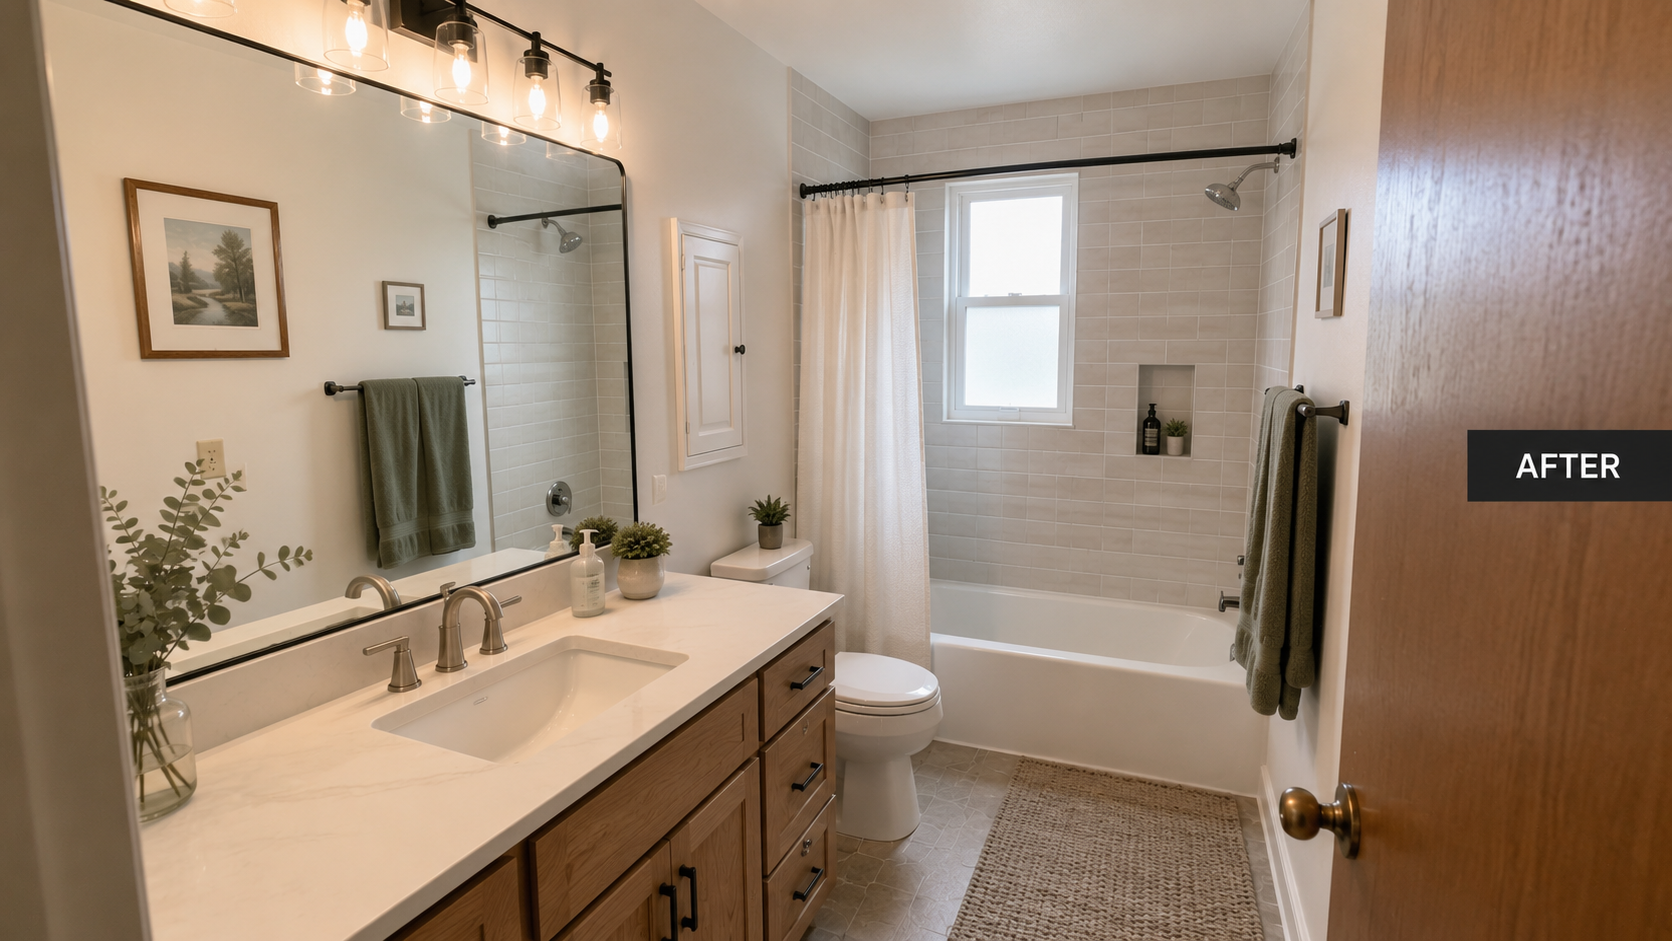
How to Make the Room Look Better Without Gutting It
If the bathroom is dry and the existing layout works, update the finishes as one visual package. A quieter vanity color will not carry the room if the brass light bar, wall-width mirror, stained caulk, yellow floor, and cluttered hardware all stay. The strongest cosmetic remodels correct several repeated details without pretending every fixture has to be replaced.
A sound oak vanity can be cleaned and kept, painted, or fitted with simpler hardware. Keep a beige or almond tub if it is solid, then use a wall color, floor, grout, and metal finish that treat it as a warm neutral rather than trying to match it with more yellow-beige surfaces. Replace the large mirror and vanity light together so the new fixture is centered and the wall repair is handled once.
Use one restrained metal finish across the faucet, light, cabinet pulls, towel bar, and shower hardware. Choose flooring for water resistance, cleanability, finished height at the toilet flange, and the transition into the hall—not just the sample color. Fresh caulk and grout should be the last visible work after the wet-area assembly has proved sound.
The Vanity Is the Easiest Place to Read the Room
Open the doors and look low. Check the cabinet floor, the area around the drain trap, the supply valves, the wall behind the pipes, the toe kick, and the side panel nearest the tub.
Particleboard fails in a way you can read. Water breaks the resin bond between the chips, the panel swells, and it stays weak after it dries. A stained base often points to an old faucet leak. A soft back panel points to the drain. Dark flooring at the toe kick points to splash, mopping, or an overflow that was cleaned up and forgotten.
If the vanity is coming out, the list that follows it is longer than the cabinet: wall repair, floor repair at the old footprint, shutoff valves, drain alignment, mirror height, light position, and baseboard patching. A stock replacement rarely lands cleanly in a 1980s footprint, partly because vanities of that period often sit around 30 to 32 inches high and much of what is sold now is 34 to 36 inches.
Caulk Lines Are Where Water Got In First
In a bathroom of this age, the caulk at the tub-to-tile joint, the shower door track, the vanity backsplash, and the floor edge is usually the first thing that failed.
Look for gaps at the tub-to-tile joint, black staining in the corners, soft drywall beside the tub, loose shower-door tracks, and cracked grout where the wall meets the tub. Any of those means water has had a route for some time.
Recaulking a dry wall is a Saturday. Rebuilding the wall behind failed caulk is the job described further up, so the caulk inspection and the tile-backer question are one question asked from two directions.
The Fan Has a Number Attached to It
Bathroom fans from this period are often undersized, clogged, noisy, or ducted into an attic. The requirement is specific enough to check against.
IRC Table M1505.4.4 sets the minimum local exhaust rate for a bathroom at 50 cfm intermittent or 20 cfm continuous. Most residential fans are intermittent, on a switch, so 50 cfm is the usual minimum for that setup. The exhaust also has to discharge outdoors. IRC M1501.1 and M1505.2 rule out discharge into attics, crawl spaces, and other areas inside the building.
Two things follow that are easy to miss. A fan rated at 50 cfm on the box does not necessarily move 50 cfm at the grille, because long duct runs, flex duct, and sharp elbows all reduce airflow. Altered or newly installed fan and duct work generally must comply with the code adopted locally, but permit requirements and the treatment of untouched existing work vary by jurisdiction.
Run the fan before you plan anything. Listen to it, hold a tissue to the grille, and go find where the duct ends. If the ceiling is being opened for lighting or repair, the fan and its duct can be handled in the same visit. Finishing the ceiling and then deciding the duct needs rerouting is how one job becomes two.
Flooring, the Subfloor, and the Toilet Flange
Bathroom flooring is tied to the toilet, vanity, tub edge, doorway, and sometimes the hall floor, which is why a floor change spreads.
Before scraping, sanding, or tearing out older resilient flooring, backing, adhesive, or patching compound, determine whether testing is appropriate. Asbestos cannot be confirmed by appearance. Suspect material should remain undisturbed until it has been assessed properly.
When old vinyl or underlayment comes up, check the subfloor before anything new goes down. Look around the toilet flange, near the tub, under the vanity, and at the doorway transition. A stain is not necessarily a problem. A subfloor that flexes or flakes is, and covering it is throwing away the new floor.
Floor height is the detail that catches people. The closet flange is meant to sit on top of the finished floor so the wax seal compresses properly against it. Add tile and backer over old vinyl and the flange can end up below the new surface, which leaves the seal bridging a gap and the toilet rocking. Extension rings exist for this, but stacking them is a repair, not a plan. Sort out the finished floor height before the toilet goes back.
The same rise affects the door swing, the threshold, and the transition into the hall. A quarter inch reads as nothing on a drawing and catches a door in practice.
Lighting and the Mirror Are One Decision
A brass light bar over a wall-width mirror throws flat light across the whole room, and a weak ceiling fixture leaves the shower dark. Poor light makes old finishes look worse than they are.
These three move together. A new mirror can expose old adhesive, paint shadows, missing texture, or a box in the wrong place. A new vanity can change the mirror height. A new light can need wall patching. Decide mirror, vanity, and lighting as one set, or you get a fixture sitting off-center over a vanity that shifted three inches.
When the Layout Should Stay
Most layouts in these bathrooms are worth keeping. Moving a toilet, tub, or shower reaches plumbing, framing, subfloor, drain slope, venting, tile, and inspection, and in a small hall bath the gain rarely covers that.
The layout is worth keeping when the toilet has reasonable clearance, the vanity size works, the tub or shower sits sensibly, the door swing does not block use, and the plumbing wall is not being opened anyway.
When It Should Change
Sometimes the plan is the problem. A door that hits the vanity, a toilet jammed against a tub, a shower too small to use, a vanity too wide for the room, or a dead corner that holds storage and gives nothing back.
Change it when the room fails at basic use, and define the scope honestly when you do. A layout change can bring new drain lines, water lines, subfloor patching, framing, electrical work, fan rerouting, new tile areas, and inspections. In a small bathroom, measure before you commit, because a better vanity size often solves more than moving plumbing does.
The Trap: New Finishes Over Old Damage
The fastest way to spend money twice is to cover damage. New tile on a weak floor. A new vanity over valves that will not close. New paint under a fan that cannot clear the room. New flooring around a flange that already moves.
That work looks finished for a season. Then the paint peels above the shower, the vanity base swells again, the floor seam opens, the toilet rocks, the tub corner darkens, and the ceiling below stains. Each of those repairs costs more the second time, because now it includes removing the work that was just paid for.
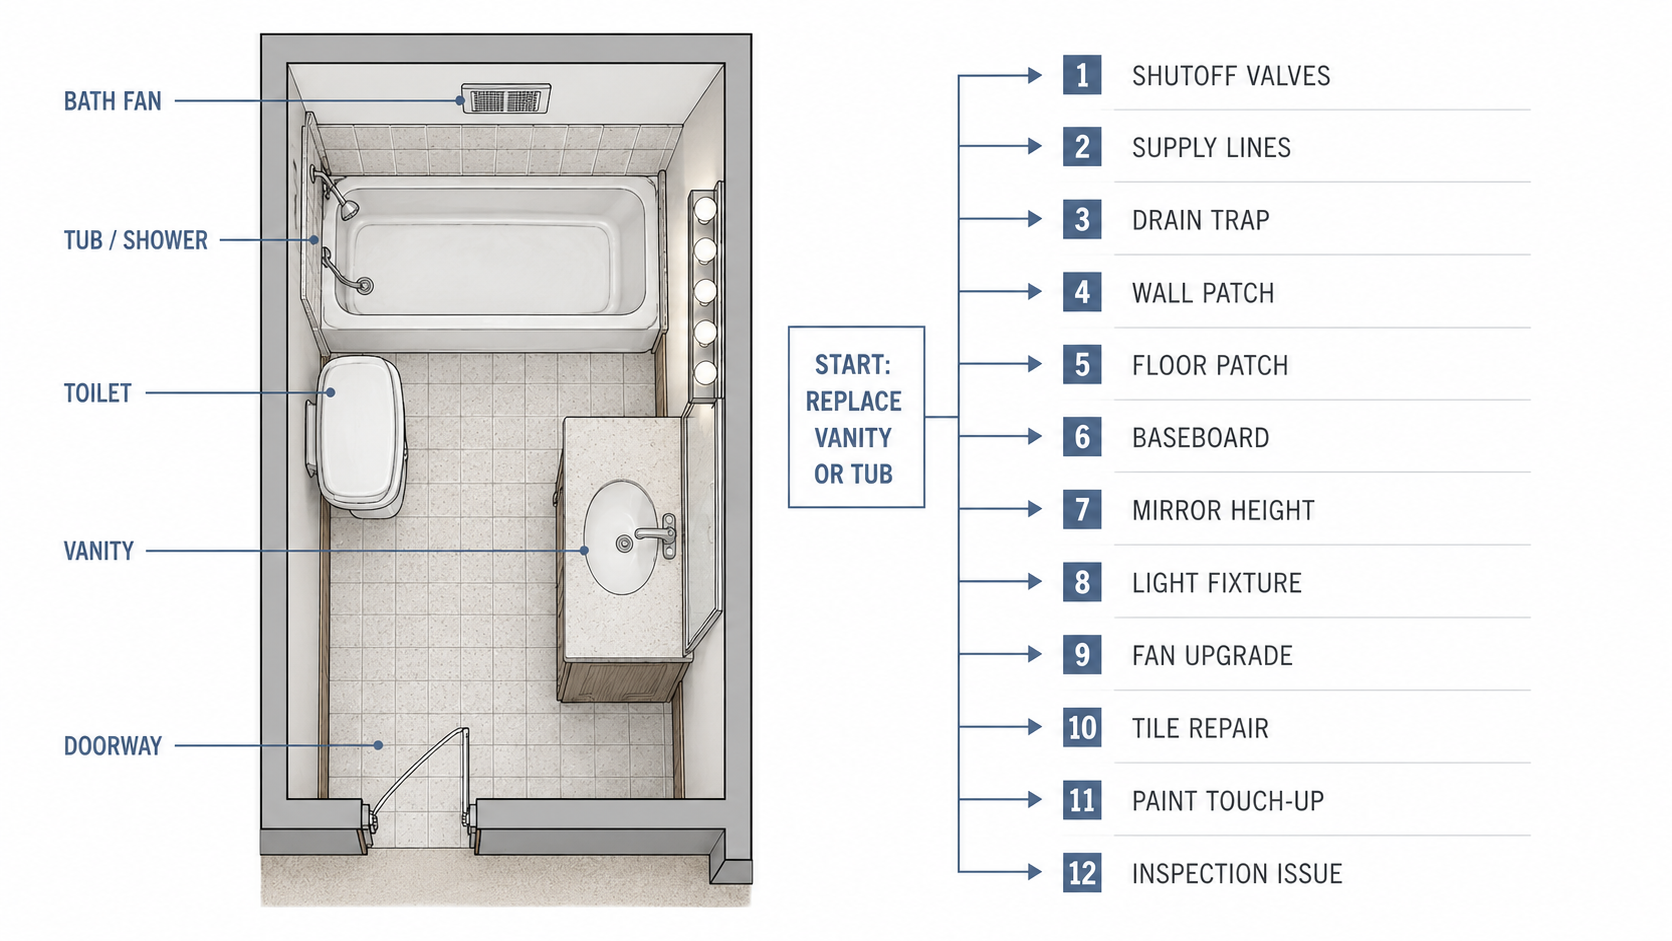
Order of Work
| Step | Decision | Why it comes here |
|---|---|---|
| 1 | Check moisture, fan venting, vanity base, tub edge, toilet base, and floor softness | Finds the leaks before finishes are chosen |
| 2 | Tap and press the surround for movement, then inspect an accessible edge or plan an allowance for exploratory opening | Flags whether the surround may be a finish job or a wall rebuild |
| 3 | Decide whether the layout stays | Controls plumbing, electrical, framing, and inspection scope |
| 4 | Open damaged or suspect areas | Reveals wall, floor, and plumbing problems before materials are ordered |
| 5 | Fix plumbing, fan and duct, subfloor, and walls | Keeps new finishes off old failure points |
| 6 | Set finished floor height, then reset the toilet | Puts the flange in the right relationship to the floor |
| 7 | Install surround, vanity, flooring, lighting, and mirror | Sets the visible room once the hidden work is stable |
| 8 | Paint, caulk, trim, and accessories | Keeps final finishes clear of rough work |
Which Scope Fits
| Choice | Best when | Watch for |
|---|---|---|
| Cosmetic update | The room is dry, the fan works, the tile is bonded, and the vanity is sound | Old shutoff valves, mirror adhesive, and failed caulk |
| Same-layout remodel | Fixture locations work but finishes and fittings are dated | Floor height at the flange, tub edge damage, vanity plumbing alignment |
| Full gut | Multiple assemblies have failed, moisture damage is extensive, the subfloor has deteriorated, or the surround must be rebuilt to the studs | Higher cost, longer schedule, permits, inspections, more trades |
| Layout change | The room does not function and plumbing work is justified anyway | Drain routing, venting, framing, electrical, inspection requirements |
What You Cannot Settle From the Doorway
The tile backer is the one that stays open longest. A surround can sound solid, look clean, and still be sitting on softened gypsum in the two courses nearest the tub, because the damage runs from the back forward. Tapping and pressing catch the obvious cases and miss the early ones.
Some of these bathrooms have a mortar bed and decades of service left. Some have paper-faced board that has already failed. There is no reliable way to tell which from the finished side, which is why the surround is worth carrying as a scope allowance until an accessible edge is inspected or something comes off the wall.
Common Questions About 1980s Bathroom Remodels
Where should a 1980s bathroom remodel start?
With moisture and the tub surround. Check the vanity base, the caulk lines, the floor at the toilet and tub, and where the fan exhausts. Then investigate what the tub tile is stuck to, because that answer can change the project from a finish update to a wall rebuild.
Why is the tile loose at the bottom of my tub surround?
Moisture-damaged paper-faced gypsum is one possibility in a 1980s surround, but failed caulk, movement, poor original bonding, plumbing leakage, or deterioration of another backer can produce the same symptom. Inspect an accessible edge or open a small area to confirm the cause.
Can I just retile over the old backer?
Not if it has failed. Current IRC provisions require an approved tile backer listed for use in tub and shower areas. A soft or deteriorated backer has to be removed and the wet-area assembly rebuilt with materials approved under the code adopted locally and installed according to the manufacturers' instructions.
What size bathroom fan does code require?
IRC Table M1505.4.4 sets 50 cfm intermittent or 20 cfm continuous as the minimum. The exhaust has to discharge outdoors, not into an attic, crawl space, or another area inside the building.
Should I keep old bathroom tile?
Keep it if it is dry, bonded, and cleanable. Hollow-sounding tile, a loose bottom course, cracked grout at the tub joint, or soft drywall beside the tub all point to investigation behind the tile rather than a cosmetic repair on top of it.
Should I replace the tub?
Not automatically. A sound tub can stay through a budget remodel. Replace it when it is cracked, poorly supported, leaking, or already tied to a failed surround, since the surround is coming off in that case anyway.
Why does my bathroom smell musty after a shower?
Usually weak or badly ducted ventilation, damp grout, water behind the vanity, or moisture under the flooring. Start with the fan: check the rate, the duct route, and where it ends.
Can I replace a vanity without touching the floor?
Sometimes. The new cabinet has to cover the old footprint, and the height difference between older and current vanities often means the wall behind it needs work regardless.
Does new flooring affect the toilet?
Yes. The closet flange should sit on top of the finished floor. Raising the floor without addressing the flange leaves the wax seal spanning a gap, which is a common cause of a rocking toilet and a stain in the ceiling below.
Should I move plumbing in a small bathroom?
Only when the layout genuinely fails or the walls are already open. Moving a fixture reaches drain routing, venting, framing, subfloor, electrical, tile, and inspection.
Sources and data
- International Residential Code, R702.4.2 and Table R702.4.2: approved backer materials for wall tile in tub and shower areas.
- International Residential Code, Chapter 15: Table M1505.4.4 minimum local exhaust rates and provisions requiring exhaust discharge outdoors.
- United States Environmental Protection Agency, asbestos and remodeling: suspect materials cannot be identified by appearance and should not be disturbed before proper assessment.
- Adopted code editions and local amendments vary. Confirm requirements with the local building department before starting work.