Add a Window to an Existing Wall Without Weakening It
How Pros Frame a Window Opening in a Finished Wall
Frame a New Window in an Existing Wall: Junior, here’s the sequence we actually run on site. We’re not “adding a window,” we’re creating a dry, square, code-clean opening that the unit will live in for 30 years. Read the flow, then copy it on your next job.
What we’re doing, in what order
Confirm loads → lay out RO from the actual unit → open the inside clean → build the king/jack/header/sill box dead square → cut the exterior plug → flash pan first, then sides, then head → set the unit plumb/level/square → insulate without warping → trim and test with water.
If you’re fuzzy on loads, skim this quick explainer on structural vs. non-bearing walls, then come back. If you want to see how a wood unit goes back together later, here’s a clean window frame basics walk-through.
Window Framing in Existing Walls Field Guide for Builders
Step through each stage of framing a new window in an existing wall. Real code notes, clean framing logic, and weatherproof details that pass inspection.
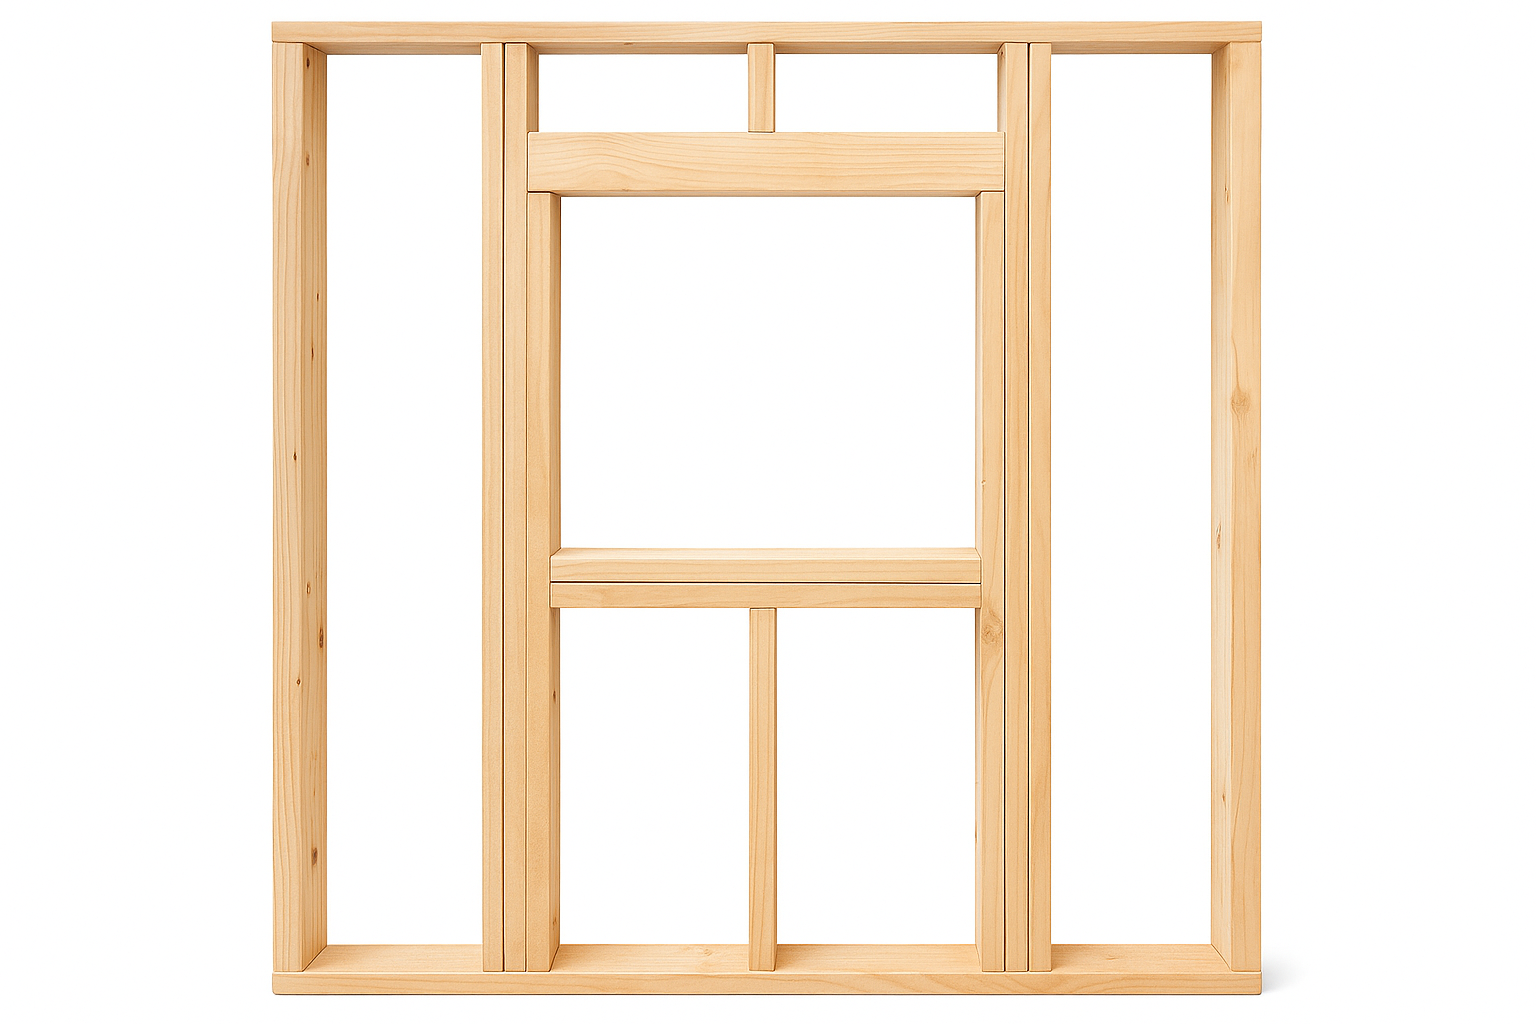
Anatomy of a Wall Opening
How a Wall Holds a Window
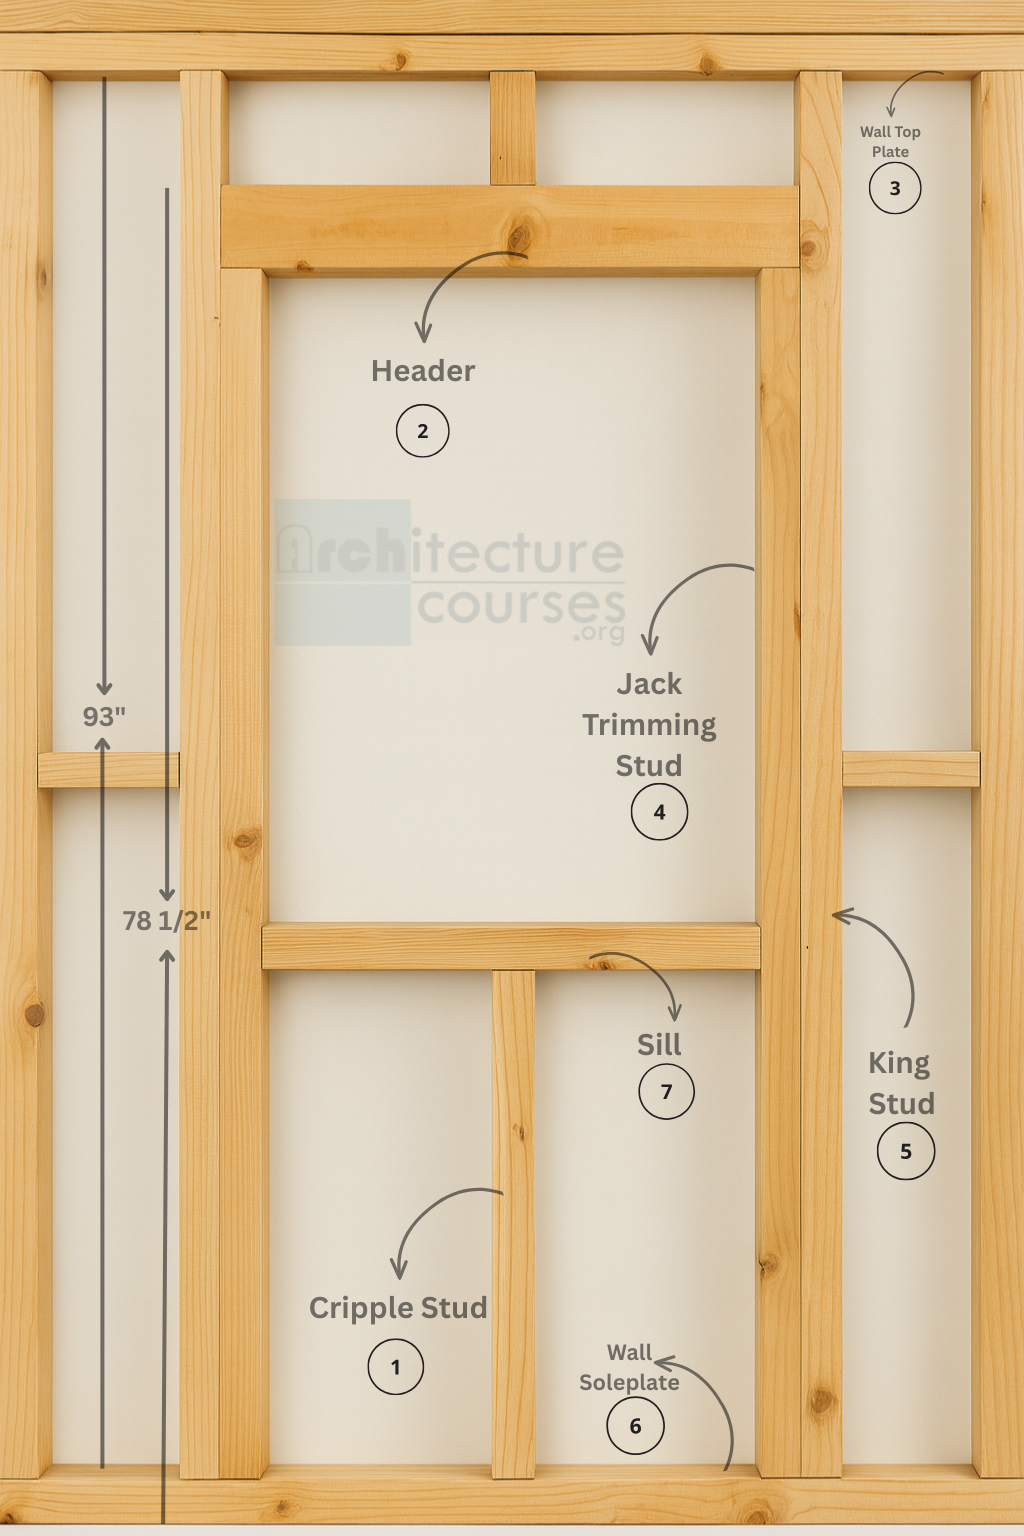
What’s in the image (window opening anatomy)
- Cripple Stud — Short studs used above the header (to the top plate) or below the rough sill (to the bottom plate) for support.
- Header — Horizontal beam spanning the opening; carries load to the jack studs (size per span/load).
- Wall Top Plate — Upper horizontal member (often doubled) that ties the studs together.
- Jack Stud (Trimmer) — Shorter stud fastened to the king that supports the header and transfers load down.
- King Stud — Full-height stud beside the opening; carries and ties in the jacks and header.
- Wall Soleplate (Bottom Plate) — Bottom horizontal member that anchors studs to the floor.
- Rough Sill — Horizontal member forming the bottom of the rough opening; seats the window (it doesn’t carry wall load).
Understanding how cripple studs, headers, sills, and plates work together to carry loads and form clean, code-ready openings. Every wall opening is a system of parts. Each has a job. The cripple stud carries the weight from above. The header bridges that weight. The king and jack studs transfer load to the soleplate. Together they form the skeleton that defines the rough opening before the window goes in.
Window & Door Rough Openings — What Each Piece Does
Use this as the legend for your photos. The wall shown in our example sits on a gable end, so vertical loads are lighter than a bearing wall—hence the modest header. Different wall types change header sizing; if you need a refresher on how walls carry weight, this quick read on bearing vs. non-bearing walls helps you choose the right member.
Parts of a Framed Window Opening
- Double top plate. Two stacked plates tie the wall together and spread roof/floor loads evenly into the studs below. They also give you meat for splicing walls and turning corners.
- Header. The beam above the hole. It jumps the load over the opening and hands it to the jacks. Size it for span, story count, and roof direction (often smaller on gable ends, larger under concentrated loads).
- King stud. Full-height stud that runs from sole to top plate. It keeps the opening straight and gives you a nailing face for sheathing, drywall, and exterior trim.
- Jack (trimmer) stud. Shorter stud that actually bears the header and carries that load down to the bottom plate. Big spans may need double jacks; narrow windows might only need one each side. If you want a deeper dive on layout, skim the simple guide to king and jack studs.
- Cripples (above). Short studs stacked over the header to reach the top plate. They re-establish the stud pattern so the load path and drywall backing stay consistent.
- Rough sill. The level 2× member that sets the bottom of the rough opening. Often doubled to give the window flange and interior trim a wider, stiffer landing.
- Cripples (below). Short studs that support the rough sill and transfer its weight to the bottom plate. They also give you fasteners for drywall and baseboard returns.
- Bottom plate (sole). The base member that anchors the wall to the floor system and collects loads from all studs above. You’ll cut the plate out inside the RO after the box is built if the unit requires it.
Doors vs. Windows (Same Logic, Fewer Parts)
Door openings use the same king/jack/header stack as a window, but there’s no rough sill and no lower cripples—clear floor is the point. You’ll still keep your header sized for the span and your kings/jacks plumb so the jamb sets square.
Step by Step Framing a New Window in an Existing Wall

What to Know Before Cutting a New Window into a Wall
Learn how to frame a new window in an existing wall with correct headers, supports, and flashing. A real field walkthrough from a builder’s view.
0) Prep that keeps you out of trouble
Permit + rules. A new opening usually means a permit. Check egress, safety glazing, and energy numbers. In older NYC or Boston buildings, measure the stair run or elevator cab—delivery can kill a day if you don’t plan it.
Scan. Kill the circuit. Pop two 1″ test holes where each jack will land and look with a borescope. If there’s wire, move it now. If the wall might be bearing, build a quick temp wall 3′ back before you cut anything.
1) Lay out from the unit, not a napkin
Order the window first. Use the manufacturer’s rough opening. Example: a “3040” casement wants 36½″ × 48½″ RO. On drywall, draw the exact RO rectangle with a 4′ level and a square. Mark where kings, jacks, header, and sill live so you can see the whole box before a single cut.
Drill a ⅛″ pilot at each RO corner through to the outside. Walk out, snap chalk lines corner to corner. That’s your exterior cut later. Keep sill height human—36–40″ finished feels right in living spaces unless egress says otherwise.
2) Open the inside clean (so your patch disappears)
Score the drywall on your layout lines, then cut. Open one stud bay past the opening on each side so you have room for kings and nailers. Vacuum. Now you can see what you’re framing into: old studs, blocking, real plate line.
3) Frame the box so the window doesn’t fight you
Kings. Full height each side, plumbed and locked to plates. Old studs bowed? Sister straight ones—don’t shim trash and expect a clean reveal.
Jacks + header. Cut jacks to carry the header. Drop in the header you actually sized (one-story 3–4′ spans are often fine with (2) 2×8; two-story usually wants (2) 2×10 or an LVL—read your table). Nail/screw into kings and jacks; keep the header level. Crown up on both plies so it settles flat, not frowny.
Sill + cripples. Measure down from the header to the RO height; set a dead-level sill. Add tight cripples under the sill and above the header to plates. Now check diagonals of the RO—make them match. If they’re off, fix wood now, not with window screws later.
If the vocabulary is fuzzy, this simple primer on studs, plates, and blocking keeps it straight.
4) Cut the exterior plug without wrecking the weather plane
Outside, set your circ-saw depth for siding + sheathing. Cut on your snapped lines. Fold housewrap like flaps (sides back, top up and taped, bottom stays). Cut the sheathing; pull the plug. Don’t shred the wrap—you’re about to stitch into it again.
5) Flash for gravity (pan first, always)
Make a pan: pre-formed or stretch tape. Pitch it out; add a tiny interior back dam so water can’t run inside. Tape the sill down and over the exterior edge at least an inch. No bathtubs—leave weeps or do tight corner patches so water can exit. Sides and head come after the unit is in; that’s how you keep shingle laps correct.
Want a refresher on the layers out there? This blunt explainer on exterior wall sheathing that actually lasts is worth a skim.
6) Set the unit like you mean it
Dry-fit first. Run sealant on the back of the side and top flanges (never the bottom). Drop the window onto sill shims at the quarter points. Tack two screws at the top corners. Now square the frame by checking the inside reveals—match diagonals, level the sill, plumb the hinge side. Shim behind screw points, not in the voids. Tighten. Operate the sash; it should glide and latch with even gaps. If it binds, you’re not square—don’t “hope” it in, fix it now.
7) Tape in the right order, integrate the wrap
Side tapes first, down over the pan edge; roll them tight. Head flashing (drip cap) next, then head tape over the top flange and under the housewrap top flap. Drop the flap, tape the horizontal cut. Shingle logic: nothing uphill should be able to dump water behind anything downhill.
8) Insulate the gap without bending the frame
Use low-expansion window foam in light passes, or backer rod + sealant. Keep the outer path able to drain; seal at the interior line. Over-foamed jambs bow, sashes stick, and you own the call-back.
9) Trim + test like a grown-up
Interior: extension jambs if needed, then casing with a clean 3/16″ reveal. Exterior: repair cladding with proper clearances, install a drip edge at the head, and don’t try to pass caulk off as flashing. Hose test from the top down with a gentle rain pattern. If it leaks, it’s the flashing sequence—open the head and fix it. Don’t bury sins with goo.
Mistakes I still see (and how we kill them on site)
Sealing the bottom flange. That makes a bathtub. Leave the bottom able to drain; the pan is your friend.
Trying to “pull square” with flange screws. You’ll twist the frame and hate the reveal. Square the RO, then set the window. Screws are not carpenters.
Over-foaming. If the sash got sticky after lunch, you bowed the jambs. Cut out the foam, reset shims at hardware points, re-foam lightly.
RECOMMENDED TOOL
Laser Measure
One-button truth. You’ll catch header drops, RO checks, and finish clearances without a helper.
Grab the pocket laser I hand to juniors
Numbers you keep in your head
Think operations clearance: level sill, plumb hinge, equal diagonals. A square box makes a quiet window. If you’re finishing inside after, this plain intro to drywall finishing and patching will save your trim reveal.
Why the order matters
We don’t flash because a book says so; we flash because wind-driven rain in New Orleans and sideways rain in Providence will find your shortcut. Pan first lets gravity work; side laps shed to the pan; head laps over everything. Do that, and the window works on a Tuesday in February when nobody’s watching.
Field Tricks We Actually Use (Fold These Into Your Next Cut)
This isn’t theory—these are small moves that make the hole cleaner, the box squarer, and the patch faster. Drop them right into the sequence above.
Layout that prevents drywall scars
Match the room. Before you mark anything, measure a finished sill in the same room and mimic that height so trim lines up later. If an apron hides the read, pop it, measure, put it back.
Compute the top cut once. From finished floor, add: header depth + unit jamb height + target sill height + a 1/2″ fudge. Strike that across both future king locations. If you need a quick refresher on parts, this clean run-through of studs and blocking keeps the language tight.
Support and cut without waking the siding
Temp wall first if in doubt. Snap in a quick 2×4 temp wall 3′ back, crown up, wedges at the top. Then cut (unsure on loads? Revisit bearing vs. non-bearing).
Corner pilots + fence. Drill a 5/8″ hole at each RO corner all the way through. Outside, snap lines through the holes, then screw a straight 1×3 on each line and ride your saw’s baseplate against it. Mark your blade-to-shoe offset once; reuse forever.
Framing details that make the unit glide
Header crowns up. Whether it’s (2) 2×8 or an LVL, align both crowns up so the assembly relaxes flat over time. Fasten jacks tight to kings—“near” isn’t good enough.
Sill first, level first. Set the rough sill dead level and square the box by diagonals before you unwrap the window. Don’t try to “pull” square with flange screws later.
Exterior plug with the weather plane intact
Depth control. Set saw depth to siding + sheathing only. Cut the plug, not the studs. Fold housewrap like flaps: sides back, head up and taped, sill untouched. You’ll stitch new flashing under the head flap next.
Set and insulate without warping
Shim where screws go. Quarter-point shims at the sill; hinge-side shims land at hardware locations. Foam light with low-expansion or go backer-rod + sealant. If you bow the jambs, the lock tells on you.
Why this extra block exists
It doesn’t change your order. It just removes the wiggle. Cleaner cuts, squarer box, and water goes out, not in. That’s the whole job.
Should a Homeowner Use CAD to Plan a New Window Opening?
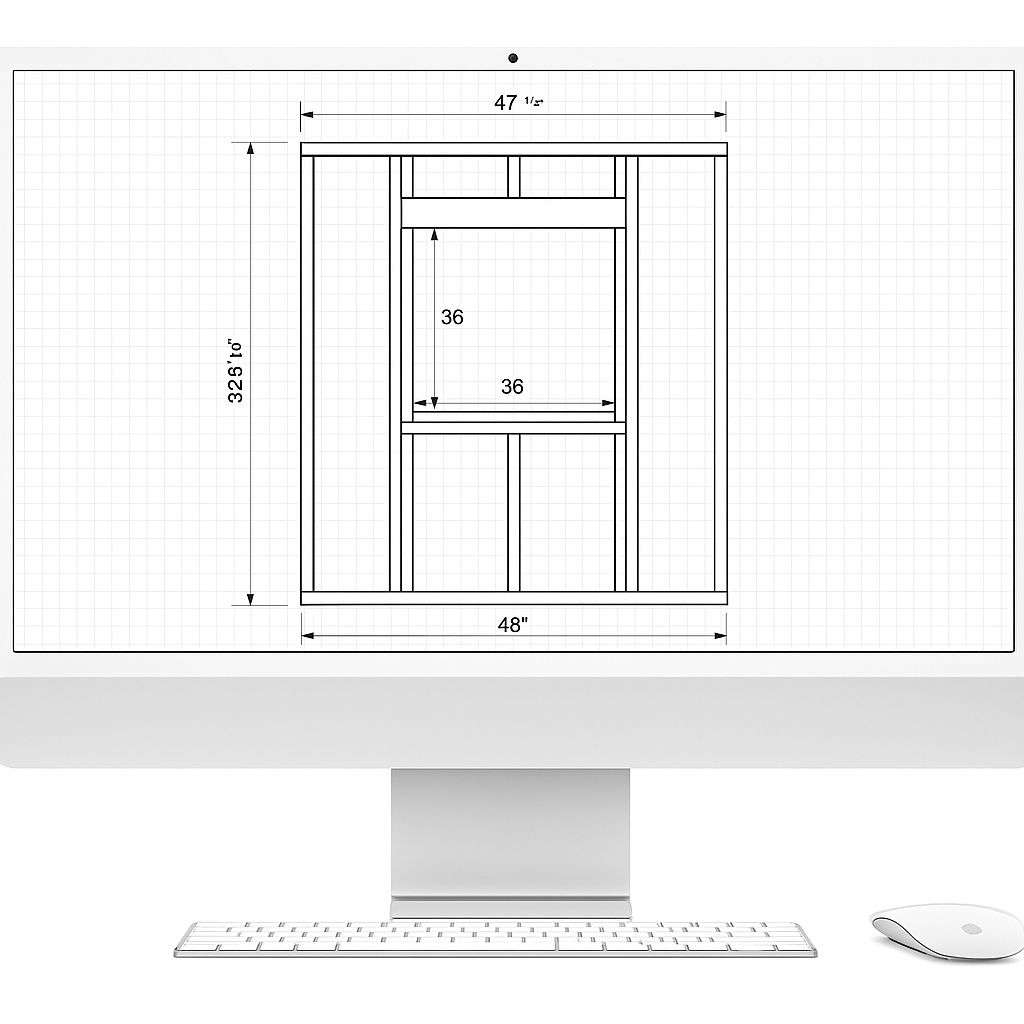
Short answer: it can help—but only if you know what the software won’t do for you. CAD won’t tell you if a wall is bearing, size your header for code, or fix sloppy measurements. What it will do is keep your layout square, your dimensions consistent, and your shopping list organized. If you’re new to framing, skim a quick framing basics primer first so you know what you’re drawing.
When CAD is worth it
- Precise layout. You can draw the rough opening to the manufacturer’s spec, place king/jack studs, and check clearances to outlets and radiators before you cut.
- Conflict check. It’s easier to spot a header crashing into a duct or a window pull hitting a cabinet when the plan is to scale.
- Clean paperwork. You can print a one-page plan with dimensions, notes, and a material list so the job doesn’t drift.
When CAD is overkill
- Simple, non-bearing openings. For a small bathroom window in a non-load wall, graph paper + painter’s tape mockups might be faster.
- No field truth. If you don’t verify as-built dimensions with a laser, a perfect model only makes you perfectly wrong.
- Structure decisions. Header sizing, shear, and point loads are engineering or code-table items—not CAD magic. When in doubt, ask a pro and review a straight-talk guide to studs, plates, and blocking.
Good software options (real-world picks)
Beginner-friendly (free/low cost)
- SketchUp Free (Web). Fast to learn, tons of tutorials. Great for 3D “box + opening” planning and quick perspectives. Add community plug-ins if you want basic stud framing visuals.
- Sweet Home 3D (Free). Simple 2D/3D with decent dimensioning. Not a framing engine, but fine for locating windows, sill heights, and sightlines.
- Floorplanner / RoomSketcher (Freemium). Drag-and-drop rooms, set wall thickness, drop openings, export a tidy plan. Great for homeowners doing one project.
- magicplan / Polycam (Mobile). Scan rooms with your phone to get a quick as-built to trace over. Treat scans as rough—confirm critical dims with a laser.
Serious DIY / Prosumer
- SketchUp Pro. Adds solid tools, DWG export, and LayOut for printed sheets. Plenty of framing extensions if you want studs, headers, and schedules visualized.
- Home Designer (by Chief Architect). Purpose-built residential software. Auto-framing, framing schedules, live sections. Easier than pro BIM, powerful enough for full window packages.
Pro-level
- Chief Architect Premier. Auto-generate framing with control over kings, jacks, cripples, headers, and RO. Excellent for window schedules and details.
- AutoCAD LT / Revit. Industry standards. LT is 2D precision drafting; Revit is full BIM. Massive power, steep learning curve—usually overkill for a single opening.
Practical workflow that doesn’t waste time
- Measure once, verify twice. Laser the room, record wall thickness, ceiling height, and obstacles. Note if the wall might be bearing.
- Draw the box. In CAD, set wall thickness and draw the rough opening to the manufacturer’s RO (e.g., 36½″ × 48½″). Place king/jack studs and a header sized from your local span table.
- Check clearances. Confirm trim widths, shade clearance, handle swing, and exterior interference (soffit, siding joints).
- Print a one-pager. RO size, sill height, header spec, stud count, and notes (flash pan first, don’t seal bottom flange). Tape it to the wall.
Pros & cons in plain English
- Pros: Fewer surprises, cleaner material takeoff, better communication with inspectors and helpers.
- Cons: Time sink if you only do one window, false confidence if you skip structural checks, and a learning curve that can stall the job.
Do you need CAD?
No. You need accurate field measurements, a square rough opening, and correct flashing. CAD is a force multiplier—great for planning, useless if it replaces judgment. If you like working on screen and you’re adding multiple openings, use it. If you’re cutting one hole on a Saturday, a square, a level, a laser, and painter’s tape will get you there.
FAQ
What size header do I actually need?
Size to span, loads, and what’s above. One-story with a 3–4' rough opening often takes (2) 2×8; two-story or roof loads may need (2) 2×10 or LVL. Don’t “upsize and pray”—use a span table for your region. Crown both plies up, glue/screw them together, and set it dead level on jacks that actually bear on the bottom plate.
Rough opening (RO): do I frame to the catalog number or the unit in my hands?
To the unit you’re installing—always. Manufacturer RO can shift by series and jambliner. Dry-fit in the shop if you can; on site, build the box square (match diagonals), then the window drops in without fighting reveals later.
Do I need temporary shoring for a small window?
If there’s any chance the wall is carrying load, yes. A quick 2×4 temp wall 3' back with a top and bottom plate takes 10 minutes and saves cracked drywall two rooms over. We shore first, then we demo.
Pan flashing — can I just tape the flange and call it good?
No. Gravity first. Build a sill pan (pre-formed or stretch tape) pitched out, with a tiny back dam. Side tapes lap onto the pan, head flashing laps over the top flange and under the housewrap flap. Leave the bottom flange able to drain—don’t caulk it shut.
What’s the fastest way to end up with a sticky sash after install?
Over-foaming the jambs. Use low-expansion window/door foam in light passes or backer rod + sealant. Shim behind manufacturer screw points, not in the voids. Operate the sash before trim—if it binds, you fix shims now, not after paint.
Where exactly do the shims go?
At quarter points on the sill, at screw locations on the jambs, and directly behind hinges/keepers on casements. No floating screws. Shims are structure; they carry load and hold square.
Housewrap got chewed up around my cut. Am I sunk?
Patch it cleanly. Think shingles: lower layers first, uppers lap over. Replace ragged wrap with new pieces that extend past the opening, then integrate your side/head tapes under the top flap. Tape only the horizontal cuts on wrap; let verticals drain.
Interior first or exterior first?
Lay out and open inside first so your patch is smart and your framing is square. Cut the exterior plug last, following the pilots you drilled from the inside. That keeps your sheathing/housewrap surgery surgical, not exploratory.
Do I set the window level or plumb to the house?
Level sill, plumb hinge side, square the frame to itself. Old houses are rarely plumb; your unit still must be. Trim hides the conversation between new and old—operation is king.
How do I water-test without flooding the living room?
Gentle hose from the top down, low flow, ten minutes. No pressure washing. Watch the interior head and jamb corners. If you see water, it’s your sequence—reopen the head, re-lap, and re-roll tapes. Don’t “caulk it and hope.”
Can I skip extension jambs if my wall is thick?
Don’t. Flush the interior plane so casing has a consistent 3/16" reveal. Crooked extension jambs telegraph as crooked casing—once you see it, you can’t unsee it.
What if my siding is brittle (old fiber-cement or stucco)?
Score and take your time. On stucco, cut wide, demo to the lath, waterproof the opening correctly, then patch with proper casing bead and a head flashing that tucks behind paper. On fiber-cement, use the right blade and support the cut; hairline cracks turn to chips fast.
Winter install tips?
Warm your sealants and foam. Keep cans, tapes, and the unit in a heated box or the truck cab. Cold tapes don’t stick, cold foam doesn’t cure, and you only find out after you’ve packed up.
Biggest rookie tells inspectors spot in five seconds?
Bottom flange caulked (bathtub), no pan, no shoring where needed, and a bowed jamb from foam. The tidy job has shingle-lapped flashing, straight reveals, and a sill that’s truly level.
I’m replacing a rotten wood unit later — anything I should read now so I don’t undo this work?
Yes. This clear, step-by-step on wood window frame replacement shows how the pieces go back together and what to watch so your new opening stays dry when that day comes.
Related
Materials & Frames
Core Guides & Planning
- Window Design: Complete Guide
- Modern Windows: From Frames to Glass
- Simple Window Design: Ideas for Every Home
- New Window Design Inspirations for Home Exteriors
- How to Design Glass Windows: Materials, Frames, and Finish
- Modern Window Designs for Homes That Work
Styles & Regional Types
- Architectural Window Types for Modern and Old Homes
- Hacienda Style Windows: How to Blend Tradition with Modern Design
- Expansive Windows in Contemporary Architecture
Shading & Canopies
DIY & How-To
- Make Your Own Windows: What to Know Before You Start
- Build Your Own Windows: DIY Tips and Common Mistakes
- Wooden Window Frame Replacement: Step-by-Step Basics