
Most 2000s kitchen before-and-after projects do not work because one finish changes. They work when the whole room stops fighting itself.
Cherry or maple cabinets, brown granite, beige tile, tumbled stone backsplash, bronze fixtures, warm yellow walls, a raised bar island, and a built-in desk can all be fine on their own. The problem starts when every surface pushes in the same direction. The room gets heavy, and the before photo looks dark even when the kitchen is clean and usable.
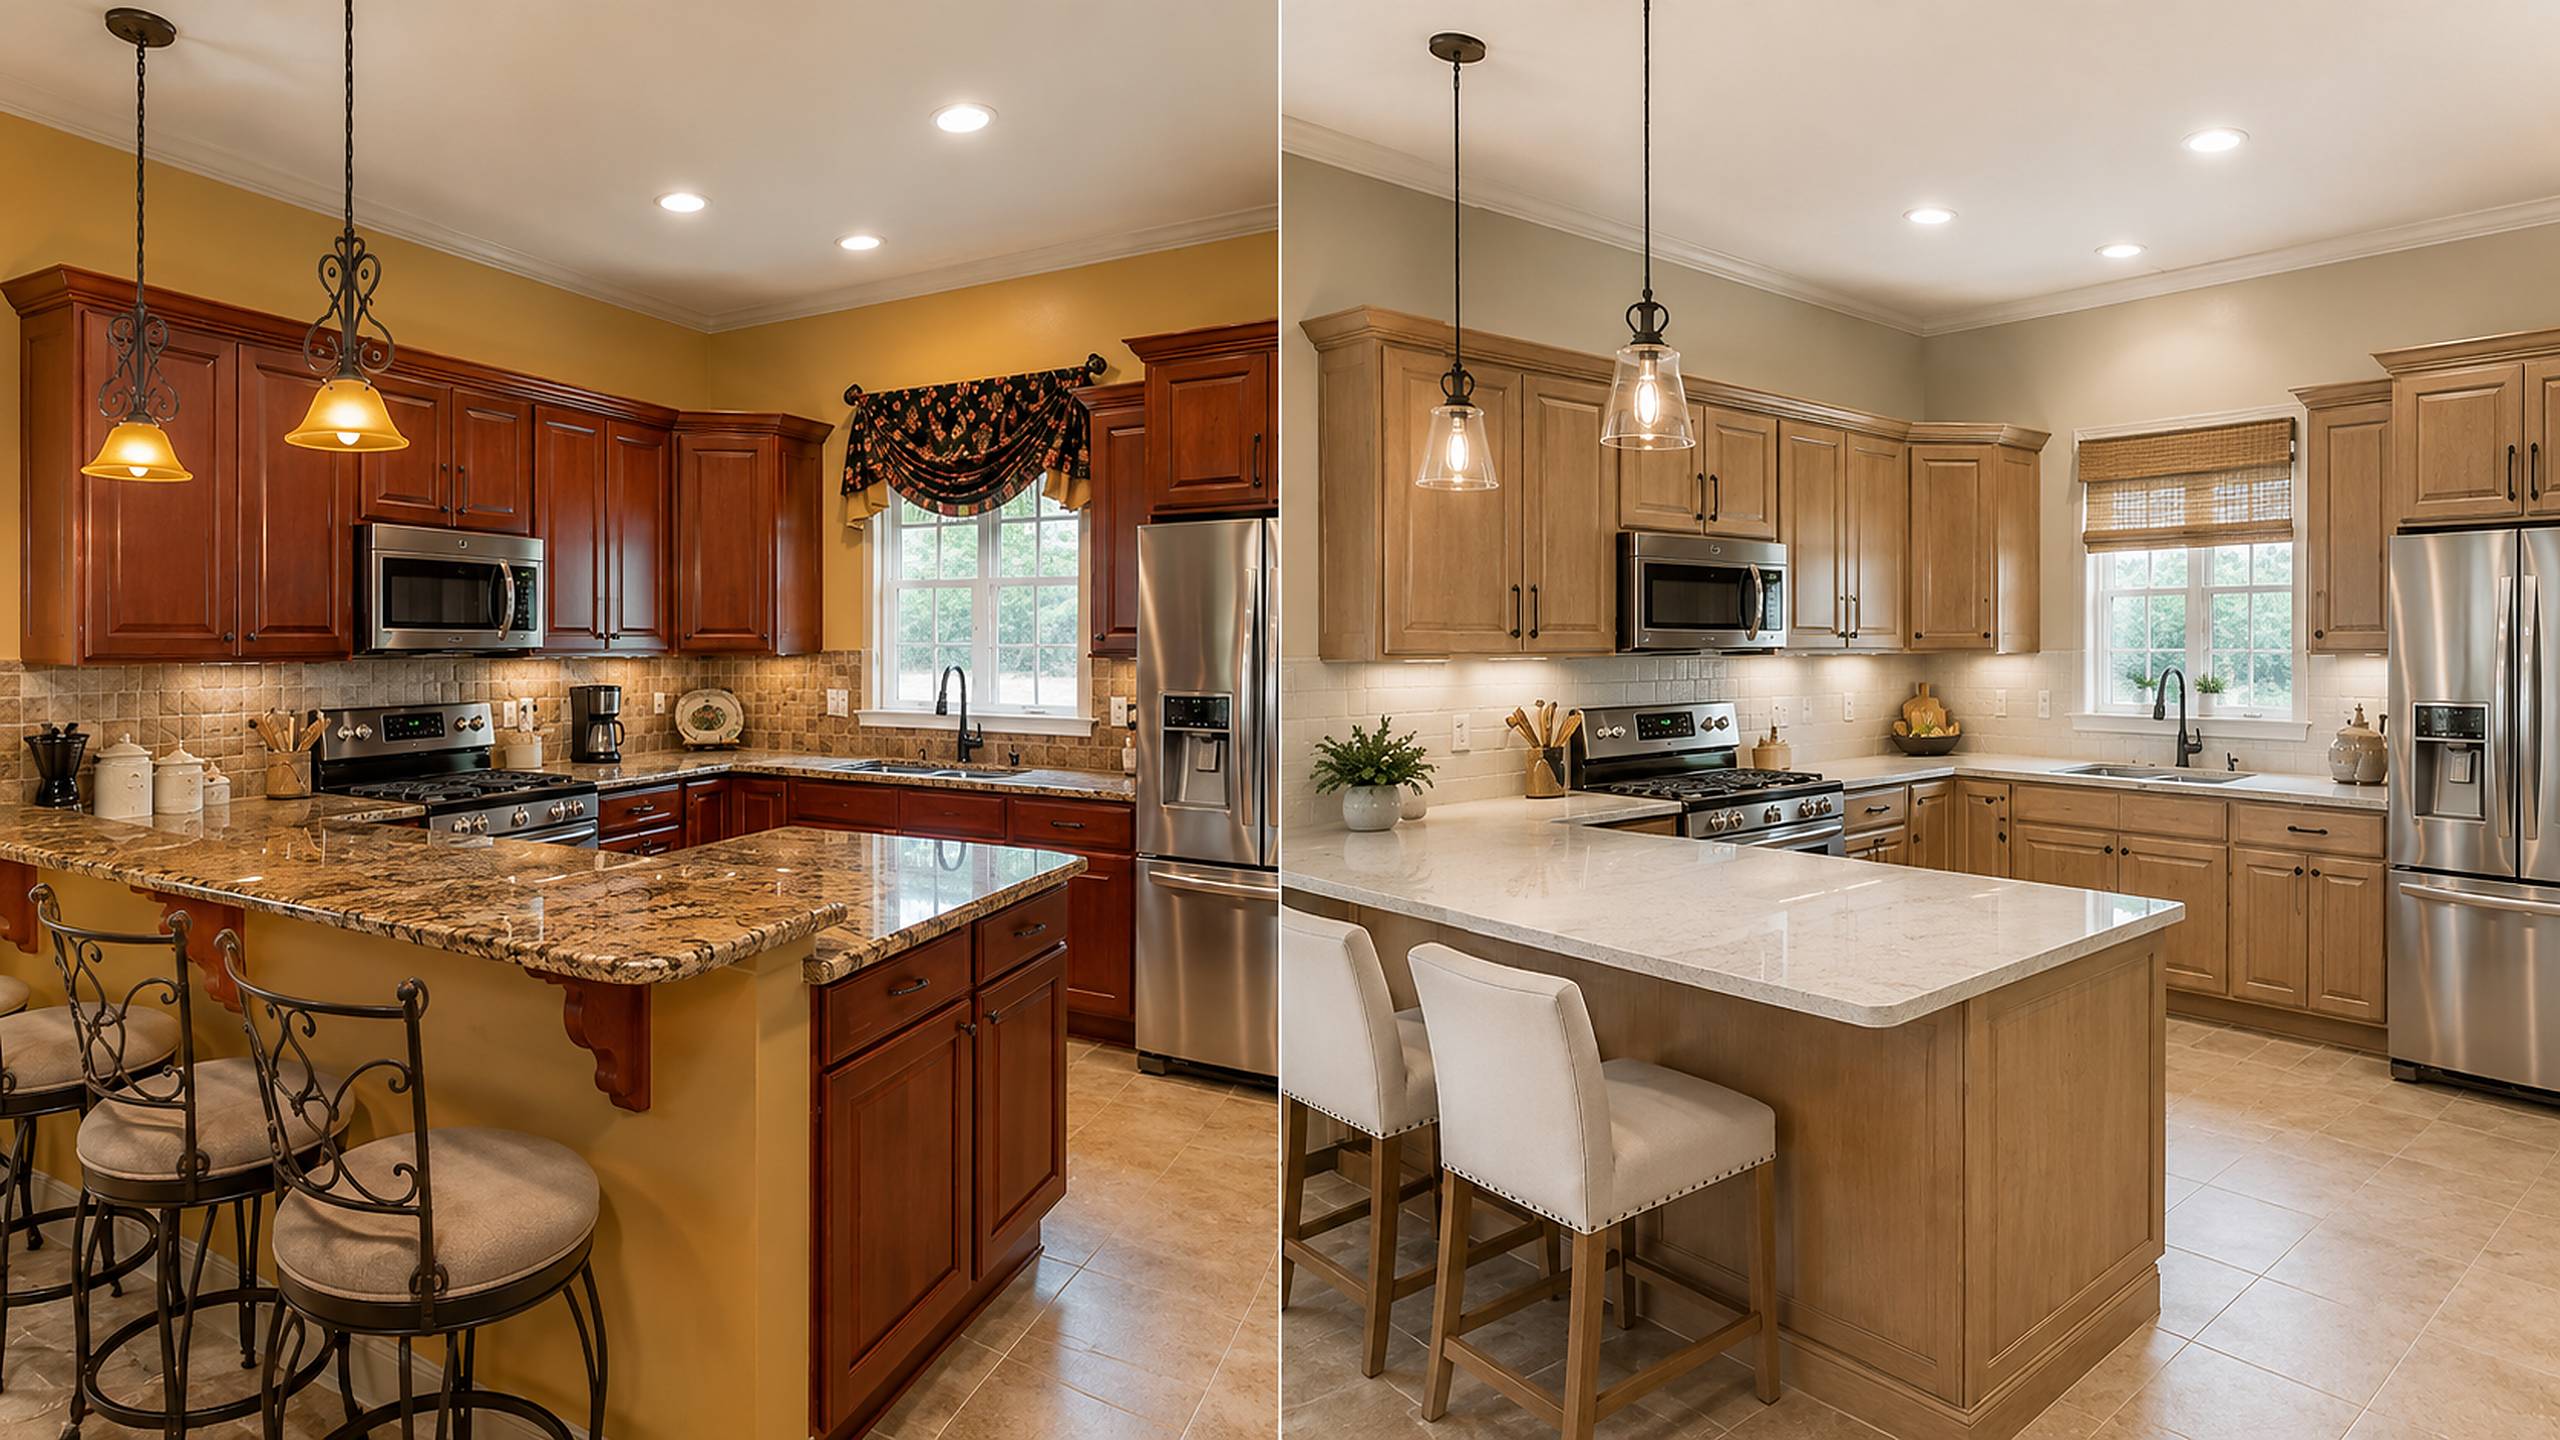
The best after photos fix that stack. They do not just make the cabinets white — they give the kitchen better light, clearer contrast, calmer surfaces, and a more useful layout.
What a 2000s Kitchen Looked Like Before
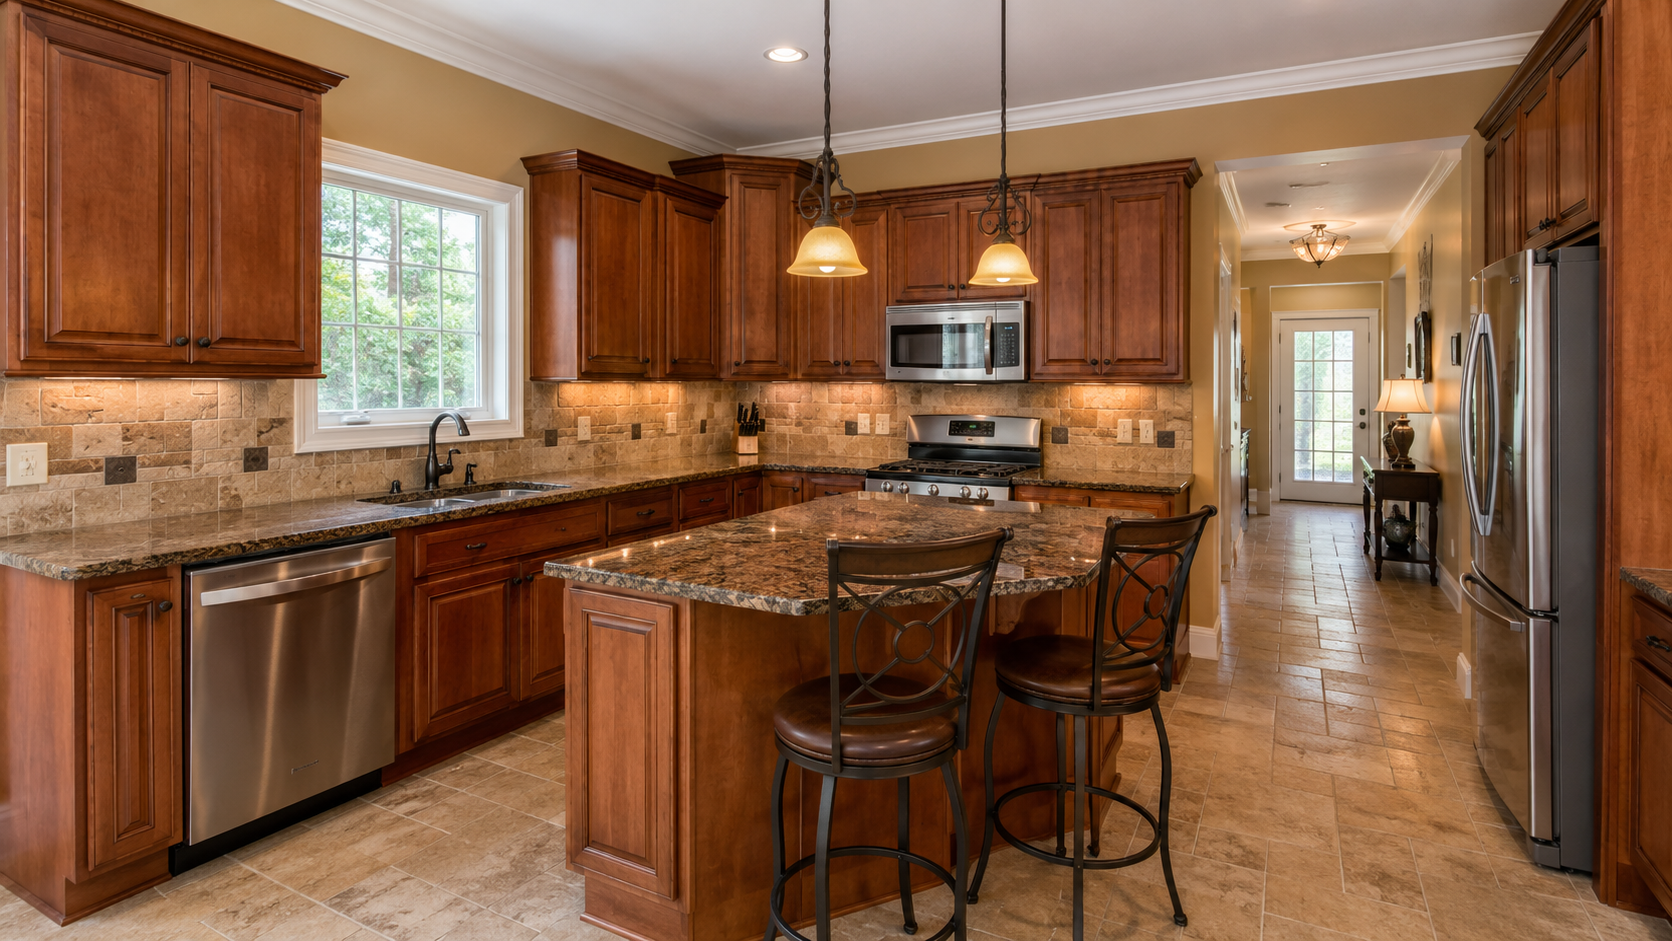
A typical early-2000s kitchen had a familiar package: raised-panel cabinets, granite with a lot of movement, beige or tan floor tile, a tumbled stone backsplash, oil-rubbed bronze hardware, and pendant lights that tried hard to look old world. Plenty of these kitchens were well built. The problem was not always the layout — often it was the finish stack. The island had a raised bar. The kitchen desk caught paper clutter. The backsplash had accent tiles. The walls leaned yellow. None of that meant the kitchen was failing. It meant the room was visually heavy.
If the kitchen leans strongly old-world or Tuscan, the finish decisions overlap with the 2000s Tuscan kitchen update strategy. The broader remodel logic sits in the 2000s kitchen remodel guide.
What Changes First in a Strong Before-and-After
The best before-and-after remodels usually fix one of two things first: the light or the surface hierarchy.
Light matters because many 2000s kitchens still have warm bulbs, dark corners, and pendants that throw a yellow cast over every finish. A kitchen can look cleaner before demolition starts just by correcting the bulb temperature and removing the darkest decorative fixtures. I have seen homeowners do this on a Friday and come back Monday convinced the room shrank — it is that fast.
Surface hierarchy matters because every kitchen needs one or two lead materials, not five. If the granite is busy, the backsplash should quiet down. If the cabinets stay dark, the walls and lighting need to work harder. If the floor stays beige, the counter and backsplash need to stop competing with it.
What Actually Makes the After Look Better
The biggest visible difference usually comes from calming several layers at once. Replacing or quieting the backsplash can stop the kitchen from reading early 2000s at eye level. Working honestly with the counter matters because brown granite can control the whole palette — ignore it and the new finishes will fight it instead. Simplifying the island can make the room feel more open without moving the whole kitchen. And fixing wall color and lighting together can change the room before a single cabinet is touched.
Cabinet paint can matter a lot, but it works best after those decisions are tested. Paint the cabinets first and the counter may suddenly look worse.
The Before-and-After Trap
Some 2000s kitchen after photos look brighter but not better. That usually happens when one surface is modernized and the rest of the room is left behind.
New white cabinets with the same dark granite, beige tile, and busy backsplash can look forced. New quartz with the same ornate bronze pendants and raised-panel cherry island can feel unfinished. The room is no longer fully old, but it is not resolved either. This is where many remodel budgets get wasted — the owner pays for a visible upgrade, but the old fixed surfaces still control the mood.
A strong kitchen before-and-after works the same way in any decade: the fixed surfaces have to agree with each other, or the update feels patched together.
Brown Granite Is Usually the Pivot Point
Brown granite is where a lot of before-and-after plans either come together or fall apart. It is not just a counter — it is a palette problem.
Granite with black, burgundy, gold, cream, or green movement will push cabinet color, backsplash, floor tone, and hardware finish around. A white cabinet that looks clean in a sample book can go chalky beside the actual slab. A soft cream can turn yellow. A gray can go flat.
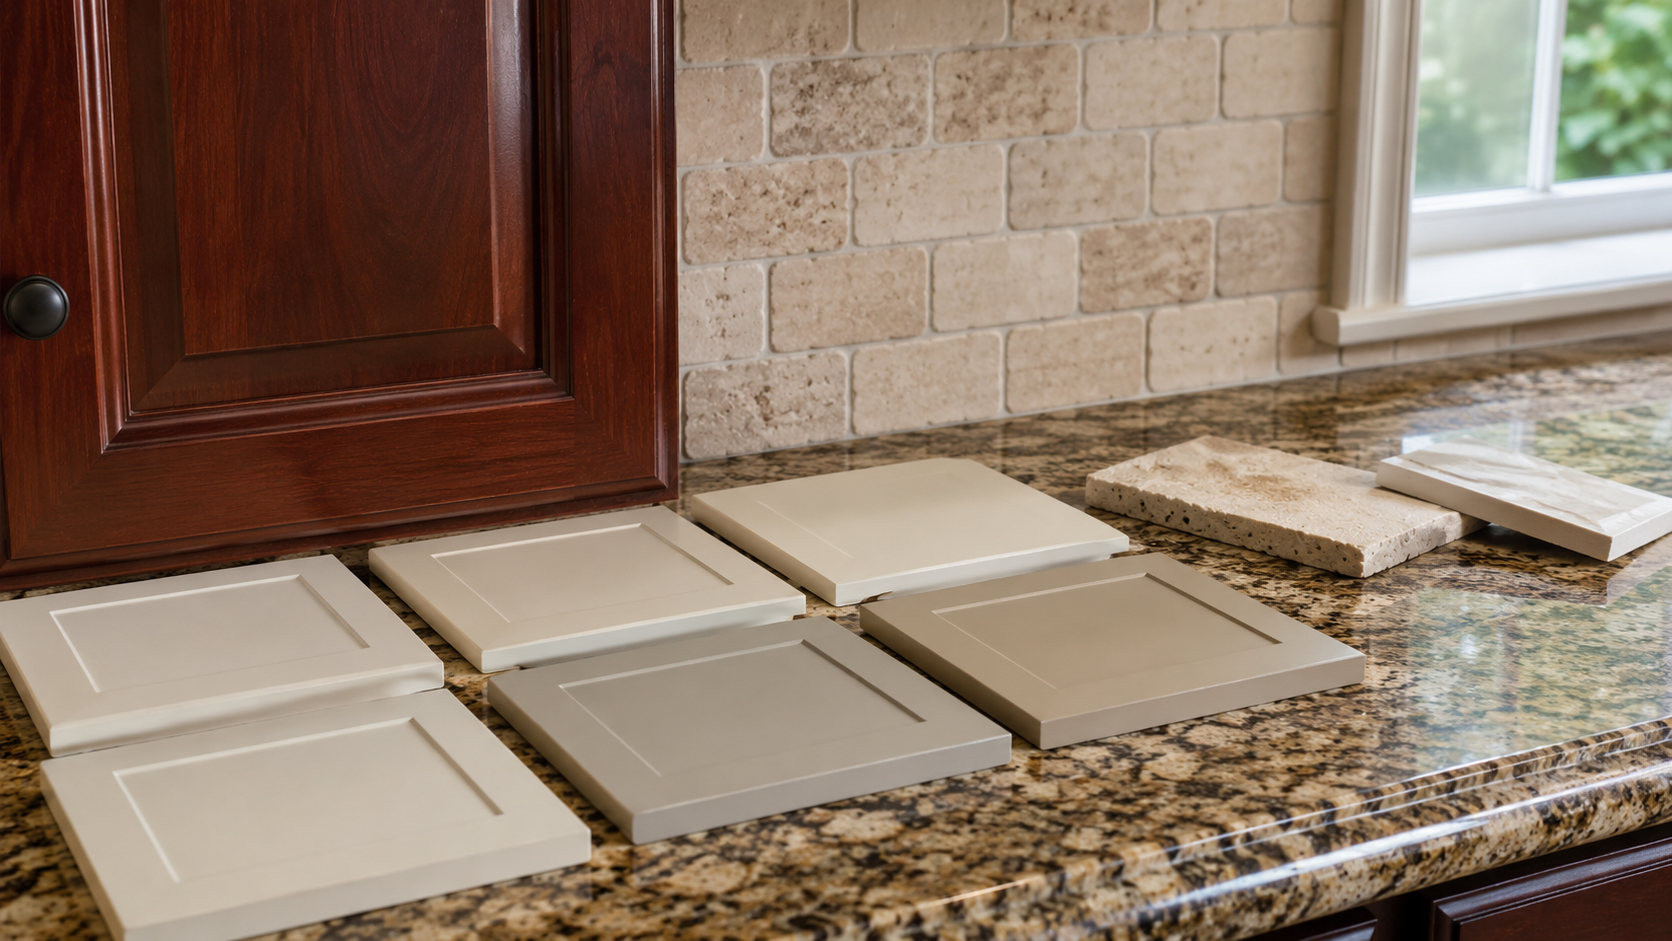
That is why sample testing belongs in the room, not online. Check samples in morning light, afternoon light, and under evening bulbs. Hold them against the counter, the backsplash, the cabinets, and the floor. If the granite stays, the remodel should work with it honestly. If the granite leaves, the whole palette opens up. Pretending the counter does not matter is how a kitchen ends up looking half-finished.
Cabinets: Keep, Paint, Refinish, or Replace
Cabinets take up the most visual space, so they usually get blamed first. That is not always fair. Keep the cabinets if the boxes are solid, the layout works, and the storage is still useful. Refinish if the stain is too red, too orange, or too dark but the wood is worth saving. Paint if the doors are still acceptable and the fixed finishes can support the new color. Replace when the boxes are failing, the door style is too dated to carry forward, or the layout needs to change anyway.
This is close to the same decision homeowners face with 1990s oak kitchen cabinets. The wood may be dated, but the construction may still be better than a cheap replacement.
The Raised-Bar Island Problem
A lot of 2000s kitchens had a two-tier island or raised breakfast bar. It hid the sink mess, gave guests a perch, and made the kitchen feel a little more formal. It also broke up the counter, blocked views, and made the island less useful for prep.
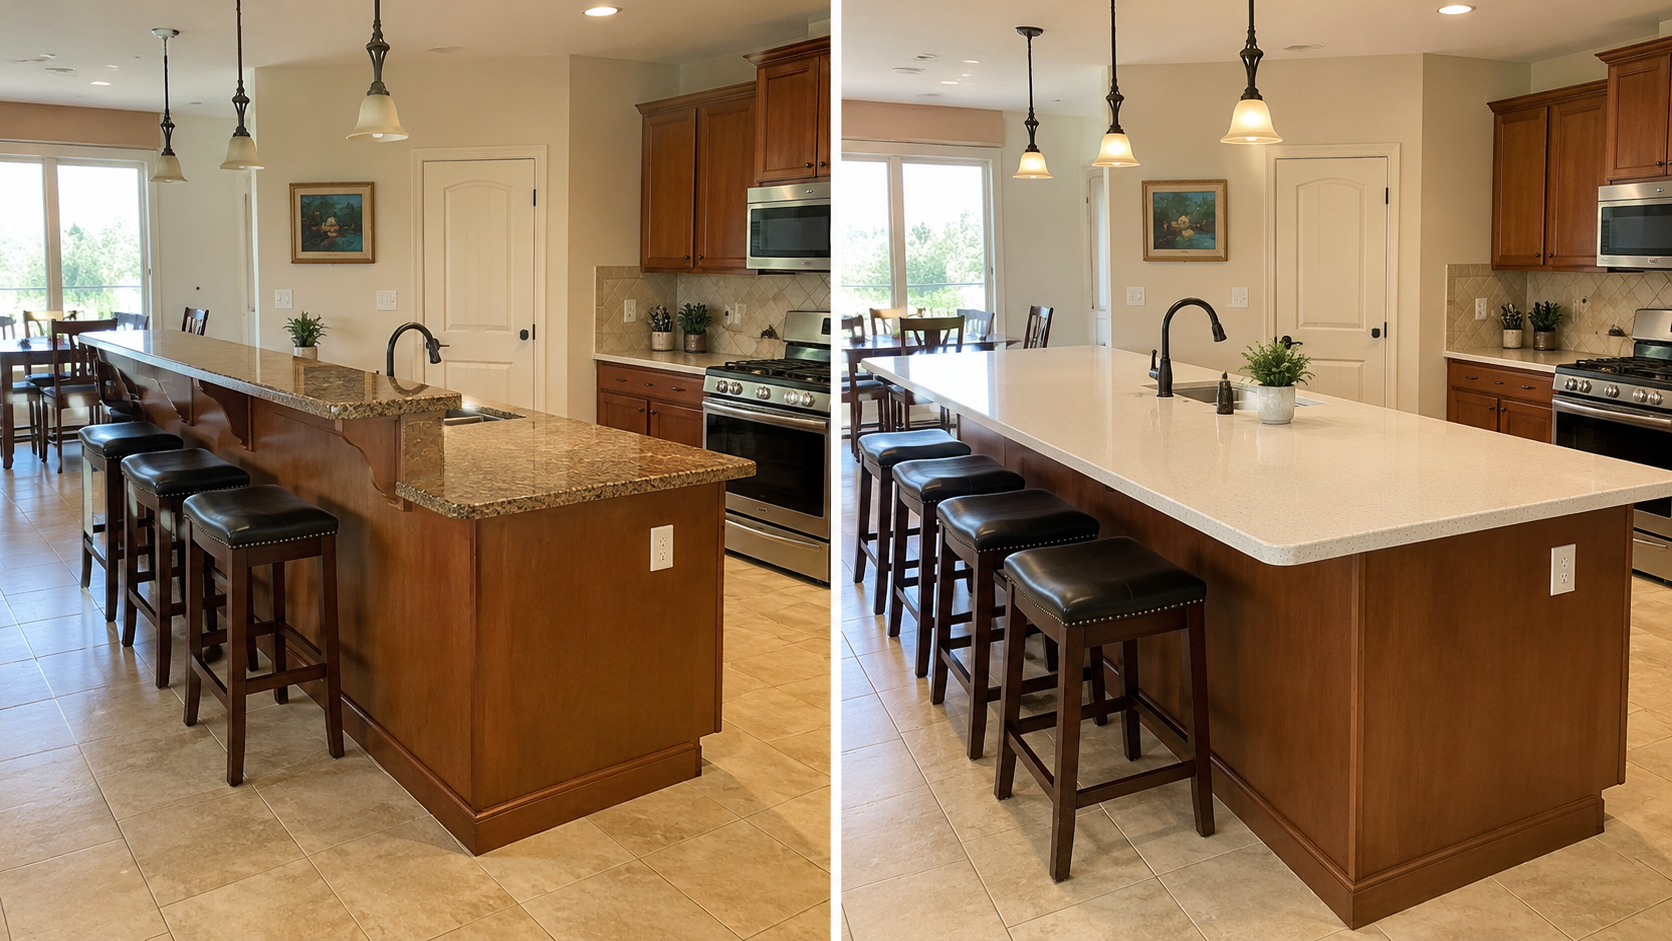
One of the strongest before-and-after moves is cutting that raised bar down to one counter height. It improves sightlines, gives you a larger usable work surface, and often makes the whole kitchen feel more current. But it is not just a cosmetic change — check for island wiring, panel seams, finished ends, plumbing, countertop support, outlet locations, and flooring changes before assuming it is a simple counter job.
The Kitchen Desk That Turned Into a Drop Zone
The built-in kitchen desk is another early-2000s time stamp. It made sense when families used landlines, paper calendars, cookbooks, and desktop computers differently. In practice, most of them ended up holding mail, chargers, school papers, receipts, and clutter.
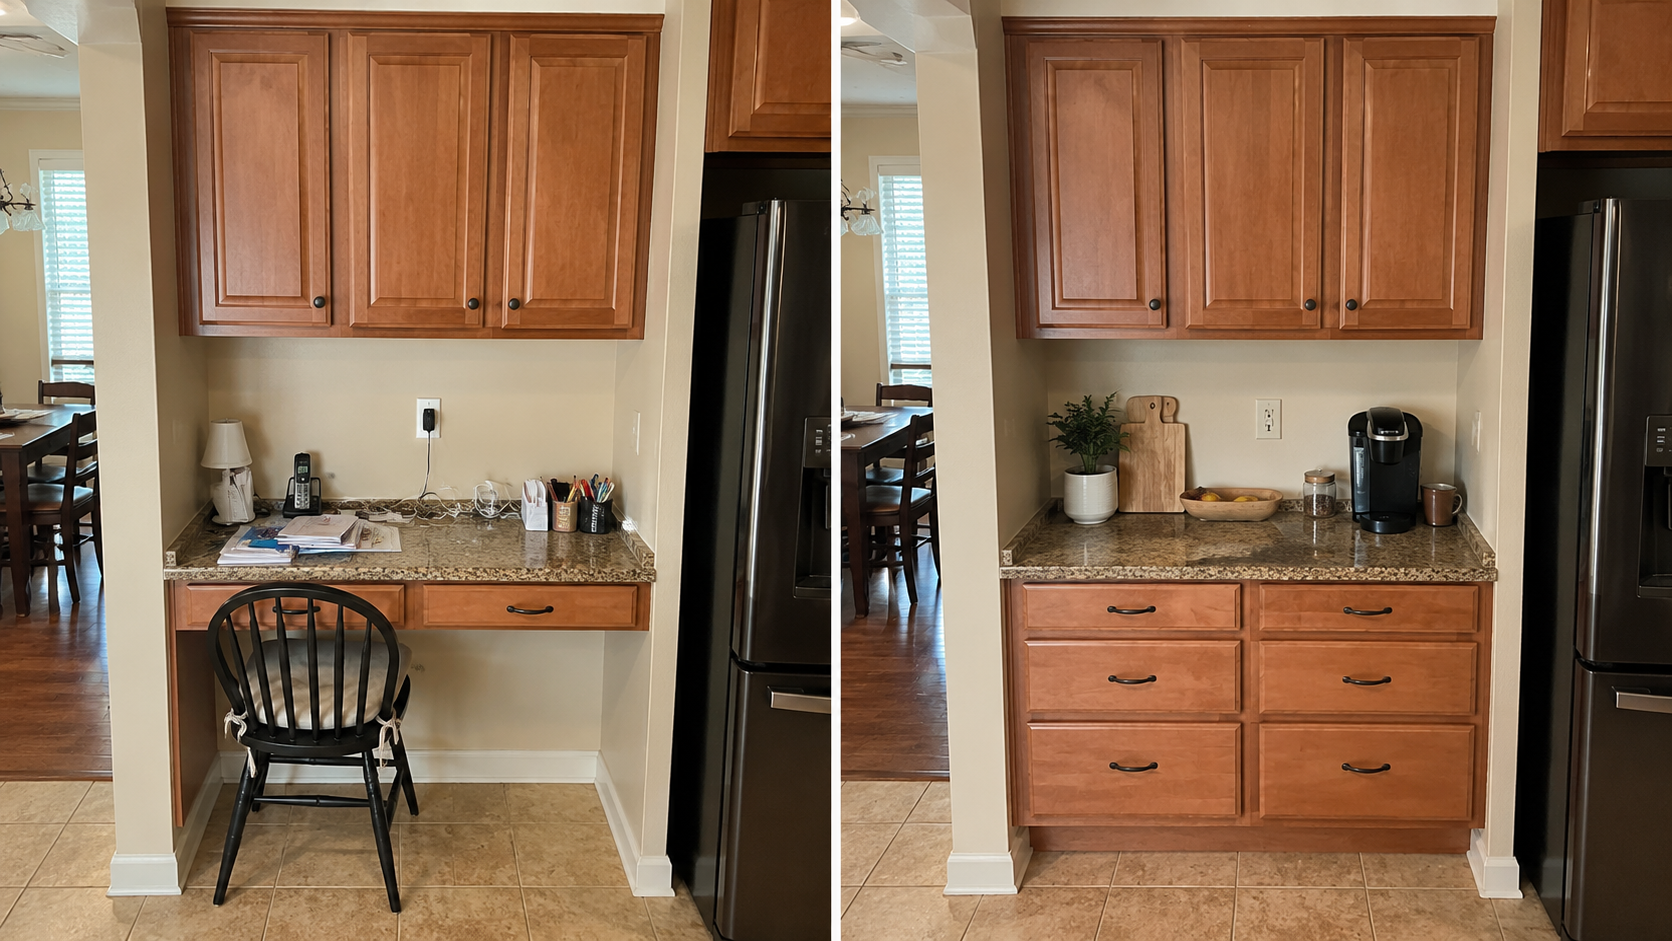
The best before-and-after fix is usually to remove the knee space and turn the area into full counter-height storage — drawers, cabinet doors, small appliance storage, or a compact coffee zone will serve the kitchen better than a half-useful desk. Watch for missing flooring, extra outlets, phone or data lines, and trim patching when you make that change.
The Floor Gap Nobody Warns You About
This is the hidden cost that wrecks the most before-and-after budgets, and almost no one writes about it until they are standing in the middle of it.
In most 2000s kitchens, the flooring — tile, hardwood, or engineered — was installed after the cabinets were set. That means the floor stops at the toekick. You can see the substrate or the old subfloor under there if you pull a cabinet away from the wall. It also means that if you replace the cabinets, you will find a gap all the way around the kitchen perimeter where the floor ends.
That gap is not always a disaster. If you are going to a different flooring type anyway, the new floor goes in after the cabinets and the gap disappears. If you are keeping the existing floor and swapping cabinets, you have a matching problem. Same tile from 2004 is no longer made. Same hardwood from 2001 may be a different plank width or finish. Same engineered floor from 2003 may have a different sheen. The patch will show if the floor is not replaced outright.
This is why experienced remodelers look at the floor before they price cabinet replacement. Before you commit to a cabinet swap, pull a toekick and check whether the floor is under the cabinets or stops at them. If it stops, budget for new flooring too, or lock in a cabinet swap that fits the existing footprint exactly so the gap stays hidden.
What Demolition Exposes That the Before Photo Hides
The before photo shows finishes. It does not show what sits behind them. Once demolition starts, you may find a backsplash that has pulled drywall paper during removal and now needs a full skim-coat or drywall replacement before new tile goes up. You may find a soffit hiding ductwork you cannot move. An island with electrical that has to be rerouted. Flooring that stops at the cabinet line.
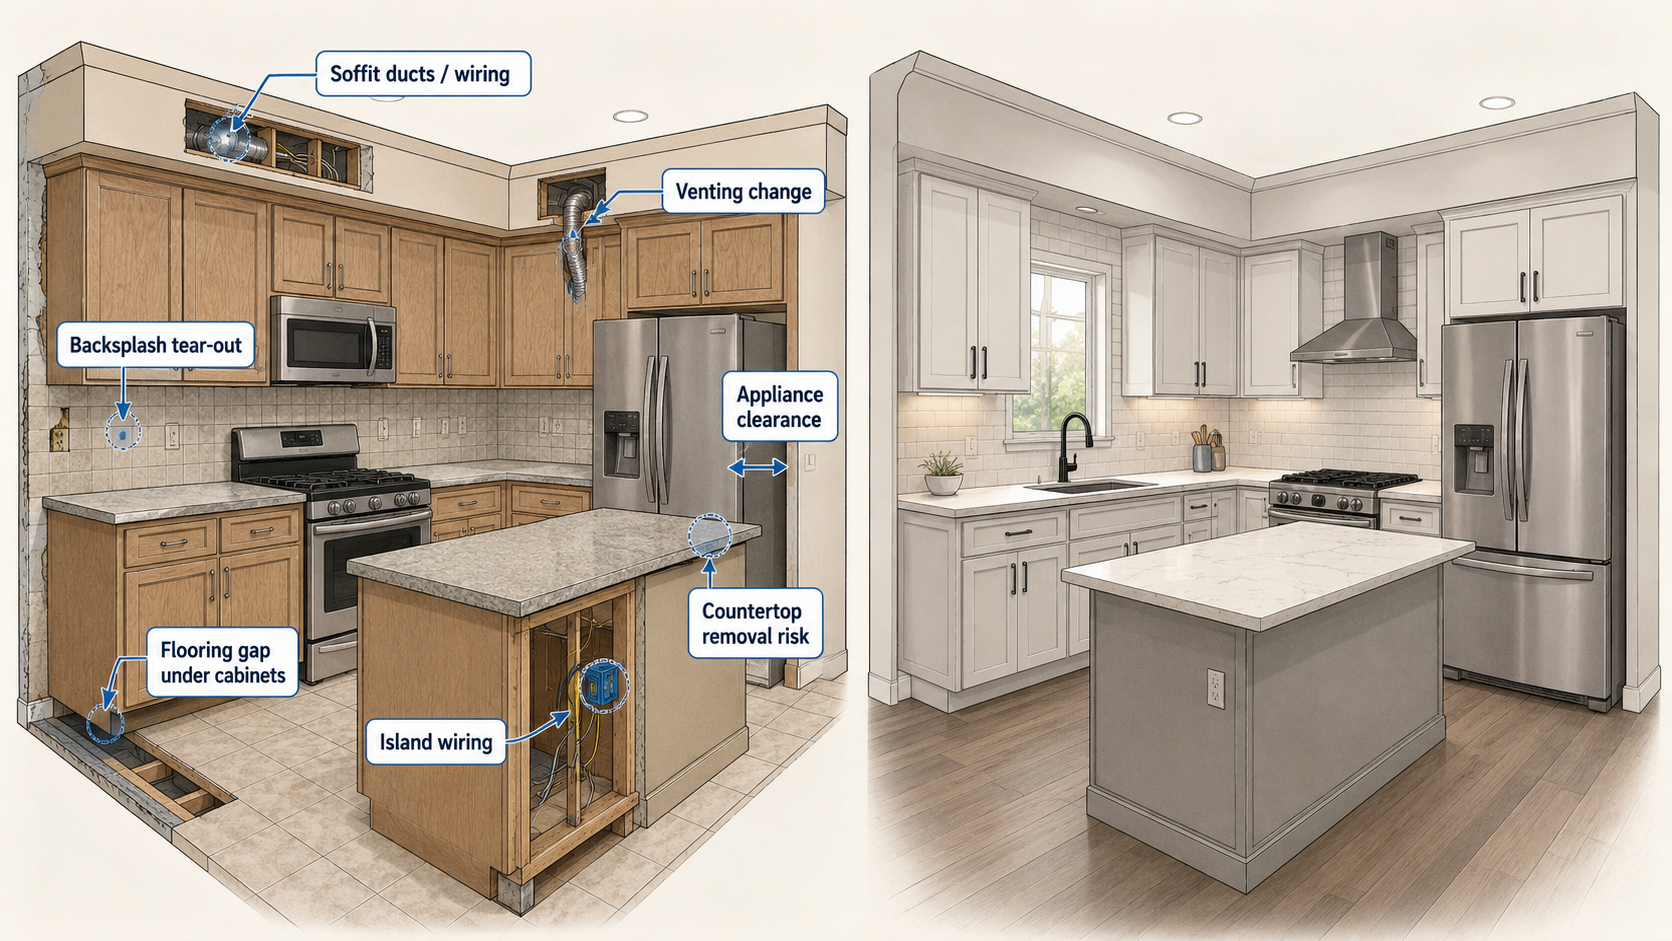
Countertop removal can stress weak cabinets. New appliances can expose awkward openings. A refrigerator upgrade can tighten the landing space at a wall. A larger range can change venting needs. That is why a finish-driven budget can blow up fast — the visible update is only part of the job.
One specific thing worth knowing about the backsplash: tumbled stone and travertine mosaics from the early 2000s were often set in thinset on standard drywall, not cement board. When they come off, they take the drywall paper with them. You can skim-coat over the damage, but you cannot just set new tile on torn paper and expect it to hold. Budget for drywall repair or replacement between the counter and upper cabinets when you pull that backsplash — iit is common enough that it should be budgeted before demolition starts.
How to Judge a Good 2000s Kitchen After Photo
A good after photo usually shows clearer contrast — the room no longer sits in one muddy brown range; quieter surface choices where one material leads and the others support; better light because the kitchen feels more open with finishes and lighting working together instead of fighting; a calmer island that works harder and blocks less; and less visual noise overall, with fewer ornate details and fewer competing finishes.
That does not mean every good after photo has to be white. Warm kitchens can look excellent. The point is control, not trend chasing.
Budget Update or Full Remodel
| Scope | What Usually Changes | Best For |
|---|---|---|
| Light refresh | Wall paint, bulbs, hardware, faucet, decor cleanup | A functional kitchen that mainly feels dark or dated |
| Surface update | Backsplash, lighting, possible cabinet paint, sink, faucet | A kitchen with good bones and dated finishes |
| Partial remodel | Countertops, island changes, desk conversion, cabinet refinish or reface | A good layout with a few strong 2000s problems |
| Full remodel | Layout, cabinets, floor, counters, appliances, lighting, ventilation | A kitchen with bad clearances, weak cabinets, or a poor plan |
Most strong before-and-after projects sit in the middle. They are not tiny and they are not full gut jobs. They fix the surfaces that control the room and leave the parts that still work. The broader 2000s kitchen remodel page goes deeper into cost scope, kitchen desks, two-tier islands, hidden costs, and what to update first.
What to Change First
If you are planning your own before-and-after, start in this order: test the room with better light first; then decide whether the countertop or backsplash is the bigger constraint; then check whether the island shape is helping or hurting the room; then figure out whether the kitchen desk should stay, convert, or go; and only then choose the cabinet direction. That order prevents a lot of expensive backtracking.
The Real Goal
A good 2000s kitchen before-and-after should not look like one trend replaced another. It should look like the room got clearer, calmer, and easier to use. Keep the useful bones. Remove the heaviest dated signals. Let the materials work in a cleaner order. That is usually what makes the after photo feel right — and what keeps it from looking like the 2020s version of the same mistake.
Read This Next
- 2000s Kitchen Remodel: What Dates It and What Still Works
- 2000s Tuscan Kitchen: What to Update and What's Back
- 1990s Kitchen Remodel: What to Update First and What to Leave Alone
- 1990s Oak Kitchen Cabinets: Keep, Refinish, Paint, or Replace?
- 1990s Kitchen Before and After: What Actually Makes It Look New