
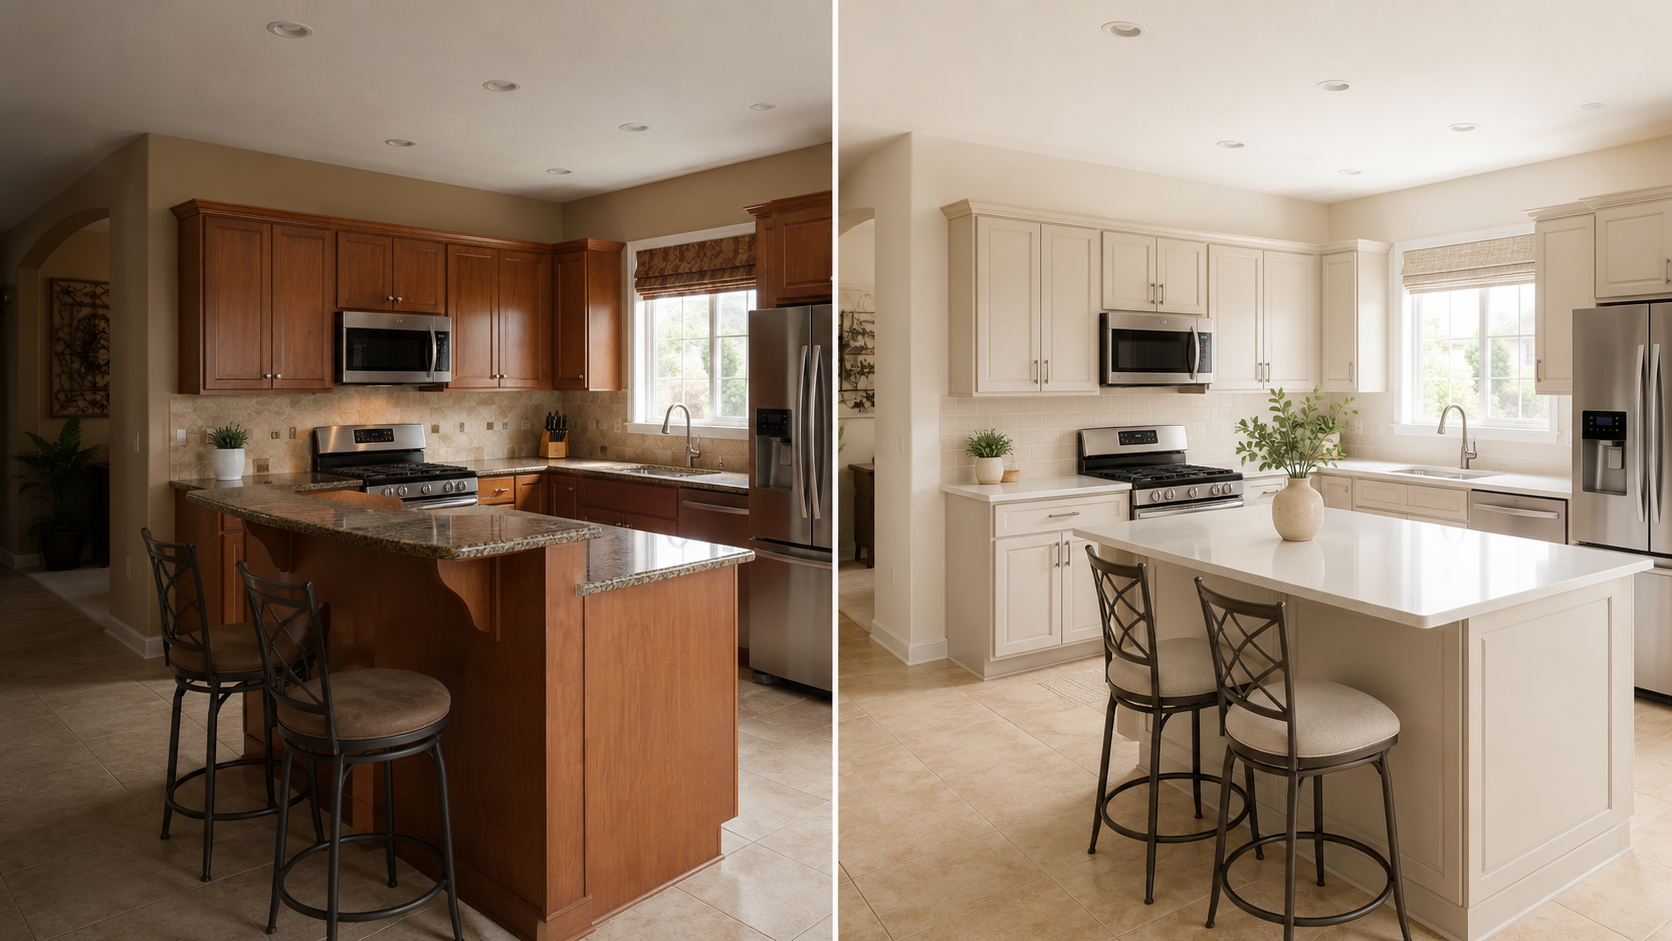
Most 2000s kitchens don't need to be gutted. The cabinet boxes are usually solid, the layout usually works, and the room is often perfectly functional — it just looks heavy, because the cherry cabinets, the brown granite, the beige tile, and the warm gold walls are all pulling in the same direction at once.
Where people lose money is the order. They paint the cabinets before the lighting is sorted, or replace the counter before anyone has really looked at the backsplash, and the kitchen ends up half-updated and somehow looking worse than when they started. This page is about what actually dates these kitchens, which parts are worth keeping, and where the budget quietly disappears once the work begins.
What Makes a 2000s Kitchen Look Dated First
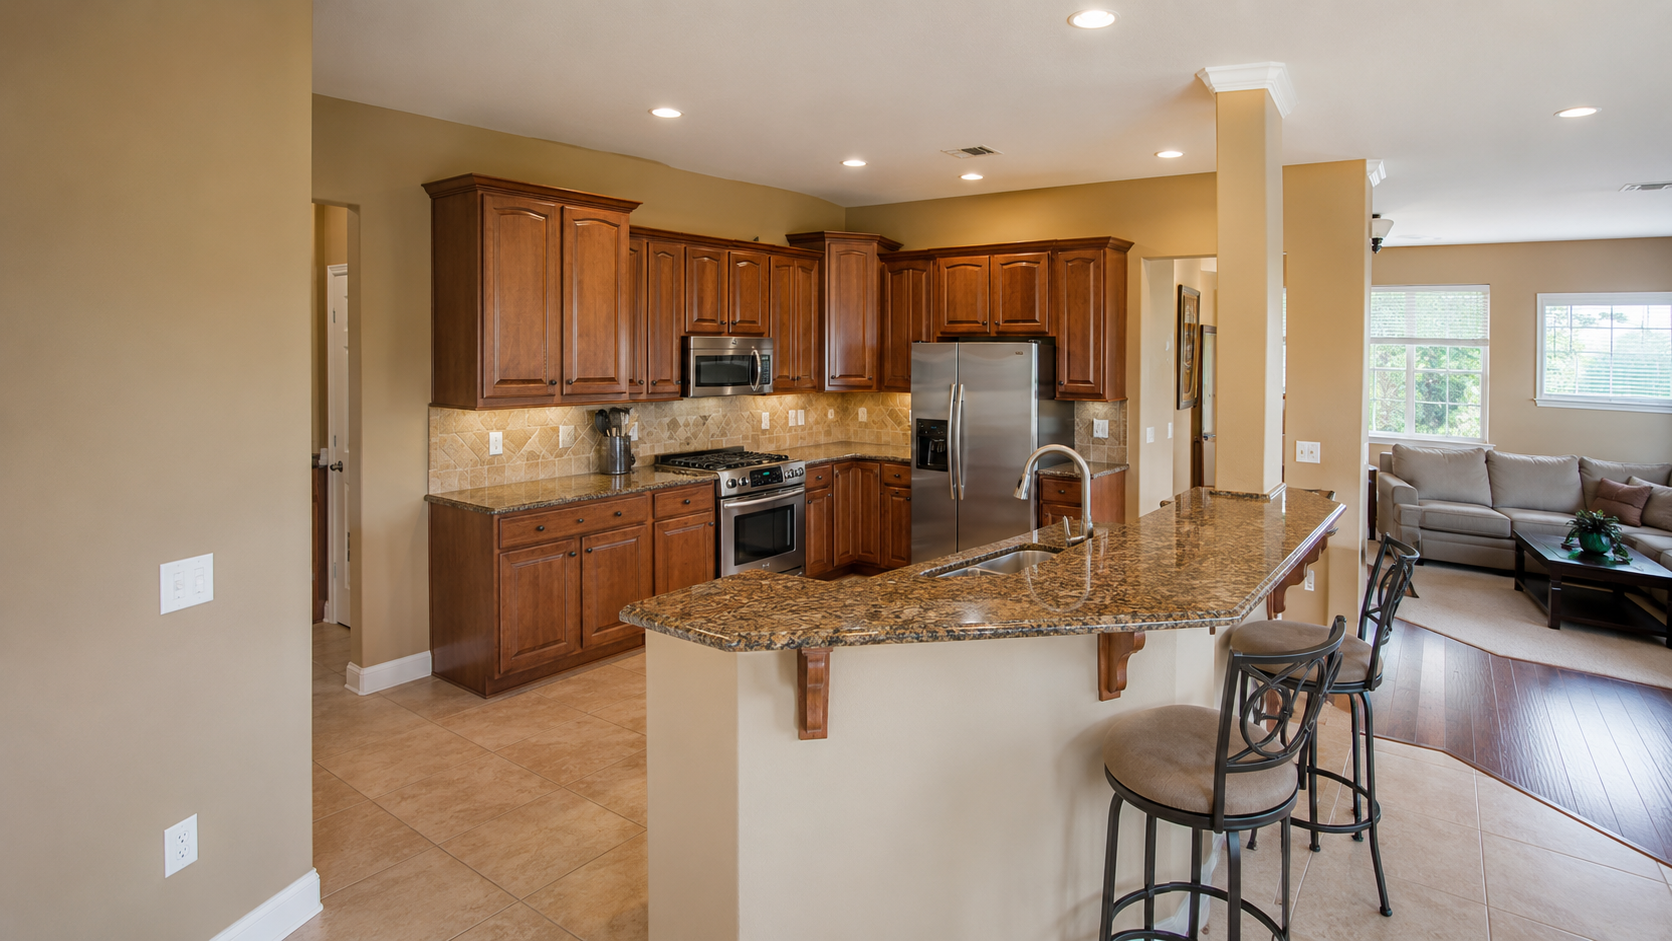
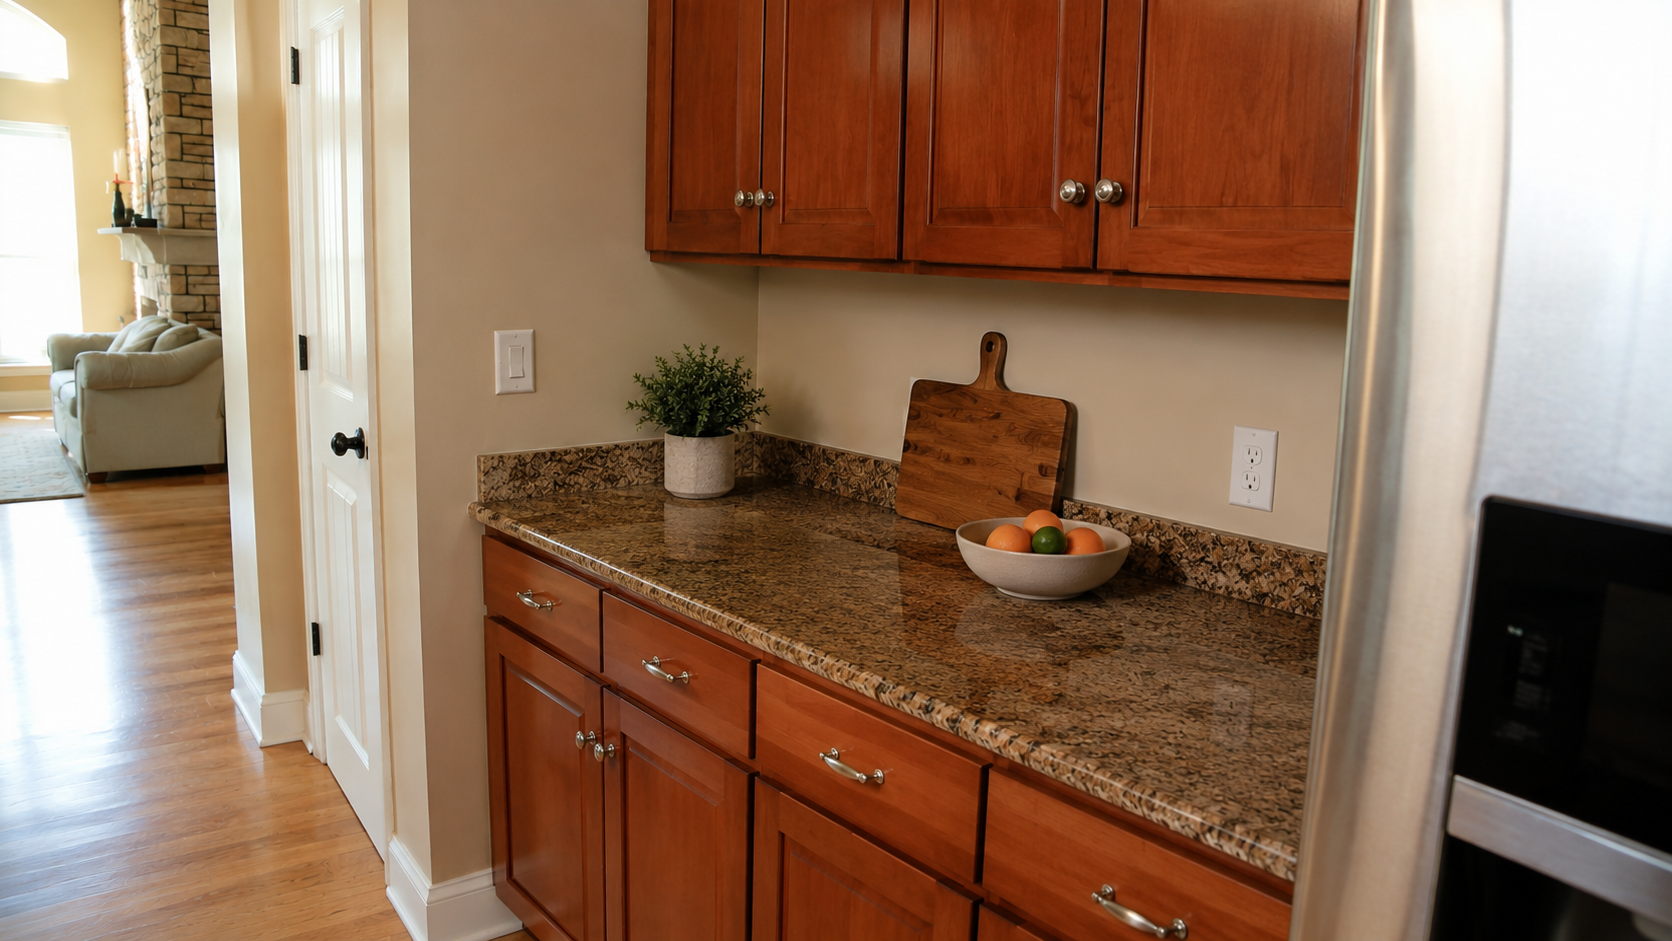
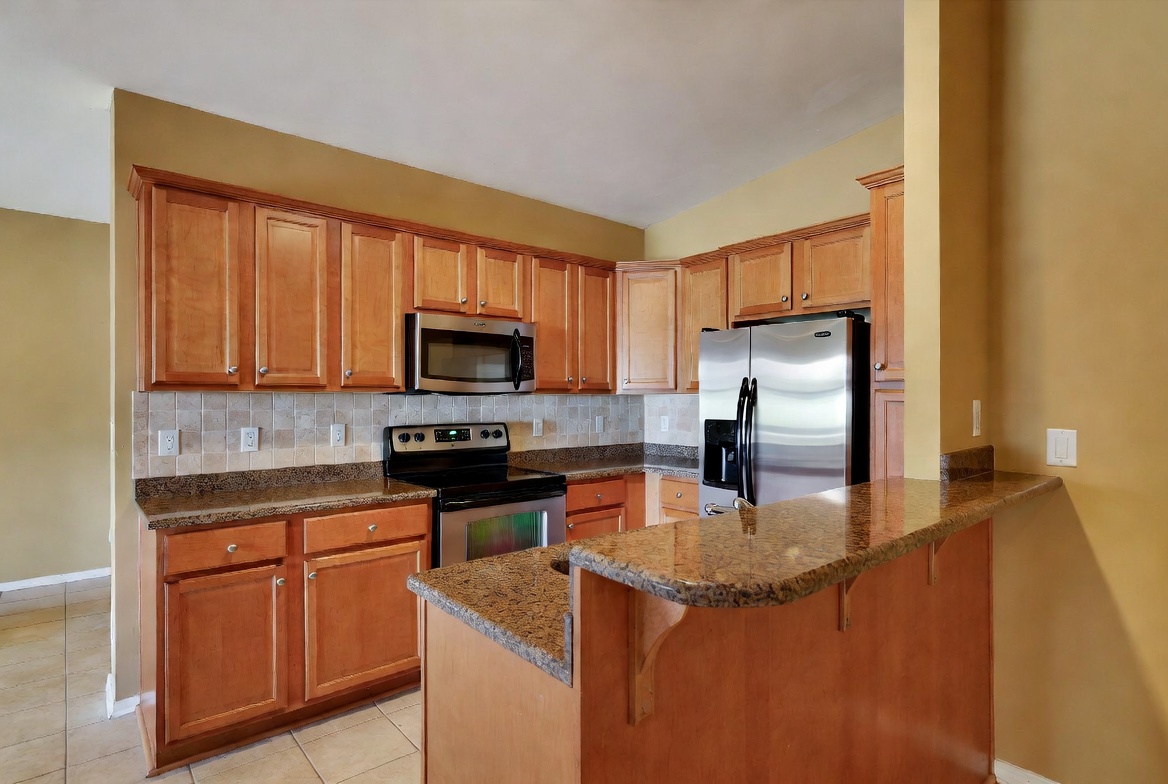
Usually it is the finish stack. Cabinets, counters, backsplash, floor, and walls all land somewhere in the same warm brown range, and nothing gives the eye a clean break. That was the look in a lot of builder kitchens, and it felt finished and expensive when the house was new. Twenty years on, the same materials make the room read darker and more closed-in than the layout actually is.
The common tells are easy to spot once you know them:
- Cherry or maple cabinets with arched or raised-panel doors.
- Brown granite, especially busy stone with gold, black, cream, red, or green movement.
- Beige tile floors that carry the same warm tone across the whole room.
- Tumbled stone backsplash, sometimes with accent tiles or a diagonal layout.
- Bronze fixtures, ornate pendants, heavy pulls, and scroll details.
- Two-tier islands with a raised breakfast bar that blocks sightlines and prep space.
- Built-in kitchen desks that turned into paper, mail, and charging zones.
Any one of those on its own can be fine. It is when four or five of them stack up together that the room starts to read as early 2000s.
A finish-only update works when the layout underneath is still good. It stops working when the room has deeper problems — poor appliance locations, an island that crowds the aisles, failing cabinets, weak ventilation, or storage that was never enough. Paint does not fix any of those.
What Might Still Be Worth Keeping
Don't assume the kitchen needs to come out. A lot of 2000s kitchens have solid cabinet boxes, decent storage, a usable pantry, and appliance locations that still make sense. The first question is whether the kitchen works, not whether you like the color.
Keep the layout if the refrigerator, sink, range, dishwasher, trash, and main prep area already cooperate. A kitchen can look brand new and still drive you up the wall if the dishwasher door blocks the path to the sink, or the island sits too close to the run behind it, or the fridge opens into a wall. A 36-inch walkway is about the minimum in a tight kitchen, and you want more than that anywhere two people pass — near the range, the dishwasher, the island seating. If the kitchen already moves well, keeping the footprint saves you flooring, electrical, countertop fabrication, and a few weeks of living without a kitchen.
Then look hard at the boxes. Open the drawers, check the cabinet under the sink, and look for swelling, sagging shelves, loose hinges, worn glides, peeling finish, and any sign of an old leak. Square boxes with a sound layout are worth refinishing, repainting, or refacing. Boxes that are coming apart are not — paint on a failing cabinet just buys you a year. The same logic runs through older wood kitchens too, including 1990s oak kitchen cabinets, where the construction is often better than whatever you'd replace it with on the same budget.
The Update Order That Prevents Waste
The most expensive mistake is starting with the most expensive visible choice. Cabinet color, countertop, and backsplash all lean on each other, so if you lock one in too early, everything else has to bend around it. The order that wastes the least money goes the other way:
- Fix the lighting.
- Choose a cleaner wall color.
- Simplify the hardware and faucet finish.
- Judge the backsplash.
- Judge the countertop.
- Choose the cabinet finish last.
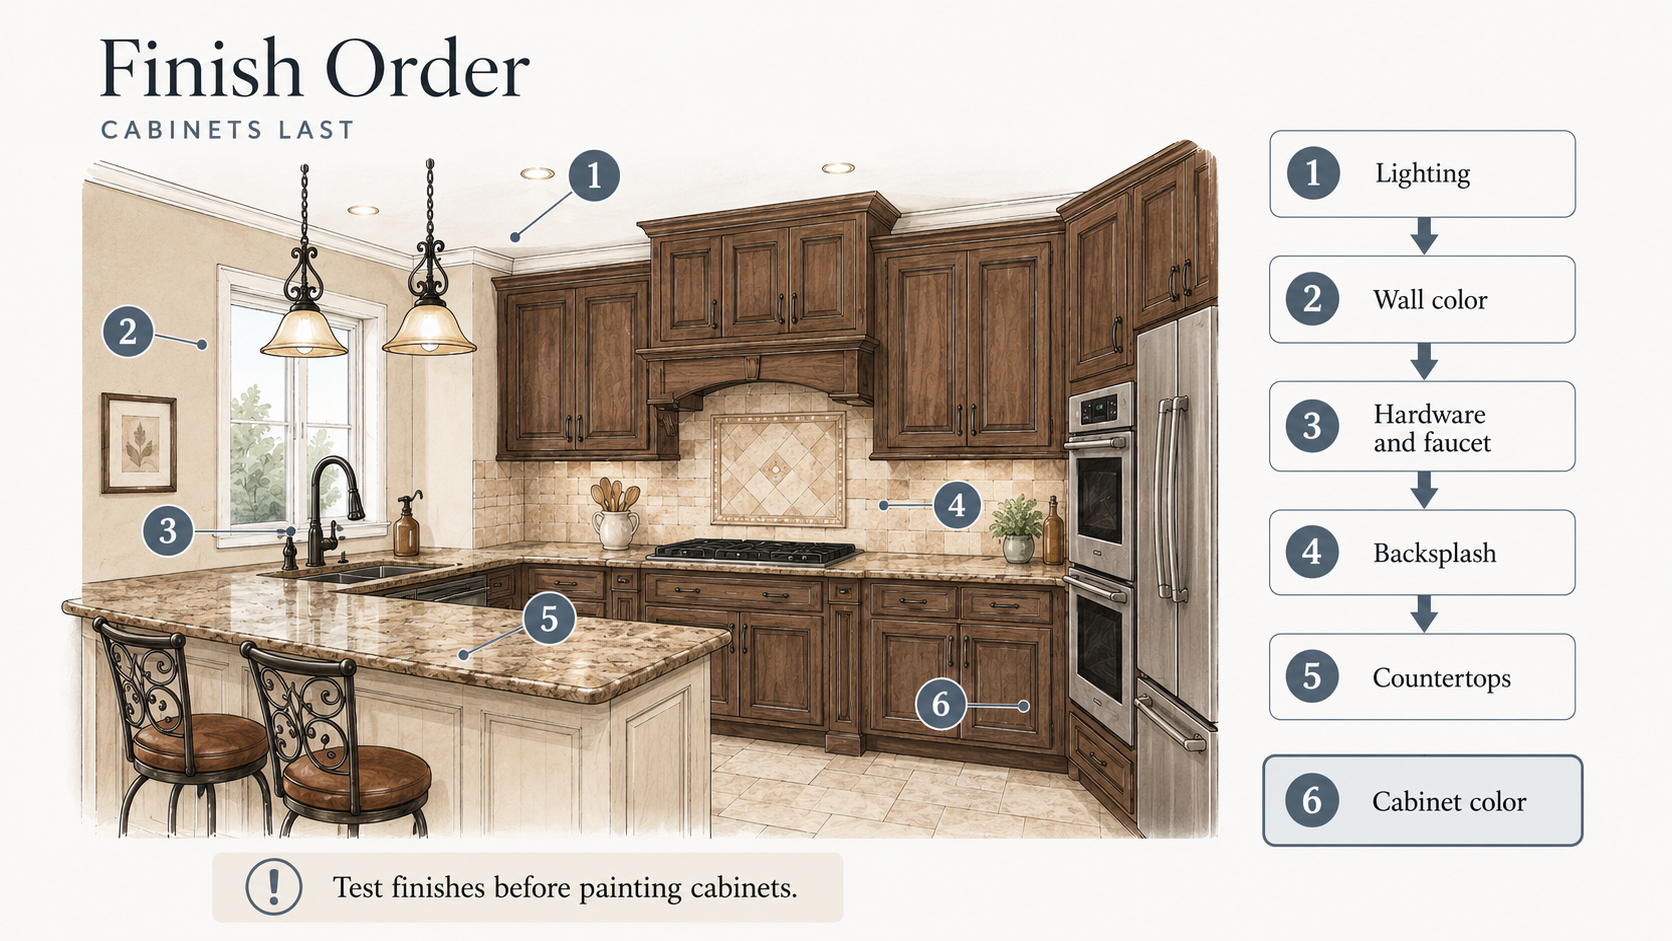
Lighting goes first because a lot of these kitchens are still running warm bulbs, heavy pendants, dark corners, and weak undercabinet light, and that alone makes everything look more orange than it is. Try bulbs around 2700K to 3000K before you choose any paint — go too cool and brown granite turns harsh, stay too yellow and the whole room stays stuck where it is.
Wall color comes next because it is cheap next to counters, cabinets, and tile. A cleaner warm white, a soft cream, a pale taupe, or a muted greige pulls a surprising amount of yellow out of a room without anyone touching the cabinetry. Hardware and faucet finish are small jobs that change the read of the room more than they should — old bronze and thick curled pulls make even good cabinets look older than they are.
Cabinet color comes last because paint can't rescue the wrong counter or backsplash sitting next to it. White cabinets beside busy brown granite can make the granite look louder, not calmer. Cream cabinets beside yellow-beige tile can turn the whole room muddy. Settle the fixed surfaces first, then choose.
The Cabinets Might Be Too Short, Not Just Too Dark
Color gets most of the blame, but a good share of what reads as dated in these kitchens is actually proportion. Builder uppers from the early 2000s often stopped a foot or more below the ceiling, with a soffit or just a dead gap up top, and the doors were usually cathedral or arched rather than flat. Paint those boxes white and you still have short, ornate cabinets with a gap over them. Cleaner, yes. Current, not really.
The change that does the most work here is height. You can stack a second row of cabinets or a glass-front section on top to carry the run up to the ceiling, or build the existing boxes up with filler and stacked crown so they read as full-height, or close in the bulkhead above them so the gap disappears altogether. Reface with a flat or shaker door while you are at it and you have changed the profile without replacing a single box. I have watched roughly eight inches of added height plus a new door front do more for a kitchen than a full coat of paint ever did, and it usually costs less than people brace for, because the cabinet boxes themselves never move.
It is worth settling this before you commit to a paint color, because a short cathedral-door upper painted bright white can actually look more dated, not less. The fresh paint sends your eye straight to the profile and the gap above it — the two things you were trying to play down.
Brown Granite and Beige Tile Control More Than You Think
Brown granite is rarely just a counter. It often sets the whole palette, because a single slab can carry cream, black, burgundy, gold, green, gray, and orange all at once, and those flecks decide what works for the cabinet paint, the wall color, the backsplash, the hardware, even the bulb temperature. The photo of a white kitchen you saved online tells you nothing about what will happen beside your particular Baltic Brown or Santa Cecilia. Your slab is the control sample.
The floor pulls in the same direction, and here the practical answer is usually the same one the pros land on: leave it. Beige tile or travertine across a whole kitchen is the single most expensive and disruptive thing you can change — it is full square footage, full demo, and it drags cabinets and appliances into the job — and you almost never need to. Work the rest of the palette around it instead. If the floor leans pink-beige or orange-beige, that just narrows which whites and creams will sit right above it; a calmer floor gives you more room to lighten everything else.
Whatever you are choosing, test it in the actual room for a full day. Morning light, afternoon light, and the bulbs at night will each make the same white, cream, taupe, or greige look like a different color. And don't judge a sample on the wall alone — hold it against the counter, under the cabinet, beside the backsplash, and down on the floor, because that is where the fight you didn't see coming shows up.
The Built-In Kitchen Desk Problem
The built-in desk is one of the clearest fingerprints of an early-2000s kitchen. It made sense in a house with a landline, a paper calendar, and a desktop computer. In most homes now it is too low to be useful counter space and too out in the open to be a real office, so it quietly becomes the drop zone — mail, cords, school papers, keys, receipts, a tangle of chargers — because it sits right where the kitchen traffic already runs.
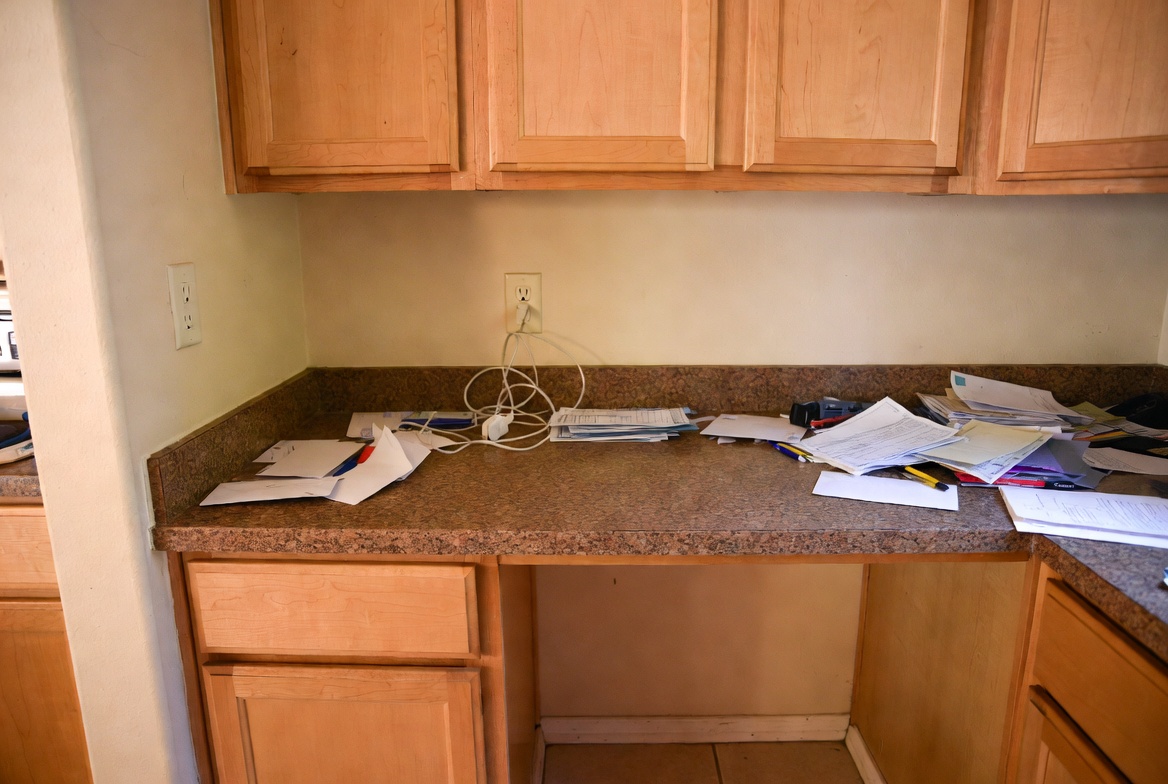
Before pulling it out, check three things. The desk-height cabinets often don't line up with the rest of the run, so the countertop has a step in it. Removing the knee space can expose missing flooring or base trim that was never run behind it. And there is usually old low-voltage wiring back there — a dead phone jack, a couple of outlets — that needs cleaning up.
The move that earns its keep is closing the knee opening and continuing the cabinetry at counter height, then giving that stretch a job. A beverage or coffee station works well in this spot — a few drawers, a beverage fridge, glass-front uppers — and so does small-appliance storage or a proper pantry pullout.
What you don't want is to tear out the desk just to leave a blank wall. These kitchens almost always need more storage, not less. The win is turning an awkward feature into something you use every day.
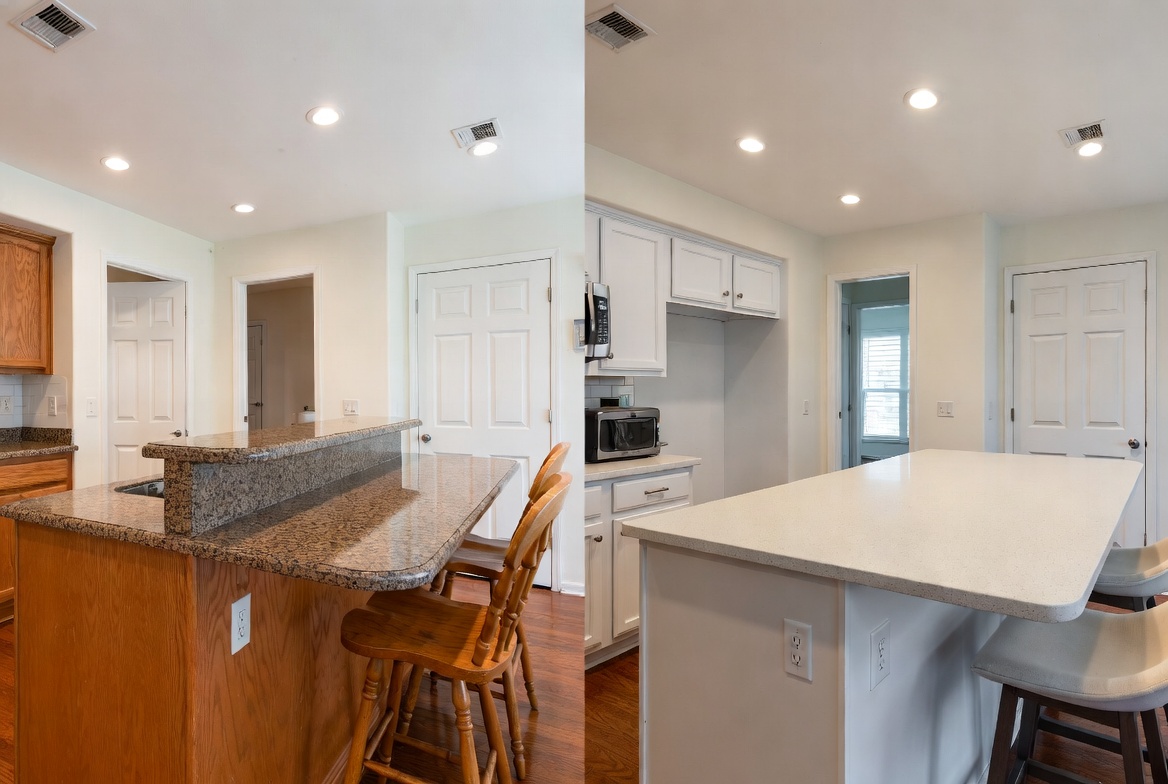
The Two-Tier Island Problem
Raised-bar islands were everywhere in the 2000s. The taller back ledge hid the sink mess from anyone sitting across from it, gave guests a perch, and made the kitchen feel a notch more formal. It also chopped the counter into two levels, blocked the view across the room, and left the prep surface smaller than it looked.
Dropping that bar to one flat level is one of the strongest single moves you can make in a 2000s kitchen. You get more usable prep space, a clear sightline across the room, easier serving, and cleaner seating — bring the counter out about 14 inches past the cabinet face and you have proper knee room for stools without the second tier.
The catch is that it is not really a countertop swap. The raised section is usually built on its own short wall, and once you take it down you may be dealing with outlets, a half-wall to frame out, finished end panels, brackets, and a new slab cut for the whole top. If the island's footprint changes at all, the floor around the base often needs patching where the old base sat. None of that makes it a bad idea. It just means pricing it as a small construction project rather than a decor swap, so the number doesn't ambush you.
Cabinets: Paint, Refinish, Reface, or Replace?
Cabinets are the part people agonize over, which makes sense — they take up the most visual space and cost the most to change. The decision comes down to the condition of the boxes and how wrong the doors are.
Paint is the right call when the boxes are solid, the doors are worth keeping, and the layout works. It lightens a heavy kitchen, but it won't erase a dated door profile or save a failing cabinet.
Refinishing suits a kitchen where the wood is good but the stain is too red, orange, glossy, or dark. It is fussier than paint and the result depends on the existing finish, the wood species, and the skill of whoever does it.
Refacing earns its cost when the boxes are sound but the doors are the problem — new fronts and a new profile without ripping the kitchen apart.
Replacing makes sense when the layout itself fails, the boxes are damaged, the drawers are poor, the uppers are too short to be worth saving, or the appliances are changing enough to force a new plan anyway.
If your kitchen leans Tuscan — heavy on brown granite, tumbled stone, and bronze — the finish calls overlap with the 2000s Tuscan kitchen update, which goes deeper into that warm style and the lighter way it is coming back.
The Backsplash Controls More Than Its Square Footage
The backsplash sits right at eye level, so it has a louder say in the room than its small footprint suggests. A tumbled stone field with accent tiles, a diagonal layout, bronze inserts, or a framed feature behind the range will keep a kitchen looking 2000s even after you've changed everything else around it. If the counter is busy, the backsplash usually needs to get quieter; if the backsplash is the busy one, the counter and cabinet color have less room to move.
Tearing out old tile also tends to take a layer of drywall with it, so budget for patching, a skim coat, outlet adjustments, and possibly redoing the undercabinet lighting while the wall is open. A backsplash that looked like a $1,500 job on paper grows once the wall behind it is in pieces. And like everything else here, don't choose the tile from a loose sample — hold it against the counter, the cabinet, the floor, and the wall color, because the wrong white can make cream granite look dirty and the wrong beige will leave you exactly where you started.
Where Remodel Costs Hide
A 2000s kitchen should never be priced from the finishes alone. The surprises live where those finishes meet the building itself.

Check these before you settle on a number:
- Soffits: they may hide ducts, wiring, plumbing, or uneven ceiling framing.
- Flooring under cabinets: old tile or hardwood often stops at the cabinet line and never ran underneath the island or the boxes.
- Backsplash tear-out: removing tile can damage drywall and turn up outlet or lighting issues.
- Island wiring: outlets, switches, and appliance circuits may need to move or be brought up to code.
- Countertop removal: old counters can take weak cabinets with them on the way out.
- Appliance clearances: today's refrigerators, ranges, and dishwashers don't always drop cleanly into the old openings.
This is the part to read before you set a budget. The visible finish is often the affordable bit. It is the repair work around it that moves the final number.
Budget Update vs Full Remodel
A 2000s kitchen can be done in layers, and the right scope depends on the cabinets, the layout, the lighting, the counters, the floor, and how much disruption you can stand.
| Scope | What Changes | Best For |
|---|---|---|
| Light refresh | Wall paint, bulbs, hardware, faucet, simpler decor | A functional kitchen that feels dark or dated but still works |
| Surface update | Backsplash, lighting, sink, faucet, hardware, possible cabinet paint | Good layout, solid cabinets, dated finishes |
| Partial remodel | Countertops, backsplash, island change, desk conversion, cabinet refinish or reface | Good footprint with a few 2000s features holding it back |
| Full remodel | Layout, cabinets, floor, counters, lighting, appliances, electrical, ventilation | Bad clearances, failing cabinets, poor storage, or layout problems |
As rough 2026 planning ranges, not quotes: a light refresh that is mostly paint, lighting, hardware, and a faucet can land anywhere from a few hundred dollars to about $2,000. A surface update moves into roughly $5,000 to $15,000 once backsplash, lighting, a sink, and cabinet finishing come into it. A partial remodel with new counters, an island change, a desk conversion, and professional cabinet work runs higher than that, and a full remodel that touches layout, flooring, electrical, and appliances climbs past $30,000 without much trouble. Local labor, cabinet condition, material grade, and whatever turns up behind the walls move all of those — and a contractor can only price what they can see unless the scope pays for opening things up first.
What to Do First
Start with the cheap moves that let you actually see the kitchen before the expensive decisions get made.
- Change the bulbs and look at the room in better light.
- Paint the walls a cleaner neutral if the current color is yellow, gold, tan, or orange-beige.
- Clear out the heavy decor — valances, fake old-world accessories, the clutter on top of the cabinets.
- Hold hardware and faucet finishes against the cabinets and counter.
- Decide whether the backsplash, the counter, or the cabinet color is the real problem.
- Check the island, the desk, the soffits, the flooring, and the appliance openings before you set a budget.
After that the direction tends to sort itself out. Some kitchens just need the cabinets painted and the lighting fixed. Some need a quieter backsplash. Some need the raised bar cut down or the desk converted, and a few need a full reset because the layout never worked in the first place. The good version of this remodel keeps the bones that are still doing their job, strips out the heaviest of the dated signals, and gets the order right so you don't end up stranded between builder-grade and half-modern.
Read This Next
- 2000s Tuscan Kitchen: What to Update and What's Back
- 1990s Kitchen Remodel: What to Update First and What to Leave Alone
- 1990s Oak Kitchen Cabinets: Keep, Refinish, Paint, or Replace?
- 1990s Kitchen Before and After: What Actually Makes It Look New