
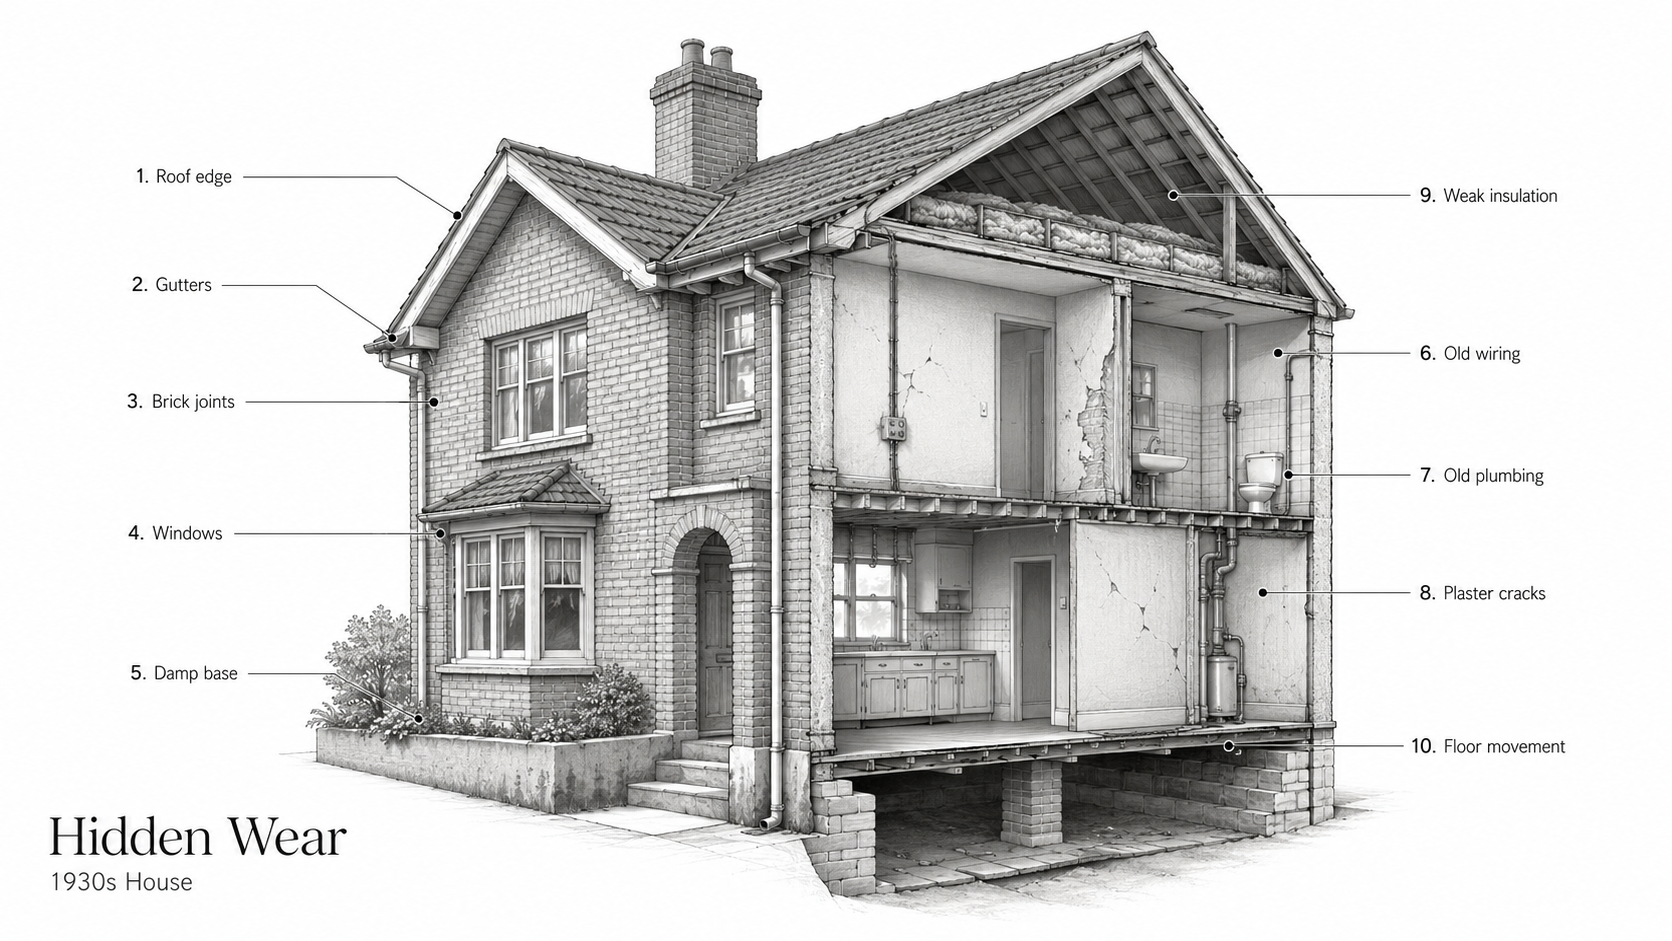
1930s houses usually fail in connected ways.
The roof leaks at a weak edge. A gutter dumps water against the brick. Mortar starts to let go. A lower wall stays damp. Plaster cracks. Floors move a little. The wiring still works, but not for the loads a modern house asks of it now. One thing leads to the next, which is why chasing them one at a time rarely works.
None of that makes these houses bad. A good 1930s house is often better planned and better built than people expect. But the weak points are real, and the order you deal with them matters: handle water, movement, and safety first, then comfort, then the way it looks.
If you are still trying to understand the style and original features, start with what 1930s houses really looked like. If you are planning upgrades once the repair issues are understood, use 1930s house renovation next.
Start With Water
Water does the most damage because it usually hides before it shows. By the time you see a plaster stain, bubbling paint, soft trim, or a musty lower room, the source may have been active for months — and in many 1930s houses, the cause starts outside and works its way in. The first thing I check on a damp wall is not the wall. It is the gutter above it.
Check these first:
- gutters and downspouts
- roof edges and flashing
- chimney junctions
- ground levels against exterior walls
- crawlspace, basement, or foundation vents
Overflowing gutters soak brick, bad grading keeps lower walls wet, and blocked vents trap moisture under timber floors. Owners almost always notice the symptom indoors first, but the cause is usually outside, doing the damage quietly.
Cracks, Sloping Floors, and Movement
Not every crack is a structural emergency. Old houses move a bit — plaster cracks, timber shrinks, and floors can settle slightly over many decades. The real question is whether the movement is old and stable, or whether the house is still shifting now.
Pay attention to:
- diagonal cracks near windows and doors
- doors that suddenly rub or stop latching
- floors that feel more uneven than they used to
- gaps opening where trim meets floors or ceilings
One pattern worth knowing in these houses is cracking above a bay window. The original bay frames sometimes did real structural work, so a later window replacement without proper support — or a tired lintel over the opening — can let movement show up there first. It is common enough that a neighbor's identical house often shows the same thing.
The wrong move is cosmetic patching before the cause is understood. Fresh filler over an active crack buys a few months at best. If the pattern suggests ongoing movement, check the drainage, foundations, framing, and load paths before doing anything decorative. Sometimes it is a serious foundation issue; sometimes it is poor drainage, tree roots, a bad previous opening, or long-term moisture change. The point is the same either way — find out which one before you hide the evidence.
Brick, Mortar, and Damp Walls
1930s brickwork can last a very long time, but it does not respond well to bad repairs. This is where a lot of owners get caught: the wall looks old, so someone repoints it with hard cement mortar, paints over the damp, or seals the surface. It looks tidier for a while. Then the brick starts paying for it.
Watch for:
- mortar falling out of joints
- spalled brick faces
- salt marks or tide lines low on interior walls
- damp patches that return after repainting
Older brick usually needs a softer, compatible mortar. If the mortar is too hard, the wall loses its flexibility and moisture has fewer places to escape, so the brick takes the damage instead. If the masonry is already showing obvious joint loss, read how to know if your brick mortar is failing before paying for repointing or paint.
Most "Rising Damp" Is Something Else
If a wall shows damp low down and someone reaches for a chemical injection or a new damp-proof course, stop before you pay for it. In a 1930s house, low-level damp gets diagnosed as "rising damp" far more often than it actually is.
The real cause is usually simpler and cheaper to fix. Raised ground, a new path, a patio, or a thick coat of render can bridge the original damp-proof course and let water track straight into the wall above it. Air bricks that ventilate the underfloor void get buried, painted over, or planted in front of, so moisture has nowhere to go. A leaking gutter or downspout soaks one patch of wall year-round. Cold corners and window reveals collect condensation because the room cannot breathe. Every one of those reads as damp on a moisture meter, and none of them is fixed by injecting chemicals into the brick.
When I see a wall painted bright white just before a sale, I assume it is hiding something rather than proving the house is dry. The honest order is the same as everywhere else on this page: find where the water is actually coming from before treating the symptom — and get that read from someone independent, not from a company whose quote is for the very treatment they are diagnosing. A damp injection sold off a meter reading is one of the most common unnecessary bills an old-house owner ever pays.
Roof Leaks and Rotten Timber
Roof problems spread. One slipped tile, a failed flashing detail, an undersized gutter, or a bad roof edge can turn into wet insulation, stained ceilings, rotten rafters, and damaged plaster if it sits long enough.

Check for:
- broken or slipped tiles
- sagging roof lines
- dark staining in the attic
- soft timber near eaves, chimneys, or valleys
- gutters that overflow in ordinary rain
A bad gutter can imitate a much bigger damp problem by dumping water exactly where the house is weakest, so before you assume the wall has a mysterious moisture issue, check whether rainwater is simply being mismanaged above it. And if timber is already soft, do not patch the visible edge and move on — stop the water first, then assess how much wood is actually gone.
Old Wiring, Old Plumbing, and Cold Rooms
This is where renovation budgets stop being theoretical. The house may still look charming, but the services behind the walls, floors, and ceilings are often what changes the scope fast.
Wiring May Still Work and Still Be Wrong
Some 1930s wiring is simply dated, and some is unsafe. Either way, a modern household asks more from it than the original system was designed to handle.
- old circuits may be overloaded
- outlets are often too few and in the wrong places
- previous patch repairs can leave a dangerous mix of old and newer work
Electrical work should not be treated as decoration. If the system is outdated, overloaded, damaged, or unsafe, it needs a proper assessment before walls and ceilings are closed up.
Plumbing Can Be the Expensive Surprise
Old supply and waste lines often hide behind good-looking fixtures. Lead and galvanized pipework can still turn up in older houses or later patch jobs, and even when a line is not hazardous, it can be scaled, leaking, poorly routed, or close to failure.
- check hidden pipe runs, not just the visible fixtures
- replace failing waste and supply lines before refinishing walls and floors
- keep good original sinks or tubs if you want, but do not trust old hidden pipework just because the fixture looks charming
Kitchens and bathrooms expose this problem fastest, because they combine plumbing, cabinets, tile, waterproofing, ventilation, and finish work in one small area.
Cold Rooms Are Often a System Problem
A lot of 1930s houses lose heat in predictable places: the attic, the floors, old windows, service gaps, and poorly sealed penetrations. The mistake is trying to solve a cold house only by upgrading the furnace or turning the heat higher — comfort usually improves when heat loss is reduced first, and the heating is then sized around the improved house.
- check attic insulation before expensive mechanical upgrades
- seal obvious air leaks before adding more heat
- keep ventilation in mind so insulation does not create condensation or mold
The right insulation approach depends on climate, wall assembly, roof design, and how much original material is staying.
Lead Paint, Asbestos, and Old Materials
A 1930s house may contain old paint, later floor layers, old adhesives, pipe insulation, ceiling materials, or patched products that need caution. Do not sand, scrape, grind, or demolish unknown materials casually — pre-1978 paint can contain lead, and some old or later-added materials may be suspect for asbestos. The risk depends on the material, its condition, its location, and whether the work will disturb it.
The practical rule is simple: test before disturbing suspect materials, especially before demolition, sanding, floor removal, ceiling work, pipe work, or large kitchen and bathroom remodels.
Repairs That Make Things Worse
Some repairs make a 1930s house worse because they hide symptoms instead of fixing causes.
- Painting over damp. It hides the symptom for a while and traps you into repeating the job later.
- Using the wrong mortar. Hard cement can damage old brick.
- Replacing windows with the wrong proportions. The facade loses shape fast.
- Starting with finishes instead of structure and water. It feels productive, but it is usually backward.
- DIY on masonry, roofing, wiring, or active damp. Cheap work can turn into expensive work.
The house does not need to stay frozen in time. It needs repairs that still make sense inside the house you bought.
Kitchens and Bathrooms Expose Hidden Problems
Kitchens and bathrooms tend to accelerate the budget because they combine systems work, finishes, labor, and layout decisions all in one place. A 1930s kitchen may still have a strong sink wall, original cabinets, old plumbing routes, floor layers, and plaster conditions that matter. A bathroom may still have good tile and fixtures but weak ventilation, tired plumbing, or water damage hiding behind the finish.

If the kitchen is already driving the budget, read 1930s kitchen remodel. If the issue is cabinet replacement, read 1930s kitchen cabinets. If the sink is original, read 1930s kitchen sinks before replacing it.
What These Repairs Usually Cost
Costs vary by region, access, contractor quality, permit requirements, and how many hidden problems turn up once the work starts. Treat these as planning ranges, not quotes.
| Repair Area | Planning Range | What Changes the Cost |
|---|---|---|
| Electrical rewiring | $10,000-$25,000+ | House size, access, panel work, plaster repair, number of circuits |
| Plumbing replacement | $6,000-$18,000+ | Pipe access, old drains, wall repair, kitchen or bath moves |
| Damp and drainage work | $4,000-$15,000+ | Grading, gutters, foundation drainage, wall damage |
| Roof repair or replacement | $10,000-$30,000+ | Roof size, pitch, flashing, decking, material choice |
| Window restoration or replacement | $8,000-$30,000+ | Number of windows, repairability, storm windows, custom profiles |
| Kitchen renovation | $25,000-$80,000+ | Cabinets, sink wall, plumbing, wiring, layout changes, finishes |
| Bathroom renovation | $15,000-$40,000+ | Tile, waterproofing, plumbing, fixture reuse, ventilation |
| Brick repairs and repointing | Highly variable | Wall area, access, mortar type, scaffold, extent of damage |
The dull advice is still the right advice: fix structure, water, wiring, plumbing, and insulation first, and leave the decorative upgrades for after that. Keep contingency money, because old houses almost always reveal more once the work starts.
What Shows Up After Work Starts
Even a careful inspection only sees so much. Once the work begins, a 1930s house tends to confirm that its problems were connected all along — the damp patch, the blocked air brick, and the leaking gutter turn out to be one story, not three.
A wall opens and the old leak has been quietly feeding rot no one could see. A floor comes up and the joist ends are damp where a buried air brick stopped the void from breathing. Repointing one elevation shows the same soft mortar everywhere the weather hits. None of it is random; it follows the water.
That is why the sequence on this page matters. Stop the water, confirm the cause, and keep the sound original parts until you know what the repair actually needs. Leave contingency money, because an old house almost always has a little more to show you once the surface comes off.
FAQ
How can I tell if my foundation is moving?
Look for diagonal cracks, sloping floors, sticking doors, and separation around openings. One sign on its own may not mean disaster, but a pattern matters.
Is "rising damp" in a 1930s house usually real?
Often it is misdiagnosed. Low-level damp in these houses is more commonly caused by raised ground bridging the damp-proof course, blocked air bricks, leaking gutters, or condensation. Find the external cause before paying for a chemical injection or new DPC, and get an opinion from someone who is not selling the treatment.
Should I repaint old brick?
Usually no. Paint can trap moisture and hide failing mortar, drainage problems, or spalled brick. Repair the wall first, then decide whether paint is even appropriate.
Is old wiring always a problem?
Not every old system is dangerous, but many 1930s electrical systems are outdated for modern loads. Have the system assessed before major renovation, especially before closing walls.
Should I replace original windows?
Only if they are too far gone to restore sensibly. Proportion matters, and bad replacements can damage the look of the whole house.
What should I fix first in a 1930s house?
Start with water, structure, wiring, plumbing, roof, drainage, and any major safety issue. Cosmetic work comes later.
Are 1930s houses expensive to repair?
They can be when hidden systems, roof work, drainage, plumbing, wiring, or masonry repairs are deferred. The earlier the cause is found, the less likely you are to pay for the same damage twice.
Read This Next
- What 1930s Houses Really Looked Like
- 1930s House Renovation: What to Fix Before You Modernize
- 1930s Kitchen Design: What Modern Updates Ruin First
- 1930s Kitchen Remodel: What a Wall Hides Until Demolition Day
- 1930s Kitchen Sinks: Keep It or Replace It?
References
Sources used for this article
- National Park Service: Preservation Briefs
- National Park Service Preservation Brief 18: Rehabilitating Interiors in Historic Buildings
- EPA: Lead Renovation, Repair and Painting Program
- EPA: Protect Your Family from Exposures to Asbestos
- Angi: Cost to Rewire a House (2026 data)
- Angi: Cost to Repipe a House (2026 data)
- HomeAdvisor: Roof Replacement Cost