
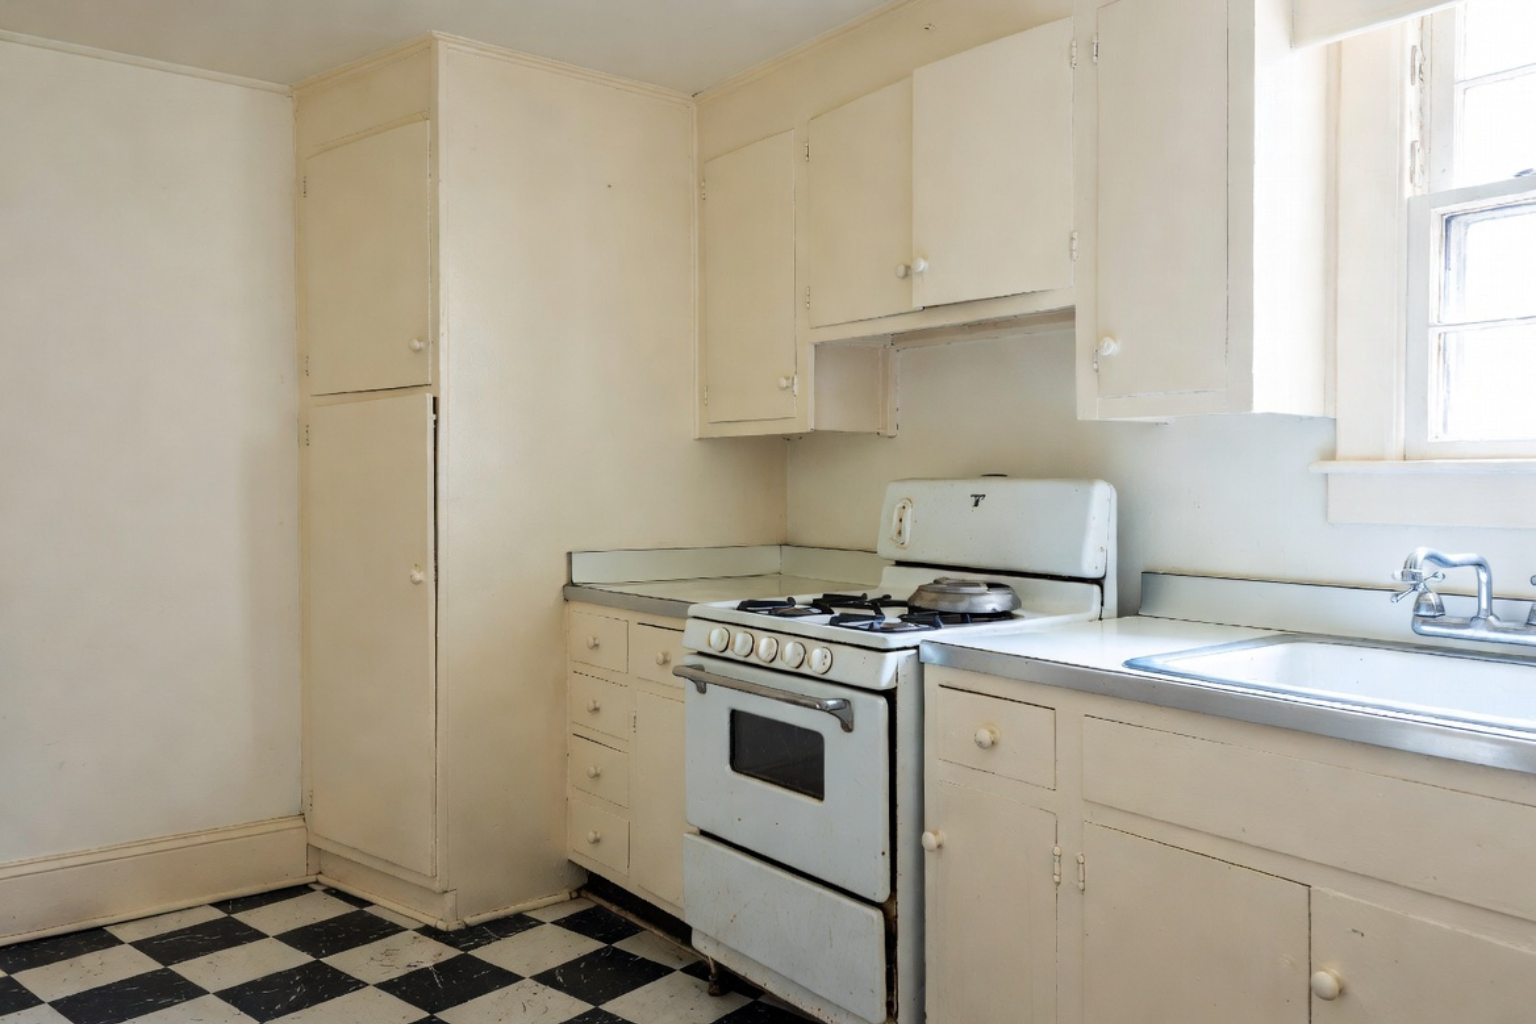
Original 1930s kitchen cabinets are often better than the replacements people buy to "fix" them.
Not always, of course. Some are rotten, cut apart, painted shut, or just too far gone to save. But when the boxes are sound, the proportions are good, and the run still fits the room, tearing them out can make the kitchen worse instead of better. The new cabinets come in straighter and cleaner, and the room loses the built-in rhythm that made it work in the first place. I have pulled out plenty of crisp new boxes that left a room feeling more generic than the tired old ones they replaced.
So the first decision is not whether the cabinets look tired. It is whether they are still doing their job. Are they holding the sink wall together? Do they fit the window? Are the drawers repairable? Is the storage awkward because the cabinets are bad, or because a later owner changed the room around them? The honest answer to those questions decides far more than the color of the paint.
The whole thing comes down to condition, fit, and consequence: what still works, what can be upgraded, and when replacement finally makes sense. For the larger room context, start with 1930s kitchen design. If the work has already moved into wiring, plumbing, demolition, or a full layout change, use 1930s kitchen remodel.
Why Original 1930s Kitchen Cabinets Can Be Better
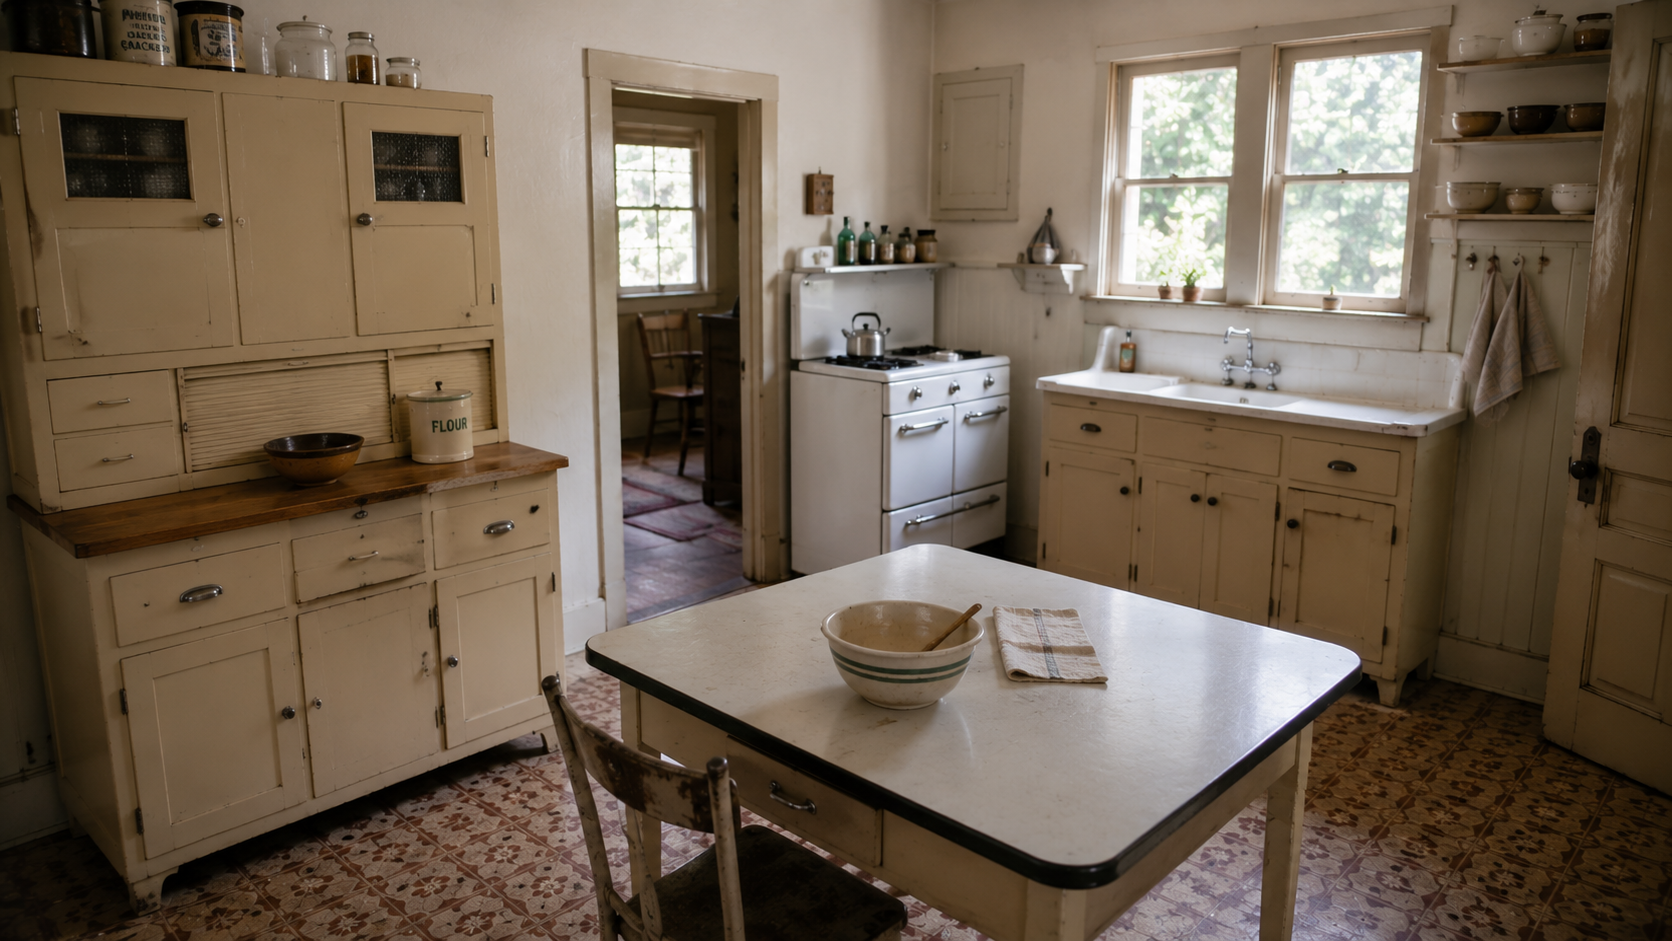
The best original cabinets were built as part of the room, not dropped into it later, and that is the whole difference. A cabinet run in a 1930s kitchen usually works with the window height, the sink position, the door trim, the stove location, and the small footprint all at once. The boxes may be shallow by modern standards, the drawers may be simple, and the paint may be worn — but the run belongs to the wall it sits on.
New cabinets solve real problems, but a lot of stock replacements bring fresh ones: deeper boxes, filler strips, tall pantry blocks, thick doors, awkward appliance openings, and a layout that quietly ignores the room's original scale.
| Original cabinets may keep | New cabinets may create | What to check first |
|---|---|---|
| Older proportions, window alignment, built-in feel, repairable wood, sink-wall rhythm | Too much depth, heavy doors, broken trim lines, filler gaps, generic layout | Box condition, drawer function, water damage, paint layers, hardware, storage problems |
The point is not that old is always better. The point is that original cabinets deserve a diagnosis before they get a demolition.
What Original 1930s Kitchen Cabinets Looked Like
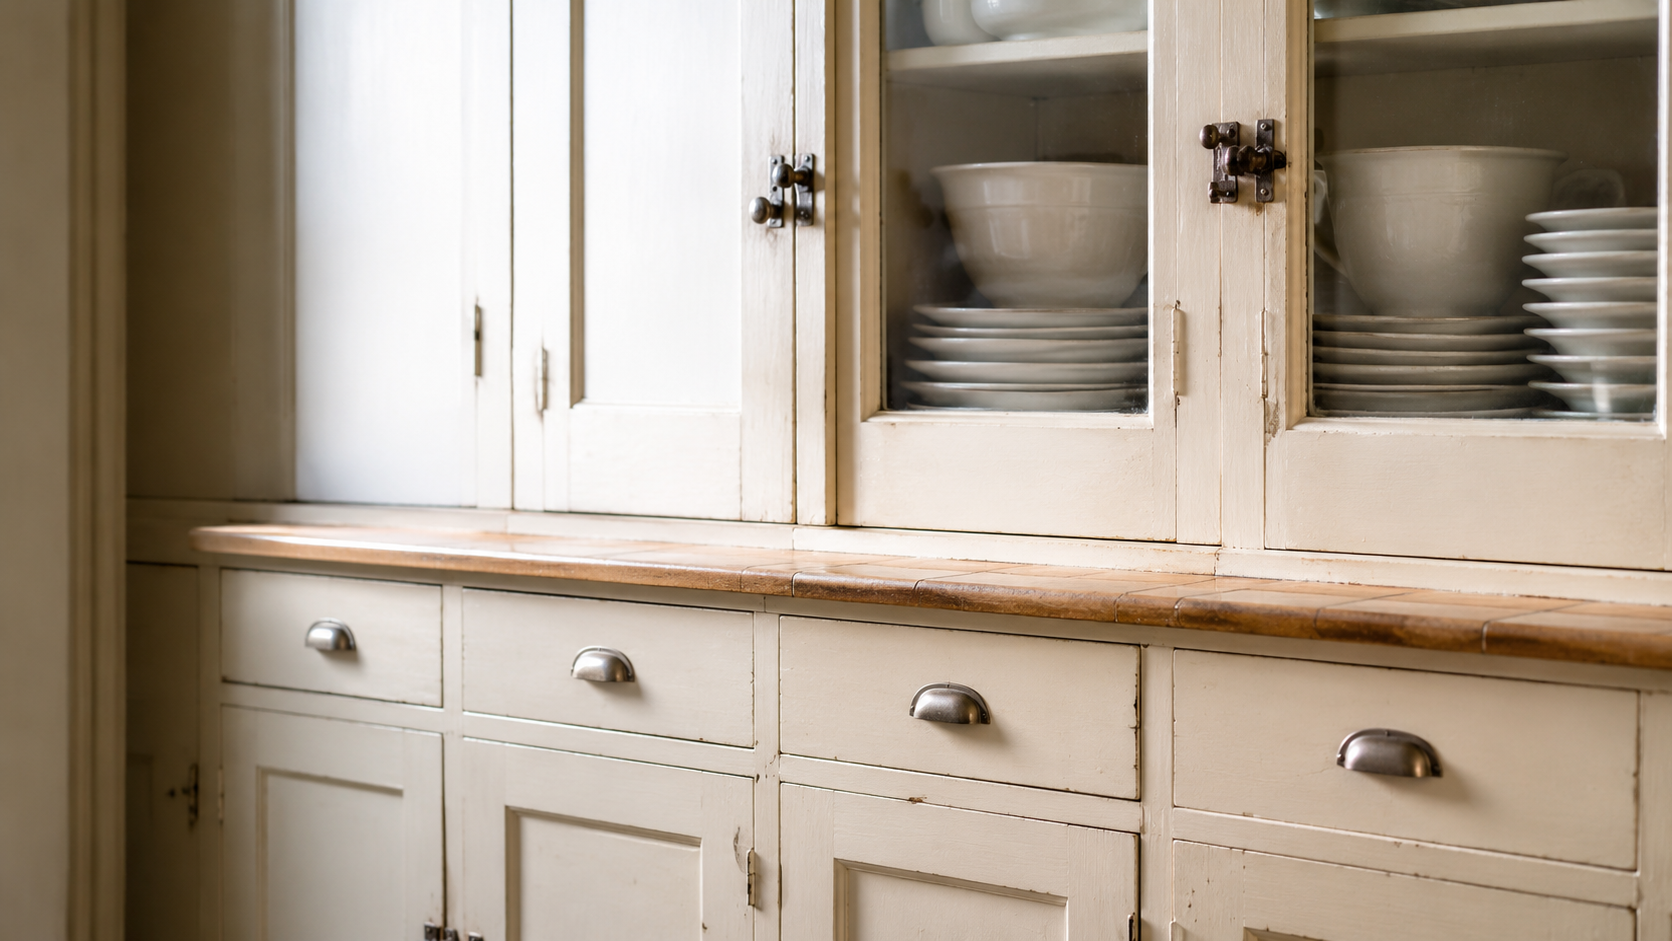
Most 1930s cabinets were quieter than people expect. They were usually painted, built in, and organized around the working parts of the kitchen, with simple door profiles and modest hardware. Glass-front uppers showed up in some kitchens, but not every wall was display space, and storage had to earn its place because the rooms were small.
- Doors: simple framed or inset doors, not heavy sculpted profiles
- Finish: painted wood in cream, ivory, pale green, muted blue, soft yellow, or white
- Hardware: cup pulls, small knobs, chrome, nickel, brass, or simple painted hardware
- Storage: drawer stacks, narrow cabinets, pantry cupboards, glass uppers, or work-focused built-ins
The good ones do not shout. They just make a small kitchen feel settled.
The Cabinet Run Matters More Than the Door Style
A cabinet door can be copied; a good cabinet run is much harder to get back once it is torn out. The run is what controls how the room reads — whether the sink feels anchored, whether the window still matters, whether the stove has landing space, and whether the kitchen feels like part of the house or like a newer kitchen squeezed into an old shell.
So before you replace anything, measure the parts that make the room work:
- cabinet depth from wall to face frame
- counter height and sink height
- distance from sink to stove
- window sill height and trim alignment
- drawer stack locations and storage zones
- aisle width with appliance doors open
A new cabinet package that ignores those numbers can look clean on installation day and feel wrong for years afterward.
Where New Cabinets Often Go Wrong
Replacement cabinets fail 1930s kitchens when they were designed for a different kind of room. A modern cabinet system tends to assume deeper appliances, wider rooms, continuous walls, and a clean drywall box. A 1930s kitchen often has none of that — plaster walls, old trim, uneven floors, a tight sink wall, and openings that do not line up with standard cabinet sizes.
- Too deep: deeper cabinets and refrigerators narrow the aisle and crowd the old room.
- Too tall: full-height pantry blocks can overpower the windows and trim.
- Too smooth: flat, glossy, continuous cabinetry can make the room feel newly generic.
- Too complete: filling every wall with cabinets can erase the partly fitted logic of the original kitchen.
The replacement can be expensive and still be wrong — which is the costly version of a bad update.
When the Originals Are Worth Keeping
Keep original 1930s cabinets when the structure is sound and the layout still helps the room. Worn paint is not failure. Sticky drawers are not always failure. Old hardware, uneven doors, and scratched shelves are repair problems long before they are replacement problems.
| Condition | Best move | Why |
|---|---|---|
| Solid boxes, tired finish | Repair, prep, repaint | The cabinet body still works; the surface needs attention |
| Good layout, bad drawers | Repair slides, rebuild drawers, add interior storage | Function improves without losing the cabinet run |
| Sound sink base, old plumbing | Fix plumbing and protect the base | The cabinet may be worth saving if water damage has not gone too far |
| Original uppers fit window and trim | Keep or copy carefully | The wall composition may be hard to rebuild with stock cabinets |
The strongest reason to keep them is not sentiment. It is fit.
When Replacement Makes Sense
Some cabinets really should go. Rot, deep water damage, failing joints, bad earlier alterations, missing structural parts, and unsafe conditions can all push a job past repair. Keeping bad cabinets just because they are old leads to leaks, mold, cracked finishes, wasted money, and a second renovation a few years later.
- Replace rotten sink bases when the cabinet has lost its structure.
- Replace badly altered runs when earlier work already destroyed the proportions.
- Replace unsafe parts when electrical, plumbing, or ventilation work cannot be done cleanly around them.
- Replace missing sections when a period-aware copy will make the room work better than a patch.
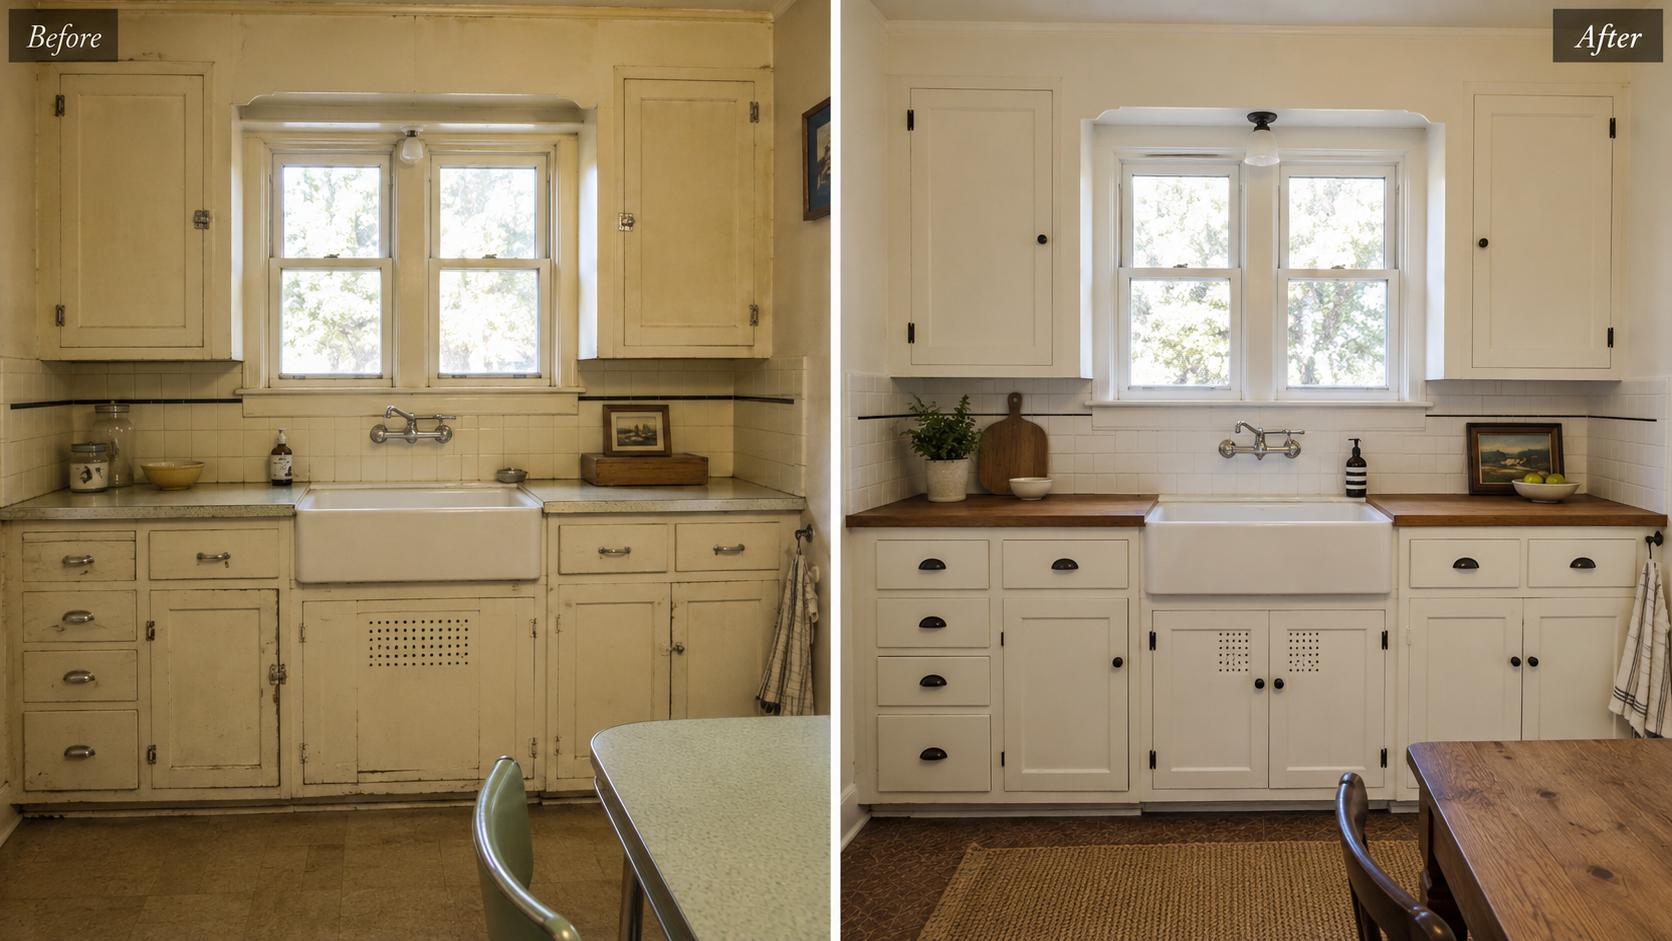
Even then, the replacement should copy the room's logic before it copies the look. Depth, proportion, the relationship to the trim, and appliance fit all matter more than a fake-vintage door.
Repair the Working Parts Before Replacing the Look
The fastest way to make old cabinets better is usually hidden. Good repairs do not photograph well, but they change daily use completely. A cabinet that felt impossible to live with may only need drawer repair, better hinges, a few shelf changes, a stable sink base, some warm light, and a careful repaint.
- Drawers: rebuild the boxes, repair the runners, adjust the slides, or add quiet modern function where it stays out of sight.
- Hinges: keep the original visible hardware when it works; replace broken parts with restrained pieces.
- Interior storage: add tray dividers, pull-outs, deeper shelves, or better pantry logic inside the old shell.
- Lighting: add warm task lighting without filling the ceiling with harsh light.
The outside should still feel like the kitchen. The inside is where it can quietly work harder.
Make the Changes You Can Undo
Here is something I wish more people heard before they pick up a drill: when you upgrade an old cabinet, try to do it in a way the next person can undo.
That sounds strange for a kitchen you plan to keep for years. But these cabinets have already lasted close to ninety years, and the parts you add now will not last anywhere near that long. Drawer slides wear out. Soft-close dampers fail. Hinges get swapped again down the road. If you screw new hardware straight into the original wood in a way that chews up the face frame, or cut the back out of a cabinet to force in a modern slide, you have traded a small problem today for a bigger one later — and you have made the cabinet harder for the next owner to save.
The better habit is simple. Add the new function in a way that can come back out. Reuse the existing screw holes when you can. Keep the original pulls in a labeled bag instead of tossing them. Mount new slides to a removable sub-piece rather than carving up the cabinet itself. Paint instead of stripping when stripping would destroy good wood. None of this is about being precious with an old box. It is about not making one choice now that locks in every choice later.
A cabinet that survived since the 1930s survived because people kept it repairable. The upgrades worth making are the ones that keep it that way.
Paint, Lead, and the Slow Part Nobody Wants to Price
Paint is where cabinet projects get badly underestimated. A 1930s cabinet may carry many layers of it — some failing, some oil-based under later latex, and some containing lead. Sanding into that blindly can throw off dust that is far more dangerous than the ugly finish you started with.
Pre-1978 painted surfaces need real caution. If the paint is going to be disturbed, check the rules, use lead-safe work practices, and hire properly when the scope calls for it. This is not the place to grind through old paint in a closed-up kitchen and hope a good cleanup fixes it afterward.
Beyond the safety side, good cabinet painting is just slow, because the prep decides the result. Cleaning, deglossing, testing the adhesion, filling, sanding safely, priming, and letting it cure all matter. Skip that work and the new finish chips first around the handles, the drawers, and the sink — exactly where you touch it every day.
The Sink Base Is the Cabinet That Tells the Truth
The first cabinet I open in an old kitchen is the sink base, because it is where the room stops hiding its condition. The doors above can look perfectly fine while the floor of that base is soft. Old leaks, bad traps, missing shutoff valves, and damp plaster behind the cabinet can all change the size of the job in a hurry.
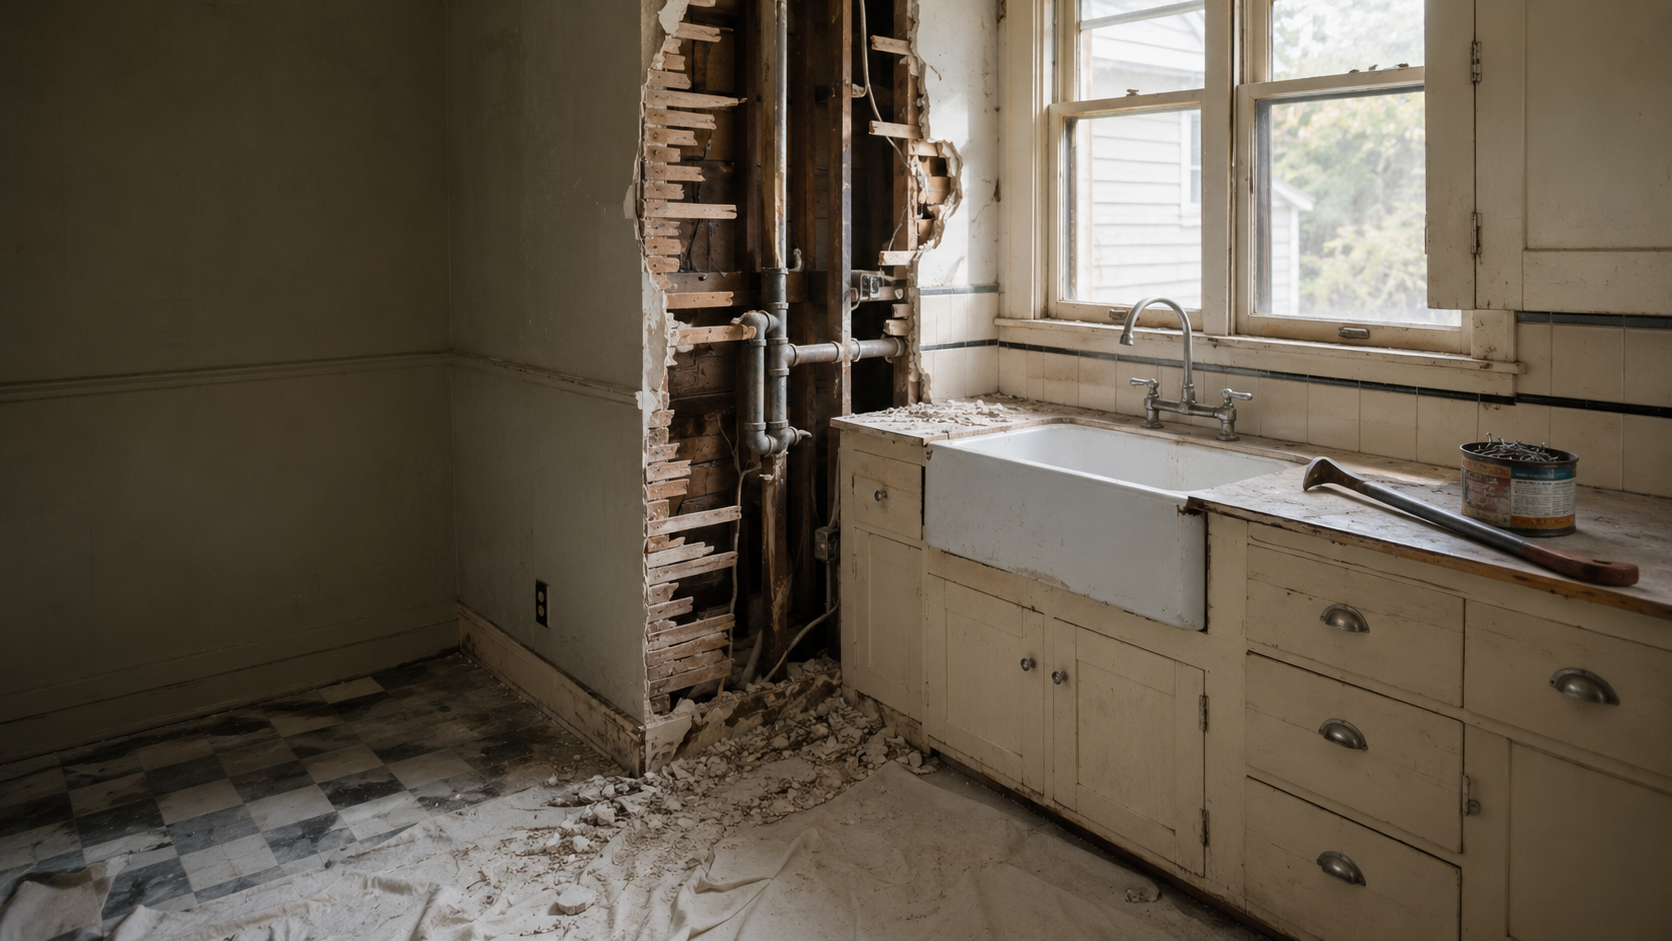
So check the sink base before you order counters or commit to saving the whole run. Look for swelling, staining, odor, loose flooring, rusted plumbing, bad shutoffs, and any sign of old leaks. If the sink itself is part of the decision, read 1930s kitchen sinks before you settle on a new cabinet plan.
What to Copy If the Originals Are Gone
When the original cabinets are missing, copy the logic rather than the costume. A period-aware 1930s cabinet does not need theatrical hardware or fake age — it needs the right scale, quiet doors, useful storage, and a finish that belongs with the room.
- Use simple framed doors rather than heavy decorative profiles.
- Keep paint colors soft and tied to the floor, sink, trim, and wall color.
- Choose restrained hardware instead of oversized pulls or artificial patina.
- Break the wall carefully with a glass upper, a pantry cupboard, or a worktable when the room needs some relief.
A clean copy beats a loud imitation every time.
The Freestanding-Piece Lesson
A Hoosier cabinet is not just a collectible. It captures a useful idea from the period: one compact piece could hold storage, a work surface, and a daily routine all at once. That mattered because in many 1930s kitchens the cabinetry had not yet taken over every wall — freestanding pieces still did real work alongside the built-ins.
For cabinets, the takeaway is practical: a hutch, a pantry cabinet, or a furniture-like storage piece can solve a real storage or work-surface problem without turning every wall into heavy cabinetry. The mistake is using one as pure decoration — if it does not earn its keep, it just becomes clutter. The fuller story of why these kitchens were partly unfitted lives on the 1930s kitchen design page.
Cost: Repair, Repaint, or Replace
Cabinet costs move around because the work is so labor-heavy. The ranges below are 2026 planning numbers for typical U.S. conditions, based on current cabinet cost references and old-house risk factors — not quotes. Paint condition, lead-safe work, local labor, the state of the boxes, sink damage, hardware, and whether the job touches plumbing or wiring can all move the price quickly.
| Scope | Planning range | What it usually includes |
|---|---|---|
| Light cabinet refresh | $1,500-$5,000 | Cleaning, hardware changes, minor adjustments, limited paint touch-up |
| Repair and repaint | $5,000-$15,000 | Door and drawer repair, prep, priming, repainting, hardware, limited interior improvements |
| Restoration-level work | $12,000-$30,000+ | Lead-safe prep, careful stripping or refinishing, repairs, custom pieces, high-quality finish work |
| Period-aware replacement | $18,000-$50,000+ | New custom or semi-custom cabinets, installation, fillers, trim, counter coordination, appliance planning |
The cheapest option is not always the best value. Replacing sound old cabinets with weak new boxes can cost more over five years if the layout gets worse, the finish fails, or the room loses the very feature that made it worth improving.
DIY Work and Pro Work Are Not the Same Job
Some cabinet work is reasonable for a careful homeowner, and some is not.
- DIY can make sense for cleaning, hardware swaps, shelf changes, minor drawer adjustments, and careful painting when paint hazards are not in play.
- Hire a pro when doors are warped, frames are loose, sink bases are damaged, finishes are failing badly, or lead-safe work is needed.
- Bring in trades when the cabinet work starts affecting plumbing, wiring, ventilation, wall repair, or floor structure.
Old cabinets punish rushed work. A bad sanding job, the wrong primer, a careless hinge swap, or a poor sink-base patch can turn a repairable cabinet into a replacement project.
What Not to Do
Bad cabinet updates tend to fail in the same predictable ways:
- Do not replace first and measure later. The old run may be solving old-house problems you have not noticed yet.
- Do not use fake age. Artificial distressing and overdesigned hardware usually read as less authentic, not more.
- Do not make every wall continuous cabinetry. Some small kitchens need visual relief and working space more than more doors.
- Do not ignore the sink base. Water damage there can decide the entire project.
- Do not bury old wiring or plumbing behind new cabinets. Fix the hidden work before the finish layer goes back on.
The goal is not to make the cabinets look untouched. It is to keep the parts that belong and fix the parts that fail.
FAQ
Are original 1930s kitchen cabinets worth keeping?
They are worth keeping when the boxes are solid, the layout still works, and the run fits the room better than a standard replacement would. Worn paint alone is not a reason to remove them.
Why are old kitchen cabinets sometimes better than new ones?
Older cabinets can have better fit, stronger proportions, repairable wood parts, and a built-in relationship to the sink wall, window, trim, and floor. New cabinets may look clean and still make the room work worse.
What did 1930s kitchen cabinets look like?
Most were practical and restrained: painted wood, simple framed or inset doors, modest hardware, glass uppers in some kitchens, compact storage, and built-in runs that suited small rooms.
Can I add modern hardware or soft-close parts?
Yes, when the change stays visually quiet and does not damage the cabinet. Hidden upgrades are usually fine, and reversible ones are better still. Oversized pulls or theatrical vintage hardware can make the room feel fake.
Should I strip or repaint 1930s cabinets?
That depends on the material, the paint condition, the earlier coatings, and the lead risk. Test before disturbing old paint. In many kitchens, careful prep and repainting are safer and more practical than aggressive stripping.
When should 1930s cabinets be replaced?
Replace them when they are structurally failed, badly rotted, heavily altered, unsafe to work around, or no longer useful once plumbing, appliance, or layout needs are considered.
What is the best color for 1930s kitchen cabinets?
Cream, ivory, warm white, pale green, muted blue, soft yellow, and other quiet painted finishes tend to fit better than cold gray, glossy black, or trend-heavy colors.
Do Hoosier cabinets belong in a 1930s kitchen?
They can, especially in a partly unfitted kitchen or a room that needs flexible storage. They should solve a storage or work-surface problem, not just sit there as a prop.
Read This Next
- 1930s Kitchen Design: What Gets Ruined First
- 1930s Kitchen Remodel: What a Wall Hides Until Demolition Day
- 1930s Kitchen Sinks: Keep It or Replace It?
- Common Problems in 1930s Houses
References
Sources used for this article
- National Park Service: Preservation Briefs
- National Park Service Preservation Brief 18: Rehabilitating Interiors in Historic Buildings
- EPA: Lead Renovation, Repair and Painting Program
- EPA: Protect Your Family from Sources of Lead
- Angi: How Much Does It Cost to Paint Kitchen Cabinets? 2026 Data
- Angi: How Much Does Resurfacing Kitchen Cabinets Cost? 2026 Data
- HomeAdvisor: 2026 Average Cost of Kitchen Cabinets