The Best Ways to Clean and Restore Painted Brick Walls
A mason’s guide to restoring painted brick. From strippers to repointing, what works, what fails, and how to keep walls breathing.
Why Bother Saving Old Brick

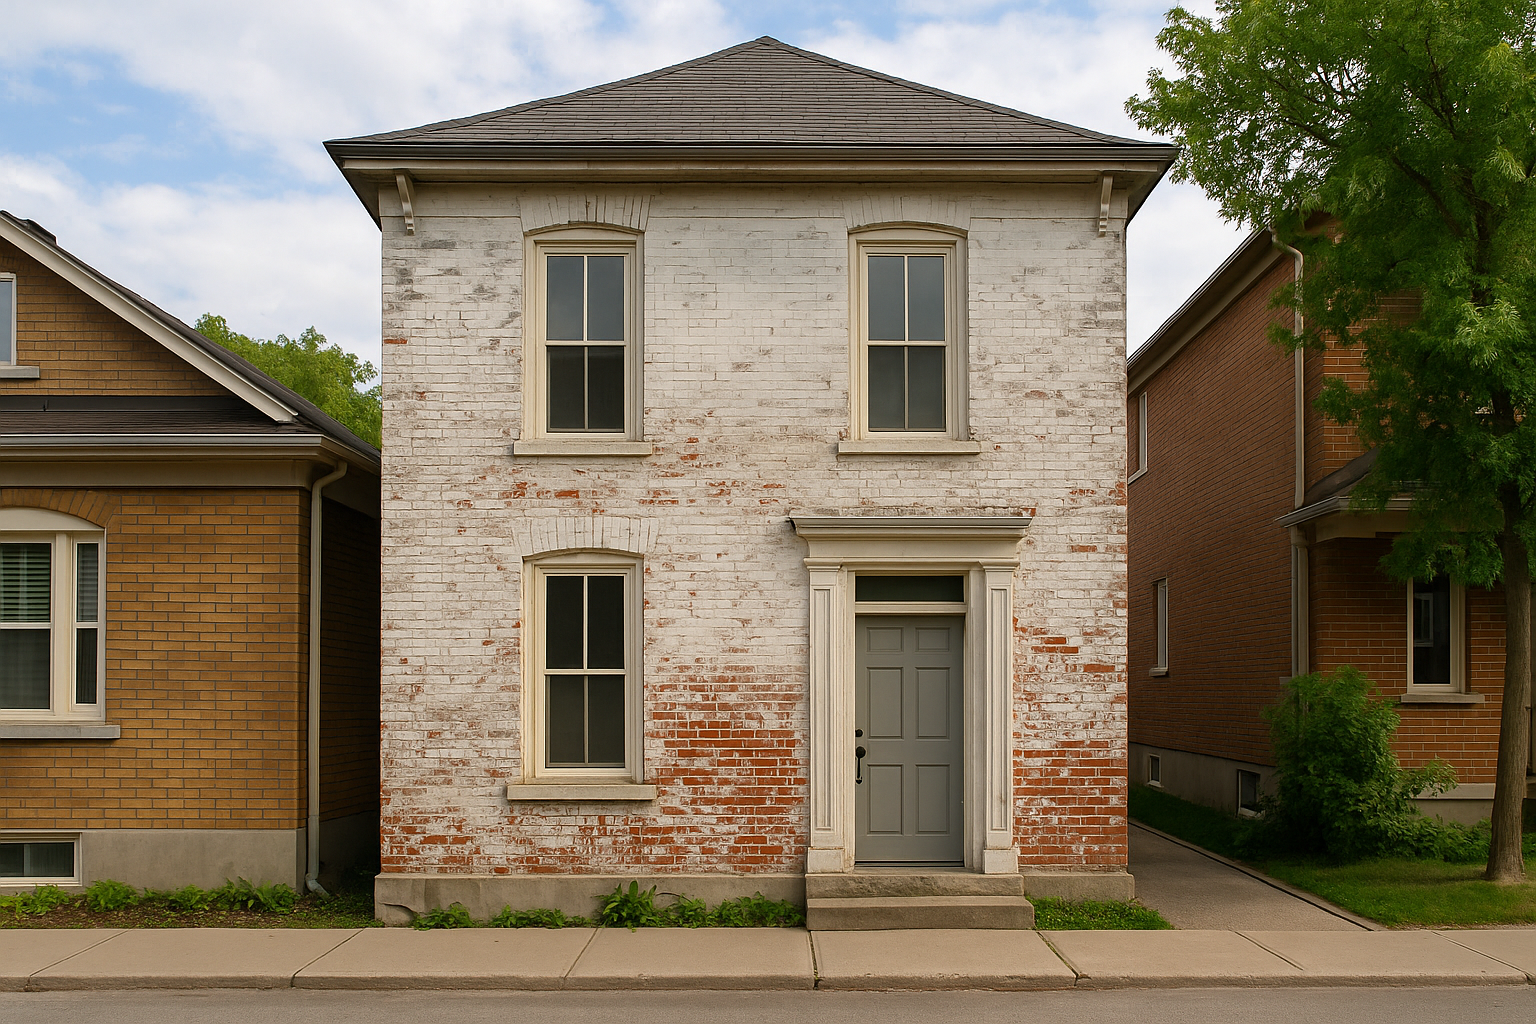
Most homeowners assume that once a brick wall has been painted, it’s ruined. I’ve lost count of how many times I’ve heard, “We’ll just cover it with cladding” or “Let’s reface it with thin stone.” That’s usually a mistake.
The truth is that under the paint, the old red face is usually still intact. It may be scarred, it may show its age, but it’s stronger and more honest than anything you’ll stick on top. Even when it’s been covered for decades, the color depth and fired finish are still there.
I’ve stripped walls where three generations of paint sat on top — oil, latex, then masonry paint. The brick underneath still had more life than reclaimed thin brick veneer you can buy today. Old clay holds its character. The imperfections become the beauty.
If you’re going to put in the effort to restore, you need to respect what’s there. That means learning how to test methods, work in controlled patches, and repair with the right mortar. Done right, the end result is a wall that tells its history rather than hides it.
Ultimate Guide: Masonry & Concrete (Creative Homeowner)
This is the field manual I hand juniors when they first get near a brick wall. Over 60 step-by-step projects, with photos that actually show the mistakes as well as the successes. It’s the closest you’ll get to watching a mason at work without being on site.
Step 1: Check the wall before you start stripping

Most failures I’ve seen come from rushing this first stage. People see paint on brick and think it’s just about scrubbing hard enough. The real work begins by reading the wall carefully before any chemical or tool comes out. Diagnosis is the difference between saving a century-old red face and destroying it.
Begin with the mortar joints. Take a small hammer or even the butt of a chisel and tap lightly across the lines. A soft thud usually means lime mortar, the kind used in handmade nineteenth-century walls. It crumbles under a key scrape and demands patience. A sharp ring means hard Portland cement, usually added later. Cement locks in moisture and often conceals frost damage, so you can’t attack it the same way. If you misread this, your stripper will bite into joints instead of paint.
Look at the paint itself. Blisters or white salts pushing through signal trapped moisture. That’s efflorescence, and it tells you the brick has been suffocating. Strip too quickly here and you’ll peel the faces off. Indoors, especially around fireplaces, it’s often latex or limewash over soot. That tends to peel easier, but you need control to avoid gouging softer spots.
Era matters. Handmade clamp-fired bricks are porous and pull paint deep inside. Machine-fired bricks are harder and smoother, with coatings sitting mostly on the surface. On patched walls you’ll sometimes find both side by side. One part will strip easily, another will resist. That’s normal, not a mistake. Plan around it or you’ll burn days redoing the same area.
I tell juniors this: spend an hour tapping and reading before you touch a chemical. That hour saves weeks of repair later. Stripping is about preservation, not perfection. If you find frost cracks, spalling, or old sandblast scars, the goal is to keep the brick alive, not scrub it to factory-clean.
Related: How to Know If Your Brick Mortar Is Failing
Recommended: Ultimate Guide: Masonry & Concrete (Creative Homeowner) — one of the best illustrated references for checking joints and knowing what you’re really working with before paint removal.
Step 2: Test paint removal safely
Never start with the front face of the house. Always pick a back corner or hidden wall and try a small section first. This isn’t about cosmetics, it’s about learning how the coating reacts. Each wall behaves differently. You’ll know quickly whether you’re dealing with latex, oil, limewash, or modern masonry paint.
For stubborn coatings, alkaline gel strippers or poultice systems like Peel Away are reliable. They keep moisture against the wall long enough to soften layers without flooding the brick. But dwell time is everything. Leave it too short and nothing happens. Leave it too long and you’ll soften the mortar. Always cover tests with plastic sheeting and check at intervals. That’s how pros learn the wall’s rhythm.
I’ve seen homeowners jump to sandblasting because it feels faster. It is — but it kills brick. The outer fire skin is only millimeters thick. Once you blast that off, the wall starts shedding sand forever. The clean look lasts a month, then you’re left with dusting, erosion, and repairs.
Dry ice blasting has its place. It works well on soot or smoke stains, especially inside old kitchens or fire-damaged areas. But it won’t lift latex paint. It just bounces off. That’s why testing small patches first is non-negotiable. You learn which method fits and which will waste time or wreck material.
Think of this step as building a map. A little square patch shows you what’s ahead on the full wall. Ignore the map, and you’re walking blind.
Related: Antique Red Brick: A Guide to Styles, Uses, and Tips
Step 3: Exterior walls and interior fireplaces
Not all brick paint behaves the same. Exterior coatings are tougher because they face rain, frost, and sunlight. They resist, they lock down harder, and they often cover repairs. Interiors, especially fireplaces, are a different story. Most are painted with latex or limewash, sometimes brushed straight over soot. Those usually lift easier but require care.
Outside walls often need heavier gels and, in some cases, low-pressure steam to get through masonry paints. But always keep moisture movement in mind. Exterior brick has to breathe. If you flood it too much, you’ll trap water and cause more frost damage the following winter. That’s why poultice strippers, used in stages, tend to work better than any “one and done” chemical.
Fireplaces are more delicate. You’ll see black staining inside from decades of smoke. Don’t chase every mark. Those stains are part of the wall’s history and don’t come out fully without grinding the surface, which destroys the character. Aim for a partial clean, where red comes through but scars remain.
Every time I’ve seen a junior over-strip a fireplace, the result looks fake — too bright, too raw, like new veneer instead of old fabric. Leave it honest. The goal is a wall that feels its age, not one that looks scrubbed for a showroom.
Related: Reclaimed Thin Brick: Add Vintage Charm Without the Bulk
Recommended: B&D Complete Guide to Masonry & Stonework — includes clear steps for working with historic finishes and when to stop before you ruin the look.
Step 4: Handling graffiti and spray paint
Spray paint on brick isn’t like layers of old household paint. It sits on the surface, fast and thin, which makes it both easier and trickier. The key is controlling the chemical so it pulls pigment without burning the brick face.
The best technique I’ve seen in urban jobs is solvent-based poultices. They soak into the spray paint, then lift it out with a paper or clay backing. But the trick is working bottom to top. If you start high, the runoff streaks and stains the wall below. Professionals always work upward, rinsing as they go.
Avoid harsh acids. Some graffiti removers load up on strong acid, which strips the color from the brick itself, leaving pale scars that look worse than the graffiti did. Always neutralize chemicals afterward. In city maintenance, crews often rotate hot water pressure washing with neutralizer rinses. It’s slower, but the wall survives.
Graffiti jobs test patience. One quick spray can take days to pull out safely. But done right, the wall recovers without permanent damage.
Related: Top Tips for Using Brick in Modern Design
Step 5: Masonry paint, limewash, and whitewash
Not all coatings are equal. Masonry paint is the hardest to remove. It was built to last, and it clings deep. Alkaline gels combined with steam cleaning are usually the only way through. Even then, expect to repeat several passes. Chasing perfect removal on masonry paint is where most people burn time and money.
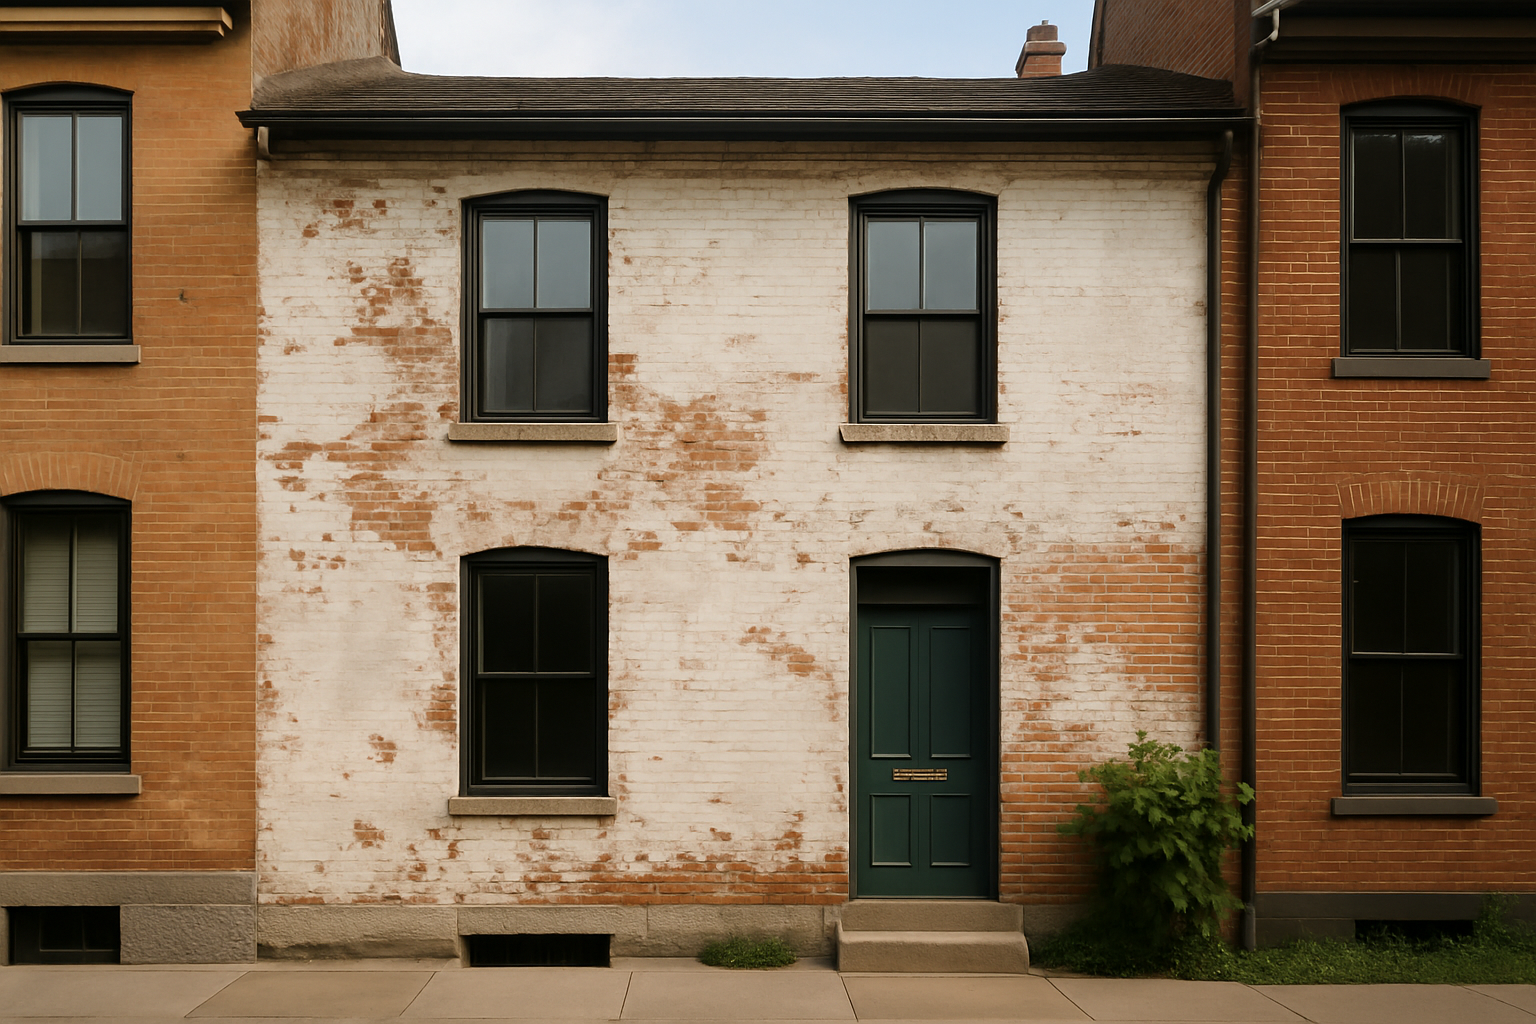
Limewash is easier. It bonds lightly and often flakes naturally. Soft washing or gentle scrubbing lifts it without chemicals. In some cases, leaving a partial limewash creates a beautiful layered effect. I’ve walked into courtyards where half-worn limewash told a richer story than any clean strip.
Whitewash sits in the middle. Sometimes it’s worth lifting, sometimes leaving. The mistake is thinking “bare brick” is always the best goal. A partial reveal often looks better and keeps character intact.
This is where restraint matters. The most convincing reveals are never 100% clean. They’re 80–90%, with scars and traces left behind.
Recommended: Peel Away Paint Remover for Masonry — a reliable poultice product when facing stubborn masonry paint.
Step 6: Repair after stripping
Once the paint is off, the joints always tell their story. Most will be weaker than you expect. Good practice is to cut out two joint depths and repoint with lime mortar. Cement-based repointing is too hard and will trap moisture again.
Sometimes the paint covered repairs with modern bricks. Don’t swap in bright new replacements. Always buy reclaimed or dirty stock so patches blend. New-clean bricks stick out like sore thumbs.
This is also the stage where you can blend replacements into patterns. Staggering color and tone avoids patchwork. Don’t think in singles. Think in spreads across the wall.
Related: Antique White Bricks: Styles, Applications, and Design Tips
Step 7: Protecting stripped brick
Freshly exposed brick is vulnerable. It needs breathable protection, never film coatings. Siloxane or silane sealers penetrate and let vapor escape. Glossy coatings trap moisture and cause spalling. If a wall is too far gone, mineral paints can recolor while still breathing.
Lighting and landscaping do more for the look than any sealer. Washing a wall with warm light at night or pulling vegetation clear lets the brick speak without coatings. That’s what keeps it beautiful in the long run.
Recommended: Siloxane Masonry Sealer — durable and breathable, unlike film products that suffocate brick.
Step 8: Lessons learned on site
I’ve seen more walls ruined by pressure washers than by chemicals. Too much pressure leaves stripes across the face. The scars never heal. Partial reveals, left imperfect, always age better.
Expect costs to skew toward labor, not product. Gels and tools are affordable. Time is not. Stripping is about slow persistence, not shortcuts. Plan for weeks, not weekends.
The best results I’ve witnessed are the ones where scars remain. The wall tells its history, and the building feels honest. Clean perfection looks fake. Honest imperfection feels right.
Related: Antique Bricks: Styles, Tips, and Where to Find Them
The Tools and Products I Rely On When Stripping Paint From Old Brick
Every wall is different. Some days you’re fighting a hundred years of masonry paint, other days it’s just one sloppy latex coat that peels off with your fingernail. The gear you carry makes the difference between saving brick faces and destroying them. I’ll walk you through what I keep in the van and why.
Hand Tools Before Chemicals
I start simple. A Goldblatt masonry hand tool set — hammer, cold chisels, and pointing irons — covers 80% of the early work. The chisels aren’t for hacking paint. They’re for testing joints and cutting back bad mortar so the wall can breathe once the paint is gone. The mistake juniors make is buying one chisel and thinking it’ll do. You need a set, because a wide blade skates across soft lime but a narrow point will sink right in.
I keep brick tongs in the kit too. Sounds excessive, but when you’ve got to pull out one bad patch or swap in a reclaimed brick, you don’t want to snap edges handling it bare-handed. Old brick chips if you so much as glance at it wrong.
When the Paint is Too Stubborn
For coatings that don’t budge, a gel stripper is the first line. Smart Strip is reliable — it clings to vertical surfaces and buys you time. But here’s the catch: dwell time matters more than volume. Spread it too thin, it dries out. Leave it too long on soft handmade brick, it bites deeper than you wanted. Control, not brute force, is the trick.
If I hit a wall with six coats of masonry paint, I go straight to Peel Away. It’s messy, poultice-style, but it lifts whole layers like a bandage. The rookie mistake is slapping it on and walking away. You’ve got to watch it, test a corner every hour, otherwise you’ll either waste product or pull too hard and shear brick faces.
Special Cases: Graffiti and Fireplaces
Graffiti is a different beast. Spray paint lives in the pores. Acid removers leave bleach halos, which scream “bad repair” for decades. That’s why I keep bare brick graffiti remover in the kit. It pulls stains without burning the surface. Still, you work from the bottom up. Do it top-down and you’ll drag rivers of dissolved pigment into clean brick below. I’ve seen whole walls ruined that way.
Fireplaces are usually latex or limewash. Softer coatings, softer approach. Ez Strip works indoors because it’s low odor. You don’t need anything hotter unless you’re stripping varnish, which is rare on brick. Don’t overdo it — those soot scars inside a firebox are history, not flaws.
Protection and Finishing
Once paint is off, brick is naked. The rookie error: leaving it unsealed. You don’t need a shiny film. You need breathability. I finish with a siloxane sealer. Invisible, vapor-permeable, keeps driving rain from soaking in but lets the wall exhale. Skip this and you’ll watch frost eat your fresh work in two winters.
What I Leave Out
People ask me why I don’t mention sandblasters or wire wheels. Because they don’t belong anywhere near old brick. They cut the face off, leave tiger stripes, and destroy the fired crust that keeps water out. Same with muriatic acid — too many homeowners melt joints and stain their walls for good. If you’re serious about preserving brick, leave the grinders and acids at the store.
In the end, you don’t need every gadget. You need a core set of hand tools, a couple of proven strippers, a graffiti solution, and a breathable finish. The rest is patience. That’s what separates a clean reveal from a wrecked wall.
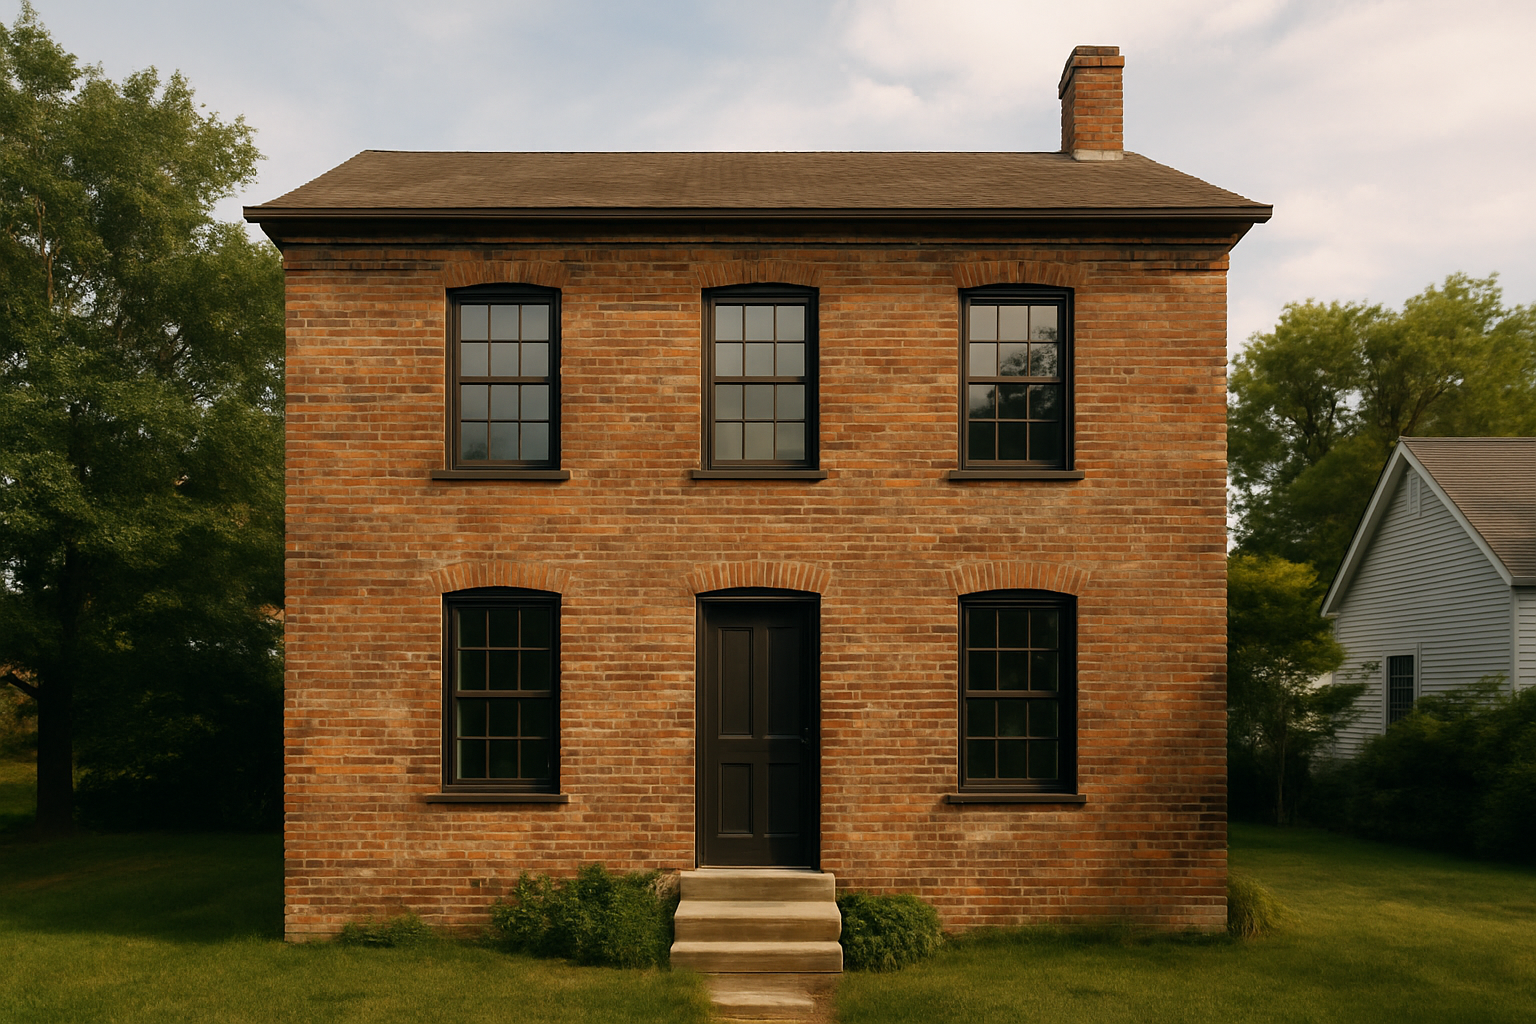
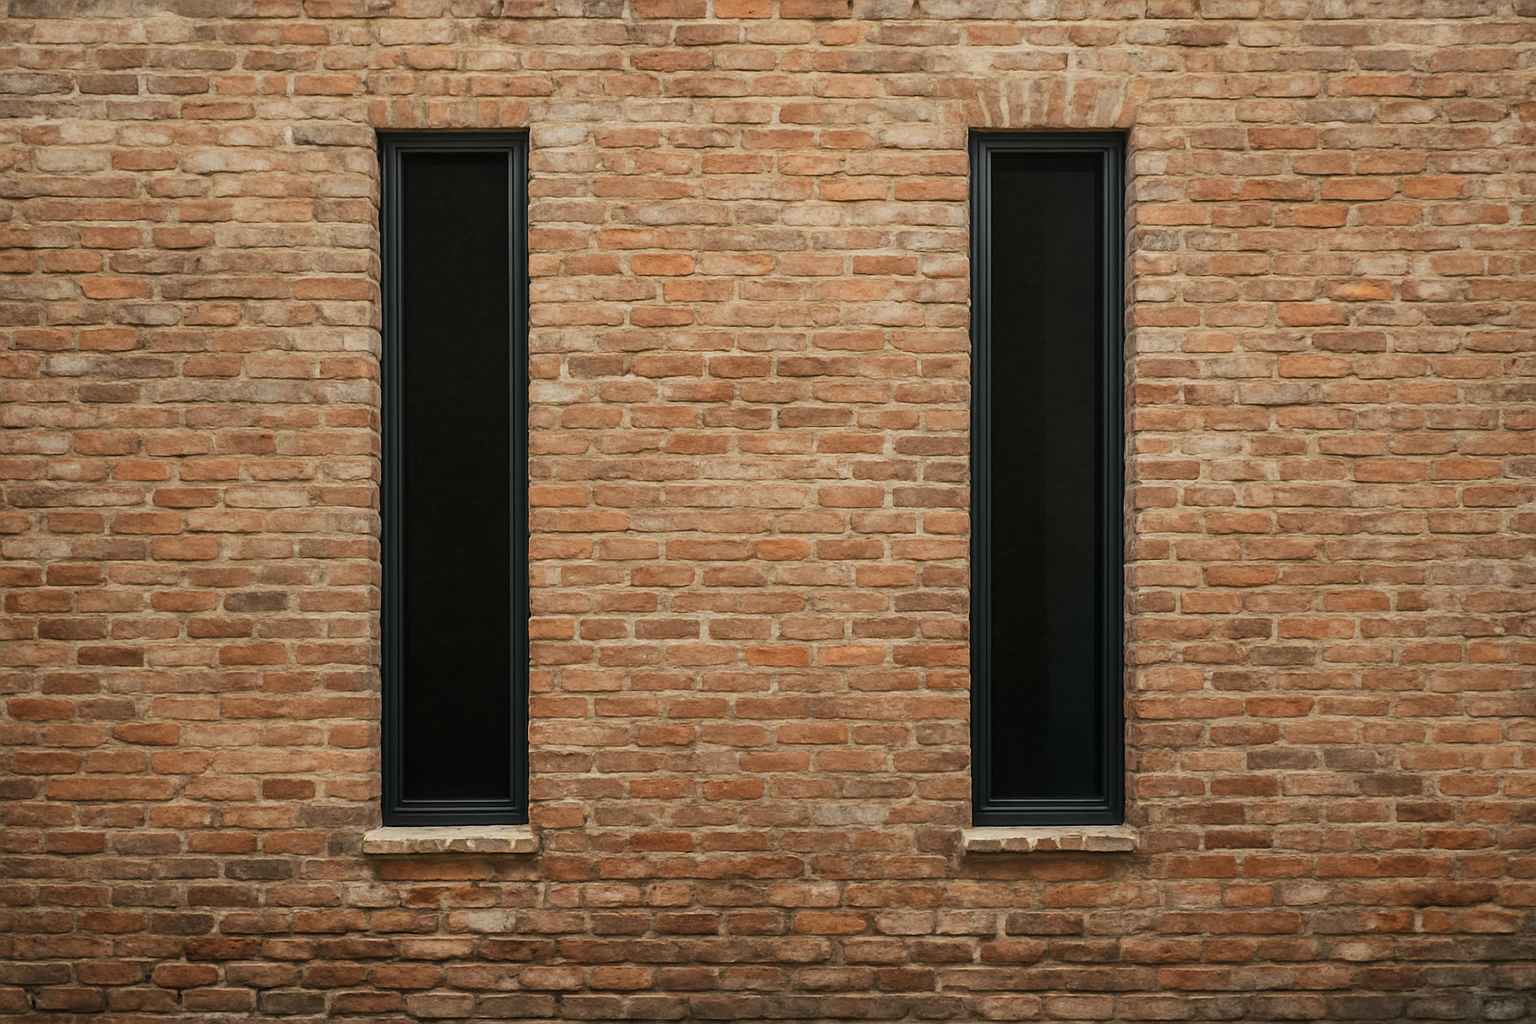
Brick Facade Refresh: Tall Narrow Windows Without Ruining the Wall
The brief. Strip the painted brick. Keep the mass simple. Add tall slit windows for a cleaner, modern face like the example shown.
1) Strip First. Then Judge The Brick
Test patches. Try small areas on a shaded corner. Start with peel-and-neutralize strippers or low-pressure steam. Skip aggressive blasting. It scars the fired face and opens the pores.
Repoint smart. After paint removal you will see every mortar flaw. Cut out crumbling joints by hand. Repoint with compatible lime mortar. Hard cement mortar traps moisture and spalls faces. If you need a quick primer on reading joints, see How to Know If Your Brick Mortar Is Failing.
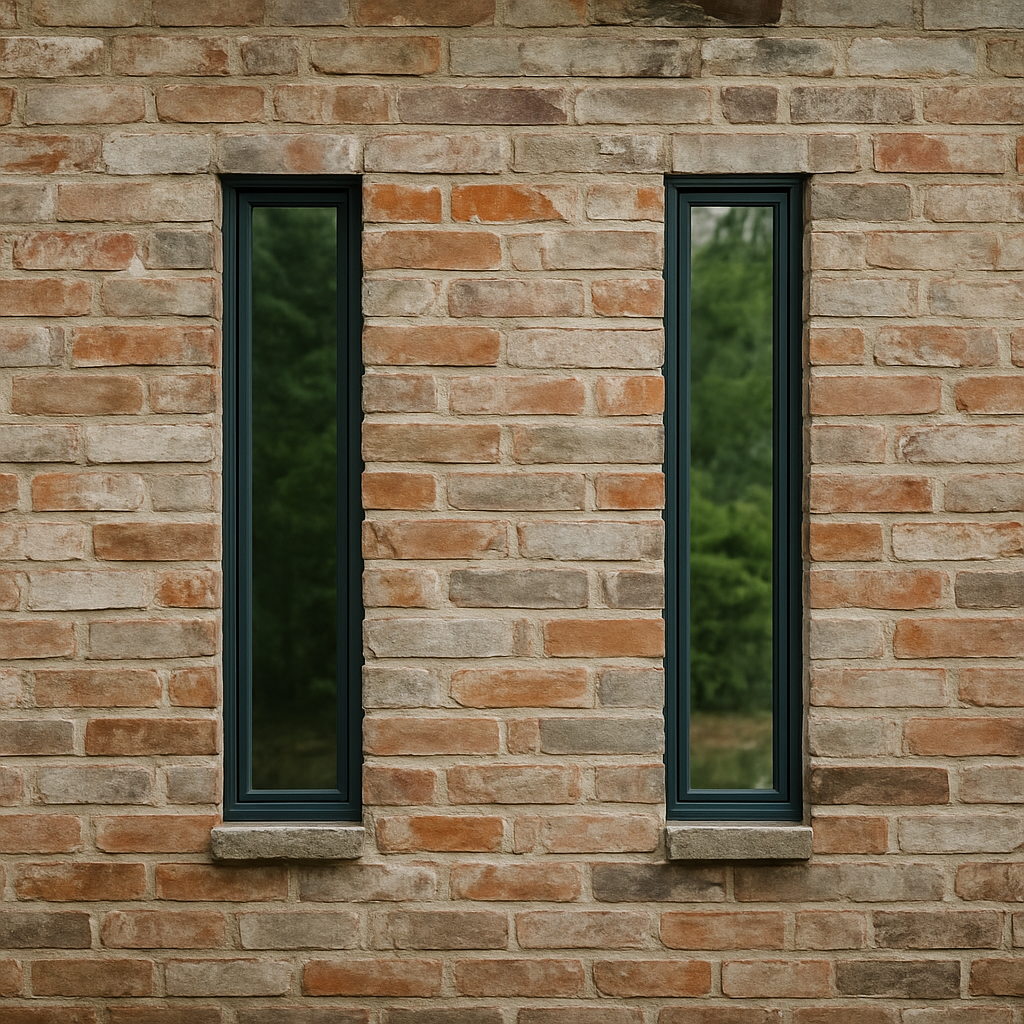
2) Do Slit Windows Fit This Wall
Proportion. Slender openings work on quiet, planar walls with tight brick coursing. They read elegant when head and sill align to the brick module. Miss the module and the eye catches the error every time.
Privacy and light. Tall and narrow brings daylight deep without giving the street a full view. Pair two or three to balance the mass. Keep jamb-to-jamb spacing equal so the rhythm holds.

3) Structure Before Saw Cuts
Lintels and load paths. New vertical slots interrupt bond. Install proper steel or precast lintels at each opening with bearing both sides. Needle and shore the wall in short bays. Work one opening at a time.
Openings near corners. Keep at least one brick length from external corners to avoid cracks. If you must go tighter, stitch with helical bars across the cut line.
4) Weather. Water. Details That Save Callbacks
Frames set proud or flush. Flush looks sharp. It also needs back dams, end dams, and a continuous sill pan. Add a subtle projecting sill or drip kerf to kick water clear.
Membranes. Wrap the rough opening. Lap flashing in the right order. Through-wall flashing with weepholes above heads if you cut through a cavity. For a quick modern-brick checklist, skim Top Tips for Using Brick in Modern Design.
5) Energy And Comfort
Glass choice. Use low-E units with warm-edge spacers. Slender windows still lose heat if you cheap out on glazing. In hot sun, pick lower SHGC for west faces. In cold shade, allow a little more solar gain.
Frames. Thermally broken aluminum or fiberglass reads crisp against brick. Black or dark bronze trims the slit and hides seal lines.
6) Interior Payoff
Light quality. Vertical slots pull light down a wall. Great for stairwells and reading corners. Aim a plaster return or shallow reveal to catch the sun and soften the beam.
Furniture logic. Narrow openings free up wall space. You can run casework between them. Keep sill height consistent with desk or bench heights if you want the window to double as a backrest.
7) Cost. Time. Access
Typical range. Paint removal and sensitive repointing can match or exceed the window spend. Budget for scaffolding, shoring, lintels, and a full day per opening once set up. Allow weather days. Fresh lime mortar needs gentle curing.
Permits. New openings on a street facade usually need approvals. Heritage overlays add review time. Submit measured elevations with the brick course logic drawn, not just a render.
8) Common Mistakes
Cutting before surveying. Walls out of plumb make parallel slits look crooked. Shoot the facade. Adjust jambs to what is true, not what the drawing said.
Gloss sealers after strip. Shiny brick looks plastic and shows roller marks. Use breathable mineral silicate or leave bare if the clay face is sound.
Skimping on sills. No drip. No projection. Wet staining starts month one.
9) A Clean Spec To Hand The Builder
- Openings. Two or three vertical slots. Head and sill aligned to brick courses. Minimum one brick from corners.
- Lintels. Galv steel angles or precast with 150 mm bearings. Through-wall flashing and weepholes above.
- Frames. Thermally broken aluminum. Factory-fitted sill pans. Site-sealed with backer rod and color-matched sealant.
- Glazing. Double glazed low-E argon. Warm-edge spacer. SHGC tuned to orientation.
- Finishes. Paint stripped by controlled chemical or steam. Lime repoint. Matte breathable finish only if needed.
Result. The wall stays honest. The windows read as precise cuts. Daylight improves. Privacy holds. The brick keeps its age without the old paint film.
Final Word
Old brick always carries beauty. Stripping is slow and messy, but worth it. The goal is never perfection. It’s to bring back breath and texture. Better to see age honestly than to hide it under plastic coatings.
FAQ
Can you remove paint from old brick without damage?
Yes, but only if you avoid sandblasting and harsh acids. Patience and poultices work better than brute force.
What’s the best way to clean a fireplace wall?
Fireplaces usually carry latex or limewash. Gentle strippers, soft brushes, and restraint give the best results. Don’t chase every stain.
Does muriatic acid strip brick?
It does, but at the cost of the brick face itself. The scars are permanent. It’s not a professional method.
How do you handle graffiti?
Solvent poultices combined with neutralizer rinses are safer than blasting. Always work bottom to top.
Is complete removal realistic?
Expect 80–90% at best. The best reveals show character, not sterile perfection.
Recommended: Residential Windows: New Technologies & Energy Performance — useful if you’re improving energy performance after sealing or repainting stripped walls.
Tools and Chemicals for Removing Paint from Brick
Masonry Tools
- Marshalltown Brick Tongs — grip and move bricks safely during partial removal or replacement.
- Goldblatt 8-Piece Masonry Hand Tool Set — hammer, chisels, jointers, and pointing tools for cleanup and repointing.
- Masonry Drill Bit & Chisel Kit — for cutting out old mortar or stubborn patches of paint.
Chemicals and Paint Strippers
- Smart Strip Advanced Paint Remover — low-odor gel that clings well to vertical brick faces.
- Ez Strip Paint & Varnish Stripper Gel — designed for masonry; safe and effective for thick coatings.
- Concrete & Masonry Paint Stripper — good for large walls with multiple layers of paint.
- Bare Brick, Stone & Masonry Graffiti Remover — targeted for graffiti and spray paint removal.
- Circa 1850 Heavy Body Paint Remover — strong gel formula for older painted surfaces.
- Peel Away Paint Remover — poultice-style system for thick masonry paint and limewash.
Protective Finishes
- Siloxane Masonry Sealer — breathable water-repellent sealer for exterior brick after cleaning.