The wall studs in a 1910s house do not stop at the first floor ceiling.
They keep going. Past the floor. Past the second floor ceiling. All the way up to the roof. One continuous stud from the foundation sill to the ridge. That is balloon framing, and if you walk into a 1910s house assuming the framing works like a house built in 1990, you are already planning the renovation wrong.
Most of the structural problems people run into in these houses are not problems with the original construction. They are problems caused by previous work done without understanding it.

Image by ArchitectureCourses.org. Cutaway of a 1910s American house showing where wet walls, service areas, and basement moisture problems often cluster.
Balloon Framing
Old-growth forests in the 1800s produced long, straight trees. Mills were cutting them fast and cheap. Balloon framing suited that material perfectly — long studs, simple method, fast to build.

The floor joist does not sit on top of the wall the way it does in modern construction. It is let into a notch cut into the stud face and held by a ribbon board nailed horizontally into the studs at each floor level. The stud itself keeps running past it.
That creates a continuous open cavity inside the wall. From the basement to the attic, uninterrupted.
Fire travels that path. So does air. Modern codes require fire blocking — a horizontal piece of lumber stuffed into the stud bay at each floor level to cut off that vertical run. Most 1910s houses never had it. If the house has been informally worked on over the decades, the blocking situation is unpredictable in either direction.
Running wire or pipe through these walls is more involved than in modern construction for the same reason. The cavity can run 18 or 20 feet tall. There is no natural stop. You account for that at the planning stage or you work around it later.
Balloon vs. Platform: Which One You Have Matters
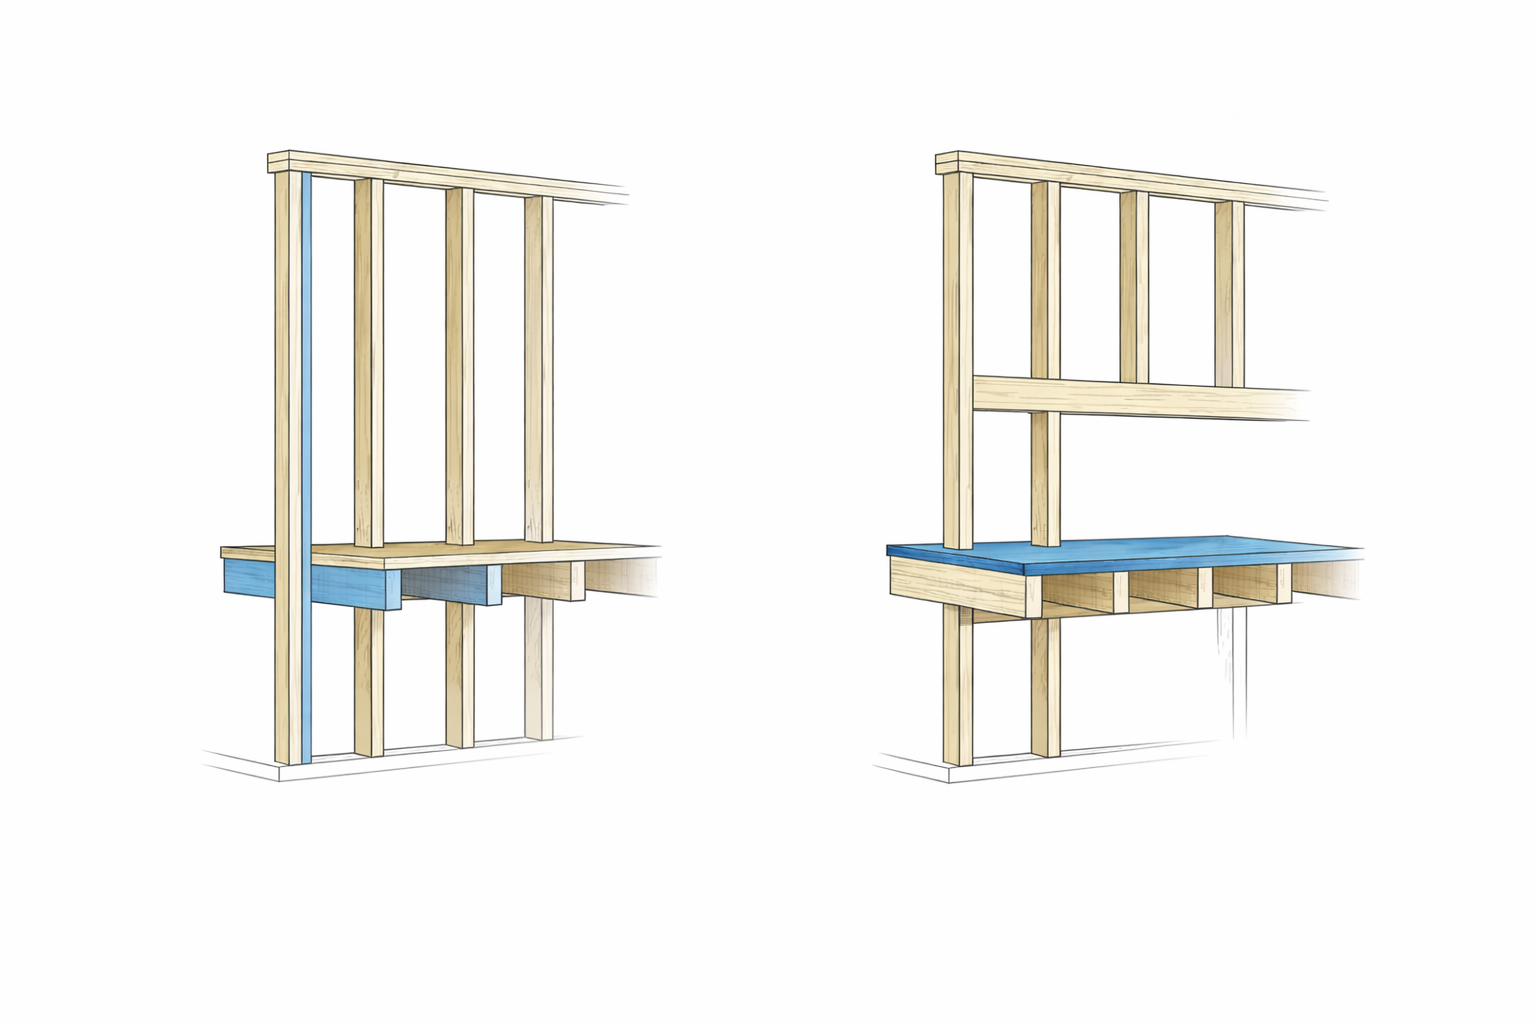
Illustration by ArchitectureCourses.org. Balloon framing and platform framing compared at the same scale.
Platform framing was beginning to show up in some newer construction by 1910.
In a platform-framed house, each floor is built as a separate structural deck. First floor walls go up. Second floor joists sit on top of them. Second floor walls frame up from that platform. The floor assembly interrupts the wall cavity at every level automatically.
Platform framing eventually became the standard because it is safer and simpler. But many 1910s houses are still balloon-framed. Some are hybrids — balloon framing in the original building, platform framing in a later addition.
Before any wall comes out of a 1910s house, open a small section at the floor line. If the stud runs past the floor without stopping, it is balloon framing. The load path is different. The header sizing logic is different. Whoever is doing the structural work needs to know that before they start, not after. For a direct comparison, see balloon framing vs. platform framing.
| Feature | Balloon framing | Platform framing |
|---|---|---|
| Stud height | Full building height, continuous | One story per section |
| Floor joist connection | Let into studs via ribbon board | Sits on top of wall plate |
| Fire path through wall | Open between floors unless blocking was added | Blocked at each floor by the floor assembly |
| Insulation retrofit | Full-height cavity; more complex | Floor breaks the cavity naturally |
| Wall removal | Different load path; needs specific structural review | Closer to modern construction logic |
| Common in 1910s houses | Yes, widely used | Starting to appear, not yet standard |
Foundations: Stone, Brick, and Early Concrete
The foundation is usually the first thing worth evaluating, and the range of conditions you will find is wider here than almost anywhere else in the house.
The most common type in pre-1920 houses is fieldstone or rubble stone set in lime mortar.
The stone is not the problem. Lime mortar is. It breaks down faster than the stone it holds together. When it starts to go, the wall loses cohesion and moisture moves through gaps that were previously sealed. Repointing is maintenance, not a structural crisis — unless it has been ignored for thirty years, at which point the scope grows fast.
The other thing about stone foundations is that they were not designed to manage water. No drainage plane. No dimple mat. No interior sump system. The original water management strategy was thick walls and grading that pitched the ground away from the footing.
That works on a dry site.
On a wet one, the foundation has been fighting water for a hundred years and losing ground. You will find the evidence when you start looking. That usually shows up first in the same places covered in common problems in 1910s houses.
Brick foundations show up in urban houses and in regions where brick was locally available. Same mortar issue. More uniform behavior and easier to assess.
Early poured concrete was beginning to appear by 1910, but mix ratios were not standardized and curing practices varied significantly. Some early concrete is nearly as hard as modern work. Some is weak, powdery, or already cracked through. Test it before you attach anything structural — anchor bolts, ledgers, hold-downs. It does not perform like modern concrete just because it looks like it.
The Exterior Wall Has No Insulation and No Moisture Barrier
The wall assembly in a 1910s house is four layers: exterior siding or shingles, wood board sheathing, stud framing, interior plaster. That is it. No insulation. No building wrap. No moisture barrier of any kind.
That was not an oversight. The wall was designed to drain and dry on its own. Wood board sheathing is permeable. Lapped siding sheds water off the face. Moisture that gets in has a path back out. The system worked because nobody changed the rules of the assembly.
Insulation changes the rules.
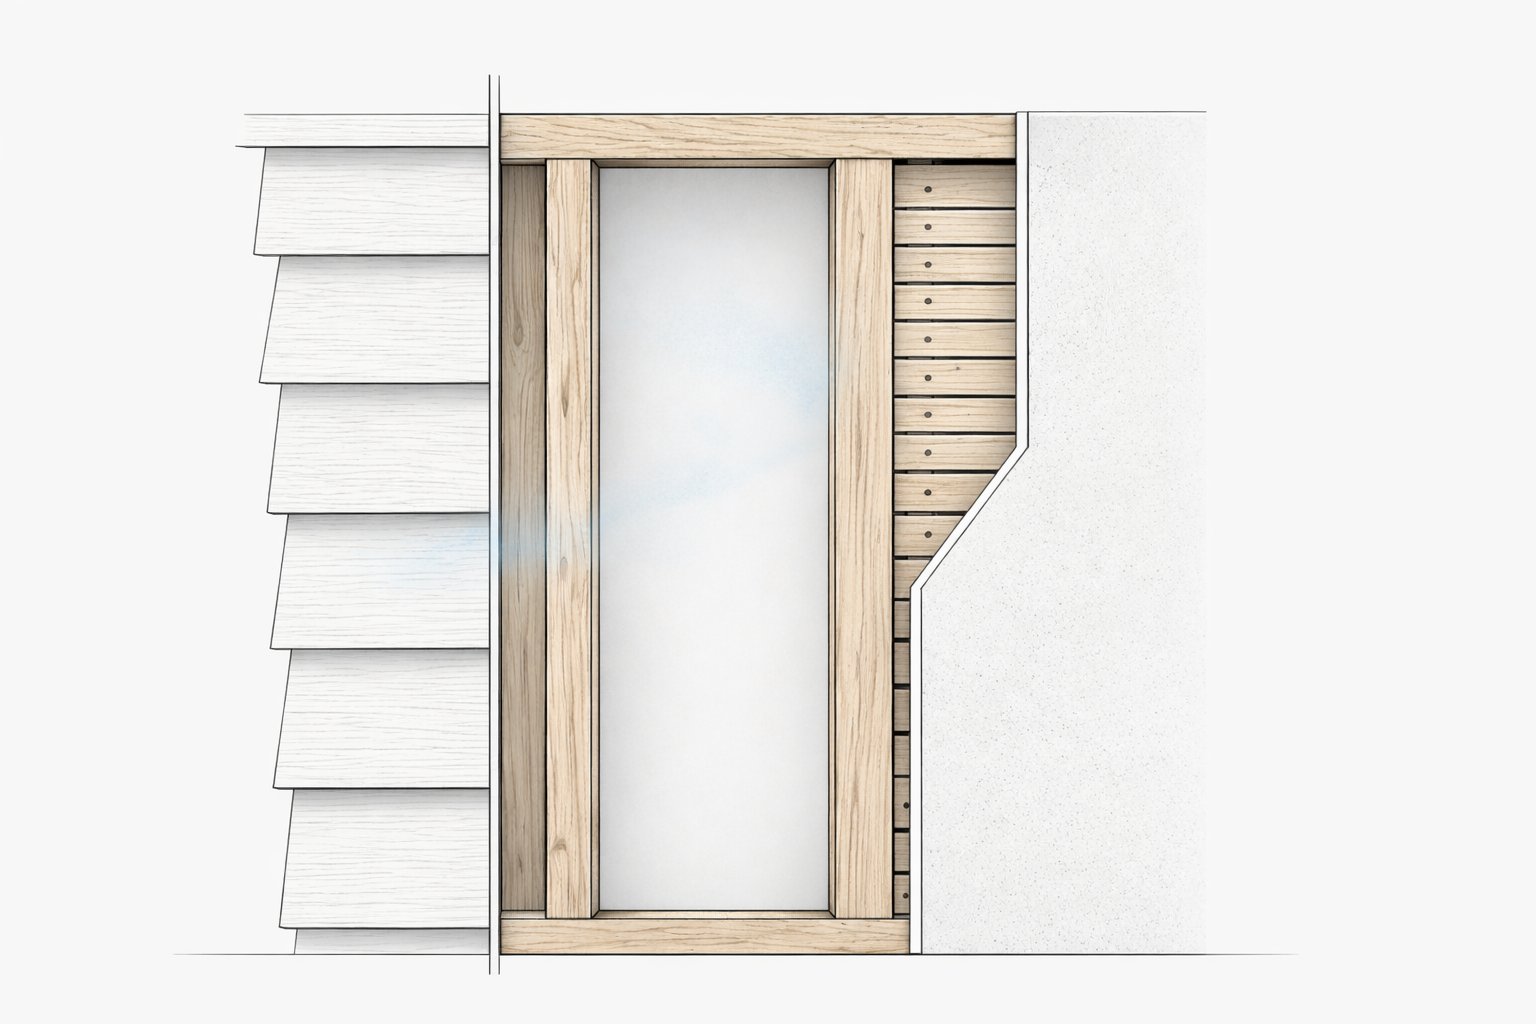
Illustration by ArchitectureCourses.org. Section of a typical 1910s exterior wall. Early wood-frame walls were vapor-open assemblies, allowing incidental moisture to dry through the materials rather than relying on modern membranes or cavities.
Add insulation to the stud cavity without understanding vapor movement and moisture that used to dry back out now hits the cold face of the insulation and sits there. The sheathing rots from inside the wall. The damage is invisible until someone pulls the siding off years later and the sheathing comes apart in their hands.
The correct approach depends on your climate zone, the specific wall assembly, and how vapor moves through it in your region. Dense-pack cellulose in a cold climate behaves differently than fiberglass batts in a mixed-humid one. A strategy that works in Minnesota causes rot in North Carolina.
Before insulating a 1910s exterior wall, get a hygrothermal analysis for your specific climate and assembly. Getting this wrong costs more to fix than the insulation will ever save on energy bills. The floor-plan and service logic behind these houses also matters here, especially if you are opening walls in service areas or changing room layout later. See 1910s house floor plans.
Plaster Walls
Interior walls in 1910s houses are lath and plaster. Thin strips of wood lath are nailed across the studs. Plaster goes on in two or three coats. The first coat is pushed into the gaps between the lath strips and keys in place as it hardens. The finish coat comes last.
The result is harder and denser than drywall. It has better sound behavior. It also does not tolerate careless drilling — hit a lath strip and the surrounding plaster cracks and pops off the wall in a radius around the impact.
Repairs have to be done with plaster-based patching material. Drywall compound shrinks differently than plaster and the repair reads through paint no matter how many coats go over it.
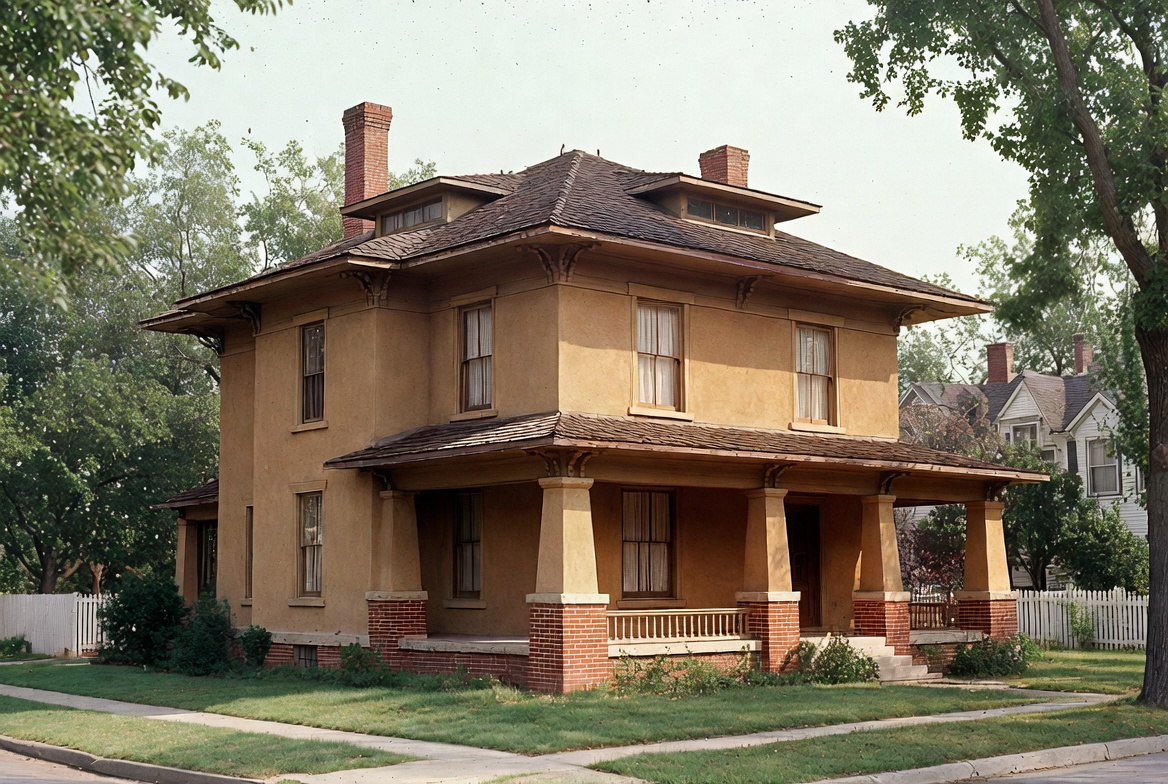
Image by ArchitectureCourses.org. Original plaster, heavier trim, older window proportions, and a cast-iron radiator help this room read as authentically early twentieth century.
What cracks mean. Hairline cracks at room corners and door frame corners are normal. The house has been settling for over a century. Those cracks have probably been there for sixty years. They mean nothing.
Stair-step cracks at exterior corners are different. So are diagonal cracks spreading from window or door corners, or any crack that has visibly changed in size recently. Those can indicate foundation movement or ongoing structural settling. Figure out what is moving before renovation work starts near those walls.
Floors
Large solid wood joists — fir, pine, or spruce — with a plank subfloor and a solid hardwood finish floor over it.
The hardwood is usually oak or maple and it is often close to an inch thick. That is why it can be sanded and refinished multiple times without hitting the limit. A lot of original 1910s flooring is still in usable condition precisely because of that thickness — something that cannot be said about most modern engineered alternatives.
In a balloon-framed house, the floor joists are let into the studs and carried by the ribbon board. Notching a joist to run pipe or ductwork has more structural consequence here than it does in platform-framed construction. The connection is doing specific structural work in a specific way. This is the detail that catches people when they are trying to run plumbing to a new bathroom and cannot figure out why they cannot cut through the framing the way they would in a newer house.
Floor squeaks are the subfloor planks shifting against the finish floor as the wood moves seasonally. Annoying. Not structural. Not worth tearing up the floor to fix unless the movement is significant.
Worth knowing: If tile or stone flooring is being planned over an existing 1910s floor system, get the deflection checked before anything is installed. Older joist spans were not designed for rigid floor coverings. A floor that handles hardwood without any trouble may flex enough to crack grout joints within a year.
Roof Framing
Cut rafters, not factory trusses.
Individual pieces of lumber shaped on site. Rafters run from the ridge board down to the wall plate. Ceiling joists tie the rafter feet together at the bottom and resist the outward thrust the rafters put on the walls. Collar ties partway up the rafters do the same job higher up.
A cut-rafter roof can be modified. Adding a dormer, finishing the attic, changing the roofline — all feasible in ways that are typically not possible in a truss-framed house, where cutting any web member compromises a factory-engineered structural system.
The collar ties are structural. They are not optional framing members that happen to be in the attic.
Remove them to gain headroom for an attic conversion and the rafters begin pushing the walls outward. The ridge drops. This develops over years, slowly enough that nobody notices until the spread is already a few inches. At that point the repair is significant. Get a structural engineer involved before any attic work that involves cutting or removing framing members.
Knob-and-Tube Wiring, Lead Paint, and Asbestos
These come with the era and they need to be on the checklist before any renovation scope gets priced.
Knob-and-tube wiring. Houses built around 1910 were wired with knob-and-tube — ungrounded two-wire circuits run through ceramic knobs and tubes through the framing. It was not unsafe when it was installed. The problem is age, modification, and anything that happened to it over the last hundred years. Insulation packed around knob-and-tube is a fire hazard because the wiring was designed to dissipate heat into open air. Many insurance carriers will not write a policy on a house with active knob-and-tube. Have an electrician assess the system before assuming it can stay.
Lead paint. Houses built before 1978 almost certainly have lead paint somewhere. Houses built before 1940 — which includes everything from 1910 — very likely have multiple layers of it. Lead paint that is intact and not disturbed is not an immediate hazard. Sanding, cutting, or demolition that disturbs it is. Any renovation that involves disturbing painted surfaces in a 1910s house requires lead-safe work practices and, in many jurisdictions, a certified contractor if the house is occupied or has children.
Asbestos. Asbestos was used extensively in building materials from the early 1900s through the late 1970s. In a 1910s house, the most common locations are pipe insulation, floor tiles and the adhesive beneath them, plaster texture coats, and roofing materials. Asbestos that is undisturbed and in good condition is generally left in place. Anything that involves cutting, sanding, or demolishing those materials requires testing first and, if positive, abatement by a licensed contractor.
Skipping these assessments does not save money. It defers cost into a scope that gets more expensive after work has already started. That is the same renovation sequence problem covered in how to update a 1910s house without stripping it out.
The Lumber Itself
Old-growth fir, pine, and spruce came from trees that grew slowly in dense forests.
Slow growth means tight annual rings. Tight annual rings mean denser, harder, more dimensionally stable wood. A 2x10 floor joist from 1910 is not the same piece of lumber as a 2x10 from a modern lumber yard. It is stiffer. Harder to cut. Structurally stronger by a meaningful margin.
When evaluating the existing framing in a 1910s house, do not assume it has degraded to the level of modern lumber. Most of the time it has not. The density that made it harder to work with is the same thing that kept it from failing.
| Material | Where used | What to know now |
|---|---|---|
| Old-growth solid lumber | Framing, floor joists, rafters | Denser and stiffer than modern dimensional lumber; structurally superior |
| Fieldstone or brick | Foundations | Stone outlasts the lime mortar; evaluate mortar condition before renovation |
| Early poured concrete | Some foundations, porch slabs | Mix quality varies widely; test before attaching structural elements |
| Wood lath and plaster | Interior walls and ceilings | Harder than drywall; must be repaired with plaster-based material |
| Wood board sheathing | Exterior walls, roof deck | Permeable by design; no moisture barrier below siding |
| Wood siding or shingles | Exterior finish | Often old-growth stock; worth repairing rather than replacing when sound |
| Solid hardwood flooring | Finish floors | Typically thick enough for multiple refinishes; original species usually denser than modern equivalents |
Where Renovation Goes Wrong
| Common mistake | Better move | What it prevents |
|---|---|---|
| Removing walls without identifying the framing system first | Open a small section at floor level to confirm balloon vs. platform before any structural decisions | Undersized headers, missed load paths, structural problems that surface later |
| Adding insulation to wall cavities without vapor analysis | Get a hygrothermal assessment for your climate zone and wall assembly | Trapped moisture, rot inside the wall, damage that appears years after the work |
| Patching plaster with drywall compound | Use plaster-based patching material, or bring in a plasterer | Visible patch lines through paint; shrinkage cracks in the repair |
| Cutting collar ties for attic headroom | Structural engineer review before removing any attic framing | Wall spread, dropping ridge, expensive structural repair |
| Replacing original wood siding rather than repairing it | Patch, prime, and repaint original wood when it is structurally sound | Old-growth stock is denser than modern replacement material and usually outperforms it |
| Assuming the foundation handles water like a modern basement | Evaluate mortar condition, drainage, and moisture history before finishing the space | Water intrusion and mold behind finished walls with no easy access to fix it |
| Starting renovation without checking for knob-and-tube, lead, or asbestos | Test before any demolition or disturbance of existing materials | Scope creep, liability, insurance problems, health risk |
Why These Houses Are Still Standing
A 1910s house that has not been heavily altered is usually in better structural shape than it looks walking in.
The framing is dense. The systems are simple. Simple systems fail in visible ways — a rafter going soft shows at the ridge, a rotting sill shows at the floor, crumbling mortar shows on the foundation wall. Failures announce themselves. Nothing hides the way it does in a modern house where assemblies look intact on the surface while failing inside.
The houses in real trouble are the ones that have been renovated badly.
Joists cut for plumbing without sistering. Walls removed without proper headers. Collar ties pulled out in 1985 for a home office. Insulation packed into cavities without thinking about what it was doing to the moisture balance. A century of small informal decisions now buried behind paint and drywall.
What you are almost always dealing with is one of two things: the original construction, which tends to hold up, or the damage left by previous work, which can be almost anything.
Figuring out which is which — that is the whole reason to understand how the house was built before deciding what to do with it.
Read This Next: Common Problems in 1910s Houses | Balloon Framing vs Platform Framing | How to Update a 1910s House Without Stripping It Out