
A water damaged door frame is almost never just a paint problem.
The bottom of the jamb goes soft because water has been landing there, sitting there, or slipping behind the threshold long enough for the wood to break down. You can scrape that soft wood out, fill it, and paint over it, and it will look repaired — but if the water path is still open, you have bought a pause, not a fix.
The real question is simple: is the damage only a small surface defect, or has water reached the jamb base, threshold, subfloor, or framing below the opening?
First Find Where the Water Enters
Start at the bottom of the door, not at the ugly paint.
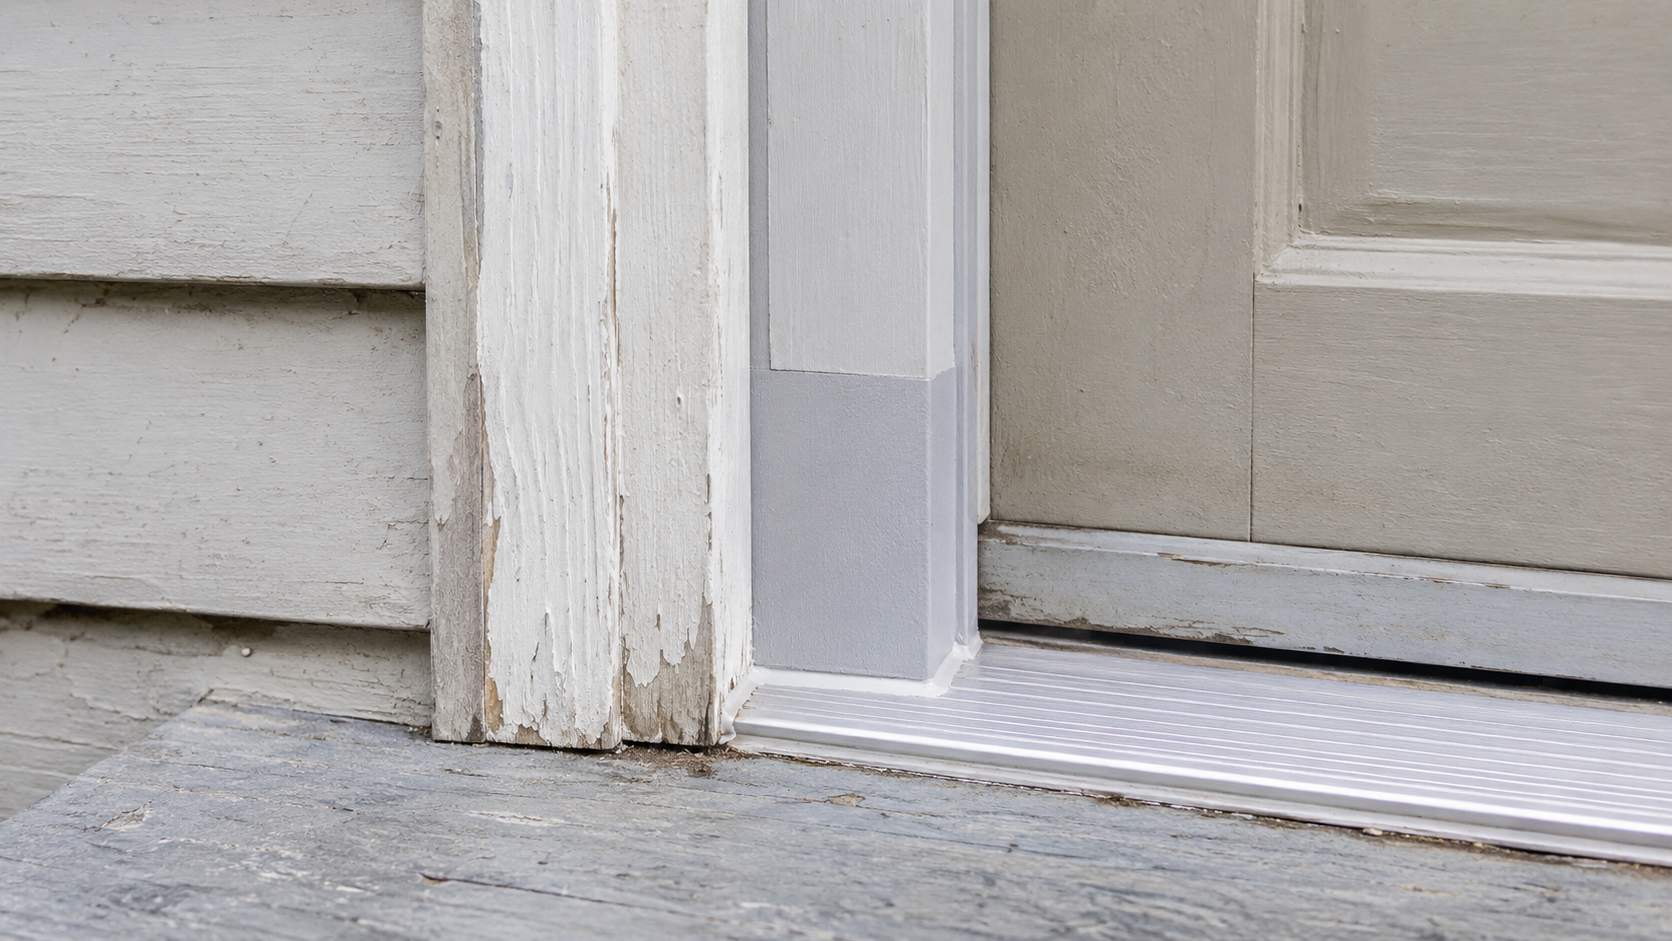
Most exterior door frame rot begins near the lower jamb, the casing base, the threshold joint, or the edge where the opening meets a porch, step, deck, or concrete landing. That area gets wet from rain, splashback, snow melt, failed caulk, poor threshold slope, missing flashing, or a landing that sends water back toward the house instead of away from it.
Look closely at four places:
- the joint between the threshold and the jamb
- the bottom two to six inches of the jamb
- the exterior casing and trim beside the door
- the landing, porch, step, or deck surface outside the opening
If the door frame is soft only at the bottom, that is telling you something. Water is concentrating there, and the repair has to explain why.

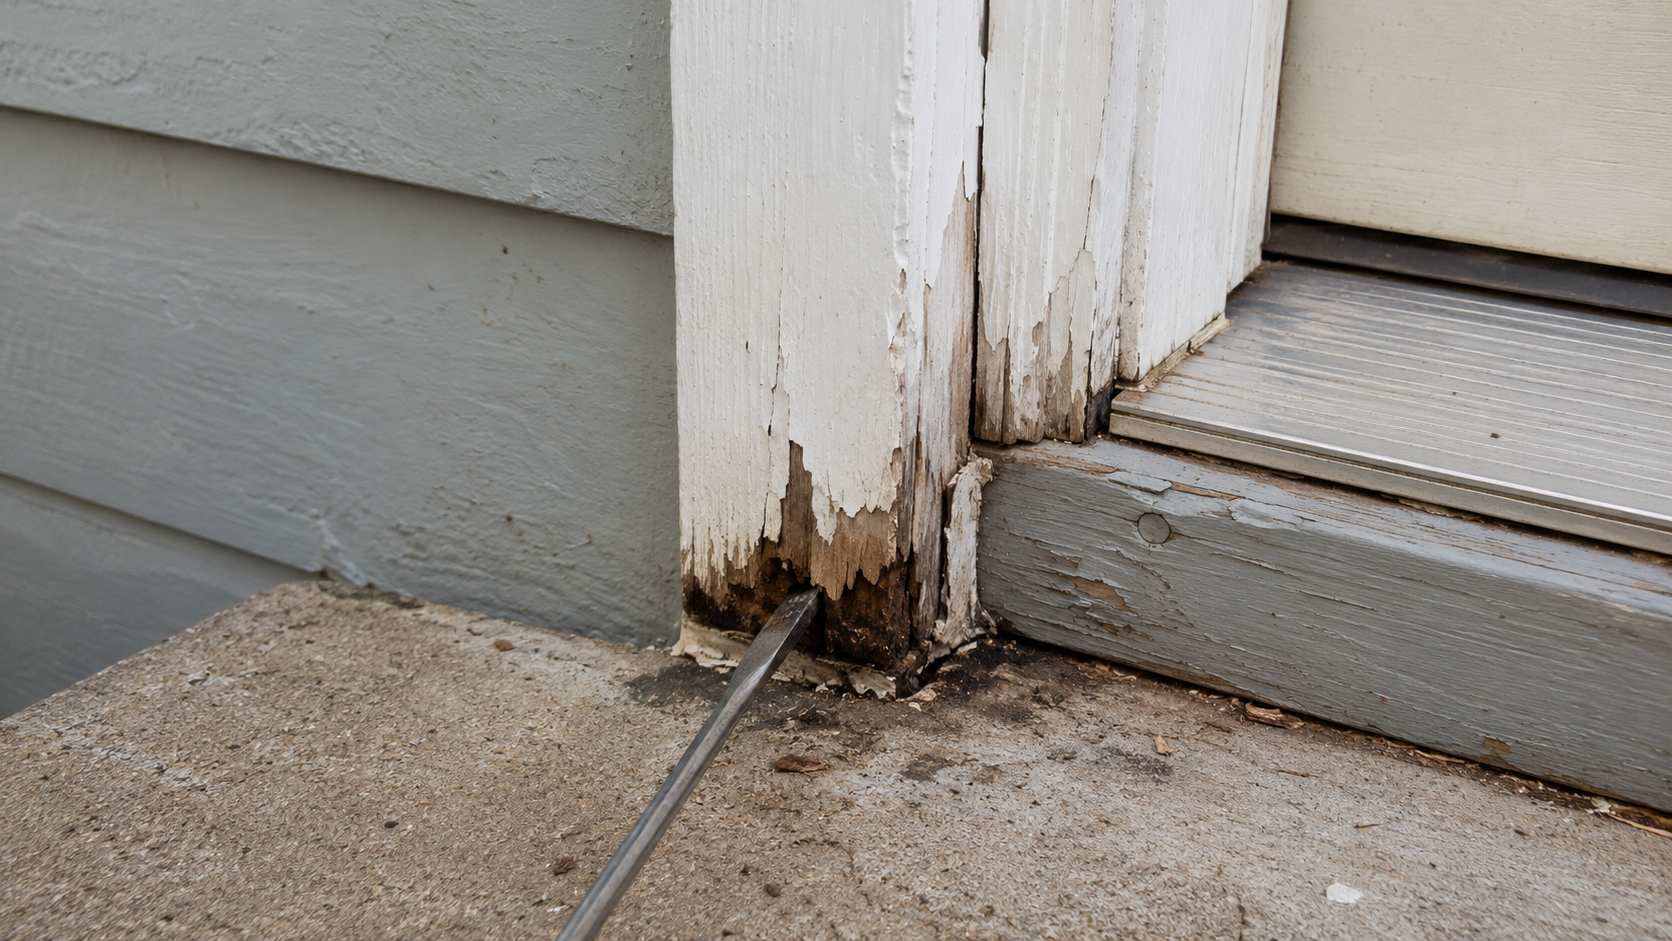
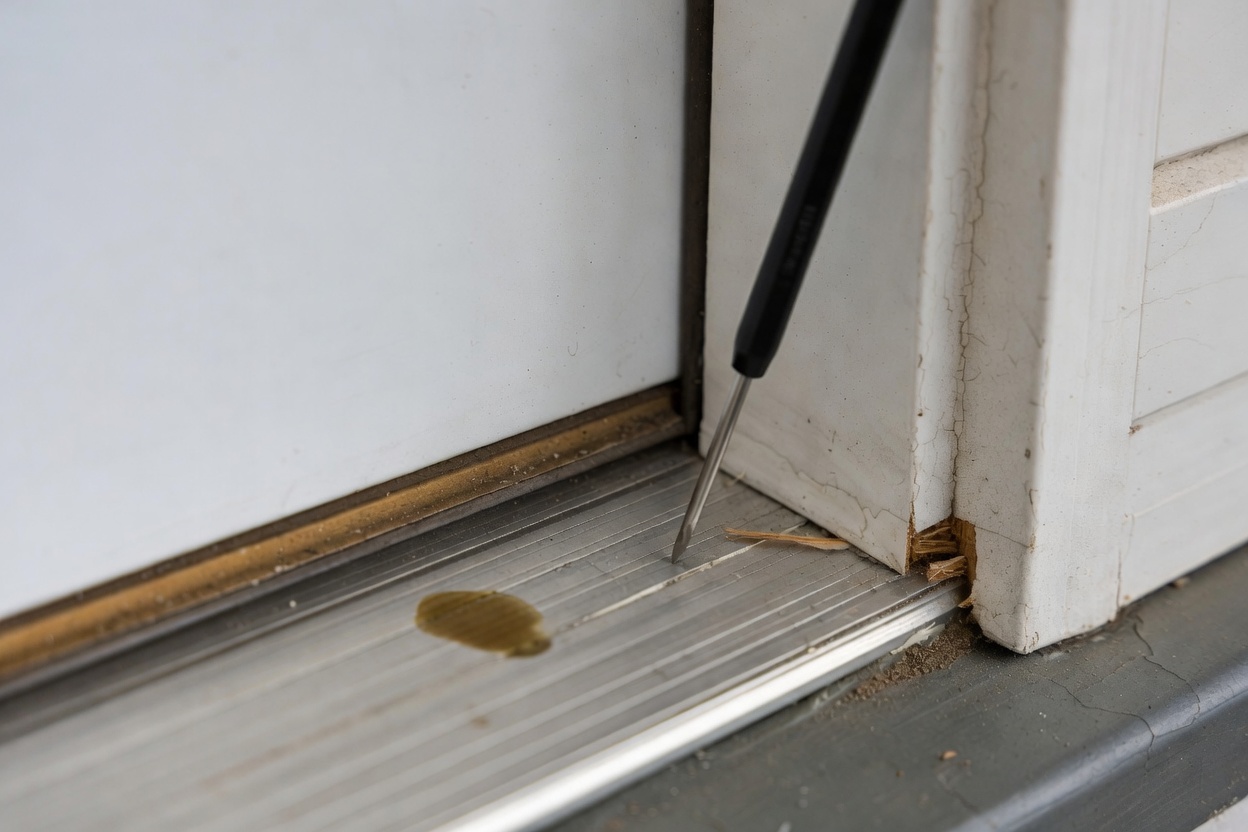
Use a small awl, screwdriver, or probe. Press gently at the lower jamb, the casing base, and the threshold joint — firm wood resists the tool, while rotten wood feels punky, hollow, crumbly, or wet. Paint may still be sitting on top while the wood underneath has already failed. I have sunk an awl into a jamb base that still wore a clean, glossy coat of paint, and the paint turned out to be most of what was holding the corner together.
That is why a door frame can look “mostly fine” until the first tool touches it.
Door Frame Rot vs Door Jamb Rot vs Threshold Damage
Homeowners usually say “door frame” for the whole opening. Contractors break it into the jamb, casing, threshold, sill, subfloor, or rough opening. The words matter because they point to different repairs.
| Part | What It Is | Why It Matters |
|---|---|---|
| Jamb | The vertical frame piece the door closes against | The lower jamb often rots first because it sits right at the threshold area |
| Casing / trim | The visible trim around the door | Can rot on the surface while the jamb is still sound, or hide deeper damage |
| Threshold | The bottom piece you step over | Leaks here feed water straight into the jamb base and subfloor |
| Subfloor / sill area | The wood below or behind the threshold | Softness here makes the job bigger than a simple trim patch |
| Rough opening | The framing around the door unit | Damage here can turn the repair into carpentry or structural work |
A rotten casing corner is one repair. A soft jamb base is a bigger one, and a leaking threshold with soft subfloor under it is bigger still.
Patch, Cut Out, or Replace?
Do not decide from the surface alone. Decide from depth, moisture, and location.
| Condition | Likely Repair | Do Not Skip |
|---|---|---|
| Small dry surface defect on trim or casing | Clean out loose fibers, harden/fill if appropriate, prime, and paint | Fix the caulk, paint, or water source first |
| Lower jamb is soft but damage is local | Cut out the rotten section and splice in new jamb material | Check the threshold joint before closing the repair |
| Threshold leaks or moves | Remove and reset or replace threshold parts as needed | Check subfloor and sill area below |
| Rot spreads behind casing or under threshold | Open the area and inspect backing, subfloor, and framing | Do not seal hidden wet wood back inside |
| Door unit is loose, out of square, or badly damaged | Replace larger frame section or full prehung door unit | Correct the landing, flashing, or drainage problem |
The jump from “patch” to “cut out” happens when the wood is no longer just scarred. If the tool sinks in, the fibers crumble, the fasteners feel loose, or the rot keeps spreading as you scrape, stop thinking like a painter and start thinking like a carpenter.
When a Door Frame Can Be Patched
A patch works when the damage is small, dry, shallow, and non-structural — a paint-grade casing edge, a minor trim defect, or a shallow spot where the water has already been corrected. The loose fibers come out, the surrounding wood stays firm, the area dries, and then the repair is shaped, primed, sealed, and painted. That is the narrow lane for filler.
Filler has no business rebuilding a jamb base that is still getting wet, hiding a leaking threshold, or bridging a loose, soft opening. A patch that traps wet wood is worse than no patch, because it makes the surface look solved while the problem keeps working behind it.
When the Rotted Jamb Should Be Cut Out
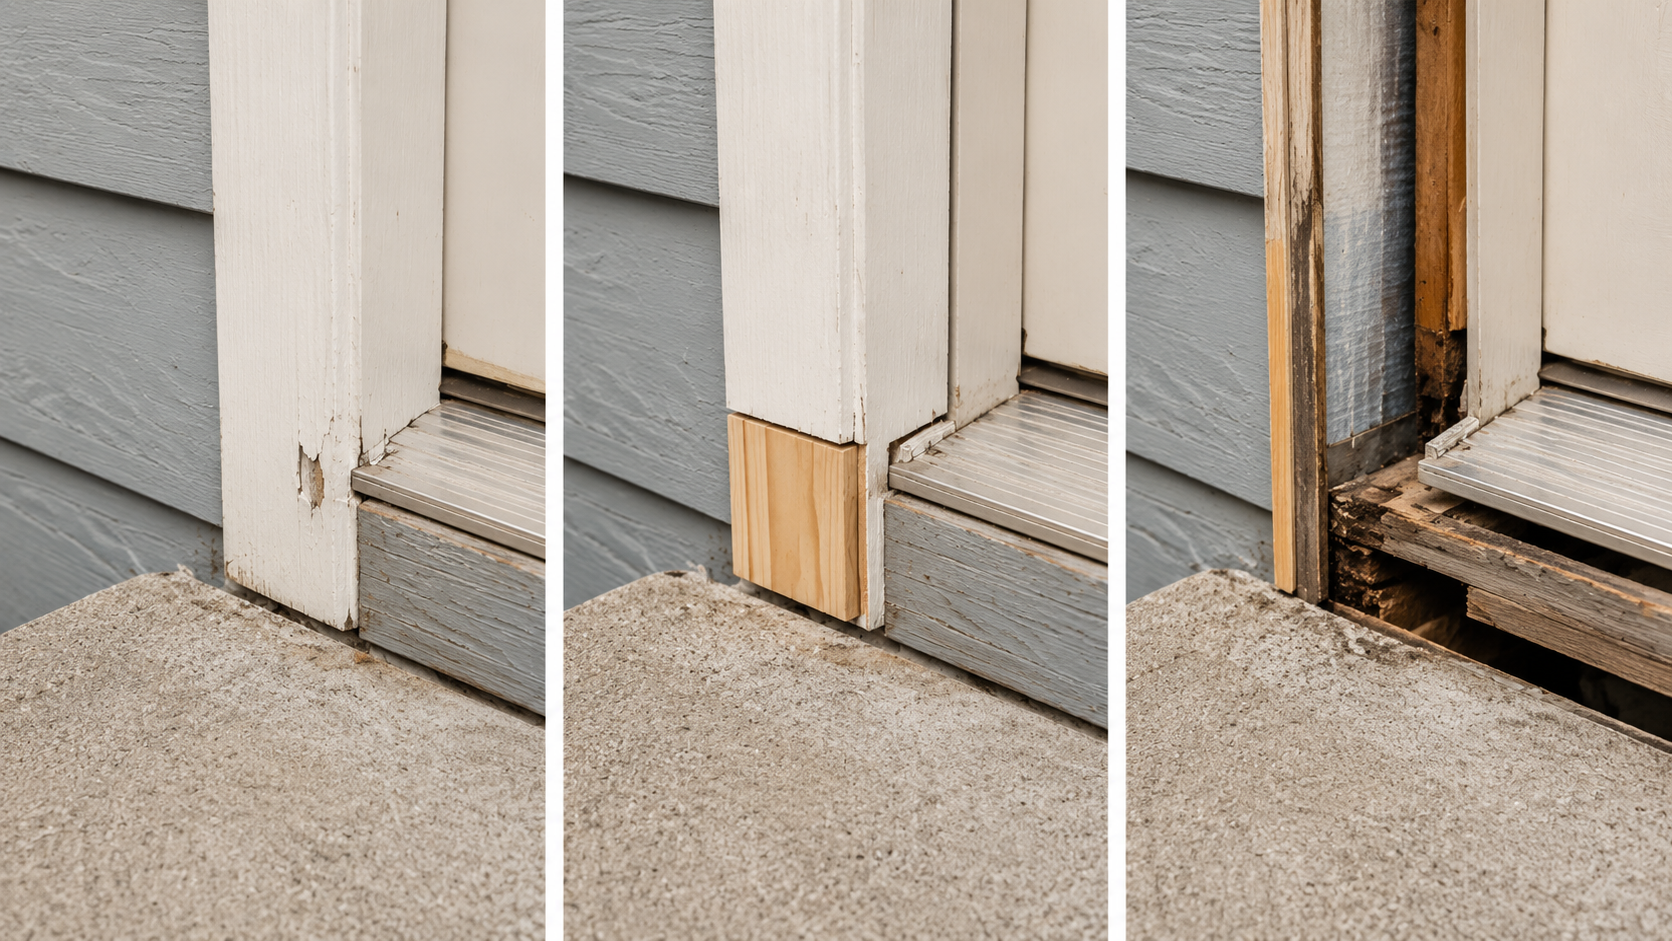
Many exterior door repairs land right here. The bottom of the jamb is soft, the upper jamb is still sound, and the door still swings and latches. The threshold may need attention, but the whole unit is not necessarily dead. In that case the repair is usually a cut-out splice: remove the rotten lower section and let in a new piece.
Every one of these I have opened, the rot ran higher up the jamb than the paint line suggested. So the cut has to reach sound wood. Not almost sound. Sound.
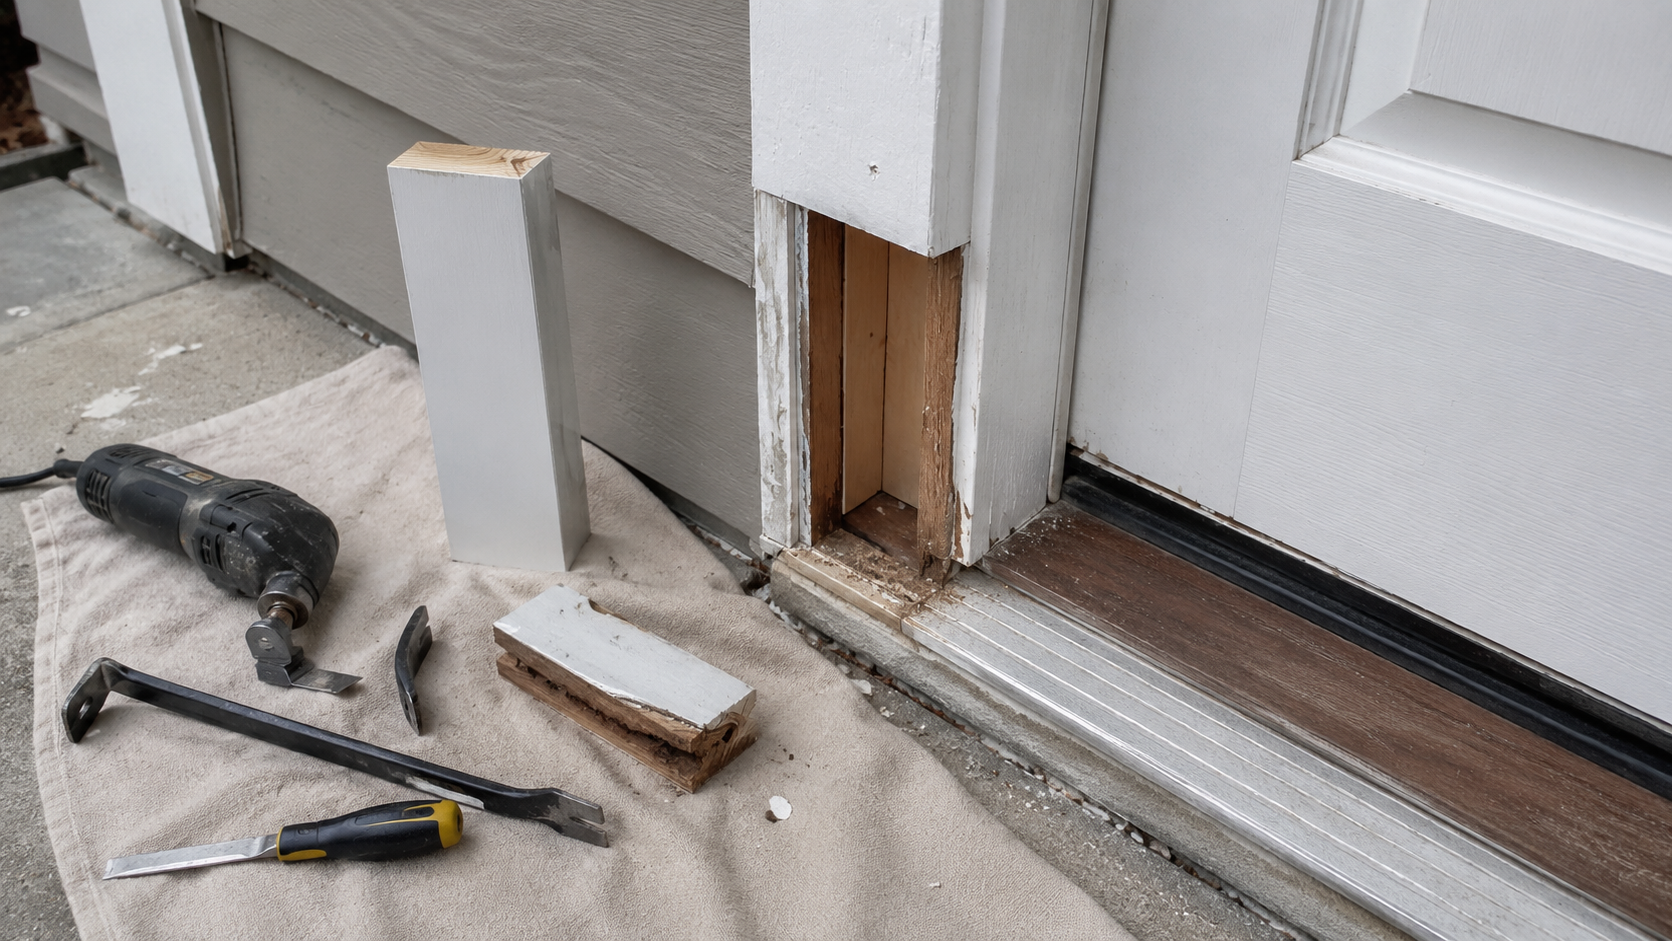
The new piece can be wood, a rot-resistant repair material, or a PVC or composite jamb leg, depending on the door, the exposure, and the finish. But the material is not the part that saves you — the joint is. The bottom cut end, the splice seam, the threshold joint, and the exterior paint system all need protection. If the original failure came from an exposed end grain or an unsealed bottom edge, repeating that same detail in fresh material just sets the clock again.
Check the Threshold, Landing, and Caulk Joint
The threshold area is where most door-frame repairs quietly succeed or fail. If water is slipping under the threshold, the jamb patch is only cosmetic. If the exterior landing slopes toward the door, the lower jamb keeps getting wet no matter what you splice in. If the caulk joint is cracked but the threshold itself is sound, the repair may stay simple. If the threshold is loose, rotten, poorly sealed, or badly installed, the job grows.
Look for:
- a dark line where the threshold meets the jamb
- failed or missing sealant at the lower corner
- water staining on the landing just outside the door
- swollen wood near the sill or threshold
- loose fasteners or movement when the threshold is pressed
- interior flooring damage near the door
Water does not need a big opening. A small joint that stays wet can do plenty of damage over a few seasons.
The Real Reason It Rotted: A Missing Sill Pan
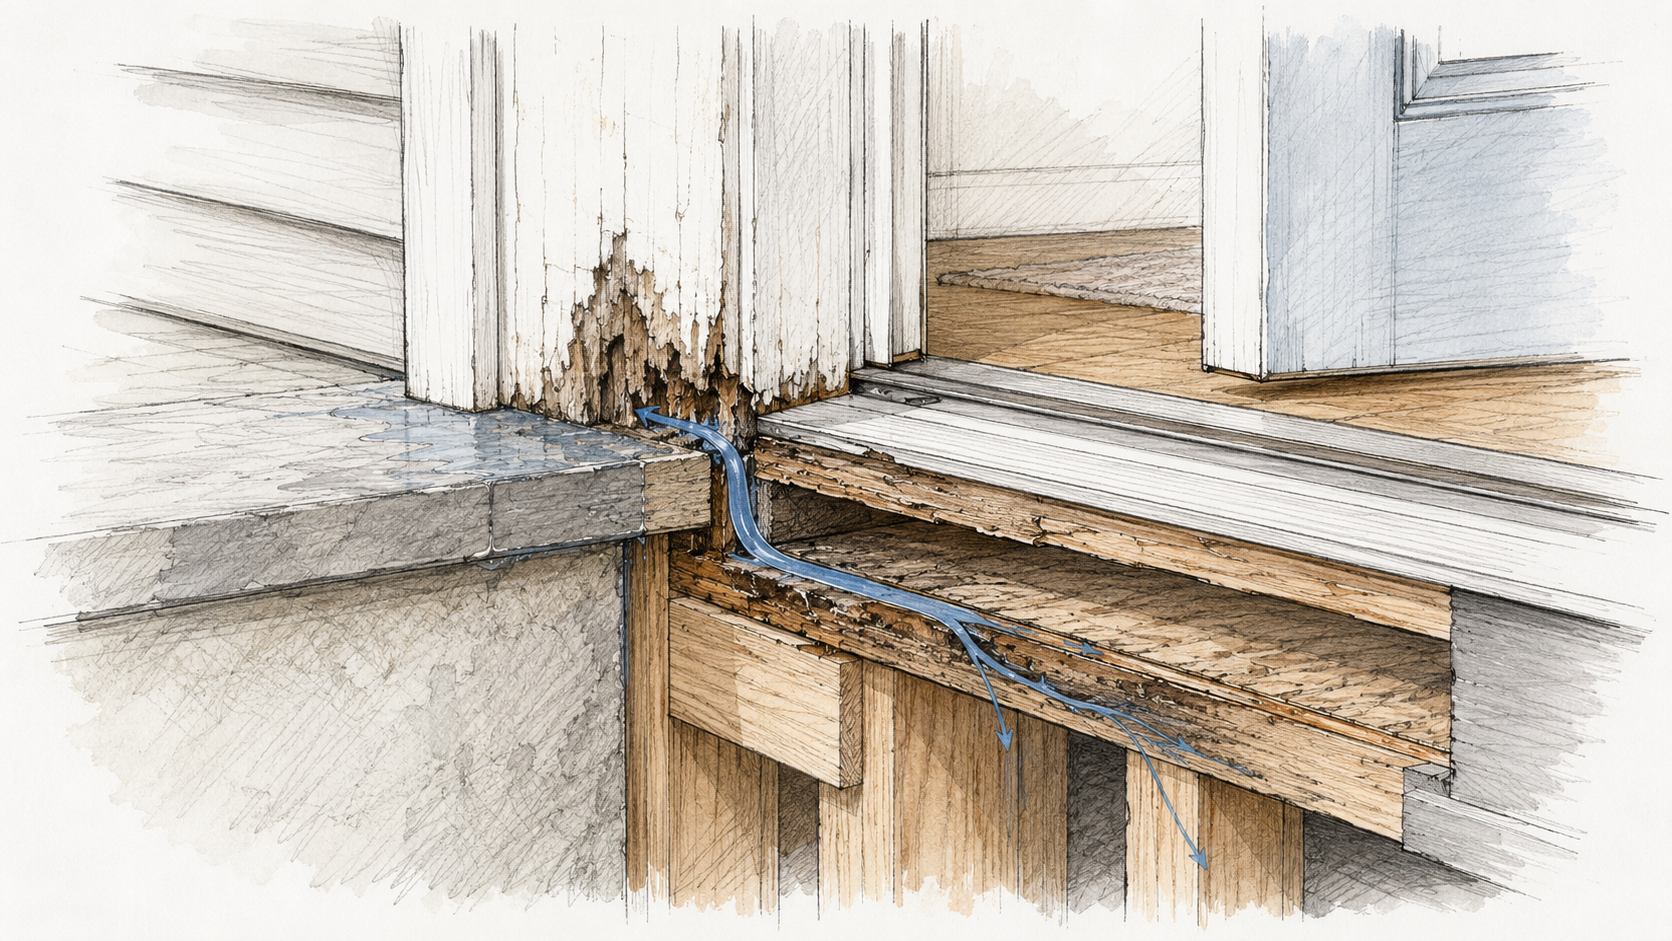
Here is the part the cost guides skip, and it is the one that decides whether you ever do this repair again. Almost every rotted exterior jamb base traces back to one missing detail under the threshold: a sill pan.
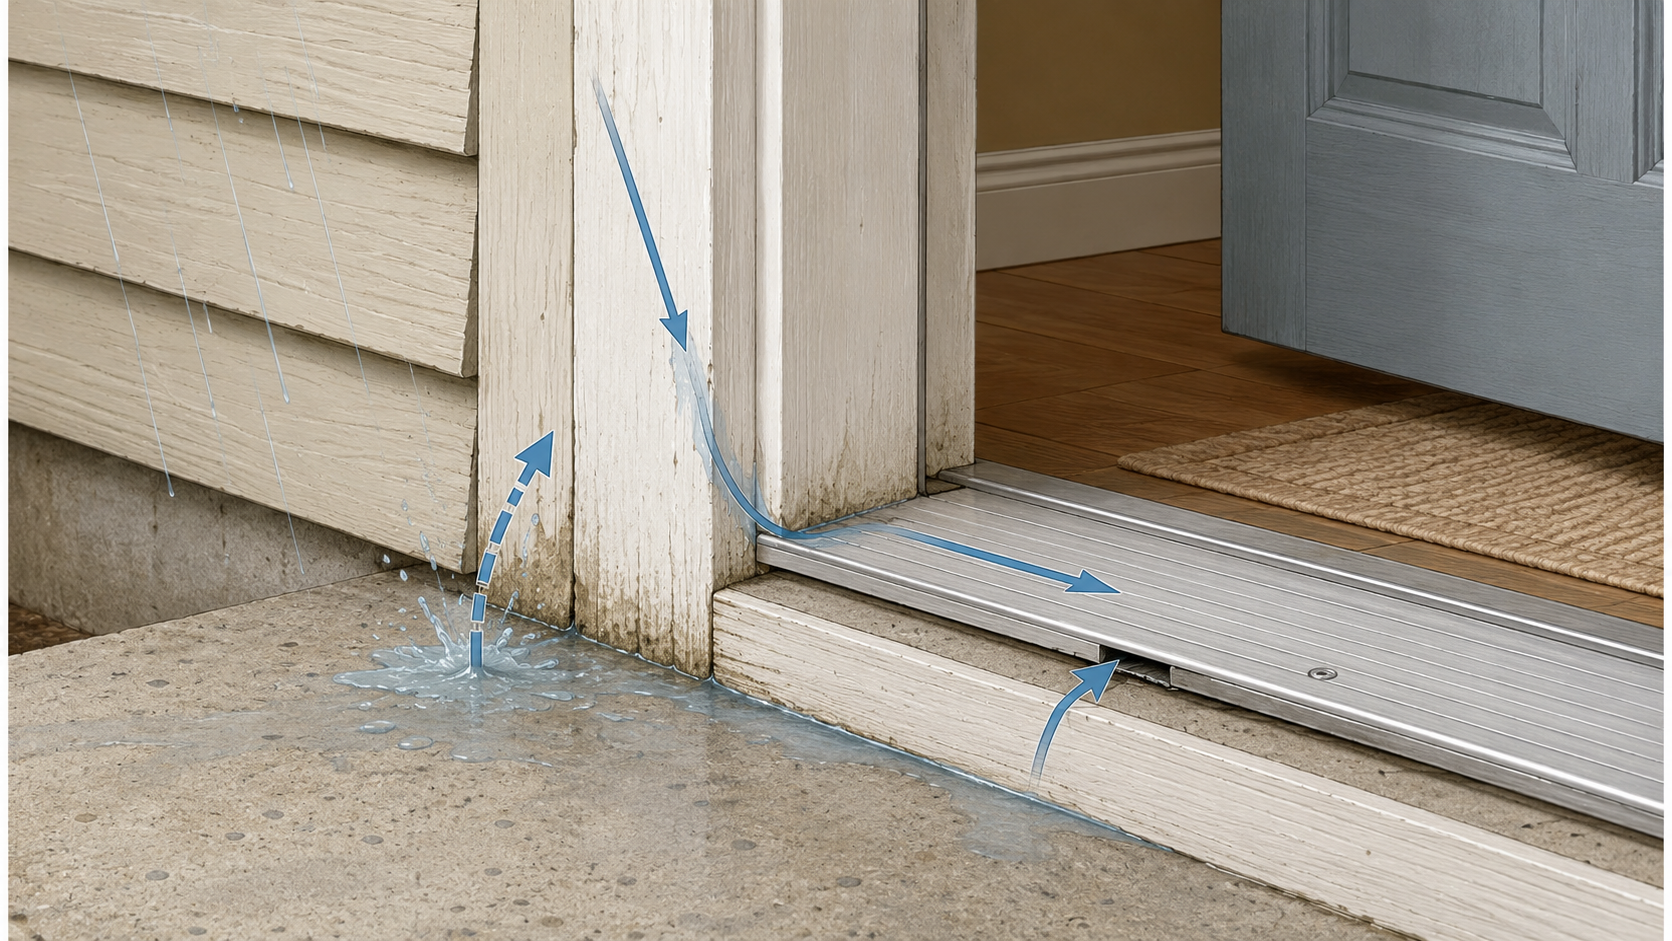
A sill pan is a waterproof tray that sits under the threshold. It has a raised lip at the back, a small dam at each end, and it laps over the wall's drainage layer in front, so any water that gets past the threshold lands in the pan and drains back outside before it can reach the jamb, the subfloor, or the rim joist behind them. Modern door and flashing details commonly require some form of sill-pan or pan-flashing protection, but the exact requirement depends on the manufacturer instructions, local code, and whether the job is new installation or repair. The practical point is simpler: without a pan or equivalent drainage detail, every little leak at the threshold has nowhere to go but into the wood.
For a repair, the sill pan is the part you add while the door is out. If you are already cutting out the jamb or pulling the unit to reset or replace it, that is the moment to put a pan underneath. Skip it and the new wood rots on the same schedule as the old. It is the cheapest piece of the whole job and the one that determines whether you are back here in five years. I have torn out plenty of these, and the ones that come back are almost always the ones nobody flashed the first time.
One mistake worth naming, because it is common and it makes things worse: do not run a continuous bead of caulk across the front of the threshold, and do not plug the factory weep holes. The front edge has to stay open so water can drain out. Seal the sides and the back, leave the front to weep. Caulk the whole thing shut and you trap water in the exact spot you were trying to protect.
Where the rot sits is also a clue to which detail failed. Rot at the bottom of the jamb and the threshold points at the sill pan or threshold seal. Rot at the top corners or high on the jamb usually means head flashing above the door failed and water ran down inside the wall. Rot concentrated at the latch side often means the perimeter caulk gave out. And one more thing worth knowing before you spend on an upgrade: a fiberglass or steel door slab will not rot, but the wood jamb, casing, and framing around it still will, so a new door alone does not fix a flashing problem.
When the Whole Door Unit May Need Replacement
Sometimes the better repair is not a patch and not a small jamb splice. A full prehung replacement can make more sense when the door is out of square, the threshold is failing, the jambs are badly rotted, the casing is hiding widespread damage, or the unit was poorly installed to begin with. It can also make sense if the door was already due — drafts, security, swelling, broken weatherstripping, poor operation.
That does not mean every rotten jamb needs a new door. But here is the honest trouble with the repair-versus-replace call: by the time you cut the jamb, reset the threshold, add the sill pan, fix the subfloor edge, and repaint, you are often within shouting distance of a properly installed new prehung door — and you usually cannot tell which side of that line you are on until the trim is already off and you can see how far the rot ran. The discovery itself costs time and money, and anyone who quotes you a confident repair-or-replace answer over the phone, sight unseen, is guessing. Sometimes the “small repair” is only small on the first phone call.
The Hidden Damage Below the Door
The visible jamb is not always the end of the damage. Water can travel below the threshold into the subfloor, the sill area, the rim joist, or the rough opening, and it does this most often where an exterior door sits near a deck, a concrete landing, a porch slab, or a low-clearance threshold. The damage may not show until the trim comes off.
This is the part nobody spells out clearly enough: the repair boundary is not set by the visible paint line. It is set by the last piece of sound material. If the subfloor edge is soft, the repair may pull in flooring, threshold removal, carpentry, and possibly exterior drainage correction. If the rough-opening framing is damaged, the work moves past finish repair. And if the door is near a crawl space, check below the opening before you assume the problem stops at the jamb.
For broader water-source tracing, use home moisture, leaks, and water damage as the next diagnostic step.
What Drives Water Damaged Door Frame Repair Cost
The price moves because the job can be three different things: a surface repair, a carpentry repair, or an opening repair.
| Cost Driver | Why It Changes the Job |
|---|---|
| Depth of rot | Surface damage can be patched; soft jambs and hidden damage need cutting and replacement. |
| Threshold condition | A leaking or loose threshold can turn the repair into a door-opening job. |
| Subfloor damage | Soft wood below the door may pull in flooring, sill, or framing repair. |
| Door operation | A door that rubs, sags, leaks air, or no longer latches may need more than jamb work. |
| Exterior landing | Concrete, porch, deck, or step drainage may keep feeding water into the repair. |
| Trim and paint | Matching old trim, priming, caulking, and painting all add real labor. |
| Full door unit replacement | Removing and reinstalling an exterior door system costs more than splicing a small jamb section. |
For 2026 planning, a small surface patch on trim or casing is often DIY-scale — roughly $15 to $45 in filler or epoxy, or about $50 to $150 if a pro handles it. A lower-jamb cut-and-splice repair commonly runs in the rough range of $180 to $450. Replacing an exterior jamb and casing outright lands closer to $320 to $600. And once the threshold, subfloor, or rough opening is involved and the fix becomes a properly installed new prehung exterior door, you are usually looking at $500 to $1,050 or more. Treat all of it as a planning frame, not a quote — the real number depends on what turns out to be soft after the first piece comes off.
Who to Call
Start with the trade that matches the damage.
| Problem | Who to Call First | When to Escalate |
|---|---|---|
| Small casing or trim rot | Finish carpenter or exterior repair carpenter | If the jamb or threshold is soft |
| Lower jamb rot | Door repair carpenter or exterior carpenter | If subfloor, sill, or rough opening damage appears |
| Threshold leak | Door installer or exterior carpenter | If the door unit needs resetting or replacement |
| Water coming from siding, porch, or landing | Exterior repair contractor | If drainage, flashing, or cladding needs correction |
| Soft floor below the door | Carpenter, flooring pro, or structural repair contractor | If joists, sill plates, or bearing areas are involved |
A handyman may be fine for a tiny trim patch. A rotted threshold with soft subfloor under it is not the same job, and a good one will say so.
The Repair Is Not Finished When the Wood Is Replaced
A new jamb piece can fail just as fast if the bottom edge goes back in unsealed and the water path is still open. The repaired area should be dry, sound, sealed, primed, caulked where it belongs, and protected by a working drainage path. That last part matters. Caulk is not flashing, and paint is not drainage — a fresh board set into the same wet detail is only a slower version of the one you pulled out.
Before you call it done, check:
- whether the cut end of the new jamb is sealed or primed
- whether a sill pan is in place if the door was reset or replaced
- whether the threshold joint is clean and protected, with the front left free to drain
- whether water drains away from the door instead of toward it
- whether the landing or porch surface sends water back at the house
- whether the door still closes and latches cleanly
- whether the bottom of the repair is protected by paint or the right exterior finish
If the water source was never corrected, the new wood is just waiting its turn.
Questions to Ask Before Hiring
Ask these before you approve the work:
- What caused the lower door frame to rot?
- Are you repairing only the visible jamb, or checking the threshold and pan too?
- What happens if the subfloor or sill area is soft?
- Is the repair wood, composite, PVC, or another exterior-rated material?
- Will the cut ends be primed or sealed before installation?
- If the door is reset or replaced, will a sill pan go in underneath?
- Is caulking, priming, and painting included?
- Is threshold removal or reset included?
- Will the door still latch and seal correctly after the repair?
- What is excluded from the quote?
The exclusion list is where the truth hides. A low quote that leaves out threshold work, painting, hidden damage, and drainage correction will not stay low.
Can You DIY a Water Damaged Door Frame?
Small trim defects can be DIY work if the wood is dry, shallow, non-structural, and easy to inspect. A lower-jamb splice is more advanced but still within reach for someone with careful carpentry skills and patience.
DIY gets risky the moment the repair touches the door's operation, the weather seal, the threshold, the rough opening, the subfloor, or the framing. An exterior door has to keep out water, air, and pests, and in many places it has to meet local code or egress requirements. A repair that looks neat but leaks is not a repair. Do not guess if the door is loose, the floor is soft, the threshold moves, or the opening is out of square.
FAQ
Can a water damaged door frame be repaired?
Yes, if the damage is local and the water source is fixed. Small surface damage may be patched. A soft lower jamb usually needs the rotten section cut out and spliced with new material.
Why does my door frame keep rotting after I fix it?
Almost always because the water source was never corrected — most often a missing or failed sill pan under the threshold. Without a pan to catch and drain leaks, every wet season feeds the jamb base again. Add a sill pan when the door is reset or replaced.
When should a rotted door jamb be replaced?
Splice or replace the jamb when the wood is soft, crumbly, swollen, or no longer holds paint, caulk, or fasteners.
Is the threshold causing the door frame rot?
It can be. Failed caulk, poor threshold slope, a loose threshold, or water trapped at the landing keeps the jamb base wet.
Can I just fill the rotten door frame?
Only if the damage is small, dry, shallow, and non-structural. Filler is not a fix for a soft jamb base, a leaking threshold, or hidden subfloor damage.
Who repairs door frame rot?
A finish carpenter, exterior repair carpenter, or door installer usually handles jamb and threshold repairs. If the floor, sill, or framing is soft, you may need a structural repair contractor or experienced carpenter.
Should I replace the whole door?
Maybe. Full replacement can make sense if the jambs, threshold, weather seal, and operation are all failing, or if repairing the old unit costs nearly as much as installing a better one.
Read This Next
For the parent repair guide, start with wood rot repair.
If the damage came from repeated leaks, read home moisture, leaks, and water damage.
For wood movement, drying, and why wet wood keeps changing after a repair, see wood moisture content, acclimation, and movement.
If similar damage shows up around windows, compare the logic with wooden window frame replacement.