
Subfloors: Your Main Hub (Start Here Before You Install Any Floor)
This page is not a step-by-step tutorial. It is a map.
If you’re about to install hardwood, LVP, tile, or even a radiant heated floor, stop here first. Every finish depends on the subfloor, and most floor problems start below the part you see.
These short sections give you a clear overview of subfloors, underlayments, leveling, moisture control, and repairs. Find the situation that sounds like your house, then click through to the deeper guides.
Subfloor Basics: What a Subfloor Does
A subfloor is the structural base layer, usually plywood or OSB fastened to joists. Its job is simple: stay stiff, stay flat, stay dry. Everything you install later depends on those three things.
If the subfloor moves, flexes, or holds moisture, the finish floor will tell on you with gaps, clicks, cracks, or buckling.
If you want the full picture of how that base ties into the rest of the floor system, there’s a clear walkthrough here: how floors work in a house from joists to finishes .
Related deep-dive topics this hub points to:
- What counts as a solid, trustworthy subfloor
- Plywood vs OSB on real jobs, not just on paper
- When old subfloors can stay and when they must come out
- How subfloors carry loads together with joists and beams
Subfloor Prep Before Any Flooring
This is the “don’t skip it” list. Before hardwood, LVP, or tile touches the house, I always walk the bare subfloor and check:
- Humidity and moisture readings in the sheets and framing
- Loose fasteners and squeaks
- High seams and low spots that will telegraph later
- Structural bounce in the joists
- Rot and soft areas around bathrooms, exterior doors, and kitchens
A finish floor can hide only so much. Good prep fixes the things people feel and hear underfoot later.
If you want the full checklist I run through before I ever open a box of flooring, it’s laid out here: floor installation basics and pre-checks .
Fixing High Spots and Low Spots (Leveling & Flattening)
Most floors fail here. Hardwood wants flat. LVP wants “pretty flat.” Tile wants dead flat.
On this part of the hub I break down:
- The difference between “flat” and “level” (they are not the same)
- When I reach for a floor sander, a planer, or self-leveling compound
- Why doorways and hall transitions are where problems show first
- How to avoid feathering issues at the edge of a leveling pour
- How small dips in the subfloor turn into LVP gaps months later
From here you can jump into the hands-on guide that shows each fix step by step, with real examples of hump and dip repairs.
Subfloors for Hardwood Floors
Hardwood is picky, especially longer boards. If the base is wrong, the floor will talk back every time someone walks across the room.
This section of the hub gives you the overview of what hardwood expects from the subfloor:
- Minimum subfloor thickness and screw or nail spacing
- How to eliminate hollow spots before the first row goes down
- When I add a second layer of plywood on older homes
- Safe moisture ranges for hardwood over wood subfloors
- Why ridges and crowned seams ruin long straight runs
The full hardwood guide picks up from here with layout, fastening, and common mistakes. For the structural side of things, it pairs well with this explainer on how joists, beams, and subfloors work together .
Subfloors for LVP (So It Doesn’t Gap or Peak)
LVP hides a lot of sins, but not waves in the subfloor. If the base is wavy, the joints will tell on you.
In this hub section I outline:
- Flatness requirements for common LVP products
- Why slight humps cause peaking at the joints
- Why shallow dips show up later as open gaps
- How I prep doorways, closets, and bathrooms for floating floors
- How to avoid tapping damage while trying to “fix” a bad base
From here you click into the full step-by-step LVP installation walkthrough so you can see how the prep and the install tie together.
Subfloors for Tile (Backer Board, Uncoupling, and Prep)
Tile is heavy, rigid, and unforgiving. If the subfloor flexes, the tile cracks. It really is that simple.
This hub section summarizes:
- Minimum stiffness and thickness I’m comfortable with under tile
- When I choose cement backer board and when I use uncoupling membranes
- The role of thinset under the board (it’s there to fill voids, not glue)
- Why I tape and skim seams before I set a single tile
- How and where expansion joints fit into a tile floor system
The detailed tile prep guide takes over after this overview and shows you the exact steps for building a tile-ready base.
Radiant Heated Floors + Subfloors
Radiant floors are great to live with, but they change the rules under the finish. The floor gets warmer, moves more, and some products simply don’t like that.
Here I give the big-picture view of how subfloors and radiant systems work together:
- Electric mats vs hydronic tubing and how they sit on or in the subfloor
- How heat affects movement in wood and man-made products
- Subfloor stiffness and thickness targets over radiant heat
- When to use thermal break panels or specialty panels over joists
- How to keep tile from cracking on heated floors
- Moisture and temperature limits during install and cure
The linked radiant-floor guide goes deeper into real-world install sequences, temperature ramp-up, and product choices.
Underlayments (Quiet, Level, or Waterproof)
Underlayments are where a lot of people get lost. The packaging promises everything at once. In real life, most products do one thing well and the rest “okay.”
This part of the hub keeps it simple:
- Sound underlayments for noise control under floating floors
- Leveling products for smoothing dips and waves in the subfloor
- Waterproofing layers for baths, entries, and damp basements
- Vapor barriers: when they help and when they cause trouble
- Underlayments I avoid under nailed hardwood
From here you can jump into the full underlayment guide that breaks down each type and shows where it belongs in the stack.
Moisture Control & Testing
Moisture ruins more floors than bad technique. You can do everything else right and still lose if the subfloor is too wet or keeps getting damp from below.
On this hub section I cover:
- Simple ways to check subfloor moisture before installing anything
- Safe moisture ranges for hardwood, engineered wood, and subfloor panels
- Seasonal movement and why readings change through the year
- Crawlspace moisture and what it does to floors above
- Extra steps for basements and slabs that might sweat
- Why dehumidifiers matter before, during, and after the install
If you’re trying to connect strange floor behavior with possible moisture issues, it’s also worth skimming this pattern-based guide: how to read floor failures in a house .
Subfloor Repairs (Squeaks, Rot, Bounce, and Soft Spots)
If your floor already feels weak, loud, or spongy, the problem is usually in the subfloor or the structure just below it.
This section gives you an overview of the repair paths:
- Sistering joists to stiffen bouncy rooms
- Blocking and bridging to calm down vibration
- Cutting out and replacing rotten subfloor panels
- Refastening squeaky areas with screws and adhesive
- Reinforcing old plank subfloors before new sheets go down
- Fixing raised seams and edges that telegraph through finishes
From here you click into the repair guide that walks through each issue with photos and real-world fix options instead of just theory.
When a Subfloor Must Be Replaced
Some subfloors can be saved with repairs. Some should not be trusted, no matter how much patching you do on top.
In this part of the hub I lay out the red flags that tell me it’s time to start over:
- Visible mold, deep rot, or crumbling panel edges
- Severe delamination in plywood or OSB
- Spongy areas around tubs, showers, and kitchen plumbing
- Rooms that are badly out of level because of structure issues
- Clear signs of termite or carpenter ant damage
- Joists that have sagged beyond what simple shimming can fix
The replacement guide linked from here breaks down safe removal, how to rebuild the base, and how to tie back into existing framing without creating new weak spots.
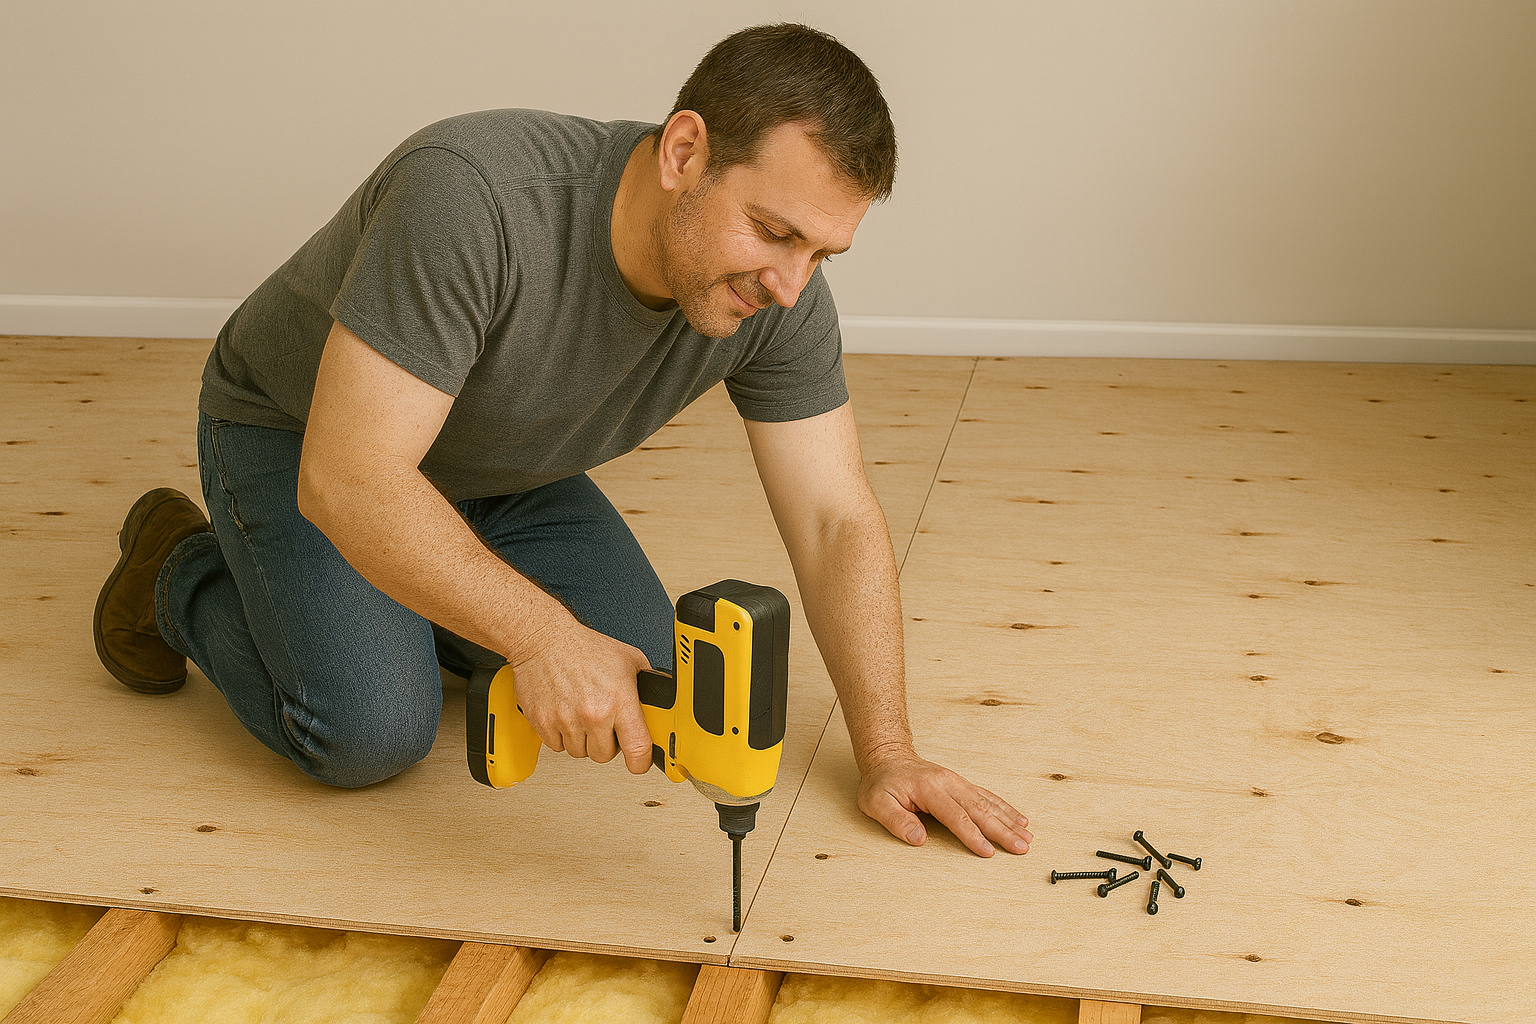
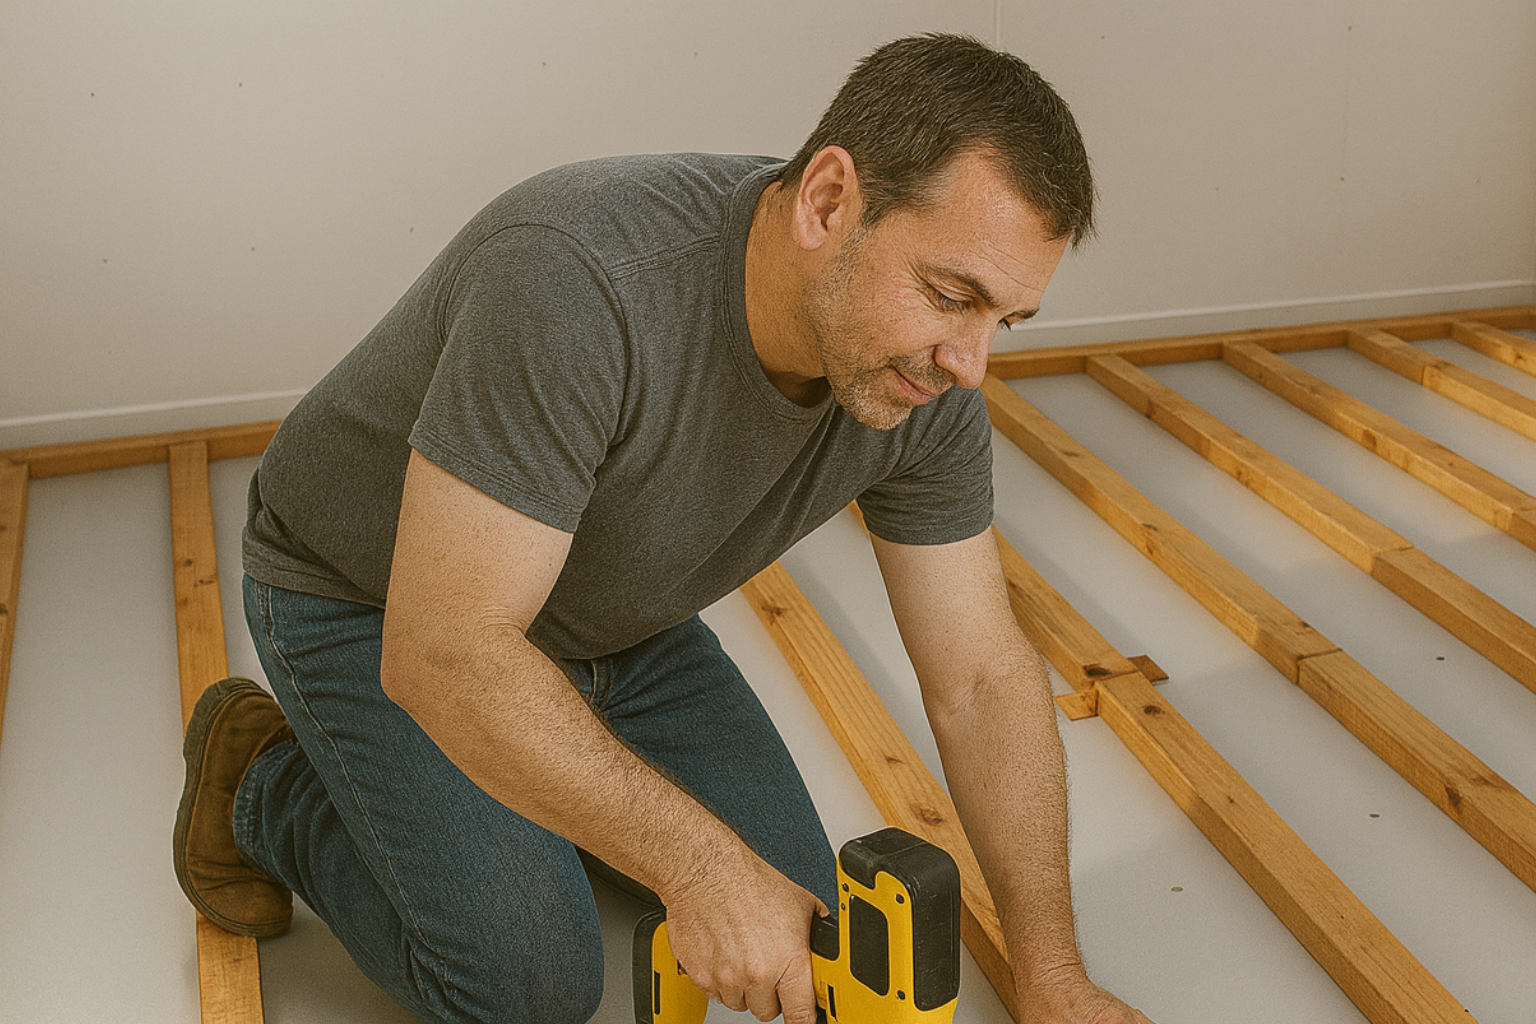
Full Subfloor Installation Guide

If you are starting from scratch, this is your main path.
This hub section gives the quick overview of what that full guide covers:
- Layout and panel orientation
- Adhesive beads on joists and why I don’t skip them
- Screw schedule along edges and in the field
- Staggering seams so they don’t all land on one line
- Leaving proper gaps between panels for movement
- Keeping transitions flush into halls and adjoining rooms
From here you jump into the illustrated subfloor install walkthrough that shows each step in order, from bare joists to a quiet, solid base.
The Subfloor Test Nobody Talks About
There’s one check I do before any tools come out, and it has saved more floors than any level, meter, or laser.
I call it “The Quiet Room Test.”
Here’s how it works:
I close the door.
I stand in the middle of the room.
I shift my weight from one foot to the other — slowly.
And I just listen.
Not for squeaks.
Not for cracks.
But for changes in pressure under the floor.
If a subfloor has a dip, soft spot, or loose seam, there’s a tiny delay between the moment your foot loads the floor and the moment you feel the support push back.
Hard to describe — easy to feel.
It’s like stepping on a thick paperback hidden under a rug.
You won’t hear it, but you feel it.
When I find that spot, I know:
-
The joist crown changes here,
-
Or the subfloor seam isn’t glued,
-
Or there’s framing movement below,
-
Or something is wet and swelling.
Homeowners walk around focusing on noise.
I focus on feedback — the floor talking back before it fails.
You can do this test in socks.
Once you feel that delay once, you’ll never un-feel it.
And you’ll find subfloor problems you would’ve walked right past before.
That’s the kind of thing that separates “installed” from “installed well.”
Subfloor → Flooring Roadmap
Once the subfloor is solid, flat, and dry, you choose your finish. This last section is your signpost to the next step.
Pick the path that matches your project:
- Hardwood over wood subfloors – layout, fastening, and details that make boards feel solid underfoot.
- LVP over a prepped base – room size limits, transitions, and expansion space so planks don’t gap or peak.
- Tile over wood – from backer board to movement joints on bigger floors.
- Radiant heated floors – how to respect the heat while still giving the floor room to breathe.
If you are still deciding what kind of finish belongs on a given floor, it can help to step back and look at use, not just looks. This overview is written exactly for that: choosing the right floor materials for each space .
From there, you can always circle back to this hub when you are ready to tackle the next room or a different type of floor.
FAQ
1. Do I really need to level the subfloor before installing flooring?
Yes. Every floor has a tolerance, and none of them forgive dips or humps. Hardwood telegraphs the shape. LVP gaps or peaks. Tile cracks. Fixing the base takes less time than repairing the finish later.
2. What moisture level is safe for a wood subfloor?
For most hardwood installs: 10–12%.
If you see 14%+, stop and figure out why. A cheap pin moisture meter is enough to catch trouble before it gets buried.
3. Can I install hardwood or LVP over an old plank subfloor?
Yes, but not directly.
Plank subfloors move too much. Add a 1/2" or 5/8" plywood layer screwed tight to the joists, then install over that.
4. Why does my floor squeak when I walk on it?
Most squeaks come from:
-
Loose subfloor fasteners
-
Joists not perfectly flat
-
Subfloor rubbing against nails
-
Seasonal shrinkage
The fix is usually screws + adhesive, not magic spray or “squeak-free” gadgets.
5. Should I glue and screw, or just screw the subfloor?
Glue and screw is best.
Glue fills voids and stops movement. Screws lock everything down. Nails alone don’t hold long-term.
6. What happens if I ignore high spots?
The flooring will tell on you.
A hump under hardwood forces the boards upward and messes up the line. LVP will peak there. Tile will rock over it and eventually crack.
7. How flat is flat enough?
Here’s the real-world checklist:
-
Hardwood: 1/8" over 6 feet
-
LVP: “close enough to flat” — but dips cause gapping
-
Tile: dead flat — less than 1/8" over 10 feet
Tile is the strictest. LVP forgives minor stuff. Hardwood complains the most.
8. Do I need a vapor barrier under a wood subfloor?
Not usually — unless there’s a crawlspace, a damp basement below, or radiant heat involved.
Each situation changes the rule.
9. Can radiant heat go under any type of flooring?
No.
Some woods warp. Some LVP melts or off-gasses. Tile is the easiest. Always check heat limits and manufacturer instructions.
10. When should a subfloor be replaced entirely?
When you see:
-
Rot or mold
-
Spongey spots
-
Delaminated plywood
-
Bug damage
-
Big structural dips
If the subfloor flexes like a trampoline, it’s time.
References
Building Codes (USA & Canada)
- International Residential Code (IRC)
https://codes.iccsafe.org - National Building Code of Canada (NBC)
https://nrc.canada.ca/en/certifications-evaluations-standards/codes-canada - CMHC – Canada Mortgage & Housing Corporation
https://www.cmhc-schl.gc.ca
Flooring Industry Standards
- NWFA – National Wood Flooring Association
https://www.nwfa.org - TCNA – Tile Council of North America
https://www.tcnatile.com - WFCA – World Floor Covering Association
https://wfca.org - MMFA – Multilayer Modular Flooring Association (LVP Standards)
https://www.mmfa.eu
Subfloor, Leveling & Adhesives
- Weyerhaeuser – OSB, Plywood, Joist Systems
https://www.weyerhaeuser.com/woodproducts/ - Schönox – Subfloor Leveling Products
https://hpsubfloors.com - Ardex Americas – Self-Levelers & Moisture Barriers
https://www.ardexamericas.com - Henry Flooring Adhesives
https://www.wwhenry.com
Radiant Heating (Hydronic & Electric)
- Warmboard – Radiant Heating Subfloor Panels
https://www.warmboard.com - Uponor – Hydronic Radiant Systems
https://www.uponor.com - DOE – Moisture & Home Performance
https://www.energy.gov
Membranes, Underlayments & Tile Systems
- Schluter Systems – Installation Manuals (DITRA, Kerdi)
https://www.schluter.com/schluter-us/en_US/architectural-resources