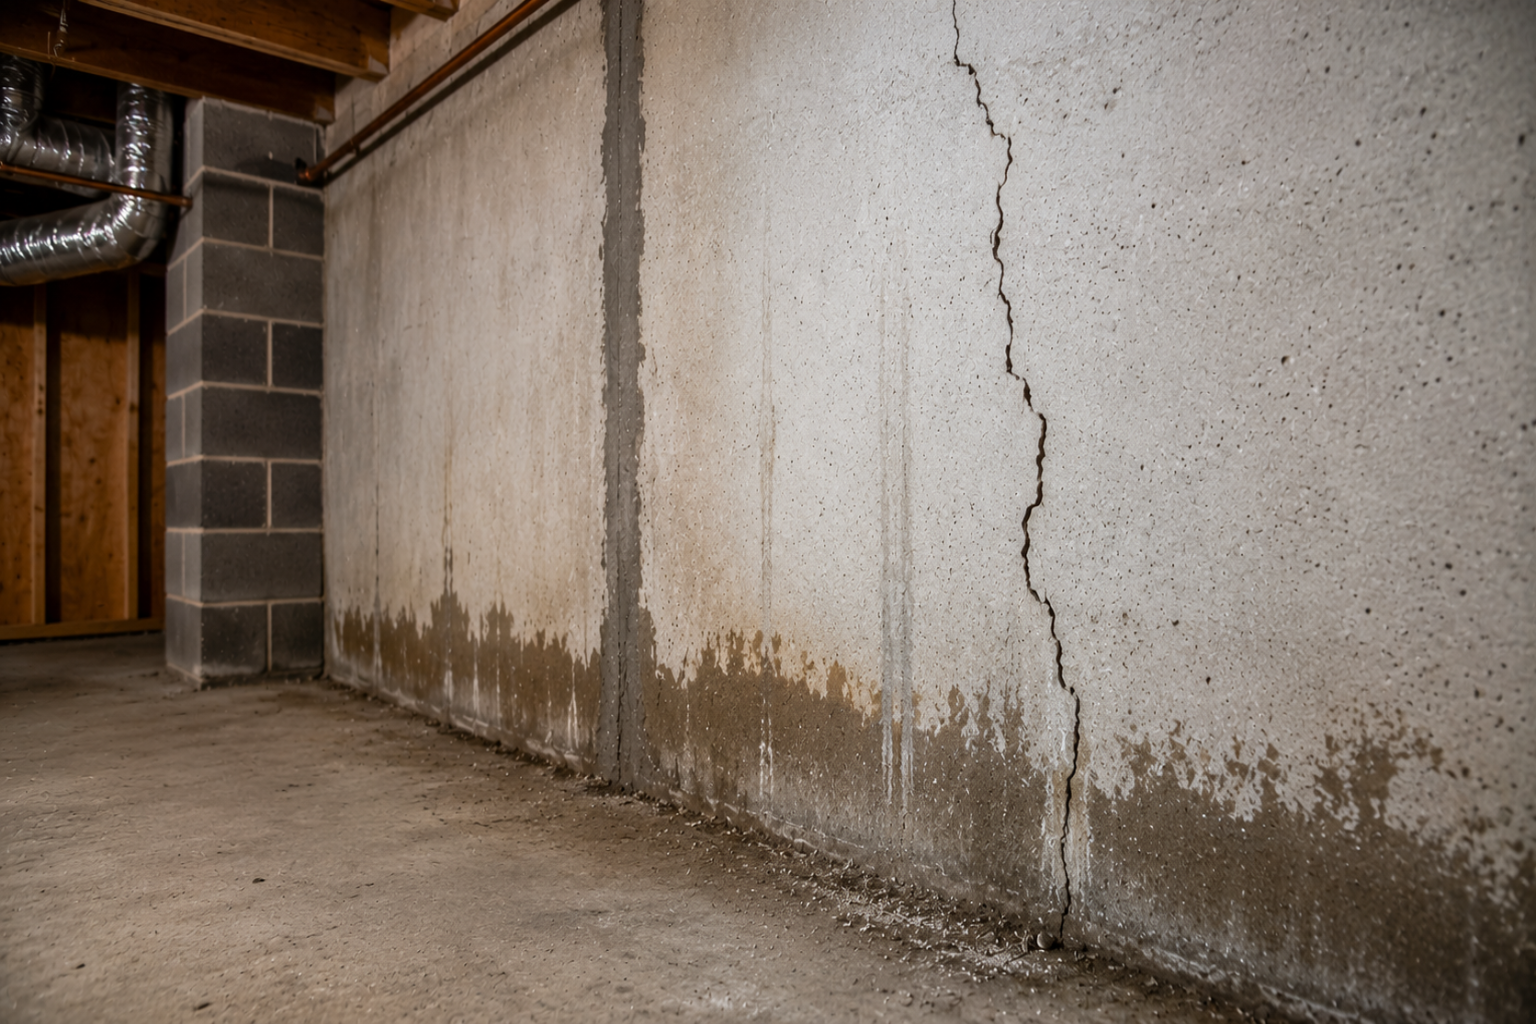
A foundation crack tells you where to look. It does not tell you what failed.
Some cracks come from shrinkage. Some come from settlement, water pressure, poor drainage, soil movement, weak site prep, or wall movement. A quiet hairline crack is not the same as a crack that widens, leaks, stains, or shifts the wall.
Read the crack before you patch it. Check the shape, width, location, water stains, wall movement, and whether the crack is changing.
Foundation crack types at a glance
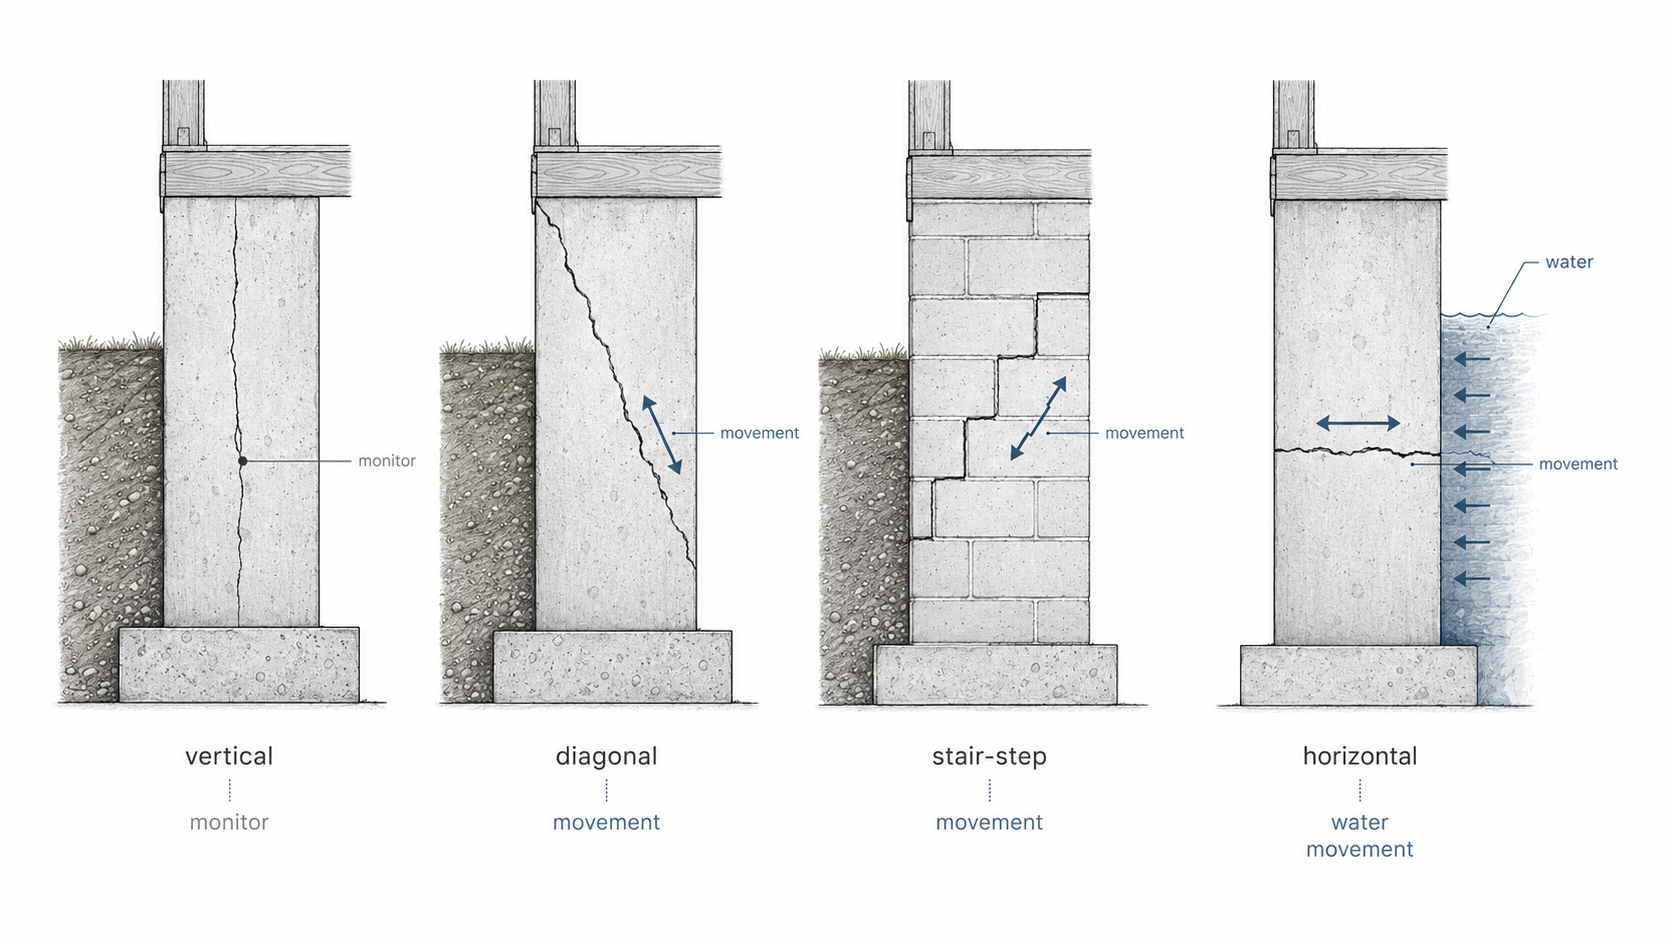
Different cracks point to different levels of concern. A narrow vertical crack in poured concrete may be simple shrinkage. A horizontal crack in a basement wall can point to soil or water pressure. A stair-step crack in block or brick can signal movement along masonry joints.
| Crack type | What it may mean | What to do next |
|---|---|---|
| Hairline vertical crack | Shrinkage, curing, minor movement, or old stable cracking | Check width, water, and whether it changes over time. |
| Wider vertical crack | Settlement, shrinkage with movement, or water entry path | Inspect more closely, especially if leaking or widening. |
| Diagonal crack | Differential settlement, corner movement, or uneven support | Look for floor slope, sticking doors, or exterior drainage problems. |
| Stair-step crack | Masonry movement, settlement, wall stress, or footing movement | Do not treat it as cosmetic until movement is ruled out. |
| Horizontal crack | Soil pressure, water pressure, frost pressure, or wall bending | Get a closer inspection, especially if the wall is bowing. |
| Leaking crack | Water path through the wall, poor drainage, wet backfill, or hydrostatic pressure | Fix the water cause, not only the inside crack. |
When foundation cracks are less concerning
Some foundation cracks are common and may not mean the house is failing. Concrete shrinks as it cures. Old houses settle. Small cracks can appear where stress concentrates, especially near corners, openings, control joints, or thin sections.
A crack is usually less concerning when it is narrow, dry, stable, vertical, and not paired with wall displacement, floor movement, water stains, or repeated widening.
Less concerning does not mean invisible. Photograph it. Measure it. Check it after heavy rain and seasonal changes. A small crack that stays the same is a different problem from a small crack that keeps changing.
When foundation cracks need inspection

Some cracks should be taken seriously right away. The concern rises when the crack shows movement, water, pressure, or a pattern that points to the structure moving.
Call a qualified foundation contractor, structural engineer, or both when you see:
- a horizontal crack in a basement or stem wall
- a stair-step crack in block, brick, or masonry
- a crack that is widening
- a crack with one side pushed inward or outward
- a crack with active water leakage
- bowing, leaning, or bulging foundation walls
- cracks paired with sloping floors or sticking doors
- new cracks after foundation work or house leveling
- repaired cracks that reopen
- multiple cracks near one corner of the house
The risk is not the crack alone. The risk is what caused it and whether the cause is still active.
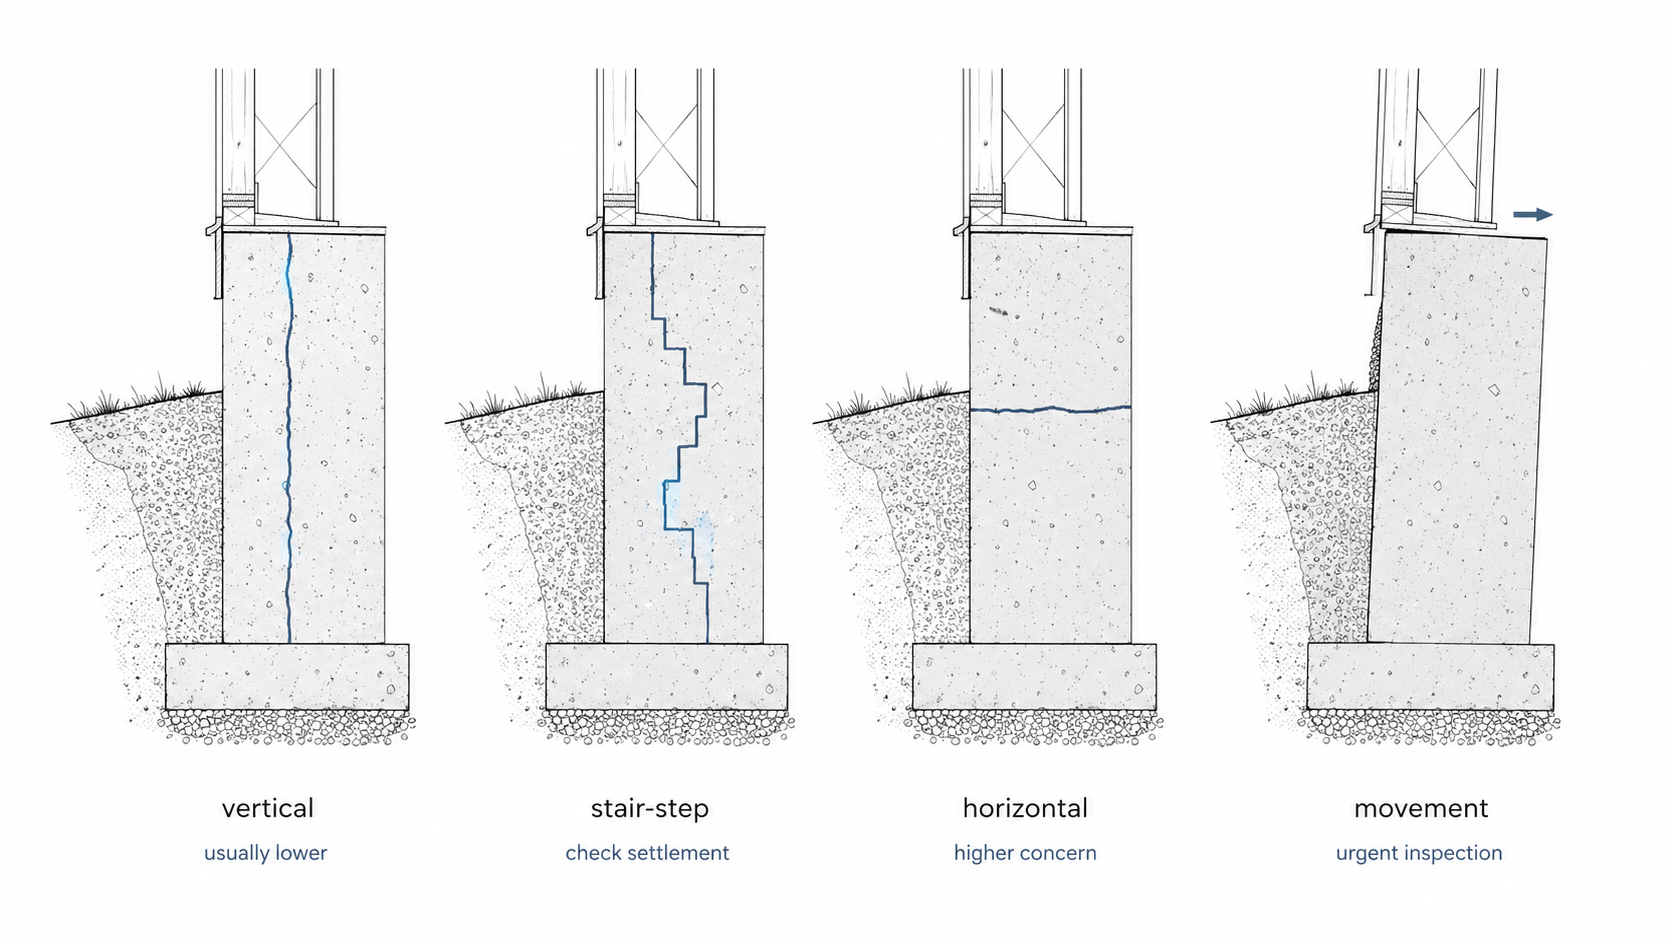
Vertical foundation cracks
Vertical cracks are common in poured concrete foundation walls. Many are caused by shrinkage or minor settlement. They can still matter if they leak, widen, or appear with other signs of movement.
A quiet vertical crack may only need monitoring or sealing. A vertical crack with staining, dampness, widening, displacement, or repeated leakage needs a closer look. Water can turn a small crack into a recurring basement or crawl-space moisture problem.
If a vertical crack is near a corner, under a concentrated load, near a large opening, or close to a settling area, do not judge it by shape alone. Location matters.
Diagonal cracks and settlement clues
Diagonal cracks often show that one part of the foundation or wall moved differently from another part. That may come from soil settlement, poor drainage, tree roots, fill soil, erosion, weak bearing, or a footing issue.
Look beyond the wall. Check the area above and around the crack. Are doors sticking nearby? Is the floor sloping? Is the exterior grade sending water toward the foundation? Are downspouts dumping near the corner? Is there a sunken slab, driveway, or patio beside the wall?
Diagonal cracks are not automatically catastrophic, but they deserve more attention than a quiet hairline shrinkage crack.
Stair-step cracks in block or brick foundations
Stair-step cracks usually follow mortar joints in concrete block, brick, or masonry foundation walls. They can happen when part of the wall settles, shifts, or is pushed by soil and water pressure.
A small stair-step crack may be stable, but the pattern is important. Masonry cracks often trace movement through joints. If the crack is widening, the wall is bulging, or the crack runs near a corner or opening, do not treat it as a simple cosmetic issue.
Stair-step cracking is also common around old repairs. A patched stair-step crack that opens again is a warning sign that the original cause may not have been fixed.
Horizontal foundation cracks
Horizontal cracks are usually more concerning than simple vertical hairline cracks. They can point to soil pressure, water pressure, frost pressure, or wall bending. In basement walls, a horizontal crack may show where the wall is being pushed inward.
Check whether the wall is straight. A crack with bowing, bulging, inward movement, or water staining needs professional inspection. Do not hide a horizontal crack behind paint, paneling, foam, or shelving without understanding the pressure behind the wall.
A wall can be patched on the inside and still be under pressure from outside. That is why drainage, grading, backfill, and wall movement all matter.
Leaking foundation cracks are water problems too
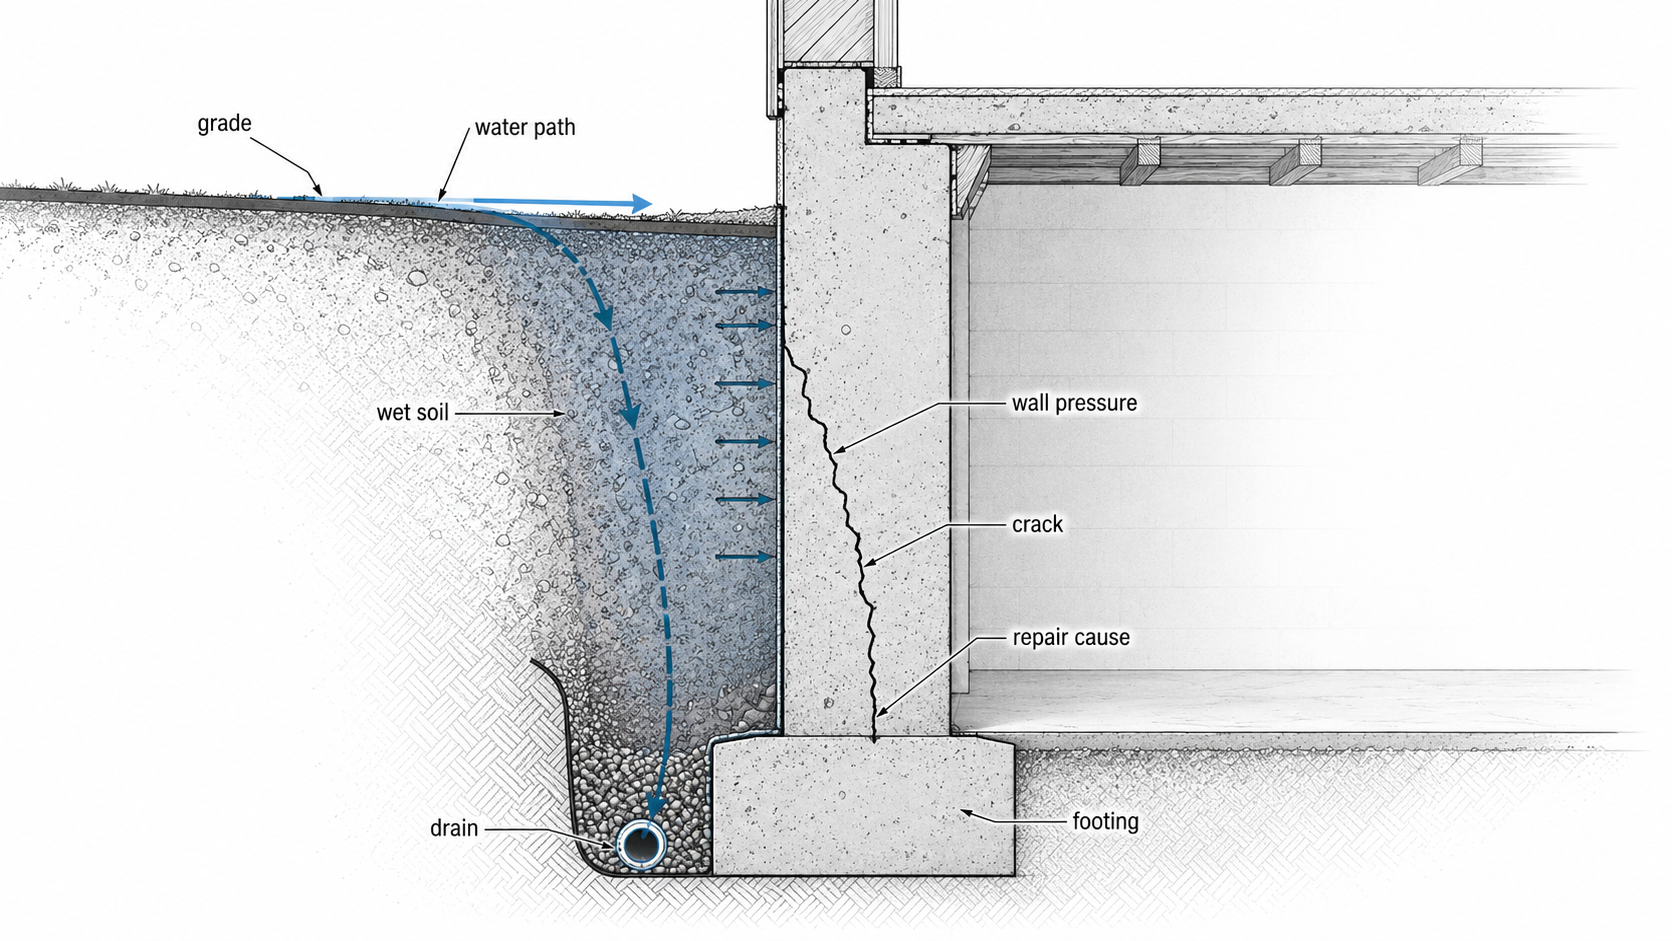
A leaking crack is not only a crack problem. It is also a water-management problem.
Water usually starts outside the foundation. Roof runoff, poor grading, clogged gutters, short downspouts, wet backfill, high groundwater, missing drainage, or failed waterproofing can push moisture toward the wall. The crack becomes the path water uses to get inside.
Sealing the inside may stop the symptom for a while, but the outside cause can still exist. If water keeps loading the wall, the crack may leak again, another crack may open, or moisture may move through a different weak point.
If the issue is tied to wet crawl-space conditions, see water in a crawl space after rain. If structural crawl-space support is also involved, use crawl space foundation repair.
Foundation cracks in slabs
Slab cracks are different from foundation wall cracks. A slab may crack from shrinkage, poor control joints, settlement, heave, voids below the slab, moisture movement, or weak base preparation.
A surface slab crack may be mostly cosmetic. A crack with a height difference across it is more important. One side may have dropped, heaved, or lost support below. If the slab is part of the house structure, garage, basement floor, or slab-on-grade foundation, the diagnosis matters before repair.
For slab movement and leveling decisions, see concrete foundation leveling.
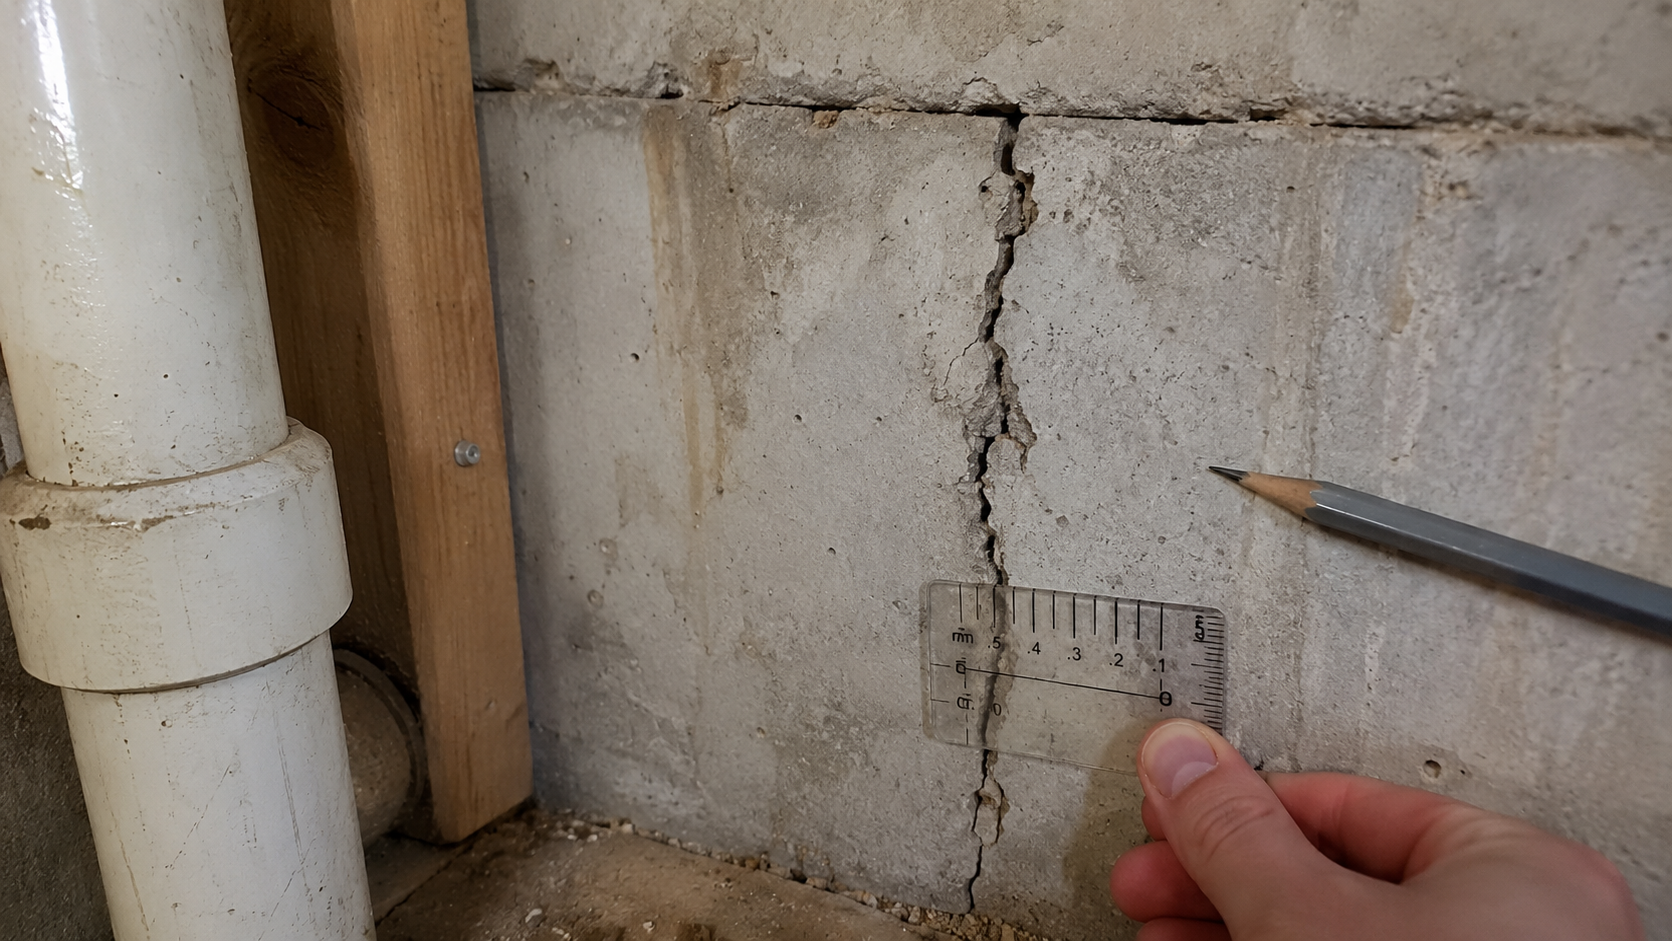
What crack width tells you
Crack width matters, but it is not the whole story. A narrow crack that leaks every storm may be more urgent than a wider crack that has stayed dry and unchanged for years. A thin horizontal crack in a bowing wall may matter more than a wider shrinkage crack with no movement.
Use width as one piece of evidence:
- Is the crack hairline or open enough to measure?
- Is it wider at the top, middle, or bottom?
- Does one side sit higher, lower, in, or out?
- Does the crack widen after rain, freeze-thaw cycles, or dry seasons?
- Has a previous patch split open again?
Do not rely on a single measurement. The important part is whether the crack changes.
How to monitor foundation cracks
Monitoring is useful when a crack looks minor, dry, stable, and there are no other movement signs. It is not a replacement for inspection when the crack is horizontal, leaking, widening, displaced, or paired with wall movement.
A simple monitoring routine is enough for many quiet cracks:
- Photograph the crack. Take one close photo and one wider photo showing where it sits on the wall.
- Measure the width. Use a ruler, tape, crack gauge, or reference object.
- Mark the date. Keep the date in a notebook or photo filename.
- Check after rain. Look for dampness, staining, white mineral residue, or musty odor.
- Check seasonally. Soil moisture and freeze-thaw cycles can change movement.
- Watch nearby finishes. New drywall cracks, trim gaps, or sticking doors can show movement above the foundation.
- Compare photos. Do not trust memory. Compare the crack against earlier images.
Call someone sooner if the crack widens, leaks, shifts, forms a new branch, or appears with floor slope, wall bowing, or door movement.
When to monitor, repair, or inspect further
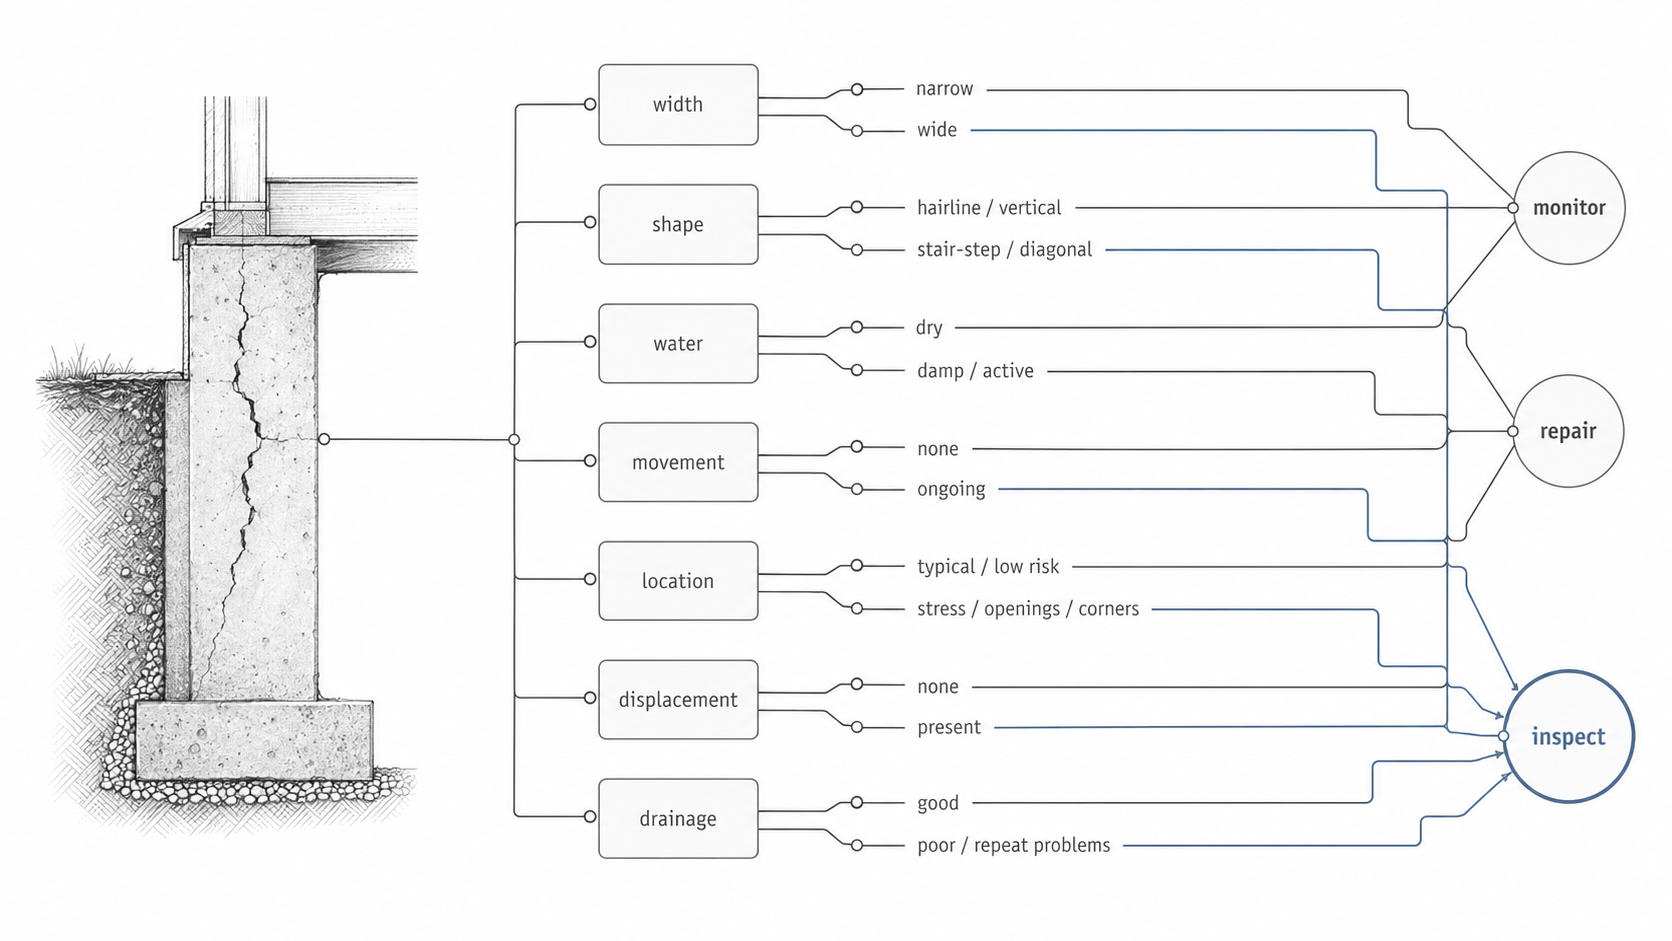
The right next step depends on evidence. A foundation crack decision should not be based on panic, a quick patch, or a single photo.
| Condition | Likely next step | Why |
|---|---|---|
| Narrow, dry, vertical, unchanged crack | Monitor or seal if needed | Often lower concern if there is no movement, leakage, or displacement. |
| Crack with water staining or active leakage | Repair crack and address water source | Interior sealing alone may fail if exterior water keeps loading the wall. |
| Horizontal crack | Inspect wall pressure and movement | Horizontal cracking can point to soil or water pressure against the wall. |
| Stair-step masonry crack | Inspect settlement and wall movement | The pattern can show movement through block, brick, or mortar joints. |
| Crack that keeps widening | Call a professional | Active movement should not be patched without diagnosis. |
| Crack with bowed wall or displacement | Structural inspection | The wall itself may be moving, not only cracking. |
When patching the crack is not enough
Patching can be the right repair for some stable cracks. It can also be wasted money if the cause is still active.
Patching alone may not be enough when:
- water pressure is pushing through the wall
- the wall is bowing or leaning
- soil is settling below part of the foundation
- the crack keeps widening
- a previous patch reopened
- the crack is tied to a low slab, sagging floor, or sticking doors
- poor drainage keeps wetting the same wall
A crack repair should match the cause. That may mean sealing, injection, drainage correction, waterproofing, wall stabilization, pier work, slab lifting, or a deeper structural inspection. The visible crack is only one part of the decision.
What a contractor should check before repairing foundation cracks
A serious repair estimate should look beyond the crack face. The contractor should explain why the crack formed, whether it is active, whether water is involved, and what is excluded from the quote.
Ask these questions before approving repair:
- Is the crack stable or active?
- Is the wall moving, bowing, or displaced?
- Is water pressure involved?
- Is the repair interior-only or exterior too?
- Are grading, gutters, downspouts, and drainage part of the recommendation?
- Does the repair include waterproofing or only crack sealing?
- What happens if the crack leaks again?
- Are permits or engineering needed?
- Will you provide photos before and after repair?
- What does the warranty exclude?
For cost planning, use foundation repair cost. A crack that looks simple can cost more if the repair also involves drainage, excavation, wall stabilization, slab movement, or structural support.
Foundation cracks near stem walls
Stem wall cracks need careful reading because the wall connects footing, slab edge, framed wall, soil, and water exposure. A small vertical crack may be less serious than a crack with staining, displacement, or repeated moisture at the base.
Stem wall repairs can range from patching to reinforcement, waterproofing, drainage correction, or partial rebuild. The repair depends on crack movement, wall condition, footing support, and water path.
For that specific topic, see stem wall foundation repair.
Foundation cracks near excavation, additions, or grade changes
Cracks can appear or change when the soil around a foundation is disturbed. Additions, trenches, new patios, utility work, grading changes, drainage work, and nearby excavation can all change how water and soil behave around the foundation.
Digging beside an existing footing can remove support if the work is too close, too deep, or poorly sequenced. Raising grade against a wall can trap moisture. A new slab beside an old foundation can send water toward the house if it is pitched wrong.
For footing depth and excavation decisions, see foundation excavation depth.
What not to assume about foundation cracks
Do not assume every crack means foundation failure. That leads to panic and bad spending.
Do not assume every crack is cosmetic. That leads to cheap patches over active movement.
Do not assume a dry crack is harmless forever. Water and soil conditions can change.
Do not assume a sealed crack is fixed. If water, pressure, or movement caused the crack, the cause may still be outside the wall.
Do not assume a foundation company’s free estimate replaces an independent engineering opinion when movement is serious, confusing, or disputed.
FAQ
Are foundation cracks normal?
Some foundation cracks are common, especially narrow vertical cracks in poured concrete. They still need to be judged by width, water, movement, location, and whether they change over time.
Which foundation cracks are most serious?
Horizontal cracks, stair-step cracks, widening cracks, leaking cracks, cracks with wall displacement, and cracks paired with floor slope or sticking doors deserve closer inspection.
Is a vertical foundation crack bad?
Not always. A narrow, dry, stable vertical crack may be low concern. A vertical crack that leaks, widens, shifts, or appears near other movement signs should be inspected.
Can I patch a foundation crack myself?
Small cosmetic cracks may be patched, but do not rely on patching when the crack is leaking, widening, horizontal, stair-step, displaced, or tied to structural movement. The cause matters more than the patch.
Why does my foundation crack leak after heavy rain?
Water may be collecting outside the wall because of grading, gutters, downspouts, wet backfill, poor drainage, or waterproofing failure. The crack becomes the path into the house.
How do I know if a crack is getting worse?
Photograph it, measure it, mark the date, check it after rain, and compare over time. Widening, leakage, new branches, wall movement, or nearby interior symptoms are warning signs.
Should I call an engineer for foundation cracks?
Call an engineer when cracks are horizontal, stair-step, widening, paired with wall movement, linked to major settlement, disputed by contractors, or part of a home purchase decision.