You’re not really shopping for “panels.” You’re shopping for a wall system that won’t stink in two winters.
Basements punish lazy assemblies. Cold concrete, damp air, seasonal pressure, and the kind of tiny leaks you don’t notice until you’ve already covered the wall.
Basement Wall Panels DIY
(Moisture-smart walls that don’t turn funky later)
- Which basement wall panel systems actually work (and why some fail)
- Moisture-first rules that keep panels from warping and growing mold
- Insulation + air sealing details that matter more than “R-value on paper”
- Fast DIY install paths: furring + panels, panel systems, removable sections
- Code and compliance realities (fire protection, electrical, permits)
- How to source cheap materials and salvage panels without importing problems
The core misunderstanding
(Panels aren’t just “finish” in a basement)
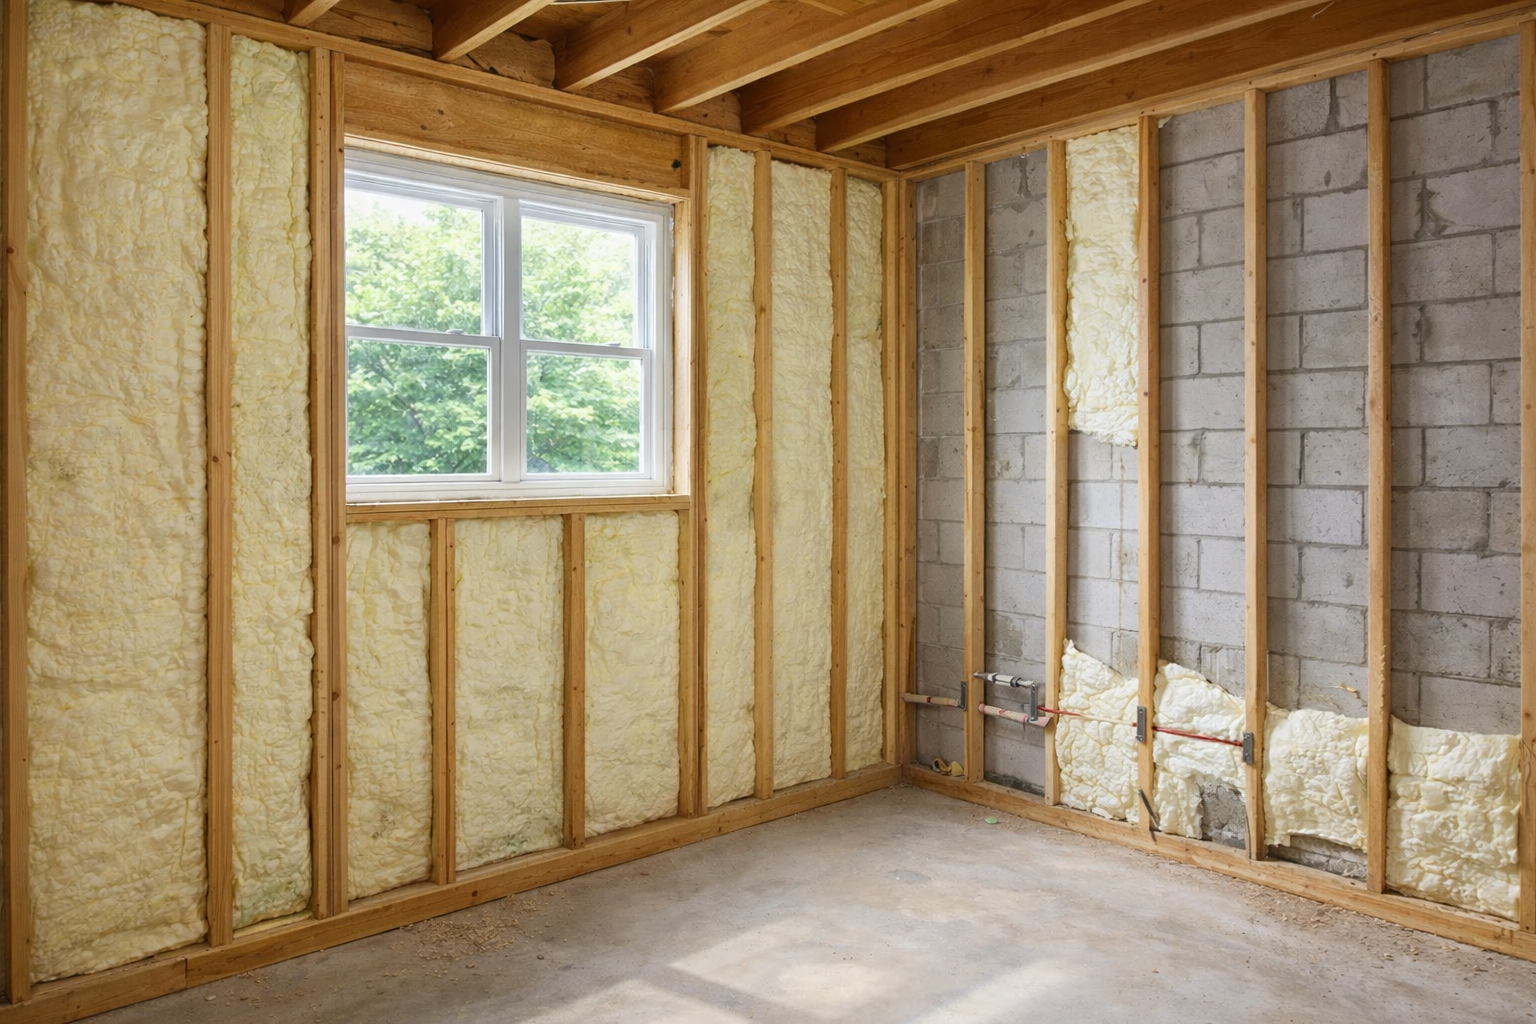
The classic failure pattern is boring: someone installs wood paneling or MDF directly on concrete, or on a thin frame with no real air/thermal break. It looks fine for a while. Then you get that musty smell, warped corners, dark staining behind the panels, and fasteners rusting like they’re underwater.
Concrete and block walls are almost never “dry.” They move moisture as vapor. Sometimes liquid. If you trap that moisture behind a panel with no drying path, you’ve built a controlled environment for mold.
So the job isn’t “attach panels.” The job is: keep interior air from condensing on cold masonry, give the wall a capillary/air break, and use finishes that aren’t mold food when life happens.
Reality check
(10 minutes that saves you 10 weekends)
1) Do you have bulk water? Puddles, active leaks, wet spots after rain, efflorescence lines, damp base of wall, a sump that runs hard.
If yes, don’t panel anything yet. You do water management first: gutters, downspouts, grading, exterior drainage, sump strategy. Interior finishes are not a fix. They are a cover. If you’re seeing wet walls only after storms, start here before you buy anything: why basement walls leak when it rains (and what fixes it).
2) Do you have a humidity problem? If the basement air lives high (sticky smell, condensation on pipes, damp cardboard, rust), panels won’t save you. Dehumidification and air sealing matter. Basements fail from air moisture as often as from leaks.
3) Is the foundation wall cold? Most are. That’s why condensation is the enemy. Warm humid interior air touches cold concrete and you hit dew point. That’s the “mystery” moisture behind panels.
Rule: in a basement, you typically want the cold wall separated from interior air with an air-impermeable layer (often rigid foam or spray foam), then your finish layer.
Pick your approach
(Three strategies that cover most DIY basements)
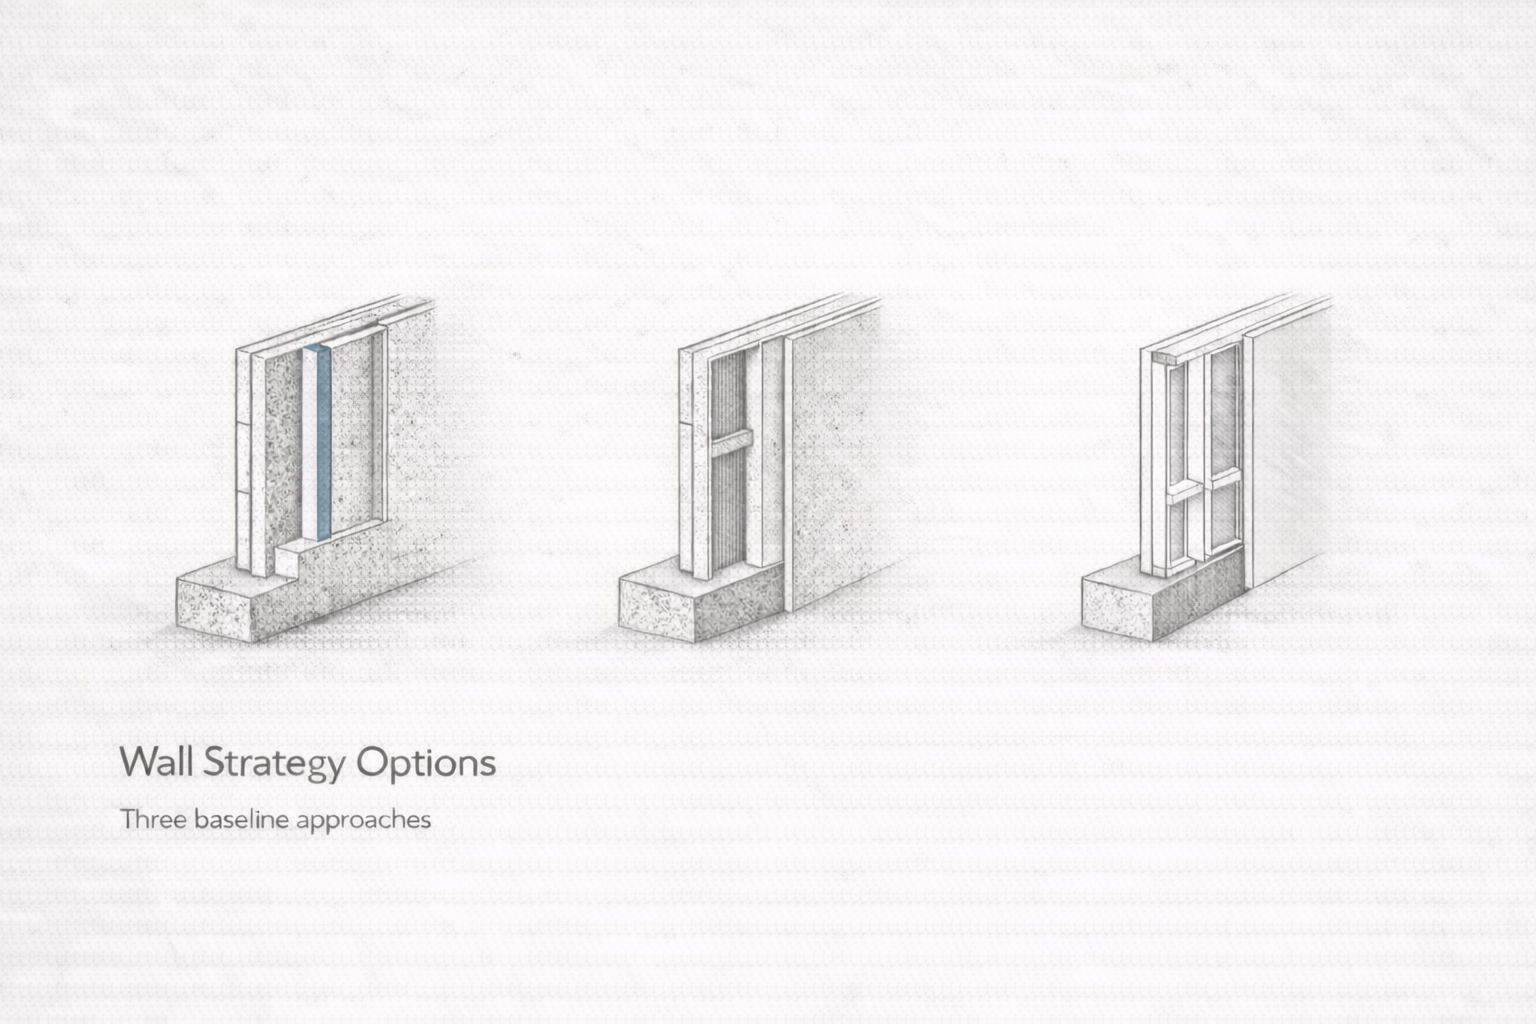
Option A: A purpose-built basement panel system. These are panels designed for foundation walls: integrated foam, plastic studs, drainage channels, or a built-in air gap. You pay more, but the system is designed around basement physics.
Option B: DIY “smart wall” assembly. This is the sweet spot for a lot of DIYers: rigid foam against concrete (sealed), then furring strips or studs, then your panel finish. Done right, it’s durable and flexible.
Option C: Finish panels only (cosmetic) on interior framed walls. This only works if there’s already a proper insulated wall between you and concrete, with moisture control handled. Don’t confuse “interior partition wall paneling” with “paneling on foundation walls.” Different risk level.
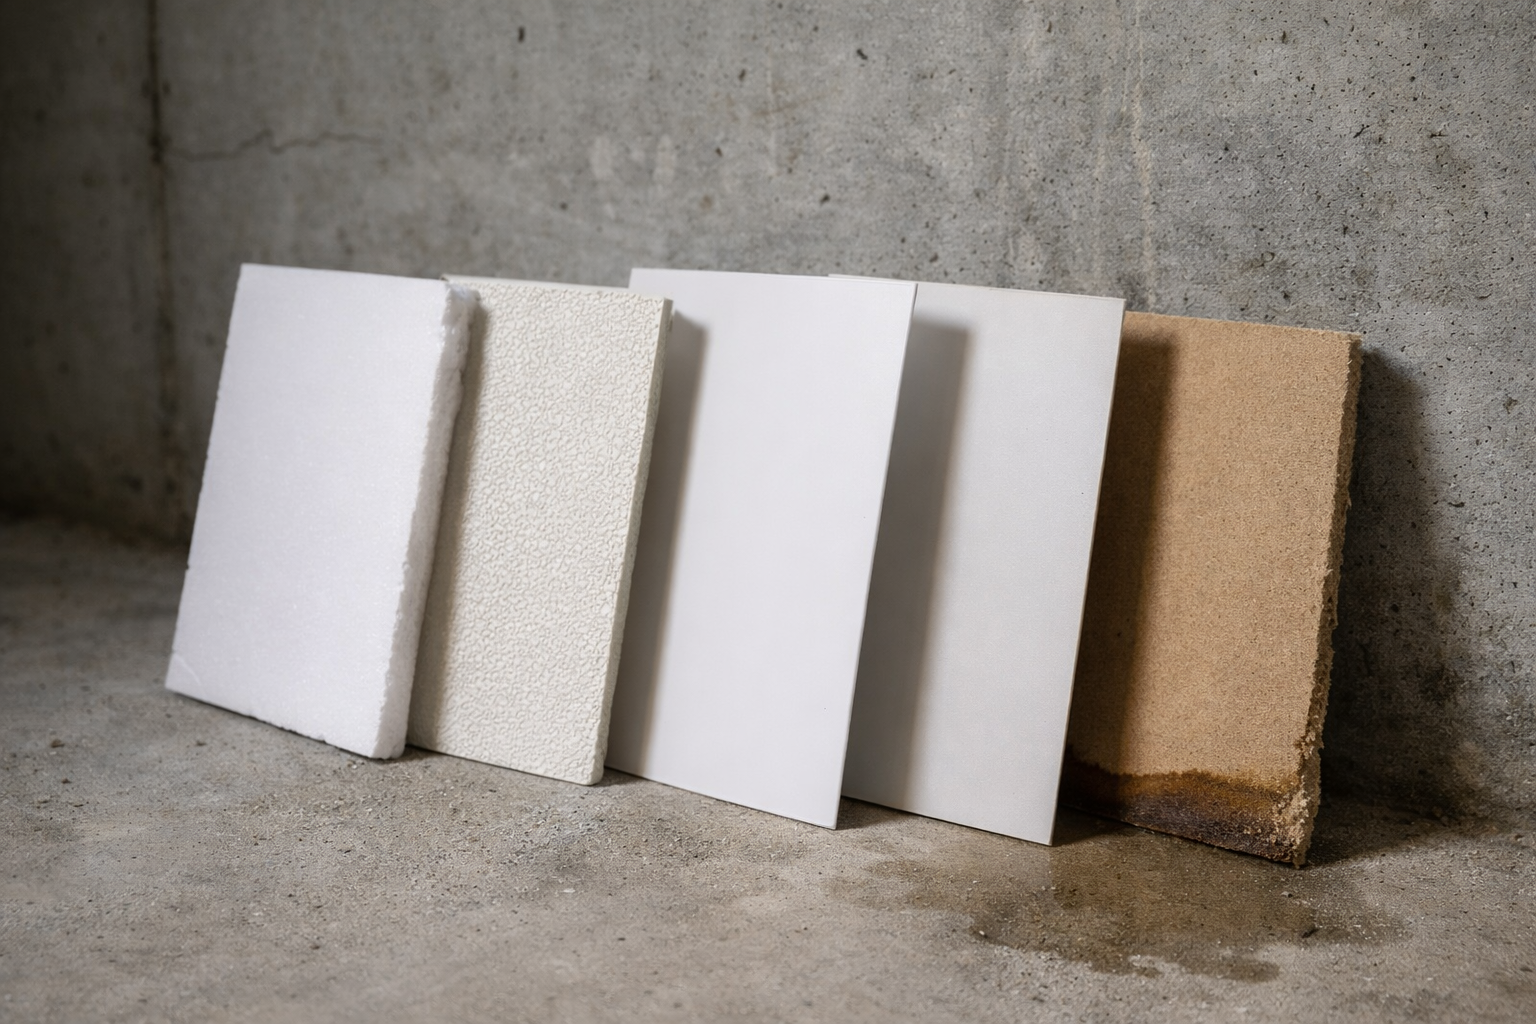
Panel materials
(What survives real basement life)
Here’s the truth: the best-looking panel is the one that survives your worst day. A small plumbing leak. A humid summer. A wet pair of boots thrown in a corner for a week.
Panel materials that behave well:
- Plywood (painted or clear finished): more stable than MDF, handles minor humidity swings better, easy to fasten, can be removed and reinstalled.
- Solid wood tongue-and-groove (properly sealed): looks great, but you need a real moisture-smart wall behind it. Wood is still wood.
- PVC panels / waterproof wall panels: not “warm” visually, but extremely resilient for utility areas, laundry zones, or storage walls.
- Fiberglass-reinforced plastic (FRP): common in commercial wet zones. Tough, cleanable, not mold food. Needs flat backing and careful adhesive choices.
Panel materials that often cause pain:
- MDF / hardboard paneling: cheap and clean… until it swells, fuzzes, and permanently telegraphs moisture events.
- Direct-glued wood paneling to concrete: it’s basically inviting moisture to live behind a finish that can’t dry.
- Carpet-like wall coverings: they hide stains until they don’t. They hold odor. Basements don’t need more soft absorbent surfaces.
If you want one simple default: paint-grade plywood on a moisture-smart assembly behind it. It’s forgiving. It’s repairable. It looks intentional if you detail it clean.
The wall assembly
(The part that makes panels “work”)
Think in layers: concrete wall → capillary/air break → insulation (often) → fastening layer → panel finish.
Layer 1: Keep interior air off cold concrete.
That’s the dew-point problem. If warm interior air reaches cold masonry, you get condensation where you can’t see it.
Layer 2: Build a capillary break.
Concrete can wick moisture. You don’t want wood or paper-faced materials directly touching it.
Layer 3: Allow controlled drying.
Basements usually need assemblies that don’t trap moisture with the wrong interior vapor barrier. Drying direction depends on climate and wall type, so be cautious about throwing plastic sheets everywhere “because someone said vapor barrier.”
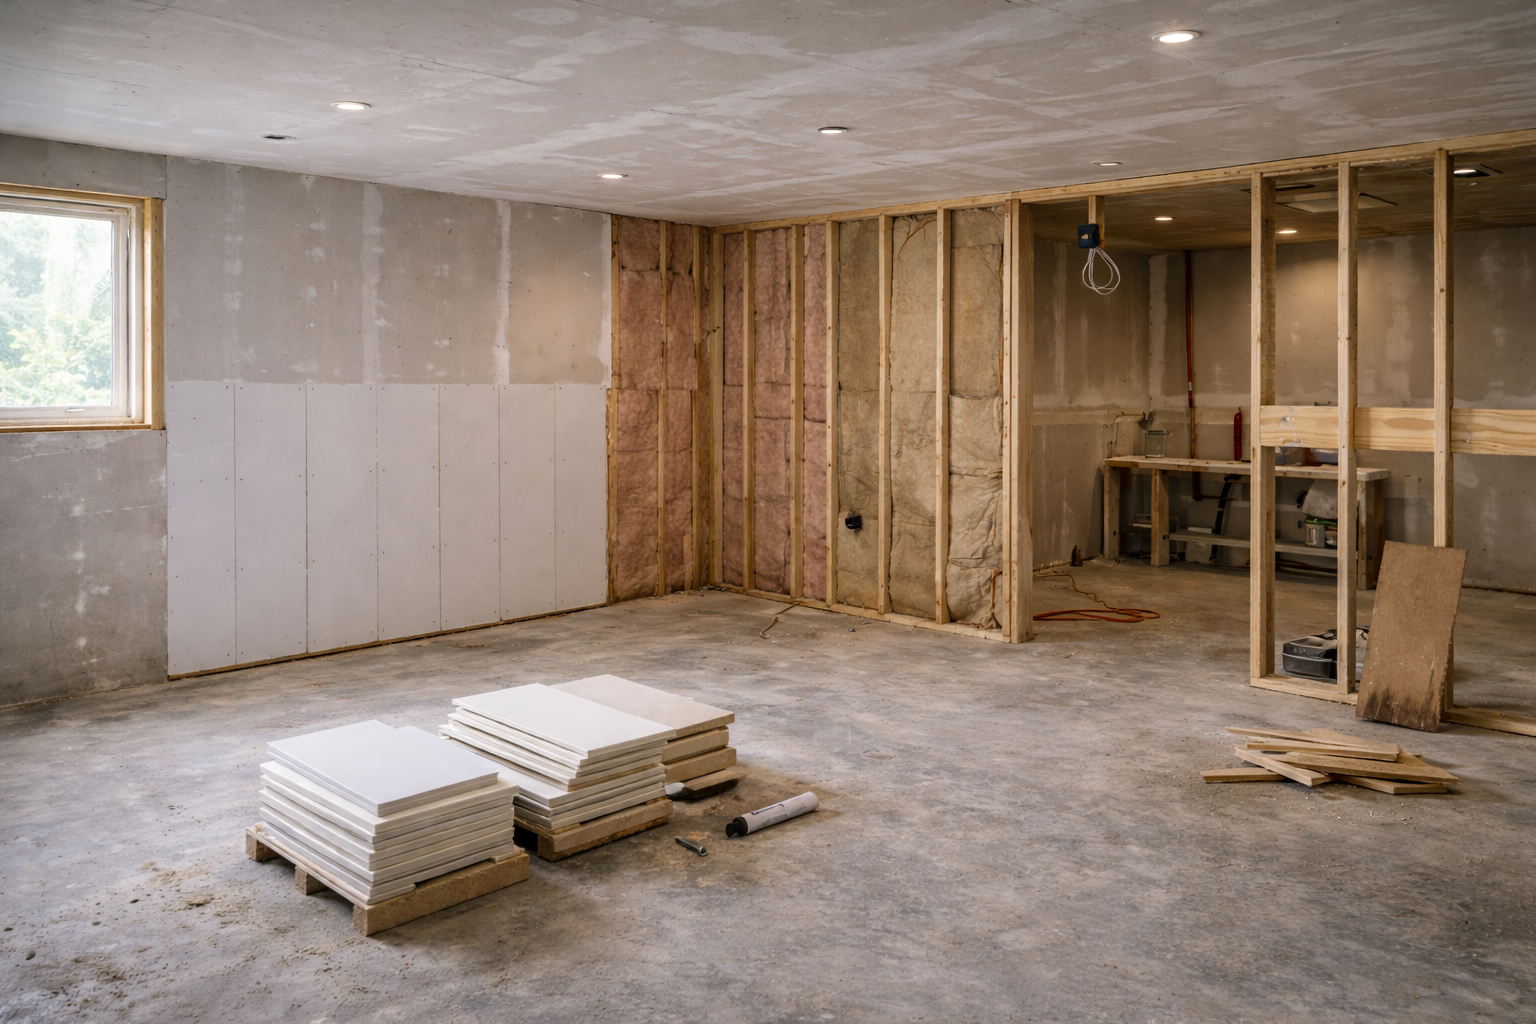
Baseline approach that works in many climates: rigid foam sealed to the foundation wall as an air barrier + thermal break, then framing/furring inside of it, then panel finish.
See our guide on insulation : Best Insulation for Concrete Basement Walls: A Simple Checklist Before You Start
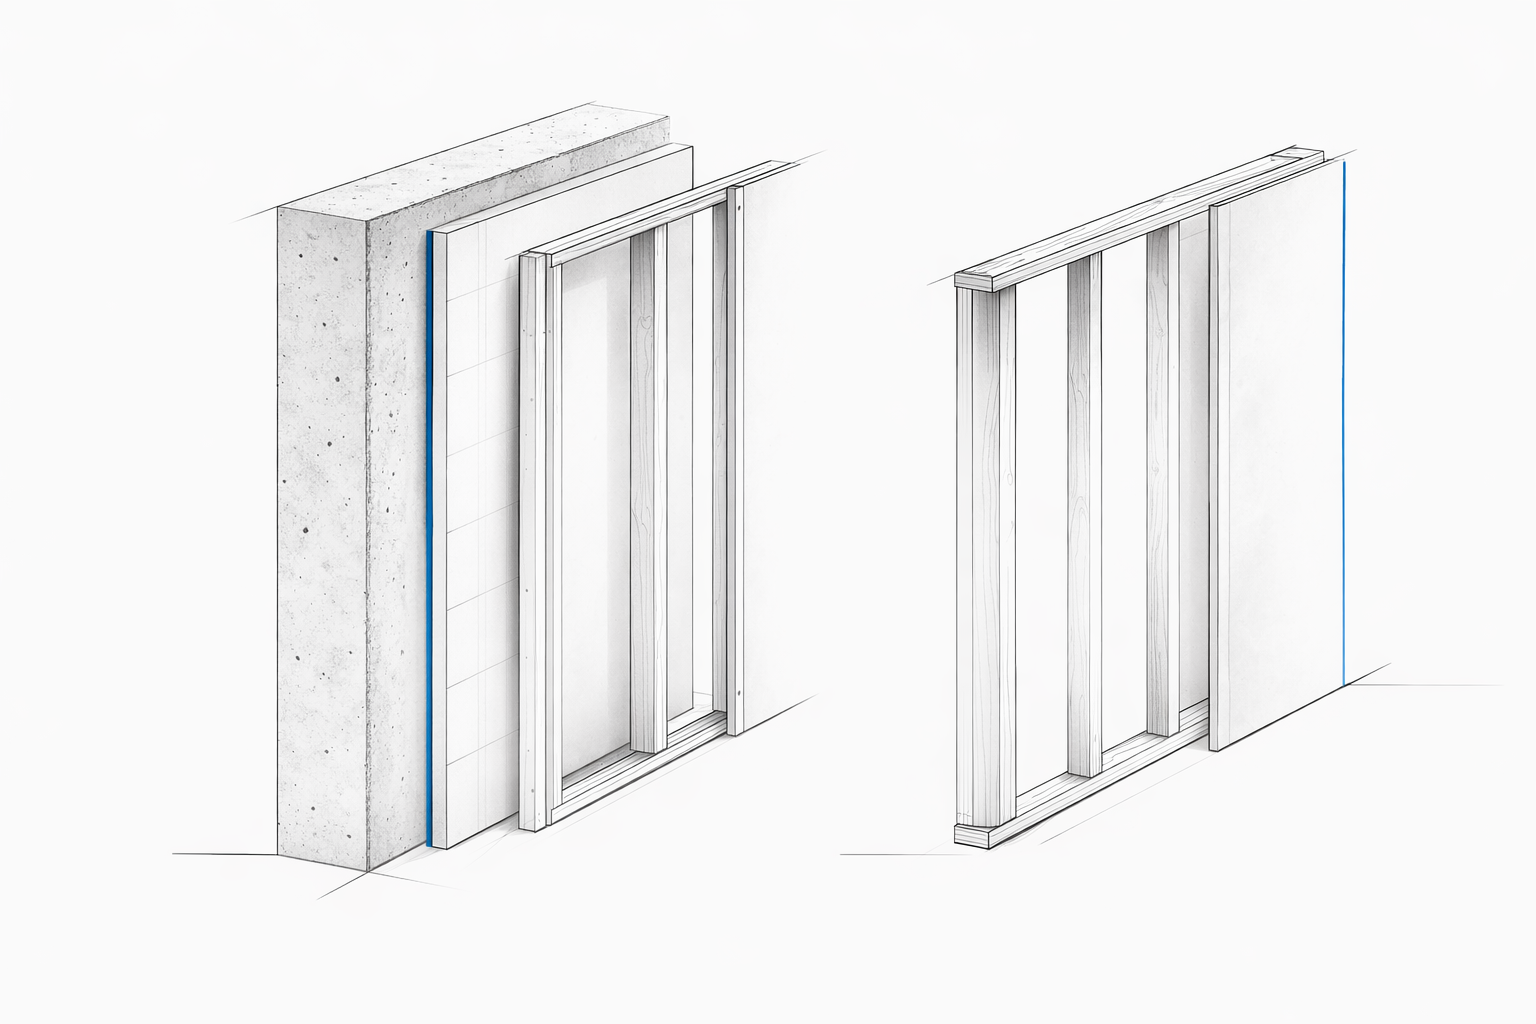
DIY method 1
(Rigid foam + furring + panels)
Why people like it: it keeps the wall thin, reduces the condensation risk, and gives you a fastening surface for panels.
How it works (conceptually): foam board is your air/thermal break against concrete. Furring strips create a fastening plane. Panels screw to the furring. Your finish stays warmer and drier.
Steps that matter:
1) Prep the wall. Clean dust and loose paint. Deal with obvious leaks. Don’t “panel over” efflorescence and hope it stops.
2) Foam board against the foundation. Use a foam type appropriate for below-grade assemblies. Fit tight. Seal edges. Seal seams. The goal is continuity, not patchwork.
3) Tape and seal seams. This is where the wall becomes an air barrier. If you skip this, you’re letting humid air find cold concrete again.
4) Add furring strips. These can be anchored through the foam to the masonry with appropriate fasteners. Keep them straight. Use shims where needed. Wavy furring means wavy panels.
5) Leave a small gap off the slab. Don’t let your panels sit on the concrete slab. Basements have minor wet events. Give yourself a sacrificial gap at the bottom and cover it with base trim later.
6) Install panels. Screw them. Don’t rely on glue alone in a basement unless the product is designed for that use and the wall is truly stable.
Where this method goes wrong:
- Foam seams not sealed, so humid air reaches cold concrete and condenses.
- Wood furring installed directly on concrete without a break, then it wicks moisture.
- Panels run tight to the slab and swell at the bottom after a damp season.
- Using MDF because it was cheap, then getting permanent swelling from minor humidity swings.
DIY method 2
(Foam + stud wall + panels)
Why it’s still common: it gives you a real cavity for wiring, sound control, straight walls, and clean detailing. It also makes it easier to mount shelves and heavy items without hunting for furring.
The key detail: keep the stud wall from being the first cold surface. If studs and batt insulation touch concrete, the backside of that wall can become a condensation party. This is also why spacing matters: basement framing layouts and options are worth reviewing before you commit.
Smarter version: foam against concrete first (sealed), then stud wall inboard. Then your panel finish over the studs.
Panel finishes that work well on a stud wall:
- Plywood sheets (painted or finished)
- Shiplap or tongue-and-groove boards
- Pre-finished panel products designed for interior walls
- Removable panel sections for access (more on that below)
When this method is worth the space: you need wiring, you want built-ins, you want flat walls, you want better acoustics, or you’re finishing the basement as real living space (not just storage).
DIY method 3
(Basement panel systems)
These systems exist for a reason: people kept reinventing basement walls, and the failure modes were predictable.
What the better systems usually do:
- Provide an integrated insulation layer against the foundation wall
- Create a fastening plane that isn’t moisture-sensitive
- Keep organic materials away from cold masonry
- Handle minor moisture without turning into mold food
How to judge a system fast:
- Is there a continuous air/thermal break against the wall?
- What parts are organic (wood/paper) and where do they sit relative to the concrete?
- Does the system include a fire protection strategy for foam?
- Can you remove panels later for inspection or repairs without destroying everything?
Not all systems are equal. Some are basically “paneling with marketing.” In basements, marketing fails fast.
Removable panels
(The upgrade nobody regrets)
Basements change. Plumbing gets altered. A valve starts weeping. A foundation crack gets monitored. You add circuits. You add data. You add a sump discharge line. If you finish every wall like it’s a permanent museum, you will eventually open it up the hard way.
Where removable panels make sense:
- Behind utility equipment and cleanouts
- Along one “service wall” where the main runs live
- In storage zones where a perfect finish isn’t the goal
How DIYers do it cleanly: use plywood panels with trim battens, or a simple reveal joint, screwed (not glued) to furring/studs. Then you can access, fix, and reassemble without turning the basement into a demolition project.
Wiring and outlets
(Plan it before panels, not after)
This shows up constantly in real DIY conversations: people install furring + panels, then realize they have nowhere to run wiring or meet outlet spacing without ugly surface conduit.
Practical rules:
- If you need modern outlet coverage, a true stud wall is often easier than thin furring.
- If you’re using thin furring, consider surface-mount raceway as a deliberate choice (not a “whoops” fix).
- Don’t bury junction boxes behind panels. Access matters. Inspectors care, and future-you cares more.
Electrical requirements vary by jurisdiction. Treat them as real. Don’t wing it. Get the rough-in checked before you close the wall.
Code and compliance
(What inspectors actually care about)
Codes vary by region, but a few patterns are consistent:
1) Foam plastics usually need fire protection.
Rigid foam and spray foam are common in basement wall assemblies, but they often require a thermal or ignition barrier (commonly drywall or an approved equivalent). Leaving foam exposed in a finished area is one of the easiest ways to fail inspection or create a fire risk.
2) Permits are common for basement finishing.
If you’re adding walls, electrical, plumbing, bedrooms, or altering egress, you’re typically in permit territory. Skipping permits can create problems at resale and can force expensive tear-outs later.
3) Treated bottom plates and slab separation details come up a lot.
Many jurisdictions want wood separated from concrete or treated where it contacts concrete. Your panel system has to respect that. A simple gap off the slab plus the right base detailing solves a lot of future swelling and odor problems.
4) Bedrooms trigger bigger rules.
Egress and smoke/CO alarms can become the real project, not the wall finish. Don’t design a “bedroom” finish without confirming local requirements.
Keep it general but honest: if you’re finishing a basement as living space, treat inspection as part of the workflow, not an optional add-on.
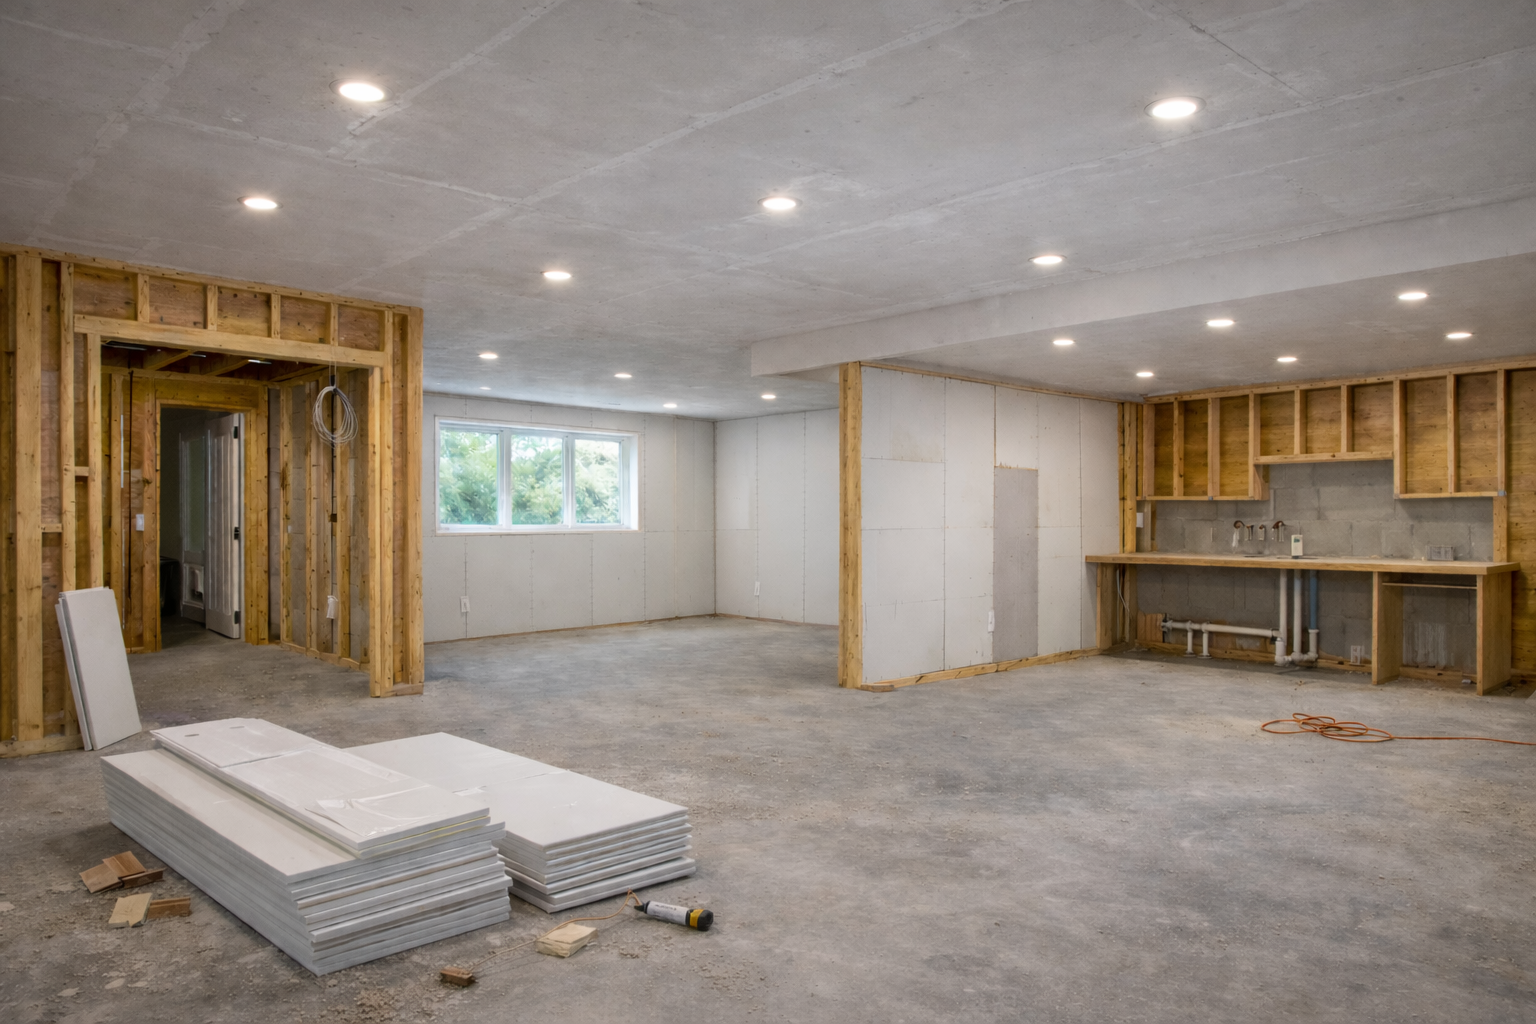
Finishing details
(The stuff that makes DIY look clean)
Basement finishes look cheap when the bottom edge is wrong. That’s where moisture events show first, and it’s where panels get beat up.
Details that work:
- Bottom gap: keep panels off the slab and hide the gap with base trim.
- Durable baseboard: consider PVC or a sealed base in utility-heavy zones.
- Clean corners: corner trims that can tolerate movement are better than brittle filler-heavy joints.
- Controlled reveals: a small reveal joint looks intentional and hides minor framing variations.
If you want painted panels: plywood takes paint better than most cheap panel boards, and it doesn’t telegraph every humidity cycle the way MDF does.
Cheap and salvage
(Save money without importing problems)
Cheap basement materials exist. The trick is not turning “cheap” into “contaminated” or “warped.”
Good salvage sources: building material reuse centers, architectural salvage yards, contractor leftovers, overstock lots, commercial remodel takeouts (office partitions, FRP, some panel products).
What to look for when buying used panels:
- Flatness: if it’s bowed now, it will be worse in a basement.
- Odor: smoke and musty odors don’t “paint out” cleanly.
- Water staining: stains often mean swelling you can’t reverse.
- Mold evidence: don’t bring that into your house to “save money.”
Salvaged wood paneling can work, but be disciplined:
- Seal all sides if you’re using real wood boards in a basement.
- Avoid mystery painted boards unless you’re prepared for lead-safe work.
- Skip pallet wood for finished basement walls. Too many unknowns: treatment, contamination, embedded grit, bugs, and movement.
Cheap new-material path that still performs:
- Rigid foam + tape/sealant (done carefully)
- Furring strips or a simple stud wall
- Paint-grade plywood panels
- Simple trim and base detail
This combo is often cheaper than “specialty basement panels,” and it’s easier to repair later.
By room type
(Because one system rarely fits the whole basement)
Utility / laundry wall: prioritize resilience. PVC/FRP or paint-grade plywood. Build access panels where valves and cleanouts live.
Living space wall: prioritize comfort and acoustics. Foam + stud wall + panel finish, with real electrical coverage and a clean base detail.
Storage wall: prioritize removability and durability. Screw-on panels beat glued finishes. Future access matters more than perfect seams.
Cold corner / exterior-heavy wall: prioritize thermal break and air sealing. This is where condensation starts if you get lazy.
Checklist
(Do this before you close the wall)
- Confirm no bulk water problems before finishing walls
- Get basement humidity under control (dehumidification, air sealing)
- Keep interior air off cold concrete (foam/spray foam layer, sealed)
- Do not attach MDF or wood paneling directly to concrete or block
- Keep panels off the slab and detail the base to tolerate wet events
- Plan wiring and outlet layout before the first panel goes up
- Build at least one removable access zone for utilities and future repairs
- If foam is involved, confirm the required fire protection layer in your jurisdiction
- Use screws where possible (repairable), not glue-only assemblies
- Salvage smart: reject warped, musty, or water-stained panels
FAQ
(Real questions that keep coming up)
Can I glue wall panels directly to a concrete basement wall?
You can physically do it. It often fails. Concrete moves moisture. If you glue panels directly to it, you create a cold, wet backside with no drying path. That’s how you get warped paneling and mold you don’t see until it’s advanced. A thin air/thermal break (sealed foam layer) plus a fastening plane is the safer baseline.
What’s the cheapest wall panel that still works in a basement?
Paint-grade plywood over a moisture-smart assembly is hard to beat. The plywood is affordable, strong, and repairable. The real cost control comes from doing the moisture layer correctly so you’re not rebuilding later.
Do I need a vapor barrier behind basement wall panels?
Be careful with blanket rules. The wrong interior vapor barrier can trap moisture in the wall and create odor and mold issues. Many basement assemblies rely on a sealed rigid foam layer as an air/thermal break rather than an interior plastic sheet. If you’re unsure, follow region-appropriate guidance and don’t install plastic “because that’s what people do.”
Are PVC or FRP panels “better” than wood panels?
For resilience, yes. They don’t feed mold and they tolerate minor wet events. For warmth and aesthetics, wood can look better, but only if the wall behind it is built correctly and you accept that wood is less forgiving when humidity swings.
How do I keep basement wall panels from getting moldy at the bottom?
Don’t let the panel sit on the slab. Leave a gap, then cover it with base trim. Control humidity. And don’t trap moisture behind the panel with a direct-to-concrete install. Bottom edges rot and swell because they’re the first place moisture shows up.
Can I do panels instead of drywall to save money and time?
Sometimes. But codes can require fire protection layers over foam, and drywall is often the simplest compliant thermal barrier. Panels can still be your finish layer, but make sure your assembly meets fire and inspection requirements where you live.
Do I need to insulate behind basement wall panels?
If the basement is conditioned and you want comfort, insulation matters. More important: the insulation layer often doubles as the thermal break that prevents condensation on concrete. A “pretty” basement wall with no thermal break can become a condensation wall in summer.
What’s the biggest DIY mistake with basement wall panels?
Treating the basement like an above-grade room: paneling on cold masonry, skipping air sealing, ignoring humidity, and assuming “it’ll be fine.” Basements are different. Build the moisture layer first, then the finish.
Is salvaged paneling worth it for a basement?
Yes if it’s clean, flat, and not water-damaged. No if it smells musty, shows swelling, or has unknown coatings you’ll need to disturb. Saving money is good. Importing problems is not.
Conclusion
(Short version: build the wall first, then the finish)
Basement wall panels can be a great DIY finish, but only when you treat them as part of a wall system: moisture control, thermal break, air sealing, and a finish layer that can survive real basement life. Build it so you can access it later, and choose materials that forgive small mistakes. Basements don’t reward perfection. They reward assemblies that can take a hit and keep working.