
Truss Lateral Bracing: What It Is, Where It Goes, and Why Crews Get Burned by It
A row of trusses can look steady long before it is steady. That is where lateral bracing matters.
The trouble starts during erection, not after the roof is finished. The trusses are standing. A few braces are on. Everybody wants speed. The line feels stable enough, so the bracing starts getting treated like temporary clutter instead of part of the load path. That is when a roof can roll, drift, rack, or drop out of alignment before the sheathing is doing any real diaphragm work.
Truss lateral bracing keeps truss lines and restrained member lines from moving sideways while the roof is still vulnerable and after the permanent restraint system is in place. Get it wrong and the result is not just an ugly frame. It can mean rollover during install, sagging later, cracked finishes, failed inspection, torn-off sheathing work, and wasted money pulling a roof back into line.
The job it is doing

A roof truss is strong in the direction it was designed to carry load. It is much less forgiving when members start rolling, when the line leans during erection, or when restraint gets assumed instead of installed.
In roof work, lateral bracing usually shows up in three connected ways:
- Temporary restraint during erection, while the trusses are still exposed and unstable.
- Continuous lateral restraint, where specific member lines need to be held from buckling sideways.
- Diagonal bracing, which ties those restrained lines back into a part of the roof that can actually stabilize them.
If you want the broader cluster first, the stronger starting pages are roof trusses, truss bracing and roof support systems, and introduction to roof structures.
Three different jobs, not one
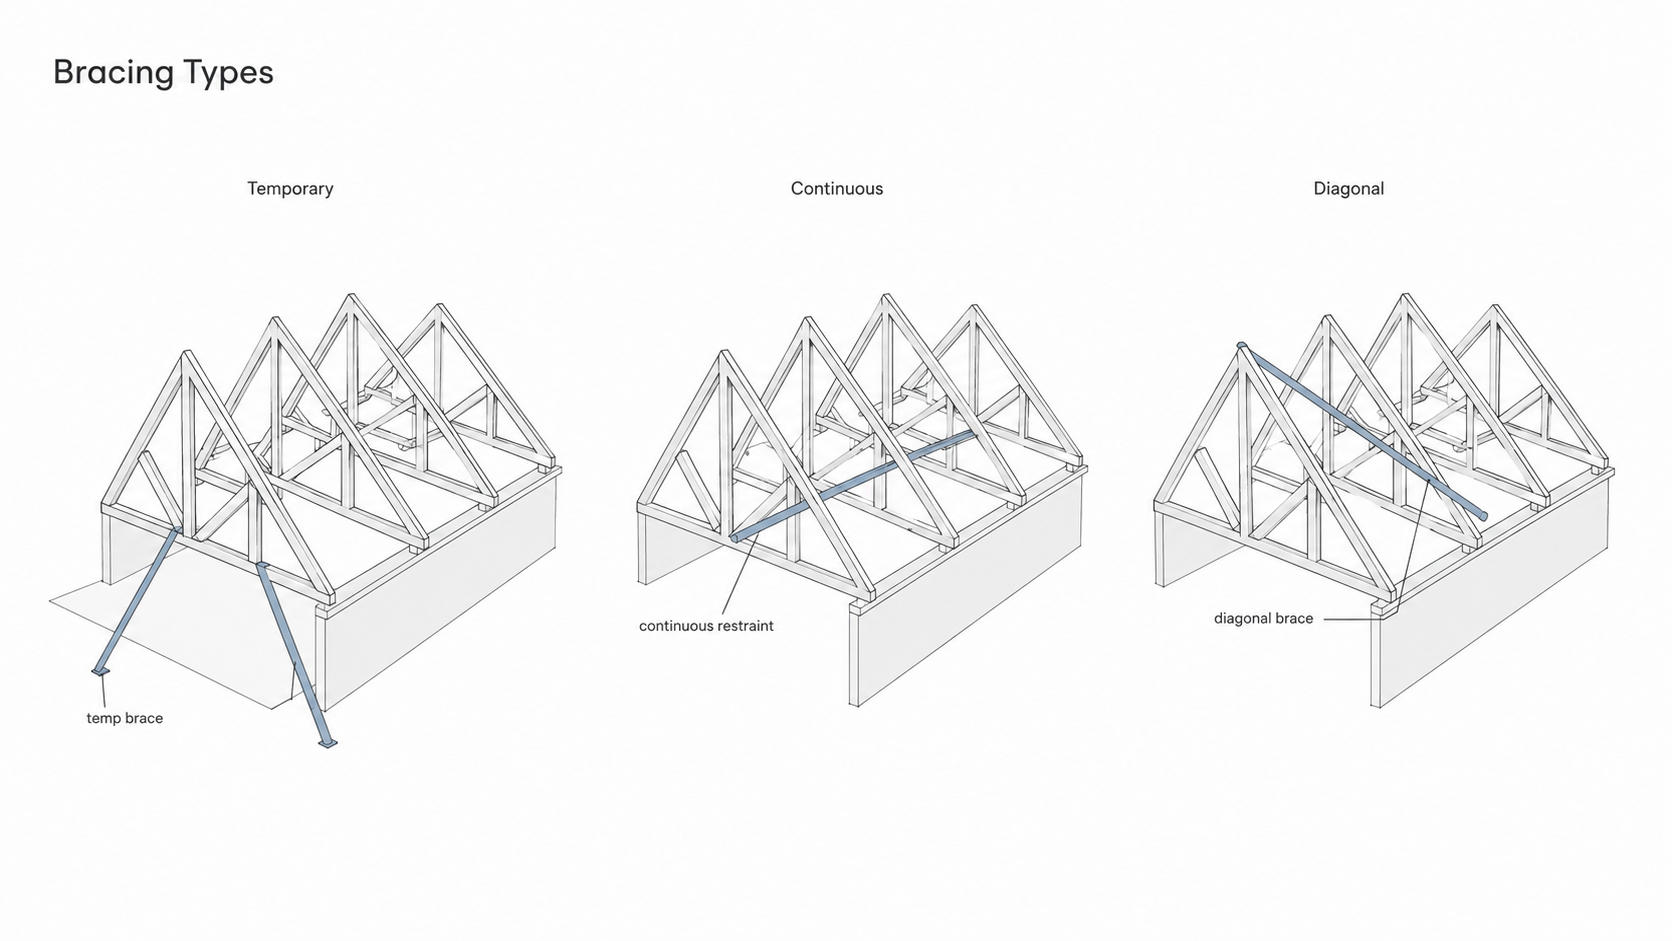
Illustration by ArchitectureCourses.org. Truss bracing usually does different jobs: holding the first trusses steady, restraining a web line, and tying that restraint back with diagonal bracing.
| Part of the job | What it is doing | Where it usually goes wrong |
|---|---|---|
| Temporary restraint | Keeps the truss line stable while erection is still in progress | It comes off too soon because the line looks steady |
| Continuous lateral restraint (CLR) | Restrains specific members from buckling sideways | It gets installed as if one line of lumber solves the whole roof |
| Diagonal bracing | Ties restrained lines back into a more stable part of the roof system | The tie-back logic never gets finished, so the whole restrained line can still move |
Temporary bracing is about surviving erection. Permanent restraint belongs to the finished structural system. CLR may restrain a member line, but it still needs diagonal bracing if the whole line can move together.
If that split is the real question, go next to permanent truss bracing requirements and diagonal truss bracing.
Where roofs start getting into trouble
Braces come off too soon. The line looks fine. Wind feels light. Somebody wants access. That is enough to make a bad decision.
The sheathing gets expected to save the sequence. Roof sheathing can stiffen the roof once enough of it is actually installed and fastened correctly. Before that, it is not a substitute for a real bracing sequence. Treat it that way and the line can rack before the roof diaphragm is even real.
CLR gets installed without the diagonal bracing that makes it work. A restrained line still needs to be tied back into something stronger than itself. Otherwise the restraint line can drift with the members it was supposed to control.
The brace lands on the convenient place instead of the right place. Bracing has to connect to the correct member line, in the correct direction, for the correct reason. Convenience nailing is how load transfer gets faked on site.
Nobody really checks the truss documents. The site starts running on memory and habit instead of the actual truss package. That is how one roof turns into rework, inspection trouble, and arguments about who was supposed to read what.
Sequence that keeps the line stable

Illustration by ArchitectureCourses.org. Continuous lateral restraint only works when diagonal bracing keeps the restrained web line from shifting sideways.
1. Read the truss package before the first brace goes on
Do this before anyone starts inventing a site solution. The restraint notes, truss drawings, and permanent bracing requirements should be driving the layout, not a guess carried over from another roof.
Worth keeping on site.
BCSI Guide to Good Practice for Handling, Installing, Restraining & Bracing of Metal Plate Connected Wood Trusses
This fits here because it deals with the part crews rush: handling, erection sequence, restraint, and bracing while the roof is still exposed.
2. Brace the first trusses immediately

Temporary restraint starts early. Waiting until the line “looks stable” is how roofs get into trouble.
Early braces are there to hold alignment and buy time while the rest of the roof is still exposed.
The first trusses are where the line either starts behaving or starts drifting. Brace them right away. Do not wait until several more are up.
- Install temporary restraint as soon as the first trusses are set and aligned.

Illustration by ArchitectureCourses.org. Temporary bracing keeps the first roof trusses from shifting before the full roof line is locked together.
- Keep those braces in place until the roof has enough permanent restraint and stability to do without them.
- Treat the early braces like part of the erection plan, not leftover lumber.
3. Install CLR where the truss documents call for it

CLR is there because certain member lines need restraint. It is not there to make the roof look tidy.
Now the restrained member lines start getting the restraint they were designed to need. This is where crews get too casual and start substituting memory for the actual bracing notes.
- Install CLR at the designated member lines, not just where it feels sensible.
- Follow the truss package for placement and fastening requirements.
- Do not treat one generic spacing rule as a substitute for the actual design.
If spacing is the real question, use truss lateral bracing span next instead of forcing that whole subject into this page.
4. Tie restrained lines back with diagonal bracing

A member line may be restrained by CLR, but that restrained line still needs to be tied back into something that will not move with it. Otherwise the whole restrained line can lean together. That is how a roof can look braced and still stay vulnerable.
- Run diagonal bracing so the restrained line ties back into a more stable part of the roof system.
- Do not assume a piece of lumber crossing a few trusses means the problem is solved.
- Connect diagonal bracing where it is actually doing structural work, not just where it is easy to nail.
This is where diagonal truss bracing becomes the more useful follow-up.
5. Brace the outer trusses and gable areas before the roof starts feeling finished

The vulnerable edges of the roof usually need more attention, not less.
Gable ends and outer trusses can get into trouble earlier than the middle of the run. They are more exposed, less forgiving, and easy to under-brace because the roof already looks close to done.
- Do not leave the ends weak just because the center of the roof feels steadier.
- Treat gable-end stability as part of the bracing plan, not a cleanup task.
- Keep temporary restraint in place until the whole line is truly stable.
If the vulnerable edge is the real issue, the better next read is gable braces.
Sheathing is not the early fix
Sheathing matters. It just gets credited too early.
Once enough roof sheathing is installed and fastened correctly, the roof diaphragm starts helping the system stiffen up. Before that, it is just partial coverage. Treat it like a finished stabilizing layer too early and you can end up with racking, twist, misalignment, and rework before the roof deck is doing any reliable lateral work.
This is one of the most common wasted-money moves on site. Visible progress starts getting treated like structural progress when the hidden stability problem is still active underneath it.
Hardware can still ruin the layout
Bad connections can undo decent bracing. The wrong screws, weak nails, random hardware substitutions, or sloppy fastening patterns can turn a good layout into a weak one.
This does not mean the page needs a giant shopping section. It means the fastening and connector requirements in the truss documents need to be followed instead of swapped out casually because something else was already on site. That shortcut can turn into movement, failed inspection, or a roof line that never comes back clean.
What bracing will not rescue
Lateral bracing does not fix a bad truss layout.
It does not replace the truss design.
It does not let a crew ignore the package notes.
And it does not turn guesswork into engineering.
If the roof is pushing beyond straightforward site practice, stop pretending the answer will appear from field habit. That is where the truss supplier, engineer, and restraint documents have to lead. For the design side of that conversation, the more useful next pages are residential roof truss design and roof bracing.
Where the money goes
People think bracing is cheap because the lumber pieces look small.
That is the wrong way to price it.
The cost problem is not the brace stock alone. It is slowed erection, extra labor, weather delay, rework after movement, misaligned sheathing, failed inspection, and the mess that follows when a truss line has to be pulled back into position. The brace that looked easy to skip can turn into the most expensive fifteen minutes on the roof.
Common mistakes that keep showing up
- Removing temporary bracing too early because the line looks stable enough.
- Using CLR without proper diagonal tie-back and calling the job done.
- Letting partial sheathing drive the decision instead of the actual erection sequence.
- Bracing from habit instead of the truss package.
- Substituting convenient fasteners or hardware where the documents call for something else.
Most of those are not dramatic errors. They are small site decisions made too casually. That is why they keep repeating.
FAQ
What is truss lateral bracing?
It is bracing used to help keep trusses or specific truss member lines from moving sideways out of position.
Is lateral bracing the same as temporary bracing?
No. Temporary bracing is part of the erection sequence. Permanent restraint and bracing belong to the finished roof system.
Does roof sheathing replace early bracing?
No. Not during erection. Sheathing helps once enough of the roof diaphragm is actually installed and fastened correctly, but it does not replace a real bracing sequence while the line is still vulnerable.
Where does lateral bracing usually go?
At the member lines and locations identified in the truss design and bracing documents. In ordinary roof work, that often means along truss runs, restrained member lines, and areas that need diagonal tie-back bracing.
Can the crew decide the whole layout in the field?
They still have to install it in the field, but the layout should not be invented casually. The truss package and bracing notes should drive the decision.
What usually causes failure?
Removing temporary bracing too early, assuming one restraint line solves the whole roof, relying on partial sheathing too soon, or skipping the actual truss documents.
Do small residential roofs still need this much attention?
Yes. Smaller roofs are still vulnerable during erection. Small does not mean forgiving.