
A contractor measures the opening, writes a number on a clipboard, and the brochure makes it sound like swapping out a pane of glass. On an older Cape, it almost never is that simple.
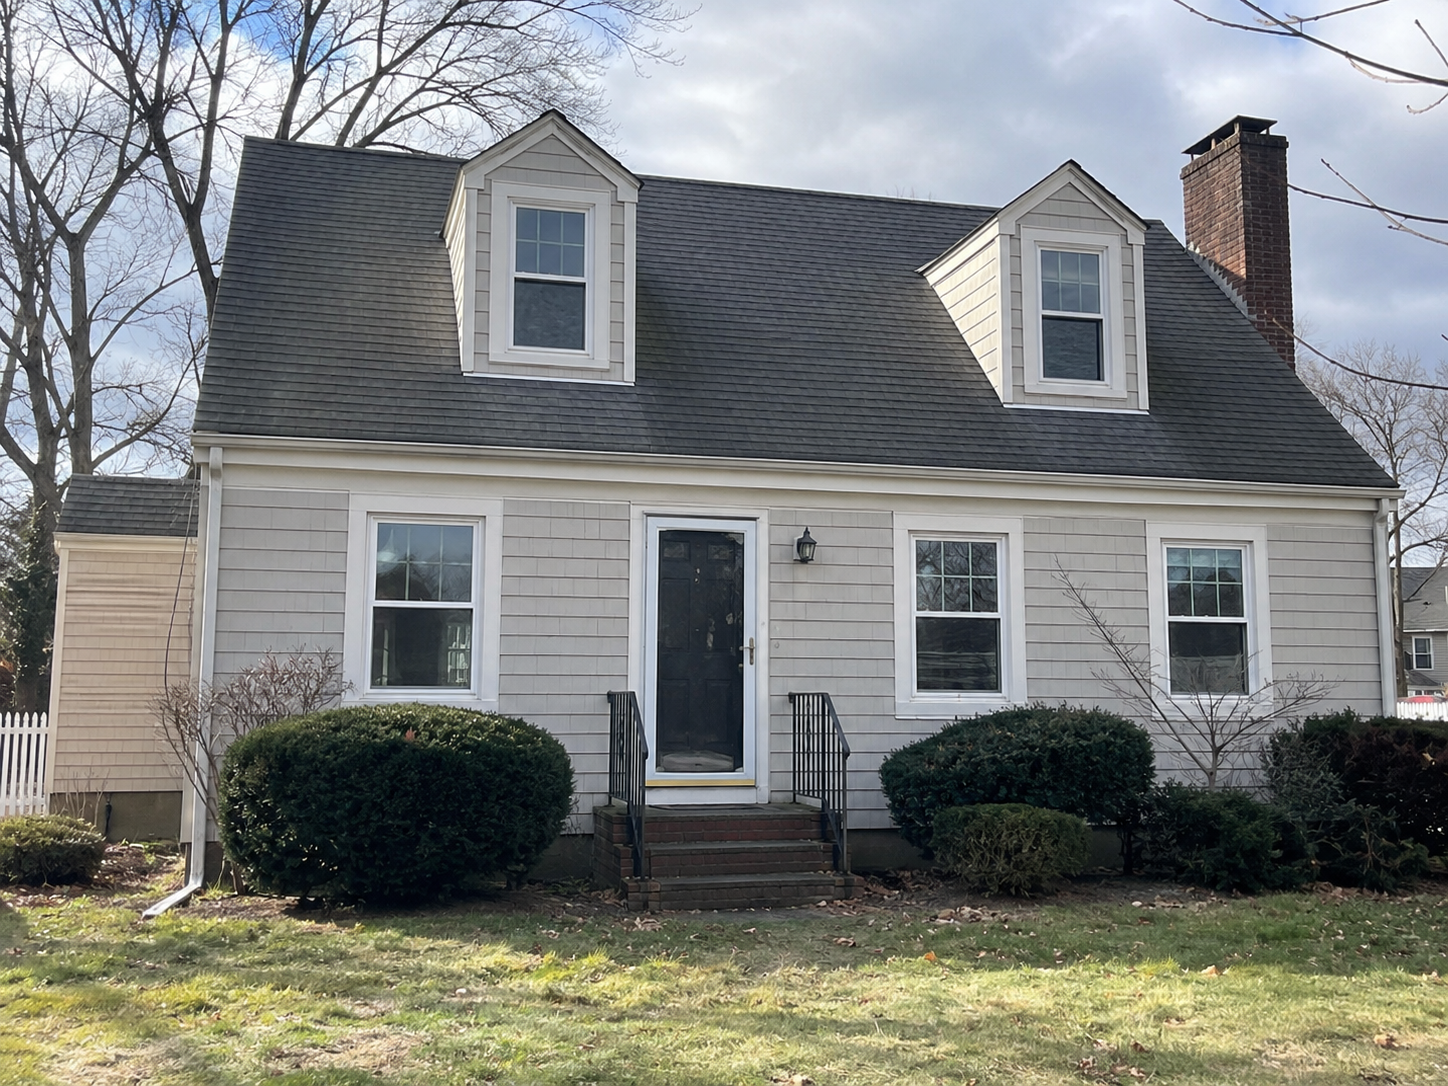
The window is tied into the siding, the trim, the sill, the depth of the wall, the layers of old paint, and the line of the roof right above it. A cheap unit can stop one draft and leave you with smaller glass, a chunkier frame, trim lines that no longer match, or the same leak sealed up behind new material. So start with the house instead of the sales pitch. If you want the style background first, read Cape Cod architecture before you shop. A good replacement makes the house more comfortable without flattening the look that made it a Cape in the first place.
Where Old Cape Cod Windows Usually Fail First
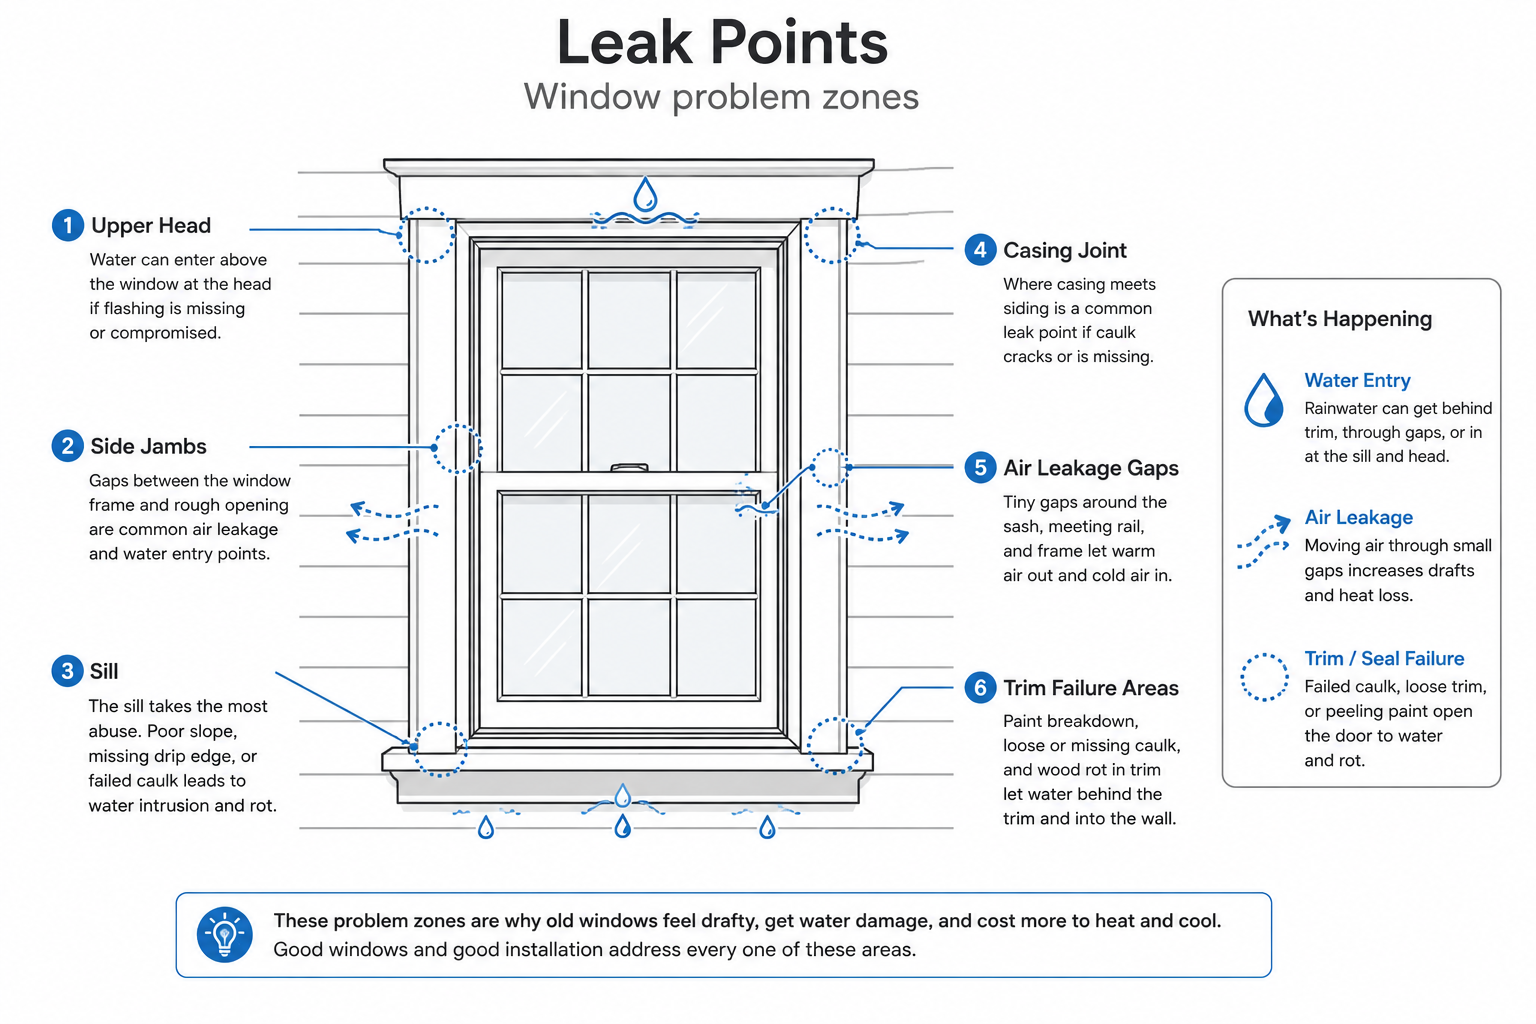
Old windows rarely fail in one clean spot. A sash rattles, but the real trouble is often the sill underneath it. Paint peels, and the cause turns out to be moisture trapped at the casing joint. A room feels cold, and the draft is sneaking in around the frame rather than through the glass.
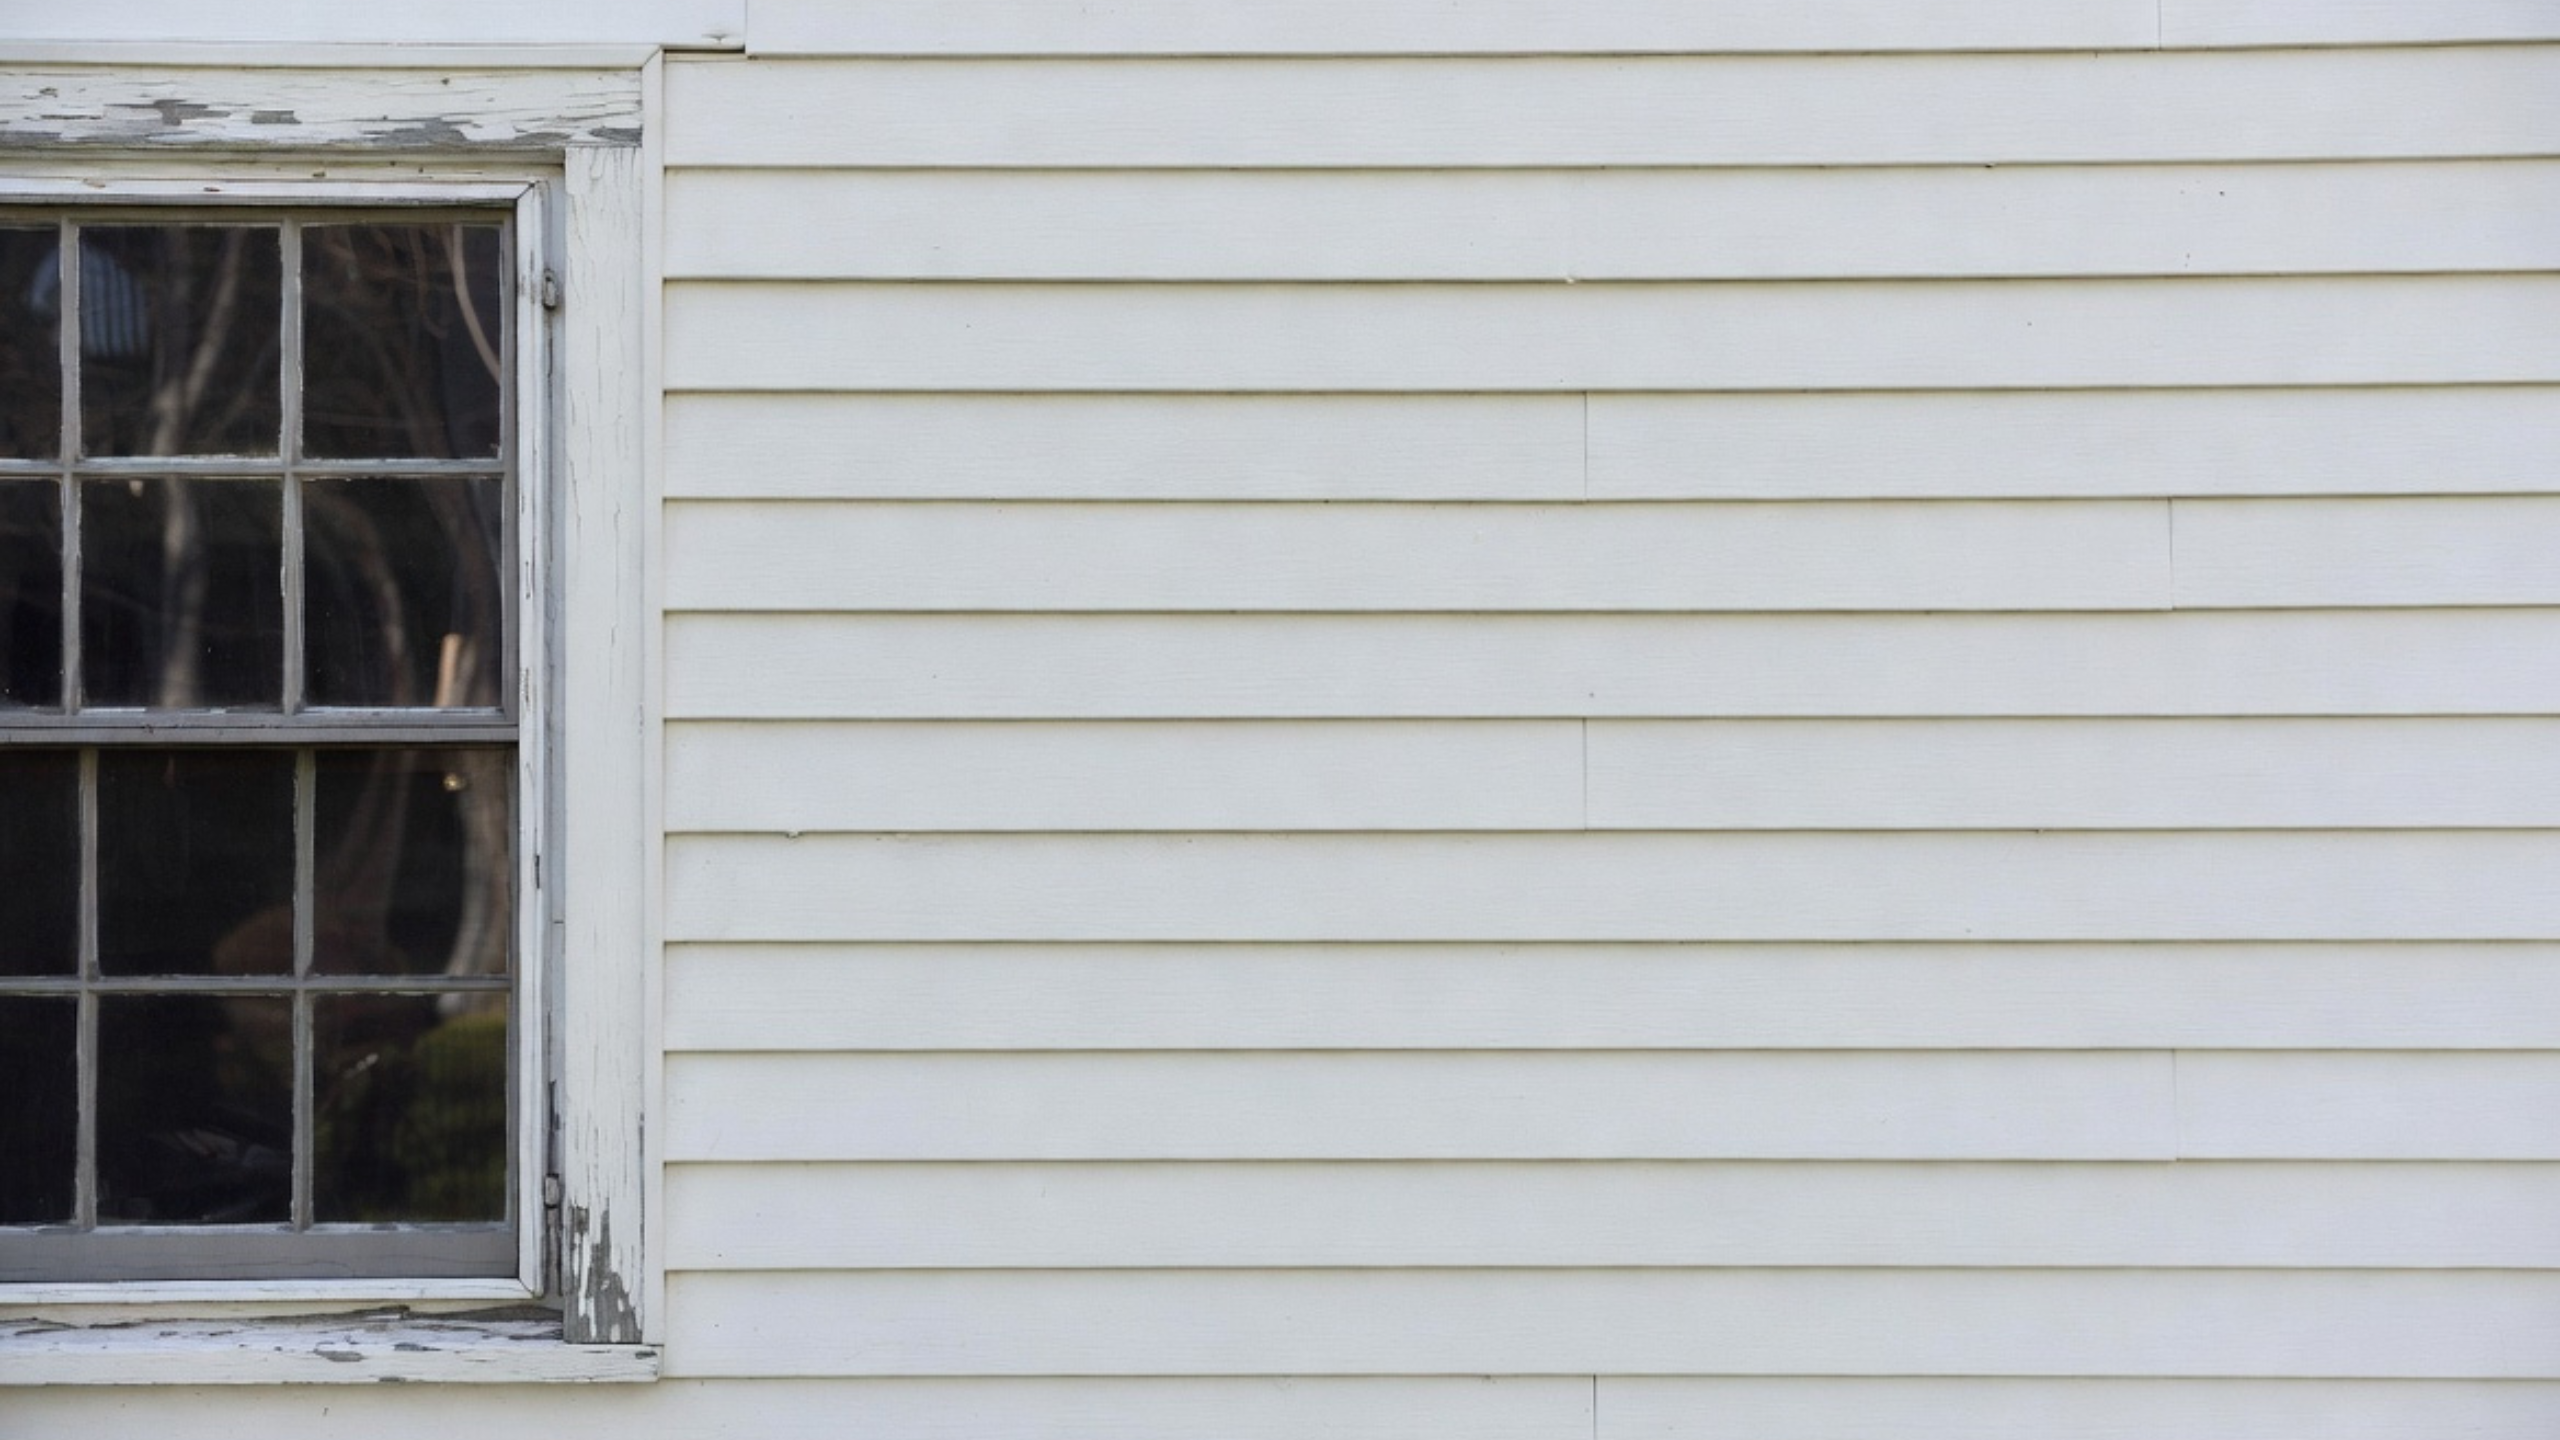
Look at the lower corners first. Rot usually starts where the sill, the side casing, and the siding all come together. If the paint is cracked there, the caulk line has split, or the siding just below the window is stained, water has probably been sitting in that joint longer than anyone noticed. I have pulled casing off more than one Cape and found the sheathing soft for a foot in either direction while the face of the house still looked fine from the street.
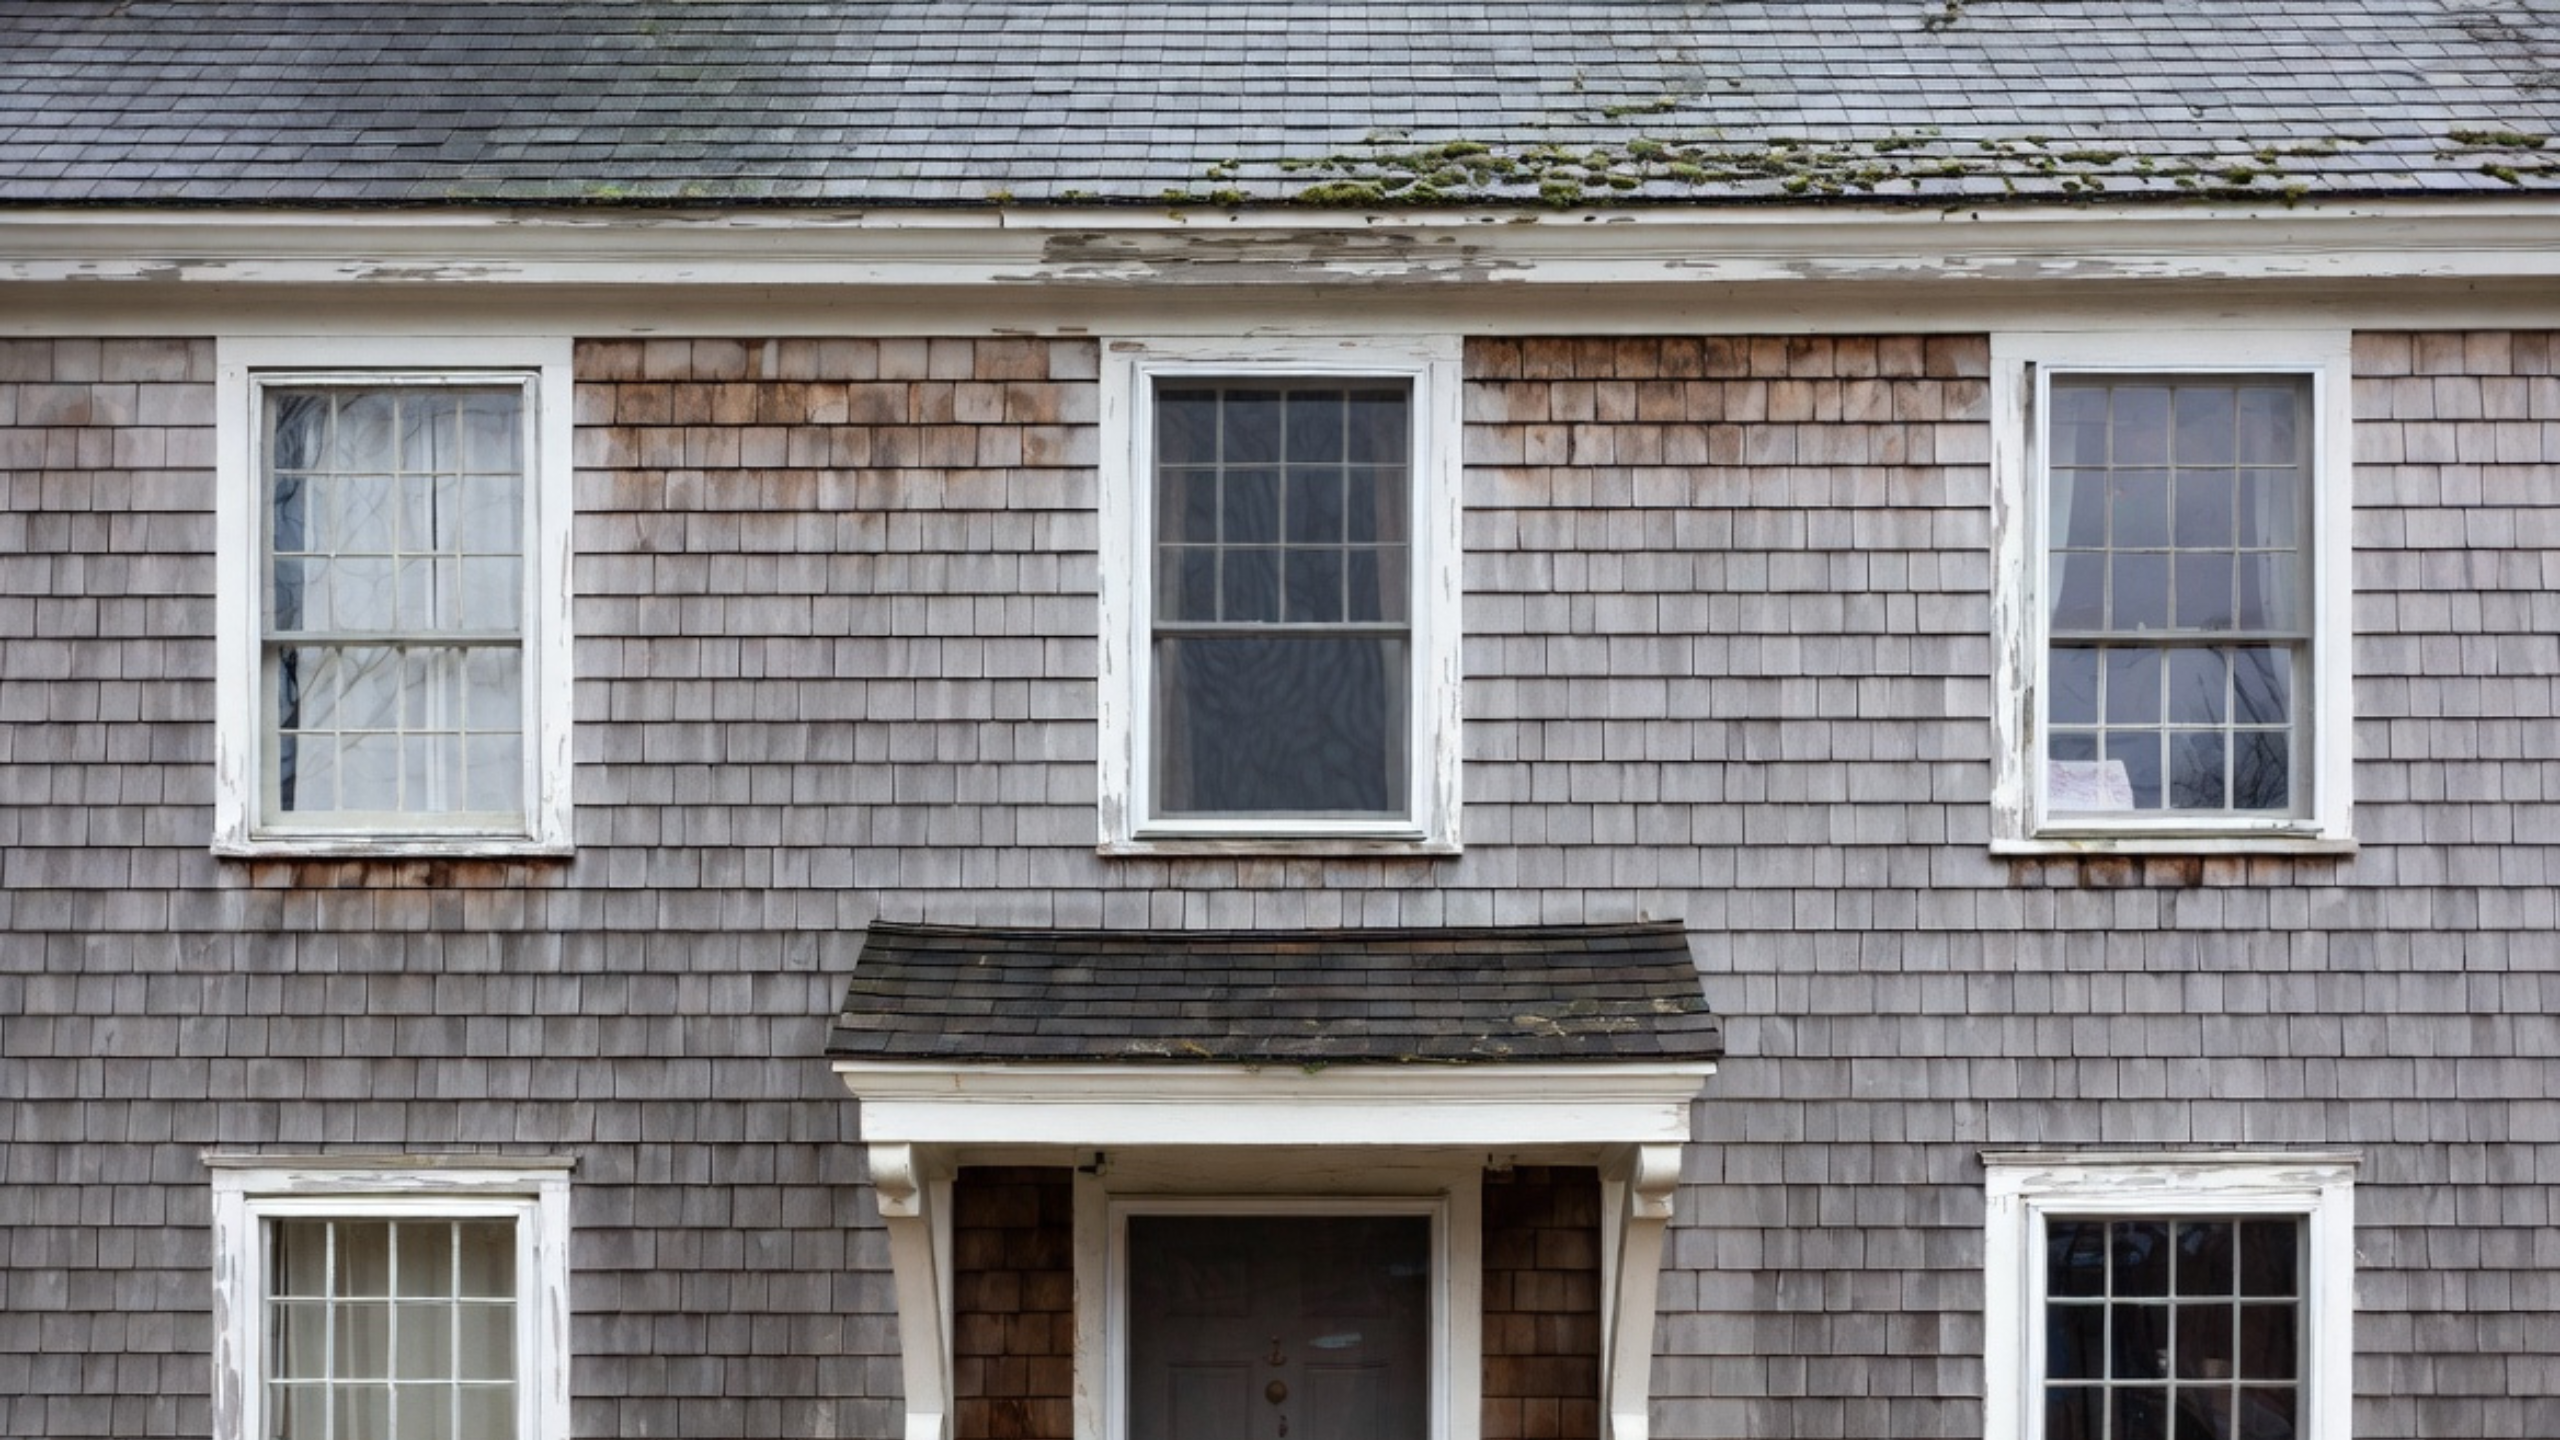
Then check the head of the window. A cracked top casing or a stain on the wall above the opening usually points to water management, not just a tired window. Drop a new unit in without fixing the flashing and head trim, and you trap the same leak behind newer, more expensive material.
Signs It May Be Time to Replace Cape Cod Windows
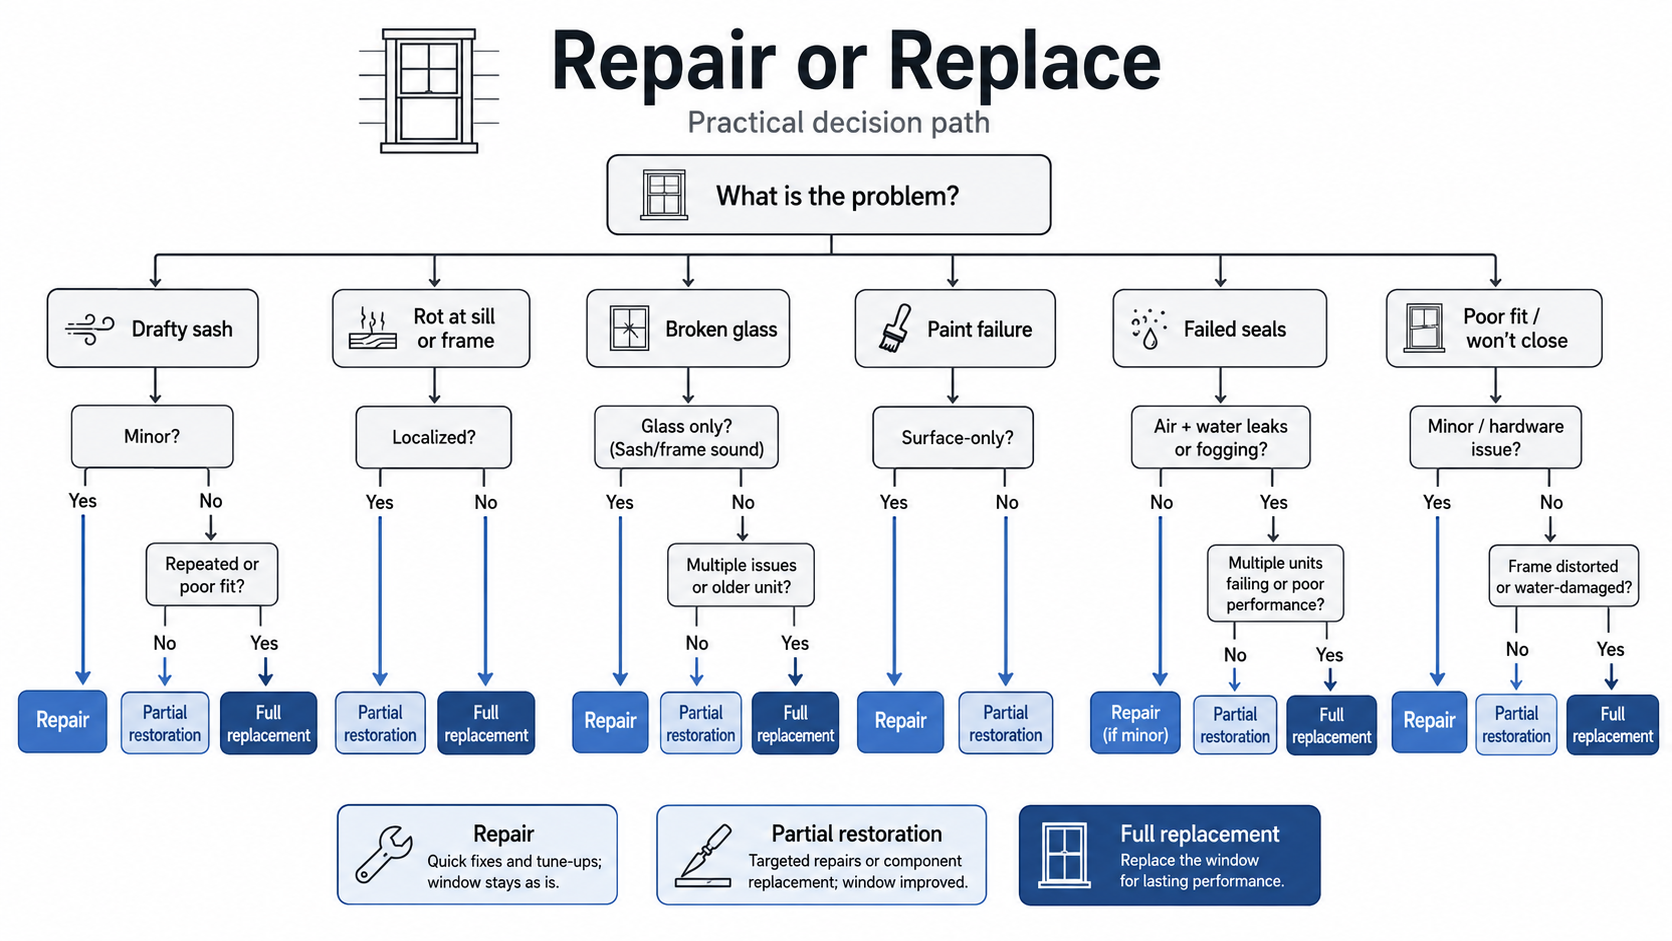
Replacement starts to make sense once the window stops doing its basic job. That can mean it leaks air, lets water in, will not lock, has a failed seal in the insulated glass, or has rotted to the point where a repair would only be a patch over the real problem.
Age by itself is a poor reason. Some old wood windows are well worth repairing, especially when the frames are still sound and the proportions suit the house. Plenty of newer replacements are already failing because they were installed badly or sized wrong in the first place.
The clearer warning signs are soft wood at the sill or rails, water stains that keep coming back, fogging between the panes of a double-glazed unit, broken balances, a sash that will not stay up on its own, insect damage, and gaps that stay put no matter how much weatherstripping you add.
As a rough guide, repair is usually enough when the sash is drafty but the frame, sill, and trim are still solid. Partial restoration makes sense when the original window matters to the look of the house and the damage is limited to a few parts. Full replacement becomes the smarter call once you are dealing with real rot, a failed glass seal, a sash that no longer works, or a leak that keeps returning.
Should You Repair the Old Windows or Replace Them?
The cheapest quote is not automatically the best move. Money spent repairing a window that was too far gone is wasted, and so is the character you give up when you tear out good original windows that only needed some attention.
Start with condition rather than the calendar. If the frame is square, the wood is sound, the sash can be fixed, and the window fits the house, repair deserves a real look before you order anything. If the sill is soft, the frame has twisted, water is getting behind the casing, or the glass seal has failed, replacement moves up the list.
It helps to know what you actually have. Windows on a true older Cape often have weighted sashes, with cords or chains running over pulleys to iron weights hidden in pockets beside the frame. Those were built to come apart and be fixed. A broken cord becomes a sash chain, deteriorated glazing putty gets raked out and replaced, and a rotted section of rail gets a profile-matched wood patch. Wood from before the 1920s tends to be old-growth, which is denser and far more rot-resistant than what a lumberyard sells today. I have measured original sashes still dead square after eighty years sitting next to ten-year-old vinyl units already bowed in their frames.
That is also why the storm-window route is worth pricing before you commit to replacement. A repaired sash with fresh weatherstripping and a good exterior storm panel can land close to a mid-grade replacement on comfort, at lower cost, while keeping the original glass and proportions.
Here is the part nobody settles cleanly. Restoration crews can show you studies where a repaired window plus a quality storm beats a cheap replacement and pays back faster. Replacement sellers can show you air-leakage figures that point the other way. Both are partly right. An old sash with a storm is rarely as airtight as a good modern unit, and on a windy winter day you will feel the difference. But the payback on tearing out sound old windows can stretch far longer than the sales pitch suggests. Which way it tips for your house comes down to your climate, how bad the sashes really are, and whether you will actually keep up the maintenance, and no brochure can answer that for you. I am not going to pretend there is a tidy winner here.
| Window condition | Better first move | Why it matters |
|---|---|---|
| Drafty sash, sound frame | Repair or weatherstrip | You may not need to disturb siding, trim, or paint. |
| Fogged insulated glass | Replace sash or unit | The seal has failed, so comfort and visibility are already compromised. |
| Rotten sill or casing | Full-frame evaluation | The wall opening may need repair before a new window goes in. |
| Wrong-size old replacement | Full-frame correction | Repeating the same opening mistake keeps the house looking off. |
Insert Replacement vs Full-Frame Replacement
This is one of the bigger decisions in a Cape window project, and the two paths are not interchangeable.
An insert, sometimes called a pocket replacement, sets a new window inside the existing frame. It disturbs less, it can save the interior trim, and it goes faster, but it gives up some glass area because the new frame sits inside the old one. On a small Cape, that matters more than people expect. The rooms are already tight, and trimming an inch or two of glass off several windows can leave the place noticeably darker.
Full-frame replacement takes the old window assembly out down to the rough opening. It costs more and tears up more material, but it is the only way to deal with rot, bad flashing, missing insulation, an out-of-square opening, or an earlier replacement that was done wrong.
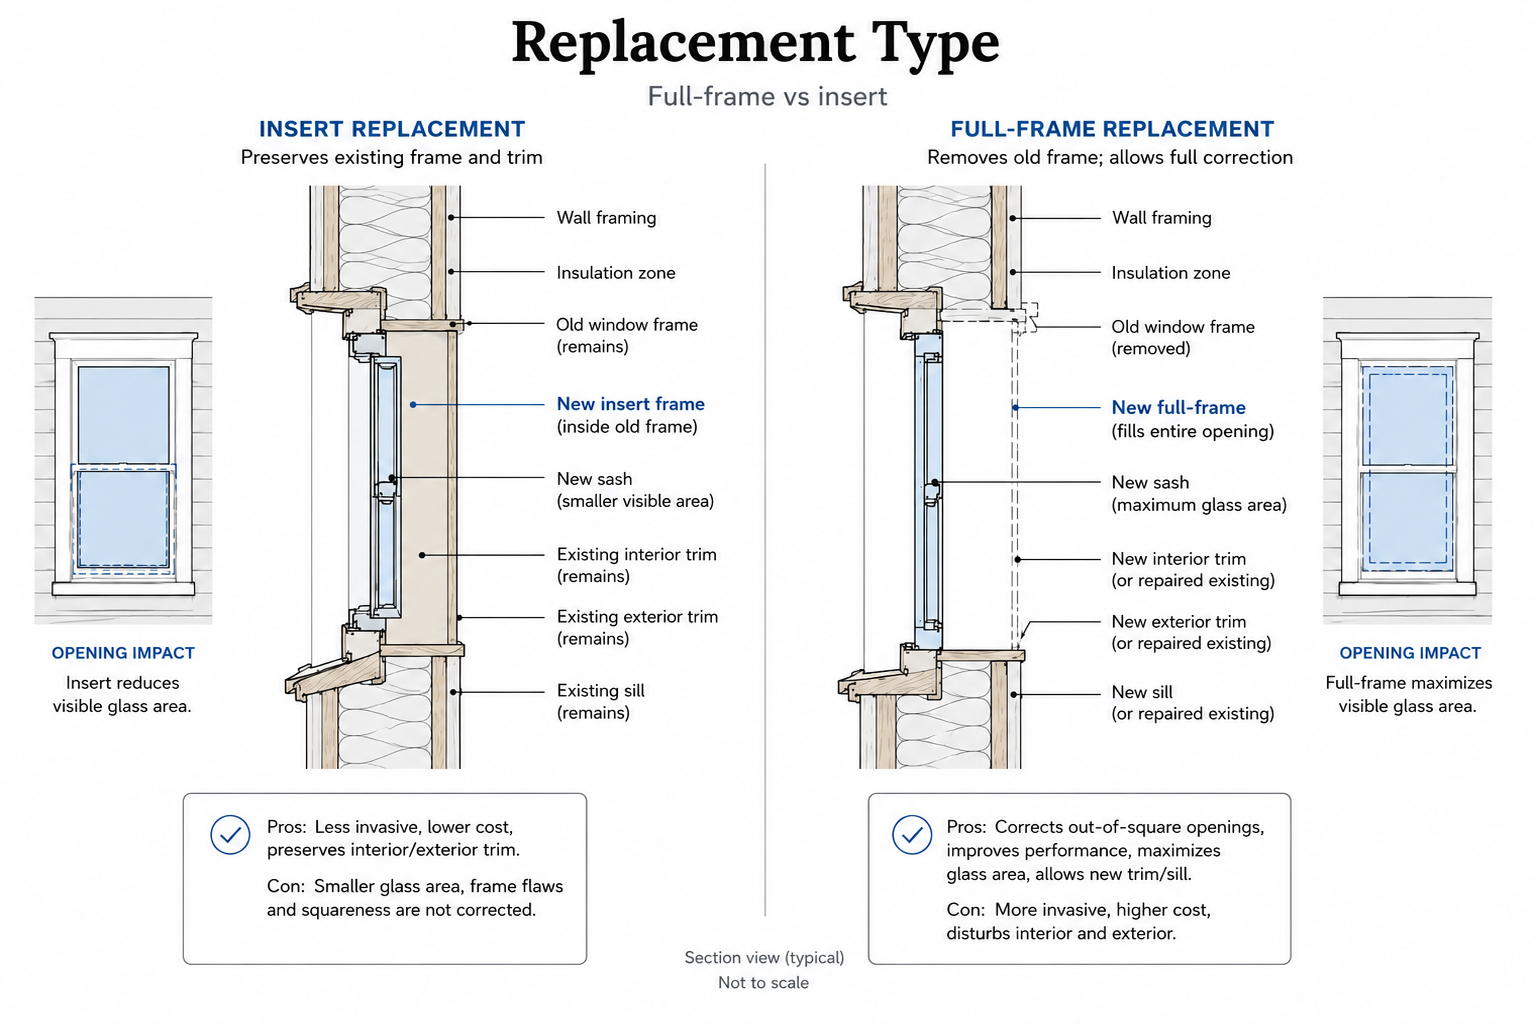
| Replacement type | Best when | Watch for |
|---|---|---|
| Insert replacement | Existing frames are sound and square | Smaller glass area, bulky frame look, hidden old problems |
| Full-frame replacement | There is rot, leakage, bad fit, or old trim failure | Higher cost, more siding and trim work, more lead-paint risk in older houses |
What Ruins the Look of a Cape Cod House During Window Replacement
A Cape does not hide a bad window. The front is usually plain, with the roof, the door, a few windows, the trim, and maybe shutters if they belong, and that simplicity is exactly what makes wrong proportions jump out. A replacement with thick frames, the wrong grille pattern, or undersized glass can make the whole house read cheaper, even when the window itself is brand new.
The most common mistake is picking a window on energy rating alone. Performance counts, but so does everything you can see: the width of the frame, the area of glass, the grille pattern, the trim, and how far the sill projects. A unit that looks too heavy for its opening changes the face of the house.
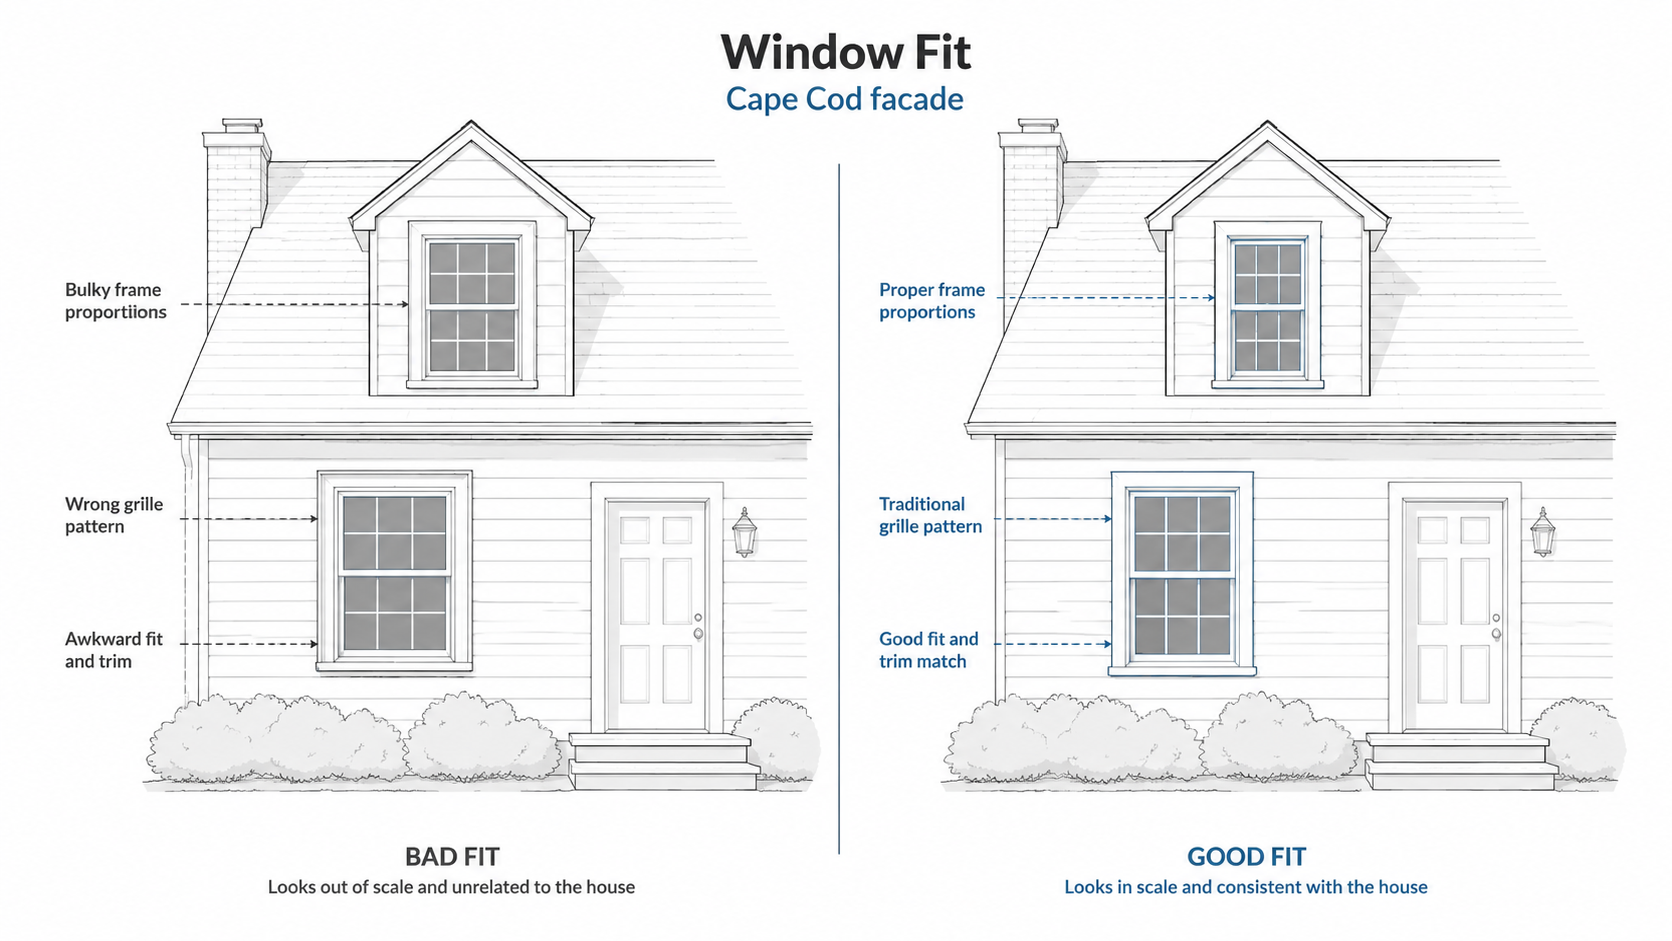
Before you order, hold the numbers up against the old windows: visible glass size, rail thickness, muntin pattern, exterior trim width, and sill projection. If the house has a strong original rhythm to its windows, keep it. Do not let a catalog's stock sizes decide what the front of your house looks like.
Choosing the Right Window Type for a Cape Cod House
Most Capes look best with simple windows. Double-hung units are the safest match for older examples because they hold the vertical proportion and the traditional rhythm. Casements can work on a side or rear wall, but they tend to look wrong on a formal front where everything else is double-hung.
Vinyl, fiberglass, composite, aluminum-clad wood, and solid wood can all work in the right spot, and material matters less than fit. Wood suits older houses and takes paint well, but it needs that paint and the upkeep that comes with it. Vinyl keeps the cost down, though its bulky frames can crowd a small opening. Fiberglass and composite buy you slimmer, stronger profiles for more money. Clad wood splits the difference, giving you a wood interior where the trim shows and a low-maintenance exterior, and it is often the sensible middle ground.
For performance, read the label rather than the sales sheet. U-factor, solar heat gain coefficient, air leakage, and condensation resistance all feed into how comfortable the room ends up. In a cold climate, U-factor and air sealing carry the most weight. In a hot or mixed one, solar heat gain matters more on the walls that take the sun.
Do These Bedroom Windows Have to Meet Egress Code?
If a window is in a bedroom, it may have a second job besides looking right: helping someone get out in a fire. In many IRC-based jurisdictions, new sleeping rooms and habitable attics need an emergency escape and rescue opening. When a window is used for that opening, the code looks at the actual clear opening when the sash is fully open, not the rough opening and not the size printed on the box.
The standard numbers many homeowners hear are 5.7 square feet of net clear opening, at least 24 inches of clear height, at least 20 inches of clear width, and a sill not more than 44 inches above the floor. But do not order windows from those numbers alone. Local adoption, room use, basement or attic conditions, sprinkler exceptions, and replacement-window rules can change what applies.
Here is where it catches people on a Cape. A double-hung only opens part of its height, so a unit that looks large from the outside may still have a smaller clear opening than expected. A casement can sometimes pass where a similar-sized double-hung does not, because the sash swings clear. If you want to keep the double-hung look on a bedroom window, you may need a taller or wider unit to make the opening work.
Replacement windows in existing openings may have different rules than new openings, but do not treat that as a free pass. Some code versions allow reduced minimums for existing or replacement windows when specific conditions are met. The exact rule depends on the adopted local code, the room use, the existing opening, the operating style, and what work is being changed. Finish the upstairs of a Cape into bedrooms, or turn a knee-wall attic into a sleeping room, and those rooms may need code-compliant emergency escape openings. Check the building department before ordering bedroom or finished-attic windows.
Upstairs Cape Cod Windows Are a Different Problem
The upstairs of a Cape is often the hardest part of the whole project. A first-floor window usually sits in a fairly normal wall. Upstairs, the opening may land in a dormer, a gable end, or a short knee wall tucked under the slope of the roof, and that changes the insulation, the flashing, the air sealing, the trim, and sometimes the code question along with it.
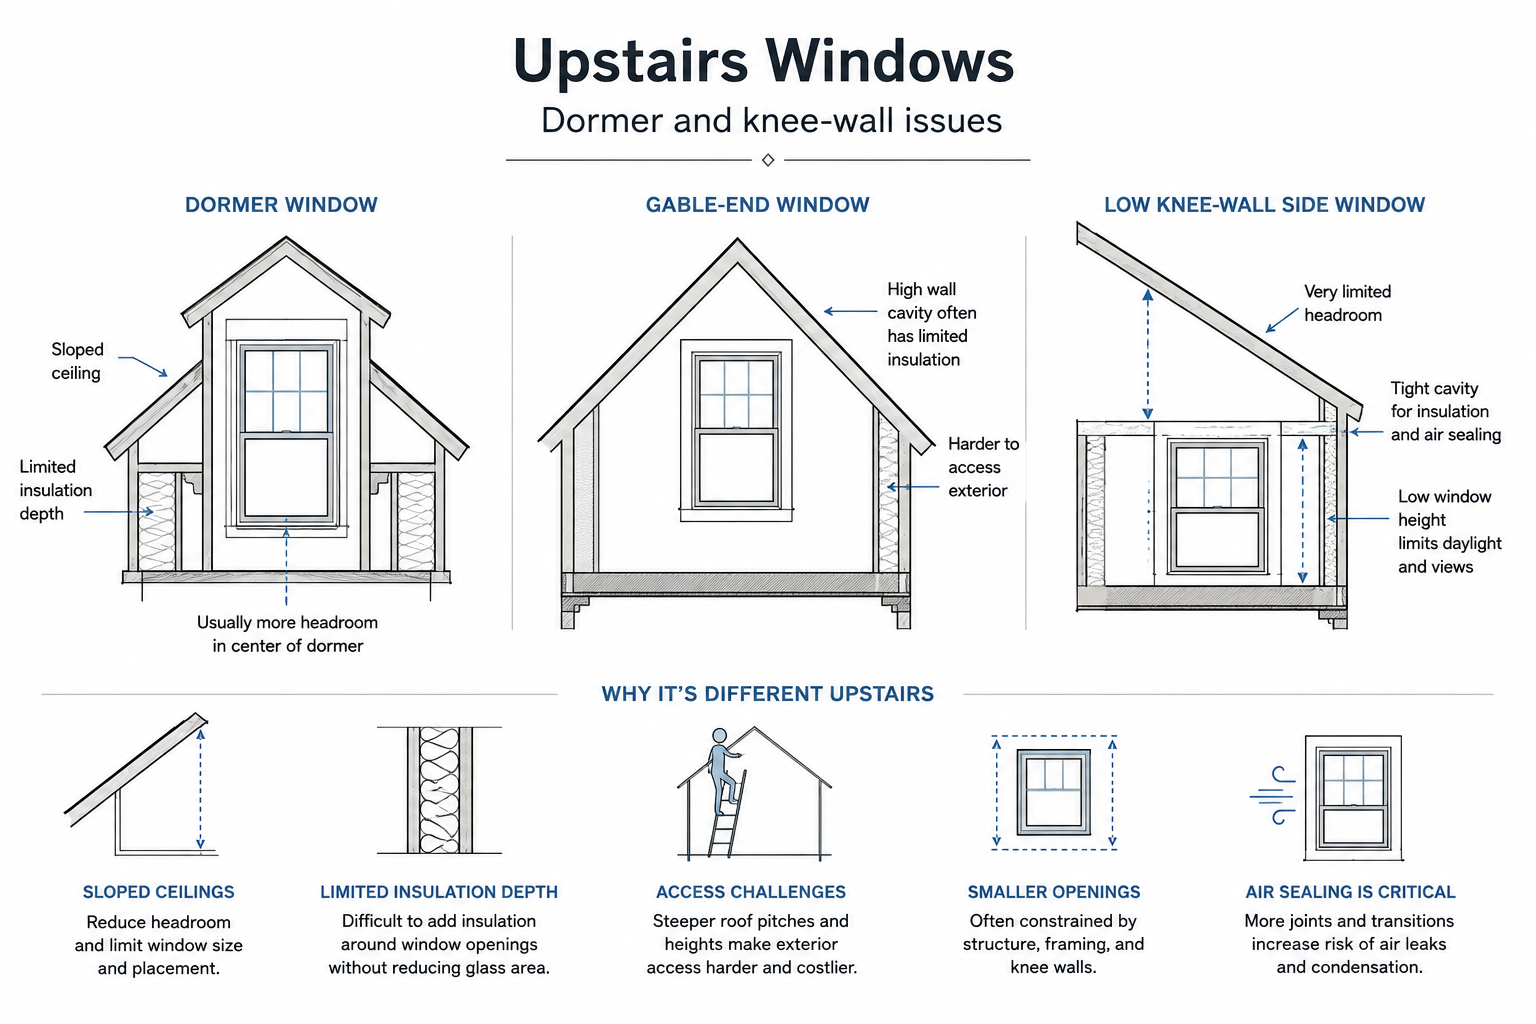
Dormer windows need extra care because they sit inside a small roof-and-wall assembly of their own. The window can be fine while the dormer cheeks, the roof tie-in, the insulation, or the flashing are not. If a dormer already shows staining, peeling paint, or a musty smell, treat the window as one suspect among several. Gable-end windows are usually easier, though they still need proper air sealing and trim. Knee-wall windows can be the worst of the bunch, because the short wall behind them is often poorly insulated to begin with, so replacing the glass without checking that cavity can leave the room cold after all the work is done.
Cost Factors That Move the Price
Window replacement cost moves around because the window is only one line on the invoice. As a 2026 planning range, a simple insert replacement runs about $600 to $1,200 per opening in many markets. A better insert with some exterior trim correction lands closer to $900 to $1,800. Once you get into full-frame work with sill repair, casing, siding patching, or dormer access, a single opening can climb into the $1,500 to $3,500-plus range.
Those are planning numbers, not quotes. Where you live, the brand, the labor market, lead-safe work, access, the siding type, hidden trim rot, and any custom sizing can all push the figure up.
| Cost driver | Why it changes the price | What to ask before approving |
|---|---|---|
| Full-frame work | More demolition, trim work, insulation, and wall correction | What old materials are being removed and replaced? |
| Rot or water damage | The wall may need repair before the new window can be set | Is sill or casing repair included? |
| Dormer location | Access, roof tie-ins, and tight wall cavities make the work slower | Are flashing and dormer trim included? |
| Pre-1978 paint | Lead-safe work may be required when painted surfaces are disturbed | Is the contractor EPA RRP certified where required? |
| Custom size or historic look | Better proportions may cost more than stock replacement sizes | Will the visible glass and trim match the house? |
Installation Details That Matter More Than the Sales Pitch
A good window will still fail if the opening is handled badly, and the details that decide it are dull ones: a square opening, proper shimming, the right fasteners, insulation around the frame, flashing at the head and sill, a clear drainage path, clean trim transitions, and caulk used only where it belongs. None of that photographs well for a brochure, and all of it is what keeps the wall dry. The jobs I have watched fail were almost never about the window itself. They came back to a sill that never got a pan flashing, or shims packed so tight the frame had no room to sit straight.
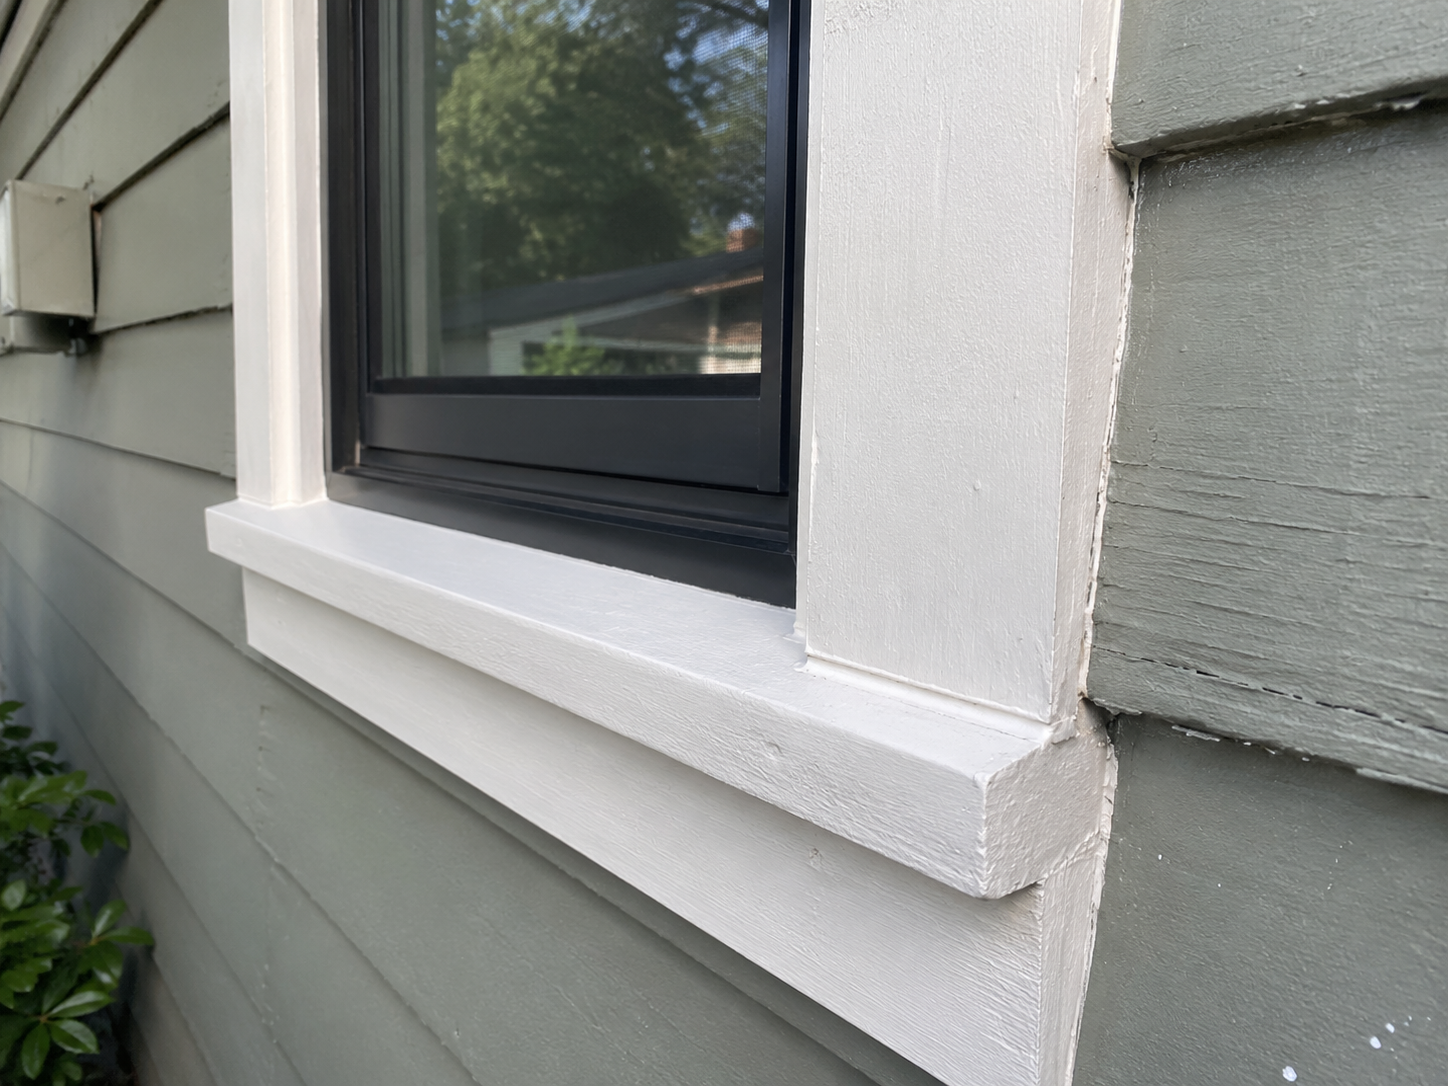
Do not let the crew bury old damage. If the sill is soft, the casing is punky, or the sheathing around the opening is stained, stop and price the repair before the new unit goes in. A window set over rotten material around it does not fix anything. It hides the problem until it comes back, usually worse and harder to reach.
When the job opens the wall, the rough opening becomes its own concern. The window has to fit the framing, and the installer still needs room to shim, insulate, and manage water around it. For the framing side of this, see window rough openings and exterior wall basics.
Lead Paint Can Change the Job
Most Capes were built before 1978, which means lead paint has to be taken seriously any time painted surfaces get disturbed, and window replacement disturbs plenty of them: exterior trim, interior casing, sills, and layers of old paint. This is not just paperwork. Dry scraping, careless demolition, and a sloppy cleanup can spread lead dust through the house and into the soil around the foundation. If the home is pre-1978, ask whether the contractor follows lead-safe work practices and whether the job triggers EPA Renovation, Repair and Painting requirements.
It is also one reason a cheap quote may not really be cheap. If one bid includes lead-safe containment and another quietly leaves it out, the lower number stops meaning much.
What Homeowners Should Check After Installation
Check the work before the crew packs up and the final payment goes out.
- Open and close every window. Each should move smoothly and lock without a fight.
- Look along the exterior trim. The lines should be clean, but not caulked shut in a way that traps water against the wall.
- Check the sill and the bottom corners after the first hard rain.
- Compare the light. If a room feels darker than before, the new frame may have eaten too much of the opening.
Inside, watch for gaps at the casing, cracked plaster, chipped paint, or trim that no longer sits flat. Outside, look over the head trim, the side casing, the sill, the siding cuts, and the caulk lines. The cheapest time to catch a problem is before the final check is written.
Replacing Cape Cod Windows in Stages
Not everyone can do a whole house of windows at once, and on a Cape there is nothing wrong with replacing them in stages, worst walls first, or the rooms you use most. Doing the weather side or the rotted openings now and the rest later spreads the cost without leaving you with a half-finished facade, as long as you plan the order so the street-facing windows end up matching.
The catch is matching them later. Window lines get discontinued, frame profiles get tweaked, and the same white vinyl double-hung from one year does not always line up with next year's. If you care about the front of the house reading as one piece, buy the front-elevation windows together even if you install them in batches, or at least write down the exact model and grille pattern so you have a fighting chance of matching down the road. A few years between phases can quietly turn into windows that never quite agree with each other.
What a Good Cape Cod Window Replacement Should Look Like
A good result does not announce itself. The house should still read as a Cape, with the windows fitting their openings, the trim looking like it belongs, the grille pattern making sense, and the glass not squeezed thin by oversized frames. Comfort goes up while the front of the house stays calm. The best replacements are the ones nobody notices, because they keep the old rhythm, fix the weak opening, and leave the house looking like itself rather than like a page out of a catalog.
Questions To Ask Before You Sign
- Are you pricing an insert or a full-frame replacement?
- Is sill, casing, or trim repair included, and what happens if rot turns up after removal?
- Will the visible glass size change?
- Does the grille pattern match the rest of the house?
- For any bedroom, will the new window still meet egress?
- Are lead-safe practices included for pre-1978 painted surfaces?
- How will the head, sill, and side jambs be flashed and sealed?
- Are dormer or upstairs windows priced differently from the first floor?
- If we phase the work, can you record the exact model so later windows match?
Related Reading
FAQ
Are replacement windows worth it in a Cape Cod house?
They can be worth it when the old windows leak, rot, fail to lock, have failed seals, or make the rooms uncomfortable. They are not automatically worth it if the original wood windows are sound and repairable, especially with a good storm window added.
Should a Cape Cod house use double-hung windows?
Double-hung windows are often the safest visual match, especially on the front. Casements can work in some side, rear, kitchen, or addition locations, but they need to fit the house rather than fight it.
Is full-frame replacement better than insert replacement?
Full-frame replacement is better when there is rot, leakage, bad old installation, or a need to correct the opening. Insert replacement can work when the existing frame is sound, though it may reduce the glass area.
Does a replacement bedroom window have to meet egress code?
It depends on the local code, room use, existing opening, operating style, and scope of work. Some code versions treat replacement windows in existing openings differently from new bedroom or finished-attic openings. Do not assume the old opening is automatically fine. Check with the building department before ordering.
Why do new windows sometimes look wrong on old Cape Cod houses?
The frame may be too thick, the glass area may be smaller, the grille pattern may not match, or the trim may be too flat. Capes have simple facades, so small proportion mistakes are easy to see.
Do upstairs Cape Cod windows cost more to replace?
They can. Dormers, roof slopes, tight work areas, access, insulation issues, and flashing details can make upstairs windows more complicated than first-floor ones.
Should I replace old Cape Cod windows before fixing siding or trim?
Not always. If the siding, sill, casing, or sheathing around the opening is failing, the window project should be coordinated with the exterior repair. Replacing the unit without fixing the surrounding wall can hide the real problem.
Sources and reference links
- U.S. EPA: Lead Renovation, Repair and Painting Program
- U.S. Department of Energy: Update or Replace Windows
- ENERGY STAR: Windows, Doors, and Skylights
- U.S. Department of Energy: Energy Performance Ratings for Windows, Doors, and Skylights
- National Fenestration Rating Council
- International Residential Code: R310.1 Emergency Escape and Rescue Opening Required
- International Residential Code: R310.7.1 Existing and Replacement Windows