

Loose ridge tiles are not a small roof problem.
They can let water in, loosen further in wind, and in the worst case come down. The hard part is not spotting cracked mortar. It is knowing whether the ridge just needs repointing, needs rebedding, or is telling you the whole setup is moving.
That is where money gets wasted. A quick repoint can tidy the roof for a while. It can also cover movement that comes back fast.
What This Covers
- Repointing vs rebedding vs dry ridge
- How to tell if the ridge is actually loose
- How ridge repointing is done properly
- What drives the cost
- When repointing is worth it and when it is not
The most common misunderstanding
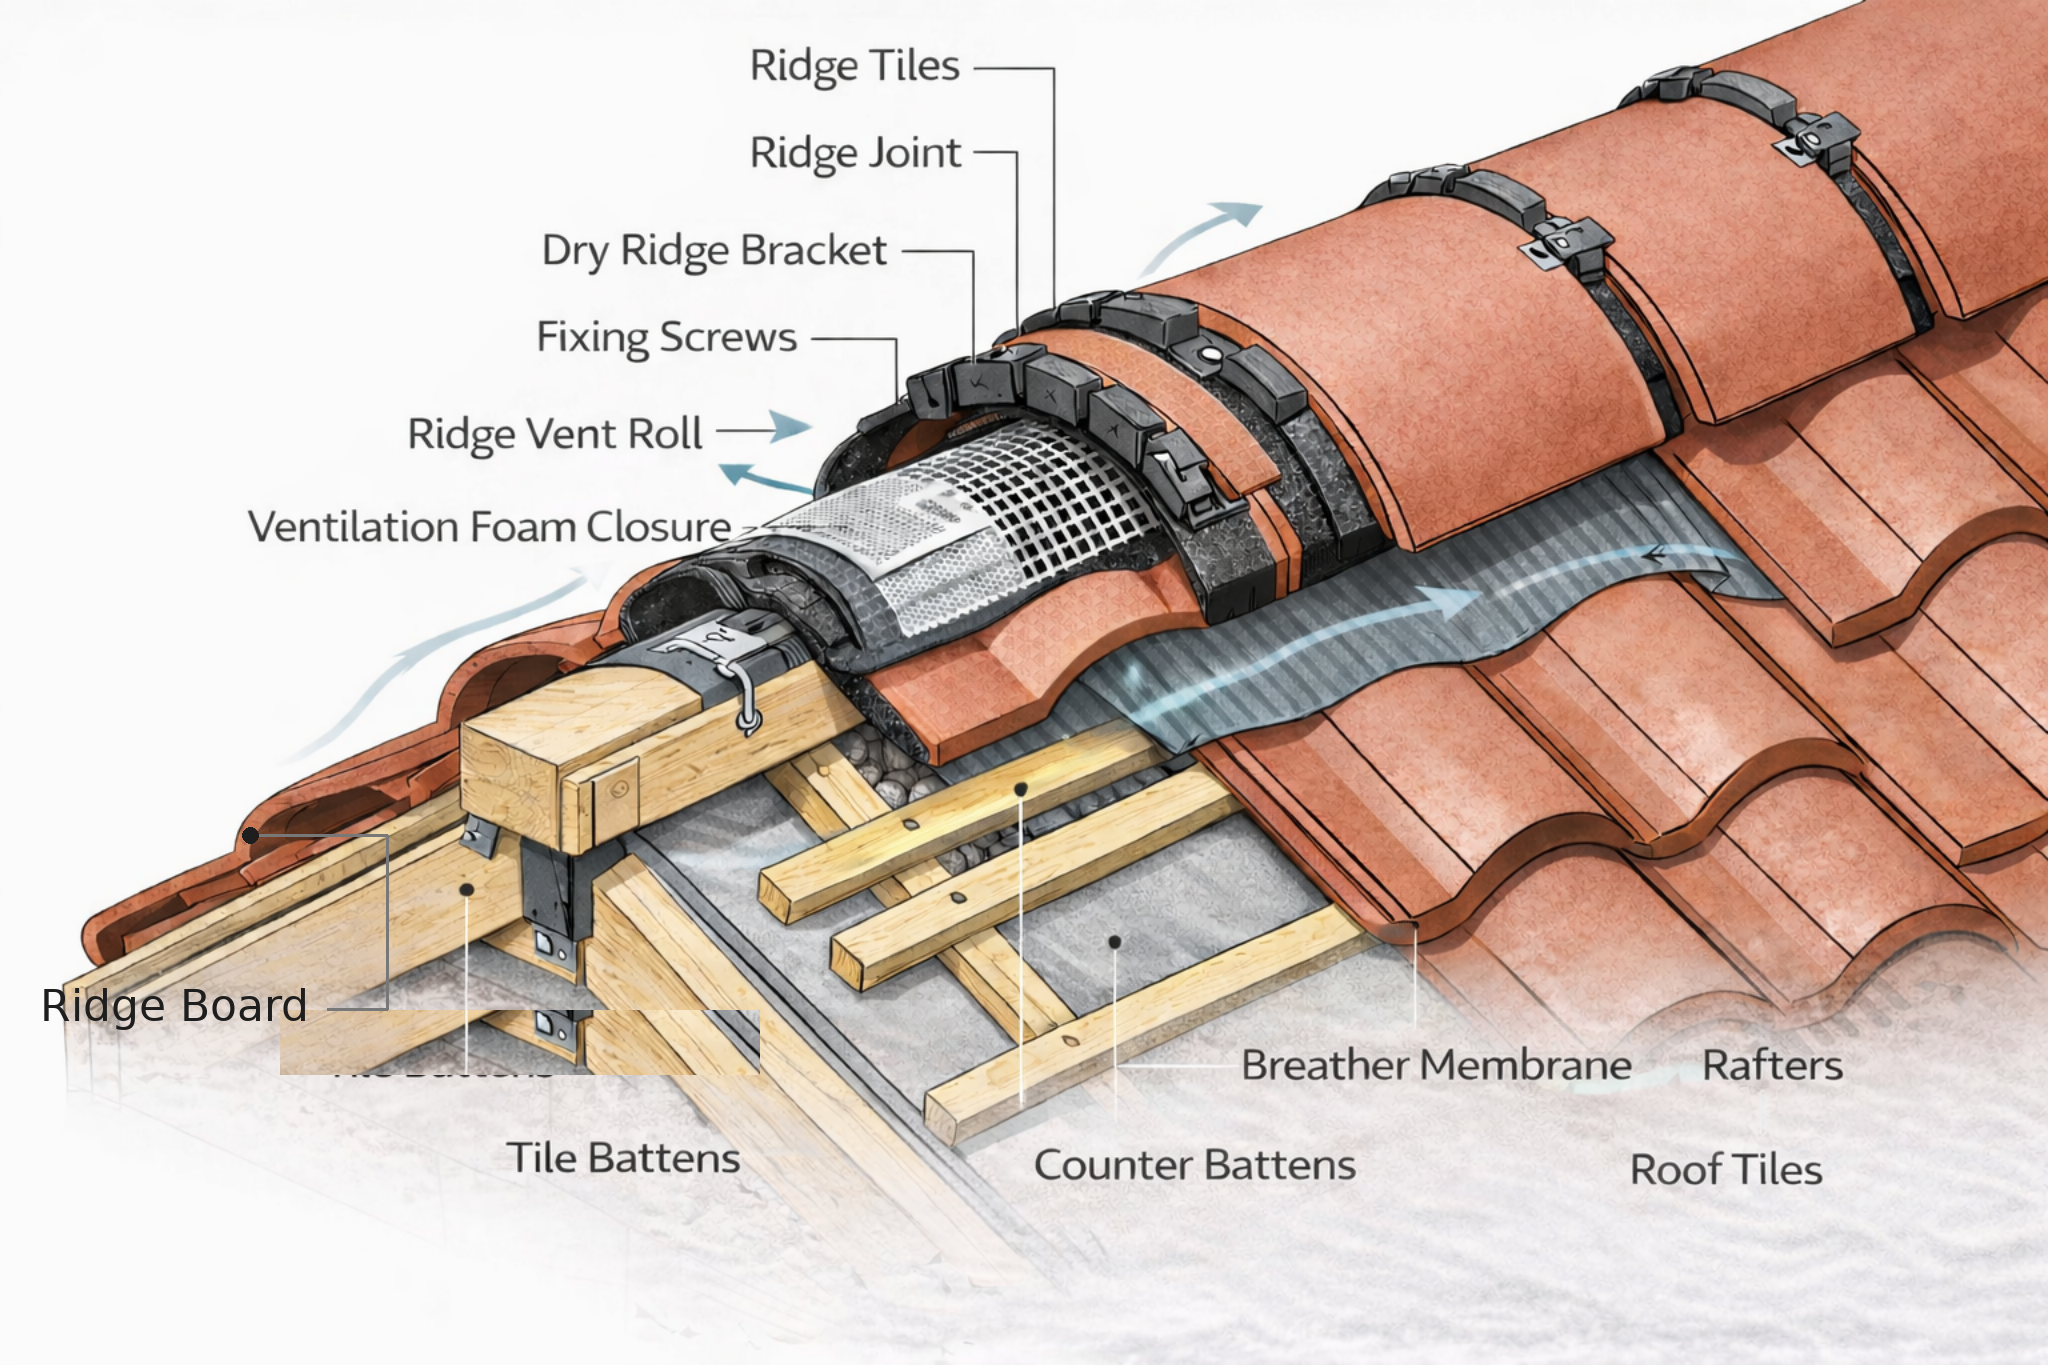
People think “repointing” re-attaches the ridge. It usually doesn’t.
On a traditional mortar ridge, the ridge tile sits on a bedding mortar layer. Pointing is the visible fillet or finish that closes the edges and sheds water. When the bedding has cracked, debonded, or the ridge tile has started rocking, new pointing is basically makeup. It can look clean. It can even slow wind-driven rain for a bit. But it does not stop the ridge tile from moving, and movement is what keeps breaking the mortar.
Decision rule: if the ridge tile moves, repointing is not the fix. You’re in rebedding or dry ridge territory.
If you want a quick refresher on how roof structure and load paths actually behave, keep this open in another tab: a plain introduction to roof structures.
What ridge repointing actually does
Good repointing does three things. It closes gaps, sheds water, and protects the bedding edge from erosion.
What it does not do: it does not add mechanical fixing. It does not correct a ridge line that has settled. It does not solve a ridge that is lifting in wind. And it does not fix a wet roof system that’s already failing underneath.
That’s why online arguments get so loud. One person repointed a ridge where the tiles were stable and the mortar just weathered. It worked. Another person repointed a ridge that was already loose. It failed quickly and they call the whole thing a scam. Both experiences are real. Different starting conditions.
Trade-off #1: speed vs longevity. Repointing is faster and cheaper than rebedding, but it’s less forgiving. If the ridge is moving even a little, repointing becomes a repeat job.
Quick diagnosis before you touch mortar
Don’t start with a trowel. Start with a test.
1) Movement test
From a safe position (or from scaffold), try to gently rock individual ridge tiles. You are not trying to snap anything. You’re checking for any “click” or motion. Movement means the bedding is compromised.
2) Crack pattern
Hairline surface cracks in the pointing can be weathering. Cracks that run along the bedding line, or gaps you can push a key into, usually mean separation. Missing chunks at the edges often means repeated movement or washout.
3) Look for displaced or “stepped” ridges
A ridge line that isn’t straight, or where a few ridges sit higher, can indicate broken bedding, shifting, or a bad previous repair.
4) Check the underside symptoms
In the loft, look at the ridge area after heavy rain. Wet staining near the apex, damp insulation near the ridge, or daylight where it shouldn’t be can mean water is getting past the ridge line.
5) Ventilation reality
Some roofs use dry ridge ventilation systems. If you mortar over a ventilated ridge detail, you can block airflow and create a different problem. If you’re not sure what system you have, read up on roof assemblies first: roofing systems explained without the fluff.
Safety note: roof work kills people. If access is sketchy, the pitch is steep, the roof is fragile, or you can’t work from a proper platform, don’t improvise. HSE guidance is blunt about preventing falls and proper ladder setup on roofs.
RECOMMENDED TOOL: Dynamic Safety Roofer’s Kit
Harness and rope system for controlled access on roof work days.
When repointing is the right call
Repoint when the ridge is stable and the pointing is just tired.
That usually looks like this:
- Ridge tiles do not move when checked from safe access
- Bedding appears intact (no voids, no rocking, no lifted edges)
- Pointing is cracked, eroded, or missing in spots
- No ongoing leak evidence at the ridge line
Repointing is often a good “maintenance” move on older roofs when you’re trying to extend service life without committing to a full ridge system rebuild.
But be honest about the ceiling. If the mortar bed is already failing across multiple runs, repointing buys time, not resolution.
Trade-off #2: cost vs durability. Cheap repointing can be decent value on stable ridges. On loose ridges, it’s paying twice. First for the cosmetic patch, then again for the real fix.
When repointing is a waste of money
This is the answer people actually want. Yes, repointing ridges can be a waste of money. It’s a waste when you’re pointing over movement.
Repointing tends to be a bad spend when:
- Any ridge tile is loose, rocking, or “clicking” under light pressure
- The bedding mortar has separated (visible voids under the ridge)
- Multiple ridge tiles are misaligned or lifted
- You’re seeing repeated cracking shortly after previous repairs
- Wind exposure is high and ridges are not mechanically fixed
In those cases, repointing is basically sealing the outside skin of a joint that is already failing structurally. It might look better. It might hold through one mild season. Then it cracks again.
What to do instead: rebedding (lift ridge tiles, renew bedding, refix correctly) or upgrading to a dry ridge system where appropriate.
Repointing ridge tiles: step-by-step that holds up
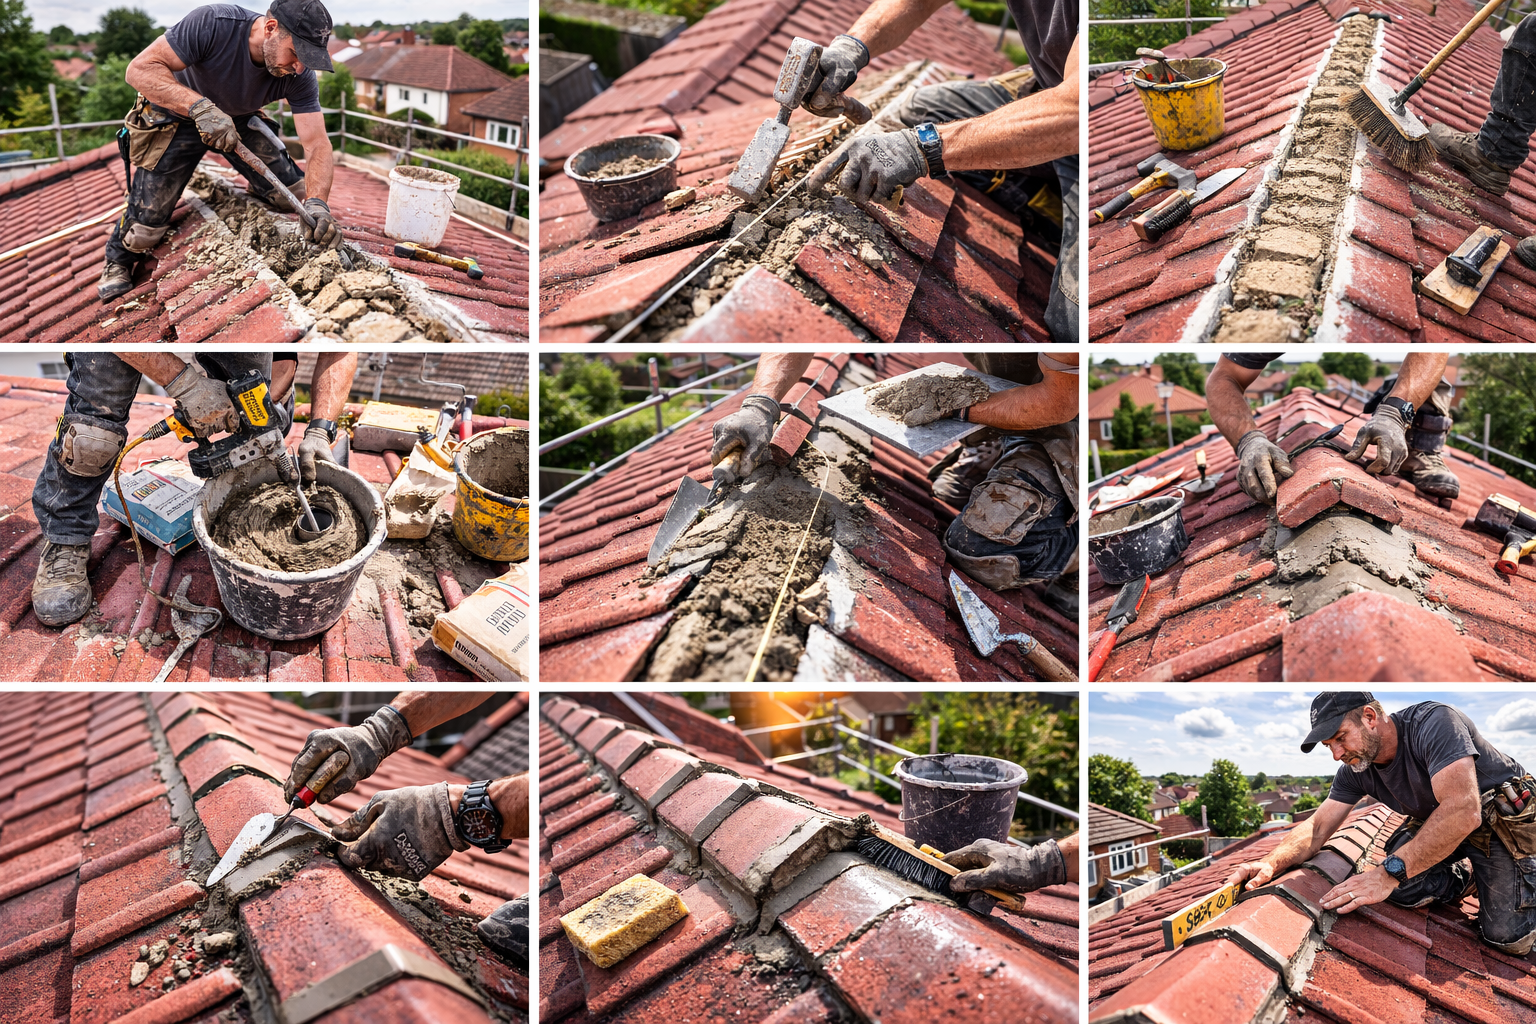
Important: this is for stable ridges. If you have movement, stop and switch scope.
1) Get safe access and a clean work zone
Working off a ladder at the apex is how bad stories start. Use scaffold or a proper roof access setup. Don’t use gutters to support ladders. Use a roof ladder correctly anchored over the opposite side of the ridge.
2) Break out all loose and hollow mortar
Don’t point over crumbly edges. Rake out loose mortar to a sound base. A lot of failed repairs are just new mortar keyed into dust. It looks fine until the first hard freeze or the first hot dry week.
3) Clean the joint
Brush out dust. If moss is involved, remove it fully. Dust is a bond breaker. If the joint is greasy from old sealants, you may need a more aggressive clean, or you accept that mortar bond is compromised and the “right call” is actually to rebuild the detail.
4) Pre-dampen, do not soak
Dry porous tiles and old mortar suck water out of fresh mortar. That can cause weak cure and early cracking. Lightly dampen the area so the mortar cures instead of flash-drying.
5) Mix mortar that matches the roof, not your ego
Mortar selection depends on tile type, exposure, and local practice. Stronger is not always better, especially on older, softer materials. In some jurisdictions and specs, modern ridge systems lean on mechanical fixing rather than relying on mortar alone.
If you’re not sure what “system approach” looks like, skim this list first: roofing materials and how they actually function.
6) Apply and compact, then shape for shedding
Press mortar firmly into the joint so it keys. Don’t just skim-coat. Shape the pointing so water sheds away from the joint, not into it. Keep your profile consistent. Ugly is not the problem. Hollow is the problem.
7) Control curing
Protect fresh mortar from heavy rain, frost, and hot sun. Fast drying causes shrinkage cracks. Cold conditions can ruin cure. If your weather window is wrong, wait. Paying for a redo is worse than waiting a week.
8) Final checks
Once cured, inspect for shrinkage cracks and any sections that debonded. Small surface cracks are not always failure. Open joints and hollow spots are.
Rebedding vs dry ridge: what changes and why
Rebedding means lifting ridge tiles, renewing the mortar bed, and refixing the ridge correctly. It addresses the actual attachment problem. It’s slower. It’s more disruptive. It’s the right fix when ridges are loose but the rest of the roof still has life.
Dry ridge (or mechanically fixed ridge systems) replaces the “mortar does all the work” logic with a system of clamps, screws, ridge unions, and often ventilation. In the UK context, BS 5534 is commonly referenced for mechanical fixing requirements and wind uplift considerations, which is part of why dry-fix systems became so widespread.
Practical reality: dry ridge is usually more forgiving long-term in exposed locations, but it costs more up front and needs correct detailing. Bad dry ridge installs exist. Loose clamps and missing fixings happen. The “system” only works if it’s actually installed as a system.
If your roof is steep or hard to access, that access cost will dominate either option. For steep pitch context and maintenance constraints, this guide helps: steep roofs, what they cost you in maintenance.
Cost to repoint ridge tiles
Start with the boring truth. The ridge itself is not usually the expensive part. Access is.
Cost drivers that show up in real quotes:
- Access: scaffold, edge protection, roof ladder setup
- Length: ridge plus hips (hip ridges add a lot of linear metres fast)
- Condition: simple repoint vs rebedding vs replacing broken ridge tiles
- Roof pitch and height: slower work, more safety scope
- Exposure: high wind zones tend to push you toward mechanical fixing
Typical ballpark patterns (not a promise, just how quotes cluster):
- UK: dry ridge replacement is often quoted per metre, with one trade source listing around £50 to £70 per metre for dry ridge replacement (access not always included).
- UK small jobs: homeowners regularly report that access and minimum call-out drive the price more than the ridge length, especially if scaffold is required.
- Australia: “ridge capping repointing” pricing is often packaged as a whole-job number, with one contractor guide placing typical repointing in the low-thousands for common homes, depending on scope and condition.
A simple estimating rule that keeps you sane: treat access as a fixed cost, then add a per-metre labour cost for the ridge work itself. If one quote is wildly cheaper, ask what they excluded. It’s usually scaffold, disposal, or “we won’t touch the loose ones, just point over it.”
Is repointing ridges a waste of money?
Sometimes yes. It’s a waste when it’s used to avoid the real fix.
Repointing is good value when: ridges are stable, bedding is sound, and your problem is weathered or cracked pointing. You’re paying for maintenance that extends service life.
Repointing is wasted money when: ridges are loose, bedding is failing, or wind uplift is already at play. You’re paying to cosmetically hide movement, not to solve it.
If you want one sentence to carry into every conversation with a roofer, it’s this:
If the ridge moves, you don’t need prettier mortar. You need a refix.
Short checklist you can use today
- After heavy rain, check loft/attic ridge line for damp staining or drips.
- From safe access, gently test ridge tiles for any movement.
- Identify whether you have a mortared ridge or a dry ridge system.
- Do not mortar over a ventilated dry ridge detail.
- Rake out loose mortar fully. Do not point over dust and crumbs.
- Budget access first. Scaffold often decides the whole job cost.
- Avoid ridge work in freezing conditions or during heavy rain windows.
- If multiple ridges are loose, stop patching and scope rebedding or dry ridge.
- Ask any contractor how they address mechanical fixing and wind uplift risk.
FAQ
Can I just repoint one cracked section of ridge?
You can, if the ridge is stable and the crack is isolated. But cracks often show up where the ridge is starting to move. Do the movement test first. If it rocks, patch pointing is basically a short subscription to future repairs.
How long does ridge repointing last?
On stable ridges with good prep, it can last years. On ridges with movement, it can crack fast. The “life” of the pointing is mostly the “life” of the ridge attachment underneath.
Repointing vs rebedding, how do I tell which I need?
Movement is the clearest indicator. If the ridge tile moves, rebedding or a dry ridge refix is the appropriate scope. If there’s no movement and the mortar is just weathered or cracked at the surface, repointing can make sense.
Is a dry ridge system always better?
Not automatically. It’s usually better in exposed locations and for long-term reliability, but only if installed correctly as a system with proper mechanical fixings. In places where BS 5534 and mechanical fixing expectations drive practice, dry-fix systems are a common upgrade.
Can I use sealant instead of mortar on ridge pointing?
Sealant can be a temporary stopgap in very specific details, but it’s not a like-for-like replacement for proper ridge detailing. If you are chasing leaks and thinking about “paint-on fixes,” read this first so you don’t waste money: what liquid rubber sealants can and can’t do.
Do I need scaffolding to repoint ridges?
Often, yes. Ridges are high, exposed, and awkward to work on safely. A “cheap” quote that skips proper access can be expensive in injuries or a failed repair. HSE guidance is clear about fall prevention and correct ladder use on roofs.
Why do ridge repairs keep cracking every year?
Usually one of three reasons: the ridge tiles are moving, the old mortar was not properly removed and cleaned, or the mortar cured badly due to weather and moisture control. Repointing over movement is the big one.
Does repointing stop leaks at the ridge?
Sometimes it reduces wind-driven rain entry through open joints. But if the leak is coming from a failing underlay, broken tiles nearby, or a ridge system that’s lifted, repointing alone is not reliable. Treat it as maintenance, not a guarantee.
Is ridge pointing a DIY job?
The mortar work itself is learnable. The height risk is the real issue. If you cannot set up safe access, don’t DIY it. Roof falls are not “oops” injuries. They change lives.
MUST READ: NRCA Roofing Manual (Full Set)
The reference set inspectors and estimators lean on when details start to matter.
Conclusion
Repointing ridge tiles is worth doing when the ridge is stable and you’re restoring a weathered joint. It’s wasted money when the ridge is moving and you’re paying for a cosmetic patch. Test for movement, price access honestly, and if the ridge rocks, skip the pointing and fix the ridge properly.
References
- BS 5534 tile fixing and mechanical fixing context (industry technical update).
- Dry ridge system overview and how it differs from mortar ridges.
- Example UK dry ridge replacement cost range (trade source).
- Example Australia “ridge capping repointing” cost framing (contractor guide).
- UK HSE guidance on preventing falls and roof ladder basics.