Build a Cheap, Predator-Proof Chicken Coop That Actually Works
Expert-Backed Cheap Chicken Coop Designs That Save You $1,000
Cheap chicken coops fail for two reasons: corners are cut on predator protection, and builders skip thinking ten steps ahead about maintenance. That means shredded wire, mold, flooded nests, and endless sweat. I’ll show you how to spend what matters—ventilation, security, durable materials—and how to skimp where it doesn’t matter. You’ll learn from pro mistakes and DIY reality all at once.
Cheap Chicken Coops That Actually Hold Up
This is not some Pinterest list of “cute backyard chicken houses.” Forget that. This is me, someone who has built and patched coops with neighbors, family, and my own flock. I’ve carried wet pallets in the rain, hammered warped lumber until dark, and watched more than one store-bought kit collapse before the year was out. The coops that last are ugly, drafty in the right places, and patched with whatever you can drag home from the yard.
Why Cheap Coops Fail
I’ve seen it too many times. Raccoons tear through thin wire like it’s paper. Rain blows in because no one thought about roof pitch. Floors stay damp, and the whole place stinks within weeks. Birds get sick, and the owner swears they’ll “buy better next time.” The truth? Better doesn’t mean prettier. It means you know where to spend: half-inch hardware cloth, a roof that sheds water, latches a raccoon can’t pick.
What the Numbers Really Look Like
I’ve seen people brag about a $200 A-frame that worked fine for four hens. I’ve seen walk-ins push $2,000 because of insulation, plywood, and corrugated metal. My own middle ground? About $600 in salvaged 2×4s and roofing tin for a 10×8. Still standing. The math is simple. Build it yourself and you save a thousand or more in labor. But you’d better budget time. A weekend for the small frames. Several long days for anything you can walk into.
Cases That Stuck With Me
-
The pallet guy. He dug holes, dropped posts in gravel, poured a splash of concrete, and built walls from free pallets. Drilled every pilot hole so the boards wouldn’t split. When he shut the door for the first time, he told me: “Creativity is your best friend.” Ugly coop. Still standing.
-
The shed couple. They dragged home a plastic garden shed, lined the roof with garage-door foam, wired one safe outlet, and dumped sand for the floor. No frostbite. No smell. Cleaning was a five-minute rake.
-
The $400 lemon. A family bought a prefab kit that sagged before the year ended. We rebuilt with salvaged lumber and metal roofing for $600. That one hasn’t moved an inch in years.
-
The big gamble. Two brand-new homesteaders spent $1,500 and built 200 square feet from scratch. No experience. Ten hens now live like royalty, and the owners can walk inside without crouching.
-
Floor mistakes. Wire floors shredded birds’ feet. Every time. Painted plywood with pine shavings lasted longer and kept hens healthy.
-
Capacity lies. Those “six-hen” kits? I watched eight birds crammed in, pecking each other bloody. We rebuilt at 8×12 with tall rafters for about $500 in salvage. Birds spread out and calmed down.
The Same Mistakes Over and Over
Chicken wire. Always chicken wire. People trust it because of the name. It stops hens. It does not stop predators.
No vents. Without a gap up high, wood rots and frostbite sets in.
Wire floors. They cause bumblefoot and misery.
Kit labels. If the box says six hens, count on four.
No predator skirt. Foxes and raccoons dig.
What It Took in Real Life
-
Two to three hundred bucks for a small A-frame.
-
Around six-fifty for the average backyard DIY coop.
-
Five hundred for a big salvaged build if you’ve got the lumber connections.
-
Fifteen hundred and up for a serious walk-in you can insulate.
And the time? A weekend for small, several days for big. Bring a drill, a saw, and a pile of patience.
Pro Moves You Only Learn the Hard Way
-
Hardware cloth, not chicken wire. Bury it twelve inches or pin it flat and cover with soil.
-
Put roosts higher than nest boxes, or hens will sleep in the nests.
-
Seal the floor. Scrape it with a drywall knife every morning.
-
Use scrap frames—pallets, sheds, half-rotten 2×4s. Spend money only on mesh, roofing, and latches.
-
Cold weather? Insulate the roof, drop a foot of wood chips, and block drafts around the roost.
How To Start Without Regret
Begin small. Four hens. A frame you can build in two days. Salvage everything you can. Spend on predator-proofing. Build doors big enough to clean through. And accept this truth: your first coop is a prototype. You’ll reinforce it, patch it, curse at it, and tweak it until it works. That’s how the best ones are born.
You might like: The Best Design for a DIY Roll Away Chicken Nest Box: Simple & Proven
Cheap Chicken Coop Step-by-Step Builds

Insanely Cheap Chicken Coop Ideas That Don’t Suck
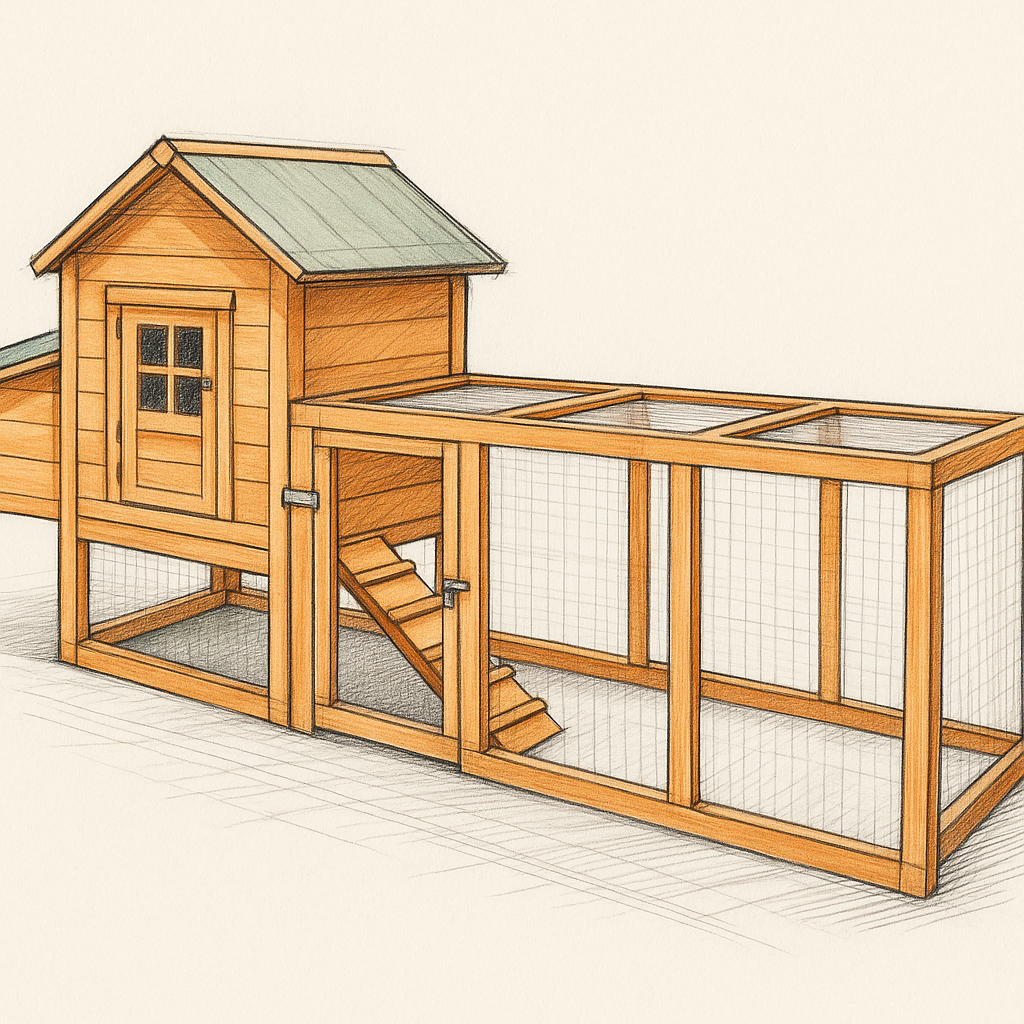
Plan A: Pallet Walk-In Coop (4–6 hens)
Specs
-
Footprint: 4 ft × 8 ft
-
Interior height: 6 ft front, 5 ft back
-
Shed roof with 1 ft front overhang
-
Vent gap along the top
-
Roosts and two nest boxes inside
-
Predator skirt around the base
Materials
-
6–8 standard 40 × 48 in pallets (heat-treated only)
-
Two 4×4 skids at 8 ft
-
2×4 lumber: eight @ 8 ft, four @ 10 ft
-
2×3 or 2×4 roosts: three @ 4 ft
-
One ¾ in exterior plywood sheet (4 × 8 ft) for floor
-
Roofing: three sheets corrugated metal or polycarbonate, 8 ft length
-
Hardware cloth: ½ in, 50 ft roll + 24 in skirt
-
Fasteners: 3 in screws, 1⅝ in screws, roofing screws, staples
-
Hinges/latches: two T-hinges, one hasp with carabiner, one slide bolt
-
Extras: gravel, two deck blocks (optional), paint, silicone caulk
Tools
Drill/driver, circular saw, stapler, tin snips, level, square, tape, utility knife, PPE.
Cost and Time
$250–450 if pallets are free. About 1–2 days of work.
Steps
-
Base – Clear site, lay two 4×4 skids on gravel, 8 ft apart. Level them.
-
Floor – Screw 2×4 joists at 16 in centers. Install ¾ in plywood floor. Seal edges.
-
Walls – Stand pallets on the floor edges, screw down, tie corners with 2×4s. Fill gaps with scraps or mesh.
-
Door Frame – On one short end, frame a 30 in opening. Build pallet-skin door. Hang with T-hinges. Add hasp + carabiner.
-
Pop Door – Cut 10 × 12 in opening on a side. Build plywood slide door with guides and pull cord.
-
Roof Frame – Raise front wall to 72 in, back wall to 60 in. Install three 2×4 rafters.
-
Roofing – Attach corrugated sheets. Leave 2–3 in vent gap under high eave, cover with mesh.
-
Predator Skirt – Wrap lower 24 in with hardware cloth. Add 24 in skirt on ground, pinned and buried.
-
Interior – Three 4 ft roost bars at 18–24 in height. Two nest boxes at 12–16 in height. Add removable poop board.
-
Ventilation – Cut two vents high on back wall (8 × 24 in). Cover with mesh.
-
Finish – Caulk, paint, sand edges, add sweep under door.
-
Run (Optional) – Frame an attached run with hardware cloth and a small access door.
Plan B: Cattle-Panel Hoop Tractor (6–10 hens)
Specs
-
Base: 8 ft × 10 ft rectangle
-
Three 16 ft cattle panels bent into a tunnel
-
Tarp or corrugated roof over back two-thirds
-
Walk-in center height
-
Movable for daily fresh ground
Materials
-
Base: four 2×6 @ 10 ft, four 2×6 @ 8 ft, plywood gussets
-
Three 16 ft cattle panels
-
Wire: 2×4 welded wire + ½ in hardware cloth (24 in high around bottom)
-
Door: 2×4 frame + welded wire
-
Roof: 12 × 16 UV tarp or corrugated metal sheets
-
Fasteners: 3 in screws, staples, U-bolts, zip ties
-
Optional: two mower wheels + axle
Tools
Drill, saw, fencing pliers, snips, ratchet, PPE.
Cost and Time
$300–550 depending on roofing choice. One long day with two people.
Steps
-
Base – Build 8 × 10 ft rectangle from 2×6. Add gussets. Brace if moving often.
-
Panels – Bend cattle panels into arches, secure with U-bolts. Space evenly. Tie seams.
-
Stiffeners – Screw two 2×4 purlins across arches. Add 2×2 ridge at crown.
-
Wire – Wrap with welded wire. Add hardware cloth 24 in high around bottom.
-
Roof – Cover back ⅔ with tarp (tight lace) or corrugated sheets. Leave front open.
-
End Walls – Frame front with 2×4s. Hinge 30 in door. Secure with hasp. Rear end can be half-closed.
-
Floor – Deep wood chips. Replace weekly. Compost builds under birds.
-
Roosts – Add a removable bar across center. Optional small pallet box for pop door.
-
Mobility – Add wheels to one end. Lift and roll.
-
Predator Skirt – If parked, lay 24 in skirt around edges. If mobile, skip skirt but lock up nightly.
Common Mistakes
-
Using chicken wire instead of welded or hardware cloth
-
Skipping roof vent gaps (causes rot and frostbite)
-
Wire floors (cause bumblefoot)
-
Undersized coops that overcrowd birds
What It Took
-
Pallet build: $250–450, 1–2 days
-
Hoop tractor: $300–550, 1 day with 2 people
-
Ongoing: repaint every 2 years, replace tarp in 2–3 years, patch mesh as needed
Pro Tips
-
Bury predator skirt 6–12 in or pin flat under soil
-
Paint floors and poop boards, scrape daily with drywall knife
-
Keep roosts higher than nest boxes
-
Add gutter + barrel for automatic rainwater collection
-
Use raccoon-proof latches (spring clips or carabiners)
How to Apply
-
Choose design based on lifestyle: pallet walk-in if fixed, hoop tractor if mobile
-
Spend on roofing and hardware cloth, save on framing with pallets or reclaimed wood
-
Design for cleaning: big doors, removable boards, chip system
-
Start with 4 hens, scale the same pattern as flock grows
FIELD PICK
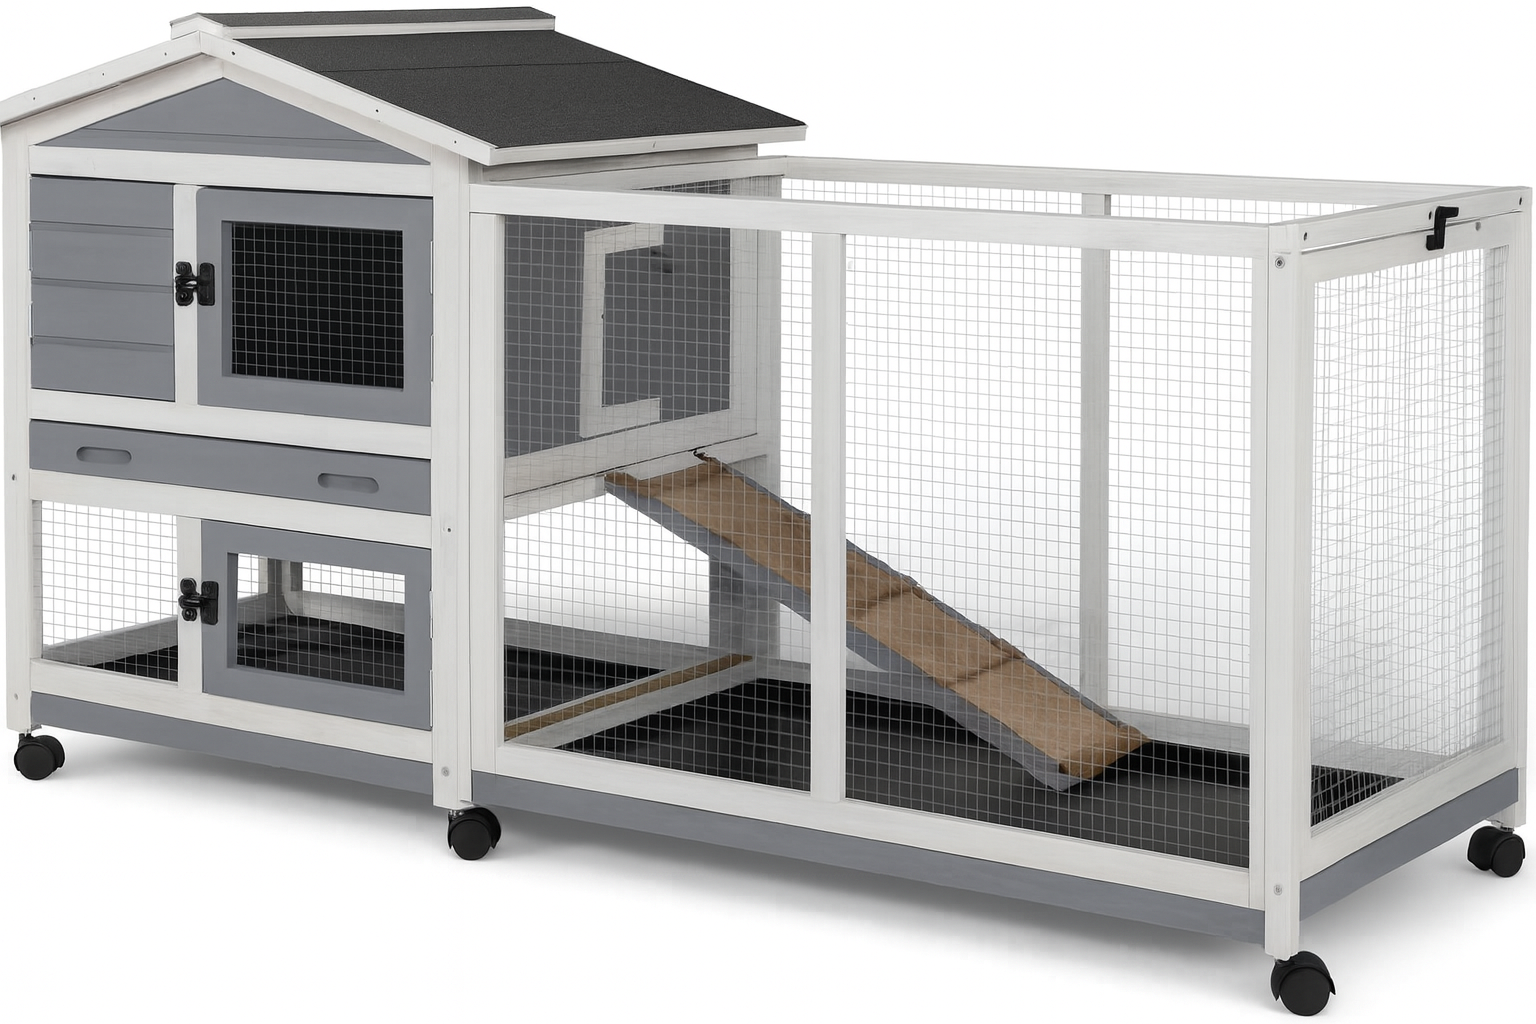
GEGURI Large Rabbit Hutch / Small Chicken Coop (48''L × 24''W × 36''H, Grey)
Wood frame, waterproof roof, pull-out tray. Amazon’s Choice, 4.3 stars from 90+ buyers. About $149.99 (typical price closer to $159.99).
For the price, this one is a budget win. Cedar frame, asphalt roof, and a leakproof tray make it sturdier than most “starter” coops under two hundred. Big enough for a few hens or as a grow-out pen, easy enough to clean without cursing. It’s not a forever coop, but if you’re just getting into chickens or need a side pen, this is one of the few cheap prefab units that actually holds up.
The Hard Truth About Cheap Coops
The first coop I ever helped build was nothing but pallets, tin, and sweat. We dragged wood out of a dumpster behind a warehouse, hammered until the sun went down, and called it done. Ugly thing. It leaked, but it held. Two years later the birds were still alive and laying, while my neighbor’s $700 prefab “country chic” coop had rotted off its legs.
That’s the part people don’t want to hear. Cheap coops work if you know where to put the effort. Spend money on wire, roofing, and predator-proof doors. Everything else—walls, frames, even nest boxes—can be scrap. I’ve seen an old trampoline frame turned into a hoop house. I’ve seen a plastic shed become a winter-proof palace with a little insulation foam and a rake of sand.
The wow isn’t in the Pinterest photos. It’s in the fact that your birds survive raccoons, stay dry in a storm, and you can clean the place without gagging. Cheap coops done right outlast the pretty ones every time.
FAQ
1. What’s the absolute cheapest way to build a coop?
Pallets. Free pallets, a sheet of plywood for the floor, a scrap roof, and hardware cloth. You’ll spend maybe $200 on screws, hinges, and mesh. Everything else you can scrounge. Ugly, but solid.
2. Can I use chicken wire instead of hardware cloth?
Only if you like feeding raccoons. Chicken wire keeps hens in but doesn’t keep anything out. A raccoon can tear through it in minutes. Use ½-inch hardware cloth.
3. How much space does each chicken really need?
Four square feet per bird inside, ten outside. More if you’ve got a heavy breed. Ignore the kit labels. If the box says six hens, that’s four in real life.
4. Do I need a floor, or can they just be on dirt?
Dirt works if you rotate or move the coop. For fixed coops, put down plywood, paint it, and cover with pine shavings. Easier to scrape and disinfect when things get nasty.
5. How do you stop predators from digging under?
Bury a skirt of hardware cloth twelve inches down or pin it flat around the base and cover with soil or gravel. Foxes and raccoons quit fast when they hit mesh.
6. What’s the worst mistake people make on cheap builds?
Ventilation. People seal coops like a box and wonder why birds get frostbite or respiratory issues. You want airflow up high, not drafts at roost level.
7. How long does a DIY coop last?
If you frame with pallets or 2×4s and protect it with paint or stain, five years easy. Add a metal roof and good mesh, and you’ll get a decade. Cheap kits? One or two years at best.
8. Is sand or wood chips better for flooring?
Depends on your climate. Sand drains and scrapes clean in dry areas. In wet zones, it clumps and stinks. Wood chips and shavings absorb better but need replacing. I use chips.
9. Can you build a mobile coop cheap?
Yes. Bend cattle panels into a hoop, screw them to a wood base, and throw a tarp over it. About $300–400. Light enough for two people to drag across fresh ground.
10. How do I know when it’s time to rebuild?
When you’re patching more than you’re cleaning. If doors sag, mesh rusts, and you’re fighting leaks every storm, it’s cheaper to rebuild. Most people stretch a coop a year too long and lose birds.